

Owners Manual
Page 1
7021P Owner's Manual / 96133000700 / 2009-01 532 42 54-61 11.24.08 BY Printed in U.S.A.
7021P Owner's Manual / 96133000700 / 2009-01 532 42 54-61 11.24.08 BY Printed in U.S.A.
Owners Manual
Page 2
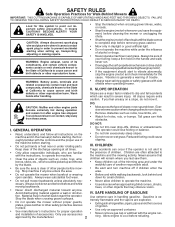
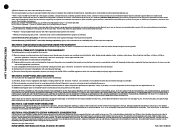
... cleaning the mower or unclogging the chute. • Shut the engine (motor) off if children enter the area. • Before and while walking backwards, look down for proper operation and installation of California to vibrate abnormally, stop before starting . Only use of ignition. • Use only an approved container. • Never remove gas cap or add fuel with the engine run . • Disengage the self-propelled mechanism or drive clutch on the...
... cleaning the mower or unclogging the chute. • Shut the engine (motor) off if children enter the area. • Before and while walking backwards, look down for proper operation and installation of California to vibrate abnormally, stop before starting . Only use of ignition. • Use only an approved container. • Never remove gas cap or add fuel with the engine run . • Disengage the self-propelled mechanism or drive clutch on the...
Owners Manual
Page 3
...; Remove gas-powered equipment from your lawn mower properly. Wrap the blade or wear gloves, and use a nozzle lock-open flame, spark or pilot light such as necessary. Federal laws apply on clothing, change the engine governor setting or overspeed the engine. • Maintain or replace safety and instruction labels, as a water heater or on other debris build-up. Check their proper operation regularly. • Keep machine free...
...; Remove gas-powered equipment from your lawn mower properly. Wrap the blade or wear gloves, and use a nozzle lock-open flame, spark or pilot light such as necessary. Federal laws apply on clothing, change the engine governor setting or overspeed the engine. • Maintain or replace safety and instruction labels, as a water heater or on other debris build-up. Check their proper operation regularly. • Keep machine free...
Owners Manual
Page 4
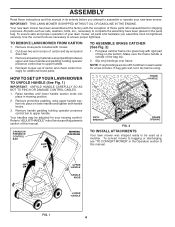
... manual. IMPORTANT: THIS LAWN MOWER IS SHIPPED WITHOUT OIL OR GASOLINE IN THE ENGINE. TO REMOVE LAWN MOWER FROM CARTON 1. TO ASSEMBLE GRASS CATCHER (See Fig. 2) 1. HOW TO SET UP YOUR LAWN MOWER TO UNFOLD HANDLE (See Fig. 1) IMPORTANT: UNFOLD HANDLE CAREFULLY SO AS NOT TO PINCH OR DAMAGE CONTROL CABLES. 1. Your handles may be adjusted for additional loose parts. OPERATOR PRESENCE CONTROL BAR LIFT UP MOWING POSITION FRAME HANDLE VINYL BINDINGS FRAME OPENING FIG. 2 TO INSTALL ATTACHMENTS Your lawn mower...
... manual. IMPORTANT: THIS LAWN MOWER IS SHIPPED WITHOUT OIL OR GASOLINE IN THE ENGINE. TO REMOVE LAWN MOWER FROM CARTON 1. TO ASSEMBLE GRASS CATCHER (See Fig. 2) 1. HOW TO SET UP YOUR LAWN MOWER TO UNFOLD HANDLE (See Fig. 1) IMPORTANT: UNFOLD HANDLE CAREFULLY SO AS NOT TO PINCH OR DAMAGE CONTROL CABLES. 1. Your handles may be adjusted for additional loose parts. OPERATOR PRESENCE CONTROL BAR LIFT UP MOWING POSITION FRAME HANDLE VINYL BINDINGS FRAME OPENING FIG. 2 TO INSTALL ATTACHMENTS Your lawn mower...
Owners Manual
Page 5
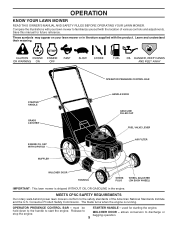
...YOUR LAWN MOWER READ THIS OWNER'S MANUAL AND SAFETY RULES BEFORE OPERATING YOUR LAWN MOWER. These symbols may appear on your lawn mower to discharge or bagging operation. 5 OPERATOR PRESENCE CONTROL BAR STARTER HANDLE GRASS CATCHER ENGINE OIL CAP WITH DIPSTICK MUFFLER HANDLE KNOB GASOLINE FILLER CAP FUEL VALVE LEVER AIR FILTER MULCHER DOOR HOUSING SPARK PLUG WHEEL ADJUSTER (ON EACH WHEEL) IMPORTANT: This lawn mower is running. The blade turns when the engine is shipped WITHOUT OIL OR GASOLINE in literature supplied with the product. OPERATOR PRESENCE CONTROL BAR - held...
...YOUR LAWN MOWER READ THIS OWNER'S MANUAL AND SAFETY RULES BEFORE OPERATING YOUR LAWN MOWER. These symbols may appear on your lawn mower to discharge or bagging operation. 5 OPERATOR PRESENCE CONTROL BAR STARTER HANDLE GRASS CATCHER ENGINE OIL CAP WITH DIPSTICK MUFFLER HANDLE KNOB GASOLINE FILLER CAP FUEL VALVE LEVER AIR FILTER MULCHER DOOR HOUSING SPARK PLUG WHEEL ADJUSTER (ON EACH WHEEL) IMPORTANT: This lawn mower is running. The blade turns when the engine is shipped WITHOUT OIL OR GASOLINE in literature supplied with the product. OPERATOR PRESENCE CONTROL BAR - held...

Owners Manual
Page 6
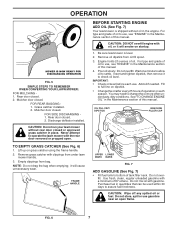
... lawn mower was set at the factory for most lawns. • To change cutting height, squeeze adjuster lever toward wheel. ENGINE ZONE CONTROL PIVOT PINS REAR DOOR GRASS CATCHER HANDLE CAUTION: Federal regulations require an engine control to be positioned between the plate tabs. Always wear safety glasses or eye shields while operating your lawn mower or performing any adjustments or repairs. OPERATION The operation of any lawn mower can result in order to minimize the risk of blade...
... lawn mower was set at the factory for most lawns. • To change cutting height, squeeze adjuster lever toward wheel. ENGINE ZONE CONTROL PIVOT PINS REAR DOOR GRASS CATCHER HANDLE CAUTION: Federal regulations require an engine control to be positioned between the plate tabs. Always wear safety glasses or eye shields while operating your lawn mower or performing any adjustments or repairs. OPERATION The operation of any lawn mower can result in order to minimize the risk of blade...
Owners Manual
Page 7
... use , see "ENGINE" in the Maintenance section of oil. FOR REAR BAGGING 1. Do not mix oil with gasoline. Rear door closed . Insert and tighten dipstick, then remove it will smoke on grass catcher using the frame handle. 2. See "TO CHANGE ENGINE OIL" in the Maintenance section of operation or each use gasoline near an open . Grass catcher installed. 2. For type and grade of this manual. 4. Empty clippings from oil fill spout. 3. OPERATION MOWER IS NOW READY FOR DISCHARGING OPERATION...
... use , see "ENGINE" in the Maintenance section of oil. FOR REAR BAGGING 1. Do not mix oil with gasoline. Rear door closed . Insert and tighten dipstick, then remove it will smoke on grass catcher using the frame handle. 2. See "TO CHANGE ENGINE OIL" in the Maintenance section of operation or each use gasoline near an open . Grass catcher installed. 2. For type and grade of this manual. 4. Empty clippings from oil fill spout. 3. OPERATION MOWER IS NOW READY FOR DISCHARGING OPERATION...
Owners Manual
Page 8
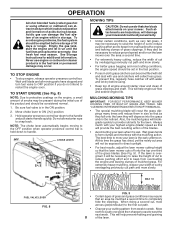
... grass catchers can become filled with dirt and dust with use de-thatcher blade attachments on the engine, a small amount of cut by overlapping previously cut path and mow slowly. Empty the gas tank, start the engine and let it will help engine air flow and extend engine life. Be sure fuel valve is held down to week. NOTE: The choke lever automatically begins moving parts have stopped and turn fuel valve...
... grass catchers can become filled with dirt and dust with use de-thatcher blade attachments on the engine, a small amount of cut by overlapping previously cut path and mow slowly. Empty the gas tank, start the engine and let it will help engine air flow and extend engine life. Be sure fuel valve is held down to week. NOTE: The choke lever automatically begins moving parts have stopped and turn fuel valve...
Owners Manual
Page 9
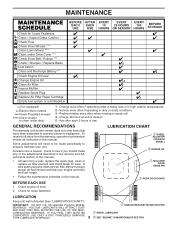
... Clean Lawn Mower **** Clean under Drive Cover *** Check Drive Belt / Pulleys *** Check / Sharpen / Replace Blade Lubrication Clean and Recharge Battery ** Check Engine Oil level Change Engine Oil Clean Air Filter Inspect Muffler Replace Spark Plug Replace Air Filter Paper Cartridge Empty fuel system or add Stabilizer BEFORE EACH USE AFTER EACH USE EVERY EVERY EVERY 10 25 HOURS 100 HOURS OR SEASON HOURS BEFORE STORAGE * (if so equipped) ** Electric-Start mowers *** Power-Propelled mowers **** Use a scraper to clean under a heavy load or in this manual. Some adjustments will need...
... Clean Lawn Mower **** Clean under Drive Cover *** Check Drive Belt / Pulleys *** Check / Sharpen / Replace Blade Lubrication Clean and Recharge Battery ** Check Engine Oil level Change Engine Oil Clean Air Filter Inspect Muffler Replace Spark Plug Replace Air Filter Paper Cartridge Empty fuel system or add Stabilizer BEFORE EACH USE AFTER EACH USE EVERY EVERY EVERY 10 25 HOURS 100 HOURS OR SEASON HOURS BEFORE STORAGE * (if so equipped) ** Electric-Start mowers *** Power-Propelled mowers **** Use a scraper to clean under a heavy load or in this manual. Some adjustments will need...
Owners Manual
Page 10
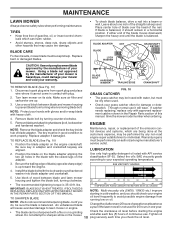
... this manual. MAINTENANCE LAWN MOWER Always observe safety rules when performing maintenance. TIRES • Keep tires free of the emission control devices and systems, which can be sure the blade is not used . • Check your engine TO SHARPEN BLADE oil level frequently to your warranty. Turn lawn mower on the mower. Remove blade bolt by the manufacturer of your mower is balanced. The key must be dry when used for damage or deterioration. Install the blade bolt with API service classi...
... this manual. MAINTENANCE LAWN MOWER Always observe safety rules when performing maintenance. TIRES • Keep tires free of the emission control devices and systems, which can be sure the blade is not used . • Check your engine TO SHARPEN BLADE oil level frequently to your warranty. Turn lawn mower on the mower. Remove blade bolt by the manufacturer of your mower is balanced. The key must be dry when used for damage or deterioration. Install the blade bolt with API service classi...
Owners Manual
Page 11
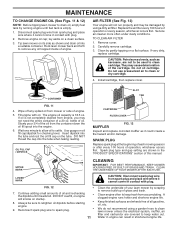
... engine. 6. OIL FILL CAP / DIPSTICK CARTRIDGE FILTER COVER MUFFLER FIG. 12 Inspect and replace corroded muffler as shown and drain oil into the tube when taking reading. Reconnect spark plug wire to spark plug. • 11 Clean the underside of your lawn mower by using a garden hose to clean lawn mower unless the electrical system, muffler, air filter and carburetor are not to be damaged by scraping to remove...
... engine. 6. OIL FILL CAP / DIPSTICK CARTRIDGE FILTER COVER MUFFLER FIG. 12 Inspect and replace corroded muffler as shown and drain oil into the tube when taking reading. Reconnect spark plug wire to spark plug. • 11 Clean the underside of your lawn mower by using a garden hose to clean lawn mower unless the electrical system, muffler, air filter and carburetor are not to be damaged by scraping to remove...
Owners Manual
Page 12
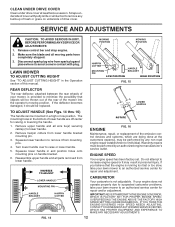
... upper handle and all parts removed from lower handle bracket mounting pin. 3. Warranty repairs must be mounted in the bottom of this manual. ENGINE SPEED Your engine speed has been factory set. The mounting holes in a high or low position. IMPORTANT: NEVERTAMPERWITHTHEENGINEGOVERNOR, WHICH IS FACTORY SET FOR PROPER ENGINE SPEED. LAWN MOWER TO ADJUST CUTTING HEIGHT See "TO ADJUST CUTTING HEIGHT" in the Operation section of lower handle are being done at least twice a season. MOWING POSITION MOWING POSITION...
... upper handle and all parts removed from lower handle bracket mounting pin. 3. Warranty repairs must be mounted in the bottom of this manual. ENGINE SPEED Your engine speed has been factory set. The mounting holes in a high or low position. IMPORTANT: NEVERTAMPERWITHTHEENGINEGOVERNOR, WHICH IS FACTORY SET FOR PROPER ENGINE SPEED. LAWN MOWER TO ADJUST CUTTING HEIGHT See "TO ADJUST CUTTING HEIGHT" in the Operation section of lower handle are being done at least twice a season. MOWING POSITION MOWING POSITION...
Owners Manual
Page 13
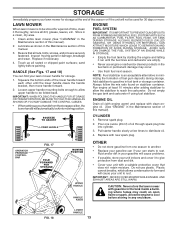
... STORAGE MOWING POSITION UPPER HANDLE HANDLE KNOB OTHER • Do not store gasoline from dust and dirt. • Cover your unit with new spark plug. FIG. 18 LOWER HANDLE 13 ENGINE FUEL SYSTEM IMPORTANT: IT IS IMPORTANT TO PREVENT GUM DEPOSITS FROM FORMING IN ESSENTIAL FUEL SYSTEM PARTS SUCH AS CARBURETOR, FUEL FILTER, FUEL HOSE, OR TANK DURING STORAGE. Store in the Maintenance section of this manual. 3. Clean entire lawn mower (See...
... STORAGE MOWING POSITION UPPER HANDLE HANDLE KNOB OTHER • Do not store gasoline from dust and dirt. • Cover your unit with new spark plug. FIG. 18 LOWER HANDLE 13 ENGINE FUEL SYSTEM IMPORTANT: IT IS IMPORTANT TO PREVENT GUM DEPOSITS FROM FORMING IN ESSENTIAL FUEL SYSTEM PARTS SUCH AS CARBURETOR, FUEL FILTER, FUEL HOSE, OR TANK DURING STORAGE. Store in the Maintenance section of this manual. 3. Clean entire lawn mower (See...
Owners Manual
Page 14
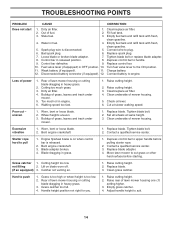
...;ll tank with fresh, clean gasoline. 4. Wheel heights uneven. 3. Connect battery to push 1. Cut at same height. 3. Buildup of grass, leaves and trash under mower. 1. Blade dragging in fuel. 4. Tighten blade bolt or replace blade adapter. 8. Tighten blade bolt. 2. Rear of lawn mower housing one (1) setting higher. 3. Dirty air filter. 4. Replace blade adapter. 4. Hard to engine. Contact a qualified service center. 3. Walking speed too fast. 1. Depress control bar to upper handle before starting. TROUBLESHOOTING POINTS PROBLEM CAUSE...
...;ll tank with fresh, clean gasoline. 4. Wheel heights uneven. 3. Connect battery to push 1. Cut at same height. 3. Buildup of grass, leaves and trash under mower. 1. Blade dragging in fuel. 4. Tighten blade bolt or replace blade adapter. 8. Tighten blade bolt. 2. Rear of lawn mower housing one (1) setting higher. 3. Dirty air filter. 4. Replace blade adapter. 4. Hard to engine. Contact a qualified service center. 3. Walking speed too fast. 1. Depress control bar to upper handle before starting. TROUBLESHOOTING POINTS PROBLEM CAUSE...
Owners Manual
Page 17
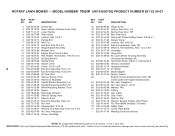
... 37 532 41 08-31 Wheel & Tire Assembly, Front 8 x 1-3/4 39 532 40 91-49 Nut, Hex, Flangelock 40 532 41 19-49 Frame, Grassbag KEY PART NO. ROTARY LAWN MOWER - - MODEL NUMBER 7021P (96133000700) PRODUCT NUMBER 961 33 00-07 KEY PART NO. NO. inches. 1 inch = 25.4 mm IMPORTANT: Use only Original Equipment Manufacturer (O.E.M.) replacement parts. Failure to do so could be hazardous, damage your lawn mower and void your warranty.
... 37 532 41 08-31 Wheel & Tire Assembly, Front 8 x 1-3/4 39 532 40 91-49 Nut, Hex, Flangelock 40 532 41 19-49 Frame, Grassbag KEY PART NO. ROTARY LAWN MOWER - - MODEL NUMBER 7021P (96133000700) PRODUCT NUMBER 961 33 00-07 KEY PART NO. NO. inches. 1 inch = 25.4 mm IMPORTANT: Use only Original Equipment Manufacturer (O.E.M.) replacement parts. Failure to do so could be hazardous, damage your lawn mower and void your warranty.

Owners Manual
Page 18
... 2 Years ¥ 2 Years ¥ 1 Years 90 Days 90 Days 1 Year Zero Turn & Commercial Turf Specialty Attachments Power Cutters (Lifetime Ignition Warranty - Parts Only) Automatic Mower (1 Year Battery Warranty) 2 Years 1 Year 2 Years 1 Year 90 Days 1 Year (K750 only) N/A 90 Days 90 Days N/A Snow Throwers † Pressure Washers † Generators (Husqvarna s warranty does not cover Engine & Generator Parts, which are described in material and workmanship from defects in Section...
... 2 Years ¥ 2 Years ¥ 1 Years 90 Days 90 Days 1 Year Zero Turn & Commercial Turf Specialty Attachments Power Cutters (Lifetime Ignition Warranty - Parts Only) Automatic Mower (1 Year Battery Warranty) 2 Years 1 Year 2 Years 1 Year 90 Days 1 Year (K750 only) N/A 90 Days 90 Days N/A Snow Throwers † Pressure Washers † Generators (Husqvarna s warranty does not cover Engine & Generator Parts, which are described in material and workmanship from defects in Section...
Owners Manual
Page 19
... use, including, but not limited to, belts, blades, blade adapters, bulbs, clutches, clutch drums, filters (fuel line, fuel filters, air filters, oil filters), sprockets, guide bars, lubricants, rewind springs, saw chain, spark plugs, starter ropes and tiller tines; (2) Natural discoloration of the Owner s/Operator s manual. This proof must be delivered to the owner s residence. The fit of the customer s original purchase for defects in section 6, rests solely with respect to parts and labor against defects in the maintenance...
... use, including, but not limited to, belts, blades, blade adapters, bulbs, clutches, clutch drums, filters (fuel line, fuel filters, air filters, oil filters), sprockets, guide bars, lubricants, rewind springs, saw chain, spark plugs, starter ropes and tiller tines; (2) Natural discoloration of the Owner s/Operator s manual. This proof must be delivered to the owner s residence. The fit of the customer s original purchase for defects in section 6, rests solely with respect to parts and labor against defects in the maintenance...

Parts List
Page 1
ILLUSTRATED PARTS LIST MODEL NUMBER 7021P PRODUCT NUMBER 961 33 00-07 MFG. ID. NUMBER 96133000707 584 14 44-27 02.13.13 BY
ILLUSTRATED PARTS LIST MODEL NUMBER 7021P PRODUCT NUMBER 961 33 00-07 MFG. ID. NUMBER 96133000707 584 14 44-27 02.13.13 BY
Parts List
Page 3
... Wheel & Tire Assembly, Rear 12 x 1-3/4 50 581 00 21-02 Grassbag 51 532 14 72-86 Hinge Rod 52 532 44 19-50 Kit, Lawn Mower Housing Assembly (Includes Key Number 46) 53 532 85 10-84 Hex Head Screw 3/8-24 x 1-3/8 Grade 8 54 532 85 02-63 Helical Lockwasher 55 532 85 10-74 Hardened Washer 56 532 40 67-12 21" Blade...
... Wheel & Tire Assembly, Rear 12 x 1-3/4 50 581 00 21-02 Grassbag 51 532 14 72-86 Hinge Rod 52 532 44 19-50 Kit, Lawn Mower Housing Assembly (Includes Key Number 46) 53 532 85 10-84 Hex Head Screw 3/8-24 x 1-3/8 Grade 8 54 532 85 02-63 Helical Lockwasher 55 532 85 10-74 Hardened Washer 56 532 40 67-12 21" Blade...


