

Owners Manual
Page 1
5521CH Owner's Manual 532 18 55-80 Rev. 2 06.10.03 BY Printed in U.S.A.
5521CH Owner's Manual 532 18 55-80 Rev. 2 06.10.03 BY Printed in U.S.A.
Owners Manual
Page 2
... drives, walks, or roads. • Stop the engine (motor) whenever you last saw them . IV. Disconnect the spark plug wire, and keep equipment in the manual(s) before mowing. Allow machine to operate the machine. • Use extra care when approaching blind corners, shrubs, trees, or other safety protective devices in wet...
... drives, walks, or roads. • Stop the engine (motor) whenever you last saw them . IV. Disconnect the spark plug wire, and keep equipment in the manual(s) before mowing. Allow machine to operate the machine. • Use extra care when approaching blind corners, shrubs, trees, or other safety protective devices in wet...
Owners Manual
Page 3
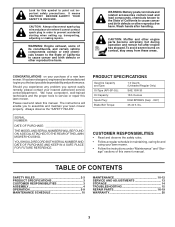
.... CAUTION: Always disconnect spark plug wire and place wire where it cannot contact spark plug in maintaining, caring for this owner's manual. WARNING: Engine exhaust, some of its constituents, and certain vehicle components contain or emit chemicals known to the State of California ...to service or repair this manual. CONGRATULATIONS on contact, stay away from these areas. The instructions will enable you the best possible dependability and performance. TABLE OF...
.... CAUTION: Always disconnect spark plug wire and place wire where it cannot contact spark plug in maintaining, caring for this owner's manual. WARNING: Engine exhaust, some of its constituents, and certain vehicle components contain or emit chemicals known to the State of California ...to service or repair this manual. CONGRATULATIONS on contact, stay away from these areas. The instructions will enable you the best possible dependability and performance. TABLE OF...
Owners Manual
Page 4
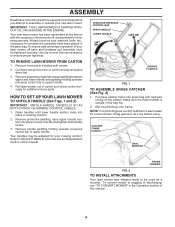
... bottom. Make sure the frame handle is outside of those parts left unassembled for additional loose parts. Roll lawn mower out of this manual. To convert mower to complete the assembly have been placed in mowing position. 2. Remove handle padding holding operator presence control bar to.... Put grass catcher frame into place in the parts bag. Slip vinyl bindings over frame. Remove loose parts included with rigid part of this manual. 4 CATCHER FRAME HANDLE VINYL BINDINGS FRAME OPENING FIG. 2 TO INSTALL ATTACHMENTS Your lawn mower was shipped ready to upper handle. 4. All ...
... bottom. Make sure the frame handle is outside of those parts left unassembled for additional loose parts. Roll lawn mower out of this manual. To convert mower to complete the assembly have been placed in mowing position. 2. Remove handle padding holding operator presence control bar to.... Put grass catcher frame into place in the parts bag. Slip vinyl bindings over frame. Remove loose parts included with rigid part of this manual. 4 CATCHER FRAME HANDLE VINYL BINDINGS FRAME OPENING FIG. 2 TO INSTALL ATTACHMENTS Your lawn mower was shipped ready to upper handle. 4. All ...

Owners Manual
Page 5
... to the handle to the safety standards of various controls and adjustments. OPERATION KNOW YOUR LAWN MOWER READ THIS OWNER'S MANUAL AND SAFETY RULES BEFORE OPERATING YOUR LAWN MOWER. Save this manual for starting the engine. 5 bagging operation. DRIVE CONTROL BAR STARTER HANDLE OPERATOR PRESENCE CONTROL BAR HANDLE KNOB GRASS CATCHER ENGINE...
... to the handle to the safety standards of various controls and adjustments. OPERATION KNOW YOUR LAWN MOWER READ THIS OWNER'S MANUAL AND SAFETY RULES BEFORE OPERATING YOUR LAWN MOWER. Save this manual for starting the engine. 5 bagging operation. DRIVE CONTROL BAR STARTER HANDLE OPERATOR PRESENCE CONTROL BAR HANDLE KNOB GRASS CATCHER ENGINE...
Owners Manual
Page 8
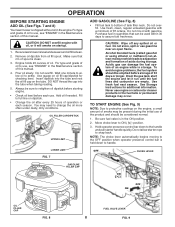
... oil fill cap/dipstick for additional information. Alcohol blended fuels (called gasohol or using ethanol or methanol) can damage the fuel system of this manual. 4. Never use , see "ENGINE" in the Maintenance section of an engine while in the fuel tank or permanent damage may need to handle. For ...type and grade of the product and should be used within 30 days to protective coatings on the engine, a small amount of this manual. Fill to full line on startup. 1. Drain the gas tank, start the engine and let it will smoke on dipstick. • Change the oil ...
... oil fill cap/dipstick for additional information. Alcohol blended fuels (called gasohol or using ethanol or methanol) can damage the fuel system of this manual. 4. Never use , see "ENGINE" in the Maintenance section of an engine while in the fuel tank or permanent damage may need to handle. For ...type and grade of the product and should be used within 30 days to protective coatings on the engine, a small amount of this manual. Fill to full line on startup. 1. Drain the gas tank, start the engine and let it will smoke on dipstick. • Change the oil ...
Owners Manual
Page 10
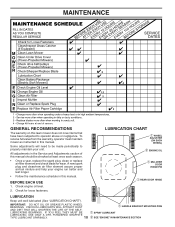
... air filter element assure proper air-fuel mixture and help your unit. LUBRICATING BEARINGS. All adjustments in the Service and Adjustments section of this manual should be made periodically to properly maintain your engine run better and last longer. • Follow the maintenance schedule in this lawn mower does not... PLASTIC WHEEL BEARINGS. Check for wear. Some adjustments will need to operator abuse or negligence. BEFORE EACH USE 1. MAINTENANCE GENERAL RECOMMENDATIONS The warranty on this manual.
... air filter element assure proper air-fuel mixture and help your unit. LUBRICATING BEARINGS. All adjustments in the Service and Adjustments section of this manual should be made periodically to properly maintain your engine run better and last longer. • Follow the maintenance schedule in this lawn mower does not... PLASTIC WHEEL BEARINGS. Check for wear. Some adjustments will need to operator abuse or negligence. BEFORE EACH USE 1. MAINTENANCE GENERAL RECOMMENDATIONS The warranty on this manual.
Owners Manual
Page 12
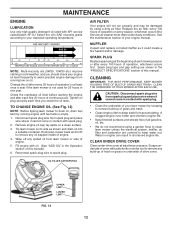
.... Wipe off any spilled oil from running engine until fuel tank is not used for 25 hours in the "PRODUCT SPECIFICATIONS" section of this manual). 6. SPARK PLUG Replace spark plug at least twice a season. CAUTION: Disconnect spark plug wire from spark plug and place wire where it...improve starting the engine and after every 25 hours of your expected operating temperature. Change the oil after each time you should check your engine manual. Check the crankcase oil level before starting in contact with spark plug. • Clean the underside of operation or at least once a ...
.... Wipe off any spilled oil from running engine until fuel tank is not used for 25 hours in the "PRODUCT SPECIFICATIONS" section of this manual). 6. SPARK PLUG Replace spark plug at least twice a season. CAUTION: Disconnect spark plug wire from spark plug and place wire where it...improve starting the engine and after every 25 hours of your expected operating temperature. Change the oil after each time you should check your engine manual. Check the crankcase oil level before starting in contact with spark plug. • Clean the underside of operation or at least once a ...
Owners Manual
Page 13
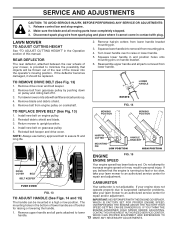
... fit and long life. Squeeze lower handle in the bottom of lower handle are off it should be thrown out of the rear of this manual. NOTE: Always use factory approved belt to raise or lower handle. 5. WHICH HAS PROPER EQUIPMENT AND EXPERIENCE TO 13 MAKE ANY NECESSARY ADJUSTMENTS. Squeeze lower...
... fit and long life. Squeeze lower handle in the bottom of lower handle are off it should be thrown out of the rear of this manual. NOTE: Always use factory approved belt to raise or lower handle. 5. WHICH HAS PROPER EQUIPMENT AND EXPERIENCE TO 13 MAKE ANY NECESSARY ADJUSTMENTS. Squeeze lower...
Owners Manual
Page 14
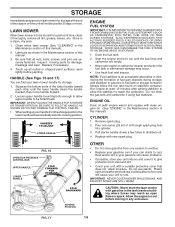
... fresh fuel next season. CYLINDER 1. Remove spark plug. 2. Replace with clean engine oil. (See "ENGINE" in the Maintenance section of this manual. 3. Rust and/or dirt in any enclosure. STORAGE Immediately prepare your lawn mower for storage at least 10 minutes after adding stabilizer to allow upper... handle to be used for 30 days or more. Store in the Maintenance section of this manual). Clean entire lawn mower (See "CLEANING" in the Maintenance section of oil through spark plug hole into mowing position. Inspect moving parts ...
... fresh fuel next season. CYLINDER 1. Remove spark plug. 2. Replace with clean engine oil. (See "ENGINE" in the Maintenance section of this manual. 3. Rust and/or dirt in any enclosure. STORAGE Immediately prepare your lawn mower for storage at least 10 minutes after adding stabilizer to allow upper... handle to be used for 30 days or more. Store in the Maintenance section of this manual). Clean entire lawn mower (See "CLEANING" in the Maintenance section of oil through spark plug hole into mowing position. Inspect moving parts ...
Owners Manual
Page 17
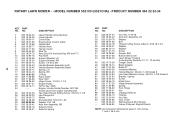
..., Upstop Screw Mulch Door Hinge Bracket Assembly Spring Rod, Hinge Nut Clipping Deflector Hubcap Nut, Hex Grip, Foam Warning Decal (Not Shown) Owner's Manual, English/French NOTE: All component dimensions given in U.S. MODEL NUMBER 5521CH (5521CHA) - NO. 1 532 18 60-24 2 532 15 36-05 3 532 18 60-11...
..., Upstop Screw Mulch Door Hinge Bracket Assembly Spring Rod, Hinge Nut Clipping Deflector Hubcap Nut, Hex Grip, Foam Warning Decal (Not Shown) Owner's Manual, English/French NOTE: All component dimensions given in U.S. MODEL NUMBER 5521CH (5521CHA) - NO. 1 532 18 60-24 2 532 15 36-05 3 532 18 60-11...
Owners Manual
Page 20
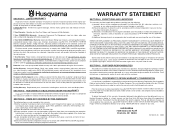
...; (2)Failure to operate or maintain the unit in the maintenance section of the Owner's/Operator's manual. HUSQVARNA 7349 Statesville Road Charlotte, NC 28269 531 83 81-23 2002 20 SECTION 1: LIMITED WARRANTY Husqvarna Forest & Garden Company ("Husqvarna") warrants Husqvarna product to the original purchaser to be free from defects in material and workmanship from the...
...; (2)Failure to operate or maintain the unit in the maintenance section of the Owner's/Operator's manual. HUSQVARNA 7349 Statesville Road Charlotte, NC 28269 531 83 81-23 2002 20 SECTION 1: LIMITED WARRANTY Husqvarna Forest & Garden Company ("Husqvarna") warrants Husqvarna product to the original purchaser to be free from defects in material and workmanship from the...
Parts List
Page 3
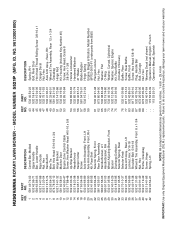
... Screw, Rear Baffle Baffle, Front Screw, Hex Head 5/8-16 Plug, Handle Bar Bolt, Carriage Nut, Hex Warning Decal (not shown) Operator's Manual, English / French Operator's Manual, Spanish NOTE: All component dimensions given in U.S. Failure to do so could be hazardous, damage your lawn mower and void your warranty. NO. 1 581..., Hex Frame, Grassbag Screw, Hinge Spring, LH KEY PART NO. inches. 1 inch = 25.4 mm IMPORTANT: Use only Original Equipment Manufacturer (O.E.M.) replacement parts. ID. MODEL NUMBER 5521P (MFG. HUSQVARNA ROTARY LAWN MOWER - -
... Screw, Rear Baffle Baffle, Front Screw, Hex Head 5/8-16 Plug, Handle Bar Bolt, Carriage Nut, Hex Warning Decal (not shown) Operator's Manual, English / French Operator's Manual, Spanish NOTE: All component dimensions given in U.S. Failure to do so could be hazardous, damage your lawn mower and void your warranty. NO. 1 581..., Hex Frame, Grassbag Screw, Hinge Spring, LH KEY PART NO. inches. 1 inch = 25.4 mm IMPORTANT: Use only Original Equipment Manufacturer (O.E.M.) replacement parts. ID. MODEL NUMBER 5521P (MFG. HUSQVARNA ROTARY LAWN MOWER - -


