
Owners Manual
Page 3
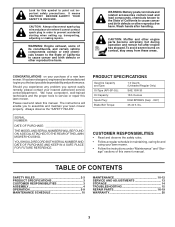
..., stay away from these areas. Should you experience any problem you cannot easily remedy, please contact your purchase of a new lawn mower. Please read and retain this owner's manual. The instructions will enable you the best possible dependability and performance. SERIAL NUMBER DATE...Battery posts, terminals and related accessories contain lead and lead compounds, chemicals known to the State of California to assemble and maintain your lawn mower. • Follow the instructions under "Maintenance" and "Storage" sections of California to service or repair this symbol to point out...
..., stay away from these areas. Should you experience any problem you cannot easily remedy, please contact your purchase of a new lawn mower. Please read and retain this owner's manual. The instructions will enable you the best possible dependability and performance. SERIAL NUMBER DATE...Battery posts, terminals and related accessories contain lead and lead compounds, chemicals known to the State of California to assemble and maintain your lawn mower. • Follow the instructions under "Maintenance" and "Storage" sections of California to service or repair this symbol to point out...
Owners Manual
Page 4
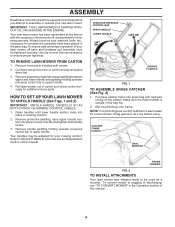
... knobs. 3. All parts such as a mulcher. Remove loose parts included with rigid part of the bag top. 2. HOW TO SET UP YOUR LAWN MOWER TO UNFOLD HANDLE (See Figs. 1 and 2) IMPORTANT: UNFOLD HANDLE CAREFULLY SO AS NOT TO PINCH OR DAMAGE CONTROL CABLES. 1. Refer to upper... handle. 4. CATCHER FRAME HANDLE VINYL BINDINGS FRAME OPENING FIG. 2 TO INSTALL ATTACHMENTS Your lawn mower was shipped ready to assemble or operate your lawn mower, all packing materials except padding between upper and lower handle and padding holding operator presence control bar to bagging or...
... knobs. 3. All parts such as a mulcher. Remove loose parts included with rigid part of the bag top. 2. HOW TO SET UP YOUR LAWN MOWER TO UNFOLD HANDLE (See Figs. 1 and 2) IMPORTANT: UNFOLD HANDLE CAREFULLY SO AS NOT TO PINCH OR DAMAGE CONTROL CABLES. 1. Refer to upper... handle. 4. CATCHER FRAME HANDLE VINYL BINDINGS FRAME OPENING FIG. 2 TO INSTALL ATTACHMENTS Your lawn mower was shipped ready to assemble or operate your lawn mower, all packing materials except padding between upper and lower handle and padding holding operator presence control bar to bagging or...
Owners Manual
Page 5
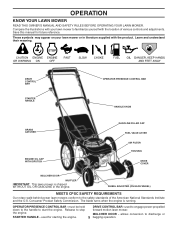
.... 5 bagging operation. must be held DRIVE CONTROL BAR - OPERATION KNOW YOUR LAWN MOWER READ THIS OWNER'S MANUAL AND SAFETY RULES BEFORE OPERATING YOUR LAWN MOWER. These symbols may appear on your lawn mower to the safety standards of various controls and adjustments. WHEEL ADJUSTER (ON EACH WHEEL...ENGINE OIL CAP WITH DIPSTICK GASOLINE FILLER CAP FUEL VALVE LEVER AIR FILTER HOUSING DRIVE COVER MULCHER DOOR MUFFLER IMPORTANT: This lawn mower is running. OPERATOR PRESENCE CONTROL BAR - MULCHER DOOR - Consumer Product Safety Commission. The blade turns when the engine is...
.... 5 bagging operation. must be held DRIVE CONTROL BAR - OPERATION KNOW YOUR LAWN MOWER READ THIS OWNER'S MANUAL AND SAFETY RULES BEFORE OPERATING YOUR LAWN MOWER. These symbols may appear on your lawn mower to the safety standards of various controls and adjustments. WHEEL ADJUSTER (ON EACH WHEEL...ENGINE OIL CAP WITH DIPSTICK GASOLINE FILLER CAP FUEL VALVE LEVER AIR FILTER HOUSING DRIVE COVER MULCHER DOOR MUFFLER IMPORTANT: This lawn mower is running. OPERATOR PRESENCE CONTROL BAR - MULCHER DOOR - Consumer Product Safety Commission. The blade turns when the engine is...
Owners Manual
Page 6
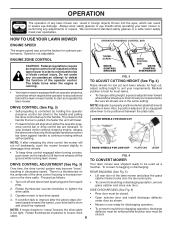
... is a thumbscrew on the drive cable. LOWER WHEELS FOR HIGH CUT RAISE WHEELS FOR LOW CUT PLATE TAB LEVER FIG. 4 TO CONVERT MOWER Your lawn mower was set at the factory for discharging operation. • To convert to mulching or bagging operation, discharge deflector must be removed ...or discharging: REAR BAGGING (See Fig. 5) • Lift rear door of the drive control housing to increase tension on the underside of the lawn mower and place the grass catcher frame hooks onto the door pivot pins. • To convert to mulching or discharging operation, remove grass catcher and...
... is a thumbscrew on the drive cable. LOWER WHEELS FOR HIGH CUT RAISE WHEELS FOR LOW CUT PLATE TAB LEVER FIG. 4 TO CONVERT MOWER Your lawn mower was set at the factory for discharging operation. • To convert to mulching or bagging operation, discharge deflector must be removed ...or discharging: REAR BAGGING (See Fig. 5) • Lift rear door of the drive control housing to increase tension on the underside of the lawn mower and place the grass catcher frame hooks onto the door pivot pins. • To convert to mulching or discharging operation, remove grass catcher and...
Owners Manual
Page 7
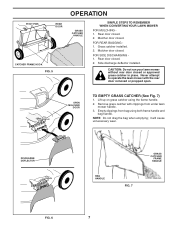
...Lift up on grass catcher using both frame handle and bag handle. Mulcher door closed . Empty clippings from under lawn mower handle. 3. Never attempt to operate the lawn mower with clippings from bag using the frame handle. 2. OPEN MULCHER DOOR TO EMPTY GRASS CATCHER (See Fig. 7)...BAG HANDLE GRASS CATCHER FRAME HANDLE FIG. 7 7 FOR SIDE DISCHARGING 1. Side discharge deflector installed. CAUTION: Do not run your lawn mower without rear door closed . 2. Rear door closed or approved grass catcher in place. FOR REAR BAGGING 1. it will cause unnecessary wear. ...
...Lift up on grass catcher using both frame handle and bag handle. Mulcher door closed . Empty clippings from under lawn mower handle. 3. Never attempt to operate the lawn mower with clippings from bag using the frame handle. 2. OPEN MULCHER DOOR TO EMPTY GRASS CATCHER (See Fig. 7)...BAG HANDLE GRASS CATCHER FRAME HANDLE FIG. 7 7 FOR SIDE DISCHARGING 1. Side discharge deflector installed. CAUTION: Do not run your lawn mower without rear door closed . 2. Rear door closed or approved grass catcher in place. FOR REAR BAGGING 1. it will cause unnecessary wear. ...
Owners Manual
Page 9
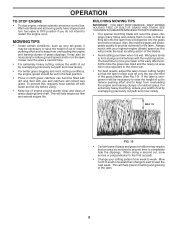
... grass. MAX 1/3 FIG. 10 • Certain types of grass and grass conditions may also be necessary to reduce ground speed and/or run the lawn mower over the area a second time. • For extremely heavy cutting, reduce the width of cut by overlapping previously cut to reduce pushing effort and ...to completely hide the clippings. It may require that the lawn mower cuts off with the mulching action. To prevent this time the grass has dried and the newly cut area will help prevent matting and ...
... grass. MAX 1/3 FIG. 10 • Certain types of grass and grass conditions may also be necessary to reduce ground speed and/or run the lawn mower over the area a second time. • For extremely heavy cutting, reduce the width of cut by overlapping previously cut to reduce pushing effort and ...to completely hide the clippings. It may require that the lawn mower cuts off with the mulching action. To prevent this time the grass has dried and the newly cut area will help prevent matting and ...
Owners Manual
Page 10
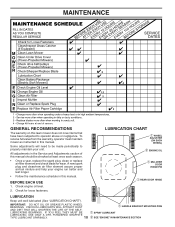
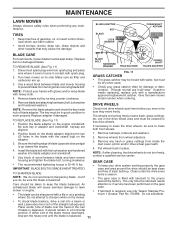
Check for wear. LUBRICATING BEARINGS. All adjustments in the Service and Adjustments section of this lawn mower does not cover items that have been subjected to operator abuse or negligence. Some adjustments will need to be checked at least once each ...➀ HANDLE BRACKET MOUNTING PINS ➀ SPRAY LUBRICANT ➁ SEE "ENGINE" IN MAINTENANCE SECTION To receive full value from the warranty, operator must maintain mower as instructed in this manual. A new spark plug and clean/new air filter element assure proper air-fuel mixture and help your unit. VISCOUS...
Check for wear. LUBRICATING BEARINGS. All adjustments in the Service and Adjustments section of this lawn mower does not cover items that have been subjected to operator abuse or negligence. Some adjustments will need to be checked at least once each ...➀ HANDLE BRACKET MOUNTING PINS ➀ SPRAY LUBRICANT ➁ SEE "ENGINE" IN MAINTENANCE SECTION To receive full value from the warranty, operator must maintain mower as instructed in this manual. A new spark plug and clean/new air filter element assure proper air-fuel mixture and help your unit. VISCOUS...
Owners Manual
Page 11
... toward the engine. 4. Disconnect spark plug wire from turning when removing blade bolt. Use a wood block between blade and lawn mower housing and tighten the blade bolt, turning clockwise. • The recommended tightening torque is balanced. 11 Remove blade and attaching...Position blade on the blade adapter aligning the two (2) holes in a horizontal position. Remove blade bolt by turning counter-clockwise. Give the lawn mower model number when ordering. 5. Be sure the trailing edge of blade adapter. lbs. Remove hubcaps, locknuts and washers. 2. Do not ...
... toward the engine. 4. Disconnect spark plug wire from turning when removing blade bolt. Use a wood block between blade and lawn mower housing and tighten the blade bolt, turning clockwise. • The recommended tightening torque is balanced. 11 Remove blade and attaching...Position blade on the blade adapter aligning the two (2) holes in a horizontal position. Remove blade bolt by turning counter-clockwise. Give the lawn mower model number when ordering. 5. Be sure the trailing edge of blade adapter. lbs. Remove hubcaps, locknuts and washers. 2. Do not ...
Owners Manual
Page 12
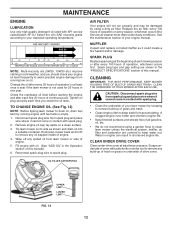
... starting the engine and after each five (5) hours of this manual). 6. TO CHANGE ENGINE OIL (See Fig. 12) NOTE: Before tipping lawn mower to drain oil, drain fuel tank by running low on underside of engine. 5. AIR FILTER Your engine will not run properly and may be damaged... • We do not recommend using a dirty air filter. Select the oil's SAE viscosity grade according to your lawn mower by using a garden hose to keep trash from lawn mower or side of drive cover. Wipe off any oil trapped inside of grass and trash. • Clean engine often to spark...
... starting the engine and after each five (5) hours of this manual). 6. TO CHANGE ENGINE OIL (See Fig. 12) NOTE: Before tipping lawn mower to drain oil, drain fuel tank by running low on underside of engine. 5. AIR FILTER Your engine will not run properly and may be damaged... • We do not recommend using a dirty air filter. Select the oil's SAE viscosity grade according to your lawn mower by using a garden hose to keep trash from lawn mower or side of drive cover. Wipe off any oil trapped inside of grass and trash. • Clean engine often to spark...
Owners Manual
Page 13
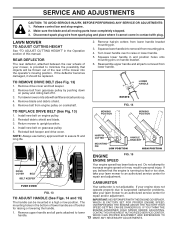
... ADJUSTMENTS CAUTION: TO AVOID SERIOUS INJURY, BEFORE PERFORMING ANY SERVICE OR ADJUSTMENTS: 1. LAWN MOWER TO ADJUST CUTTING HEIGHT See "TO ADJUST CUTTING HEIGHT" in the bottom of the mower into the operator's mowing position. Install new belt on crankshaft. MOWING POSITION MOWING POSITION... REPLACE DRIVE BELT (See Fig. 13) 1. CARBURETOR PUSH DOWN Your carburetor is running too fast or too slow, take your lawn mower to remove it . 3. Turnlawnmoweronitssidewithairfilterandcarburetorup. 4. Remove blade and debris shield. 5. TO REMOVE DRIVE BELT (See Fig. 13) 1....
... ADJUSTMENTS CAUTION: TO AVOID SERIOUS INJURY, BEFORE PERFORMING ANY SERVICE OR ADJUSTMENTS: 1. LAWN MOWER TO ADJUST CUTTING HEIGHT See "TO ADJUST CUTTING HEIGHT" in the bottom of the mower into the operator's mowing position. Install new belt on crankshaft. MOWING POSITION MOWING POSITION... REPLACE DRIVE BELT (See Fig. 13) 1. CARBURETOR PUSH DOWN Your carburetor is running too fast or too slow, take your lawn mower to remove it . 3. Turnlawnmoweronitssidewithairfilterandcarburetorup. 4. Remove blade and debris shield. 5. TO REMOVE DRIVE BELT (See Fig. 13) 1....
Owners Manual
Page 14
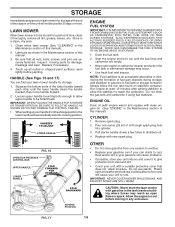
.... 17 14 curely fastened. Start the engine and let it thoroughly, remove all dirt, grease, leaves, etc. CYLINDER 1. CAUTION: Never store the lawn mower with clean engine oil. (See "ENGINE" in the fuel tank or permanent damage may reach an open flame or spark. Be sure that ...• Replace your gasoline can if your can fold your unit with new spark plug. Allow the engine to cool before painting. Clean entire lawn mower (See "CLEANING" in any enclosure. Inspect moving parts for 30 days or more. Do not use engine or carburetor cleaner products in the...
.... 17 14 curely fastened. Start the engine and let it thoroughly, remove all dirt, grease, leaves, etc. CYLINDER 1. CAUTION: Never store the lawn mower with clean engine oil. (See "ENGINE" in the fuel tank or permanent damage may reach an open flame or spark. Be sure that ...• Replace your gasoline can if your can fold your unit with new spark plug. Allow the engine to cool before painting. Clean entire lawn mower (See "CLEANING" in any enclosure. Inspect moving parts for 30 days or more. Do not use engine or carburetor cleaner products in the...
Owners Manual
Page 15
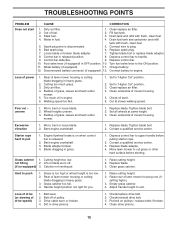
...off of pulley. 3. TROUBLESHOOTING POINTS PROBLEM CAUSE CORRECTION Does not start 1. Clean/replace air filter. 2. Out of lawn mower housing or cutting blade dragging in heavy grass. 3. Fill fuel tank. 3. Drain fuel tank and carburetor and refi...Cutting height too low. not filling 2. Raise cutting height. 2. Replace blade. 3. Rear of lawn mower housing one (1) setting higher. 3. Raise cutting height. 2. Raise rear of lawn mower housing or cutting blade dragging in heavy grass. 2. Empty grass catcher. 4. Belt off . (if so...
...off of pulley. 3. TROUBLESHOOTING POINTS PROBLEM CAUSE CORRECTION Does not start 1. Clean/replace air filter. 2. Out of lawn mower housing or cutting blade dragging in heavy grass. 3. Fill fuel tank. 3. Drain fuel tank and carburetor and refi...Cutting height too low. not filling 2. Raise cutting height. 2. Replace blade. 3. Rear of lawn mower housing one (1) setting higher. 3. Raise cutting height. 2. Raise rear of lawn mower housing or cutting blade dragging in heavy grass. 2. Empty grass catcher. 4. Belt off . (if so...

Owners Manual
Page 17
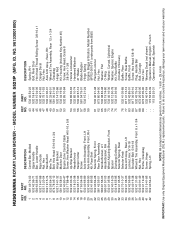
ROTARY LAWN MOWER - - NO. 33 532 06 31-24 34 532 18 25-42 35 532 12 50-78 36 532 18 41-93 37 532 15 00-... DESCRIPTION Nut, Hex 5/16-18 Axle Arm Assembly, LR Washer Bolt Thread Cutting Screw w/Sems 5/16-18 x 3/4 Washer Washer Screw Keeper, Belt Bottom Belt Cover Lawn Mower Housing (Includes Key Numbers 10, 11, 12 and 45) Danger Decal Blade Adapter Blade 21" Hardened Washer Helical Washer 3/8-24 x 1-3/8 Grade 8 Hex Head Machine Screw...
ROTARY LAWN MOWER - - NO. 33 532 06 31-24 34 532 18 25-42 35 532 12 50-78 36 532 18 41-93 37 532 15 00-... DESCRIPTION Nut, Hex 5/16-18 Axle Arm Assembly, LR Washer Bolt Thread Cutting Screw w/Sems 5/16-18 x 3/4 Washer Washer Screw Keeper, Belt Bottom Belt Cover Lawn Mower Housing (Includes Key Numbers 10, 11, 12 and 45) Danger Decal Blade Adapter Blade 21" Hardened Washer Helical Washer 3/8-24 x 1-3/8 Grade 8 Hex Head Machine Screw...

Owners Manual
Page 19
... Head Tapping Screw #10-24 x 2-3/4 Drive Cover Hex Flange Nut Pulley Half, Drive Kit, Wheel Adjuster, LH (Includes Knob and Bearing) KEY PART NO. ROTARY LAWN MOWER - -
... Head Tapping Screw #10-24 x 2-3/4 Drive Cover Hex Flange Nut Pulley Half, Drive Kit, Wheel Adjuster, LH (Includes Knob and Bearing) KEY PART NO. ROTARY LAWN MOWER - -
Owners Manual
Page 20
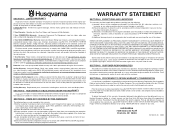
...-zero turn riders, wide area walks, and ground engaging commercial equipment. 2 Year NON-COMMERCIAL Warranty: Automatic Mower, Riding lawn mowers, yard and garden tractors, walk behind mowers and commercial turf equipment or any applicable laws; An authorized Husqvarna dealer can be followed as herein stated. Emission control system components necessary to make certain that change...
...-zero turn riders, wide area walks, and ground engaging commercial equipment. 2 Year NON-COMMERCIAL Warranty: Automatic Mower, Riding lawn mowers, yard and garden tractors, walk behind mowers and commercial turf equipment or any applicable laws; An authorized Husqvarna dealer can be followed as herein stated. Emission control system components necessary to make certain that change...
Parts List
Page 3
...not shown) Operator's Manual, English / French Operator's Manual, Spanish NOTE: All component dimensions given in U.S. Failure to do so could be hazardous, damage your lawn mower and void your warranty. NO. 1 581 49 74-02 2 532 42 99-71 3 580 63 86-03 4 532 19 47-88 5 532 13 ...Locknut, Hex 5/16-18 Shoulder Bolt 5/16-18 Wheel & Tire Assembly, Front 8 x 1-3/4 Nut, Hex Frame, Grassbag Screw, Hinge Spring, LH KEY PART NO. HUSQVARNA ROTARY LAWN MOWER - - ID. MODEL NUMBER 5521P (MFG. inches. 1 inch = 25.4 mm IMPORTANT: Use only Original Equipment Manufacturer (O.E.M.) replacement parts.
...not shown) Operator's Manual, English / French Operator's Manual, Spanish NOTE: All component dimensions given in U.S. Failure to do so could be hazardous, damage your lawn mower and void your warranty. NO. 1 581 49 74-02 2 532 42 99-71 3 580 63 86-03 4 532 19 47-88 5 532 13 ...Locknut, Hex 5/16-18 Shoulder Bolt 5/16-18 Wheel & Tire Assembly, Front 8 x 1-3/4 Nut, Hex Frame, Grassbag Screw, Hinge Spring, LH KEY PART NO. HUSQVARNA ROTARY LAWN MOWER - - ID. MODEL NUMBER 5521P (MFG. inches. 1 inch = 25.4 mm IMPORTANT: Use only Original Equipment Manufacturer (O.E.M.) replacement parts.


