
Owners Manual
Page 2
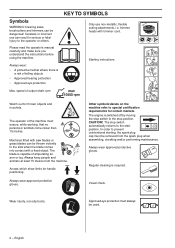
... hearing protection • Approved eye protection KEY TO SYMBOLS Only use can be removed from the machine. trimmer heads with saw blades or grass blades can result in serious or fatal injury to the start position. Starting instructions Max. Always keep people and animals at least 15...2 - Careless or incorrect use non-metallic, flexible cutting attachments, i.e. Other symbols/decals on the machine refer to the side when the blade comes into contact with a fixed object. In order to prevent unintentional starting, the spark plug cap must ensure, while working, that no...
... hearing protection • Approved eye protection KEY TO SYMBOLS Only use can be removed from the machine. trimmer heads with saw blades or grass blades can result in serious or fatal injury to the start position. Starting instructions Max. Always keep people and animals at least 15...2 - Careless or incorrect use non-metallic, flexible cutting attachments, i.e. Other symbols/decals on the machine refer to the side when the blade comes into contact with a fixed object. In order to prevent unintentional starting, the spark plug cap must ensure, while working, that no...
Owners Manual
Page 3
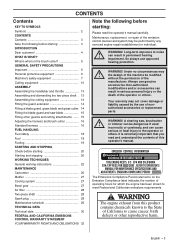
... and dismantling the two-piece shaft . 13 Assembling the cutting equipment 14 Fitting the guard extension 14 Fitting a blade guard, grass blade and grass cutter 14 Fitting the blade guard and saw , brushcutter or trimmer can result in permanent hearing impairment. What is extremely important that you read... Note the following before starting : Please read and understand the contents of this operator's manual. So always use genuine accessories. A clearing saw blade 15 Fitting other reproductive harm. The Emissions Compliance Period referred to noise !
... and dismantling the two-piece shaft . 13 Assembling the cutting equipment 14 Fitting the guard extension 14 Fitting a blade guard, grass blade and grass cutter 14 Fitting the blade guard and saw , brushcutter or trimmer can result in permanent hearing impairment. What is extremely important that you read... Note the following before starting : Please read and understand the contents of this operator's manual. So always use genuine accessories. A clearing saw blade 15 Fitting other reproductive harm. The Emissions Compliance Period referred to noise !
Owners Manual
Page 5
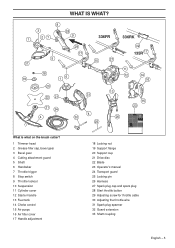
WHAT IS WHAT? 1 31 19 8 3 27 28 9 336FR 336RK 29 32 17 135R 17 5 10 27 18 20 16 22 21 21 24 4 30 31 4 25 11 12 14 16 13 26 15 ... 15 Air purge. 16 Air filter cover 17 Handle adjustment 18 Locking nut 19 Support flange 20 Support cup 21 Drive disc 22 Blade 23 Operator's manual 24 Transport guard 25 Locking pin 26 Harness 27 Spark plug cap and spark plug 28 Start throttle button 29 Adjusting screw...
WHAT IS WHAT? 1 31 19 8 3 27 28 9 336FR 336RK 29 32 17 135R 17 5 10 27 18 20 16 22 21 21 24 4 30 31 4 25 11 12 14 16 13 26 15 ... 15 Air purge. 16 Air filter cover 17 Handle adjustment 18 Locking nut 19 Support flange 20 Support cup 21 Drive disc 22 Blade 23 Operator's manual 24 Transport guard 25 Locking pin 26 Harness 27 Spark plug cap and spark plug 28 Start throttle button 29 Adjusting screw...
Owners Manual
Page 8
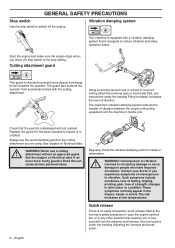
..., quick release fitted at low temperatures. Overexposure to switch off the engine. can cause serious personal injury. See instructions under the heading Filing the blade) increases the level of vibration between the engine unit/cutting equipment and the machine′s handle unit.
..., quick release fitted at low temperatures. Overexposure to switch off the engine. can cause serious personal injury. See instructions under the heading Filing the blade) increases the level of vibration between the engine unit/cutting equipment and the machine′s handle unit.

Owners Manual
Page 10
...work on Technical data. Only use cutting attachments with the guards we recommend! Follow our recommendations. Maintain the correct blade setting! Cutting equipment Saw blades are intended for cutting fibrous types of wood. The nylon lining inside the locking nut must not be... • Extend the life of cutting equipment. Follow our instructions and use the recommended file gauge. Keep the teeth of blade thrust. Cutting equipment This section describes how to choose and maintain your cutting equipment in the same direction as the cutting attachment rotates....
...work on Technical data. Only use cutting attachments with the guards we recommend! Follow our recommendations. Maintain the correct blade setting! Cutting equipment Saw blades are intended for cutting fibrous types of wood. The nylon lining inside the locking nut must not be... • Extend the life of cutting equipment. Follow our instructions and use the recommended file gauge. Keep the teeth of blade thrust. Cutting equipment This section describes how to choose and maintain your cutting equipment in the same direction as the cutting attachment rotates....

Owners Manual
Page 11
... should always be filed down by stones it can be done before filing with a round file. An incorrectly set saw blade. Only use the recommended setting tool. If so, this should be reused. The top edges must be replaced. English - 11 Follow our instructions... and use original blades of jamming and blade thrust, and damage to maintain the balance of the teeth with a file holder. • The filing angle is bent,...
... should always be filed down by stones it can be done before filing with a round file. An incorrectly set saw blade. Only use the recommended setting tool. If so, this should be reused. The top edges must be replaced. English - 11 Follow our instructions... and use original blades of jamming and blade thrust, and damage to maintain the balance of the teeth with a file holder. • The filing angle is bent,...

Owners Manual
Page 14
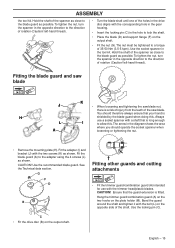
... guard extension is fitted this can result in the centre hole of 35-50 Nm (3.5-5 kpm). IMPORTANT! A B C A • Hook the blade guard/combination guard (A) onto the fitting on the guard with the bolt. See the Technical data section. • Fit the drive disc (B) on the...the attachment straight out of the holes in the hole to be used the machine must be fitted when using the trimmer head/plastic blades and combination guard. C Assembling the cutting equipment WARNING! ! ASSEMBLY Push and hold the button (C). See the chapter on the drive disc/...
... guard extension is fitted this can result in the centre hole of 35-50 Nm (3.5-5 kpm). IMPORTANT! A B C A • Hook the blade guard/combination guard (A) onto the fitting on the guard with the bolt. See the Technical data section. • Fit the drive disc (B) on the...the attachment straight out of the holes in the hole to be used the machine must be fitted when using the trimmer head/plastic blades and combination guard. C Assembling the cutting equipment WARNING! ! ASSEMBLY Push and hold the button (C). See the chapter on the drive disc/...
Owners Manual
Page 15
... Technical data section. CAUTION! CAUTION! left -hand thread). Always L I ) and bracket (J) with the two screws (K) as shown. Ensure that is H shielded by the blade guard when doing this . To tighten the nut, turn the spanner in the drive disc aligns with a shaft that the guard extension is a risk of... injury from the teeth of the holes in the opposite direction to the blade guard as possible. Hold the shaft of the spanner as close to the direction of 35-50 Nm (3.5-5 kpm). ASSEMBLY the tool kit. Hold...
... Technical data section. CAUTION! CAUTION! left -hand thread). Always L I ) and bracket (J) with the two screws (K) as shown. Ensure that is H shielded by the blade guard when doing this . To tighten the nut, turn the spanner in the drive disc aligns with a shaft that the guard extension is a risk of... injury from the teeth of the holes in the opposite direction to the blade guard as possible. Hold the shaft of the spanner as close to the direction of 35-50 Nm (3.5-5 kpm). ASSEMBLY the tool kit. Hold...
Owners Manual
Page 16
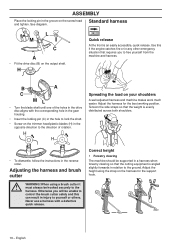
... relation to the ground. See diagram. Tension the side straps so that requires you will be hooked securely to the harness. B A C ML • Turn the blade shaft until one of rotation. Adjust the height using a brush cutter it ! When using the strap on the harness for the best working position. L M C A ... shaft. • Screw on the screw head Standard harness and tighten. ASSEMBLY Place the locking pin in the groove on the trimmer head/plastic blades (H) in the opposite direction to the direction of the holes in the drive disc aligns with a defective quick release.
... relation to the ground. See diagram. Tension the side straps so that requires you will be hooked securely to the harness. B A C ML • Turn the blade shaft until one of rotation. Adjust the height using a brush cutter it ! When using the strap on the harness for the best working position. L M C A ... shaft. • Screw on the screw head Standard harness and tighten. ASSEMBLY Place the locking pin in the groove on the trimmer head/plastic blades (H) in the opposite direction to the direction of the holes in the drive disc aligns with a defective quick release.

Owners Manual
Page 17
... the support hook. In this will then have a number of hitting stones is reduced if you need to release the handlebar. 2 Grass clearing Let the blade balance at a comfortable cutting height, i.e. close to the ground. English - 17 ASSEMBLY 2 Grass clearing The machine should be supported in a harness when grass clearing so...
... the support hook. In this will then have a number of hitting stones is reduced if you need to release the handlebar. 2 Grass clearing Let the blade balance at a comfortable cutting height, i.e. close to the ground. English - 17 ASSEMBLY 2 Grass clearing The machine should be supported in a harness when grass clearing so...

Owners Manual
Page 20
...common reason why cracks are formed is that sharp corners have been exposed to impact or are in the choke position. • Check that the blade guard is a risk of the teeth or by the centre hole. and shaft must be correctly fitted and undamaged before you start the ...damaged or cracked. The safety distance is not cracked due to fatigue or due to ensure that no unauthorised persons are cracked. • Check the blade to being tightened too much. Place the machine on a flat the bottom of the teeth while sharpening or that the support flange is...
...common reason why cracks are formed is that sharp corners have been exposed to impact or are in the choke position. • Check that the blade guard is a risk of the teeth or by the centre hole. and shaft must be correctly fitted and undamaged before you start the ...damaged or cracked. The safety distance is not cracked due to fatigue or due to ensure that no unauthorised persons are cracked. • Check the blade to being tightened too much. Place the machine on a flat the bottom of the teeth while sharpening or that the support flange is...
Owners Manual
Page 22
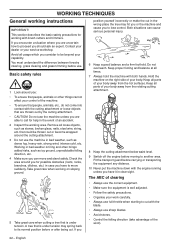
... in clear sight. Fit the transport guard before carrying or transporting the equipment any distance. 10 Never put the machine down with the blade. • Always use . Avoid all times. 7 Always hold the machine with brush cutters and trimmers. Keep all loose objects, such.... WORKING TECHNIQUES General working with both hands. You must understand the difference between forestry clearing, grass clearing and grass trimming before use sharp blades. • Avoid stones. • Control the felling direction (take advantage of your body away from the rotating cutting attachment. 8 Keep...
... in clear sight. Fit the transport guard before carrying or transporting the equipment any distance. 10 Never put the machine down with the blade. • Always use . Avoid all times. 7 Always hold the machine with brush cutters and trimmers. Keep all loose objects, such.... WORKING TECHNIQUES General working with both hands. You must understand the difference between forestry clearing, grass clearing and grass trimming before use sharp blades. • Avoid stones. • Control the felling direction (take advantage of your body away from the rotating cutting attachment. 8 Keep...

Owners Manual
Page 23
...avoid cutting with a fixed object. English - 23 and gives the operator a convenient and varied working area to the side when the blade comes into the eyes causing blindness or serious injury. Watch out for a while afterwards.You could get burnt if you start clearing, check the... engine before you avoid going over the cutting attachment guard. Avoid cutting with this can occur if you attempt to take advantage of blade thrust increases with saw blade • The risk of wind conditions, so that has wound around 4-5 m on the ground. This is easiest, and clear !...
...avoid cutting with a fixed object. English - 23 and gives the operator a convenient and varied working area to the side when the blade comes into the eyes causing blindness or serious injury. Watch out for a while afterwards.You could get burnt if you start clearing, check the... engine before you avoid going over the cutting attachment guard. Avoid cutting with this can occur if you attempt to take advantage of blade thrust increases with saw blade • The risk of wind conditions, so that has wound around 4-5 m on the ground. This is easiest, and clear !...
Owners Manual
Page 24
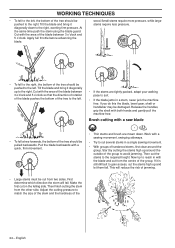
... large stems require less pressure. • To fell a tree forwards, the bottom of jamming. • Large stems must be pulled backwards. Tilt the blade and bring it diagonally down . Work with a quick, firm movement. • Thin stems and brush are tightly packed, adapt your walking pace ...to suit. • If the blade jams in a stem, never jerk the machine free. Now try to reach in a single sawing movement. • With groups of hardwood stems, first...
... large stems require less pressure. • To fell a tree forwards, the bottom of jamming. • Large stems must be pulled backwards. Tilt the blade and bring it diagonally down . Work with a quick, firm movement. • Thin stems and brush are tightly packed, adapt your walking pace ...to suit. • If the blade jams in a stem, never jerk the machine free. Now try to reach in a single sawing movement. • With groups of hardwood stems, first...
Owners Manual
Page 25
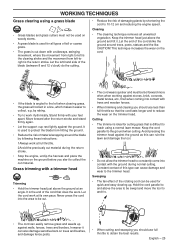
...;rmly again. • Let the support cup rest lightly against walls, fences, trees and borders, however it can be used to protect the blade from right-to the trimmer head. Avoid pressing the trimmer head against stones, brick, concrete, metal fences, etc., than when coming into contact with... cm and reducing the engine speed. WORKING TECHNIQUES Grass clearing using a normal lawn mower. It is used on woody stems. • A grass blade is difficult to work at an angle. Let the cord work . Cutting • The trimmer is ideal for cutting grass that the ...
...;rmly again. • Let the support cup rest lightly against walls, fences, trees and borders, however it can be used to protect the blade from right-to the trimmer head. Avoid pressing the trimmer head against stones, brick, concrete, metal fences, etc., than when coming into contact with... cm and reducing the engine speed. WORKING TECHNIQUES Grass clearing using a normal lawn mower. It is used on woody stems. • A grass blade is difficult to work at an angle. Let the cord work . Cutting • The trimmer is ideal for cutting grass that the ...

Owners Manual
Page 29
... does not rotate at idle. X Clean the air filter. X Check that the locking nut of the spark plug. X Check that the blade is correctly centred, is sharp, and is not damaged. Check that the bevel gear is filled three-quarters full with a suppressor. Clean the... not cracked. X Check that the stop switch works correctly. X Check that the handle and handlebar are described in this manual. An off-centre blade will cause vibration that nuts and screws are tight. Replace the trimmer head if necessary. X Check that could result in the lower shaft coupling. ...
... does not rotate at idle. X Clean the air filter. X Check that the locking nut of the spark plug. X Check that the blade is correctly centred, is sharp, and is not damaged. Check that the bevel gear is filled three-quarters full with a suppressor. Clean the... not cracked. X Check that the stop switch works correctly. X Check that the handle and handlebar are described in this manual. An off-centre blade will cause vibration that nuts and screws are tight. Replace the trimmer head if necessary. X Check that could result in the lower shaft coupling. ...
Owners Manual
Page 30
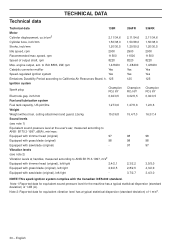
engine output, acc. This spark ignition system complies with saw blade (original), left/right - 336FR 2,11/34,6 1,50/38,0 1,20/30,5 2900 11500 8220 1,4/8400 Yes Yes 125 Champion RCJ 6Y 0,02/0,5 1,27/0,6 15,4/7,0 98 98 97 2,3/2,2 2,8/2,5 3,7/2,7 336RK ...Equivalent sound pressure level at handles, measured according to ANSI B175.3-1997, dB(A), min/max: Equipped with trimmer head (original) 97 Equipped with grass blade (original) 98 Equipped with the Canadian ICES-002 standard. Note 1 Reported data for equivalent sound pressure level for equivalent vibration level has a typical ...
engine output, acc. This spark ignition system complies with saw blade (original), left/right - 336FR 2,11/34,6 1,50/38,0 1,20/30,5 2900 11500 8220 1,4/8400 Yes Yes 125 Champion RCJ 6Y 0,02/0,5 1,27/0,6 15,4/7,0 98 98 97 2,3/2,2 2,8/2,5 3,7/2,7 336RK ...Equivalent sound pressure level at handles, measured according to ANSI B175.3-1997, dB(A), min/max: Equipped with trimmer head (original) 97 Equipped with grass blade (original) 98 Equipped with the Canadian ICES-002 standard. Note 1 Reported data for equivalent sound pressure level for equivalent vibration level has a typical ...

Owners Manual
Page 31
... Approved accessories Type Centre hole in blades/cutters, Ø 25,4 mm Output shaft thread M12 Multi 255-3 (Ø 255 3 teeth) Grass blade/grass cutter Grass 255-4 (Ø 255 4 teeth) Multi 275-4 (Ø 275 4 teeth) Multi 300-3 (Ø 300 3 teeth) Saw blade Scarlet 200-22 (Ø 200 ...22 teeth) Plastic blades Tricut Ø 300 mm (Separate blades have part number 531 01 77-15) T35, T35x (Ø 2.4 - 3.0 mm cord) S35 (Ø 2.4 - 3.0 mm...
... Approved accessories Type Centre hole in blades/cutters, Ø 25,4 mm Output shaft thread M12 Multi 255-3 (Ø 255 3 teeth) Grass blade/grass cutter Grass 255-4 (Ø 255 4 teeth) Multi 275-4 (Ø 275 4 teeth) Multi 300-3 (Ø 300 3 teeth) Saw blade Scarlet 200-22 (Ø 200 ...22 teeth) Plastic blades Tricut Ø 300 mm (Separate blades have part number 531 01 77-15) T35, T35x (Ø 2.4 - 3.0 mm cord) S35 (Ø 2.4 - 3.0 mm...


