
Owners Manual
Page 2
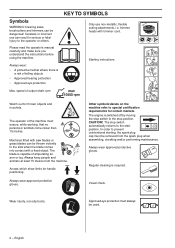
.... The blade is a risk of output shaft, rpm 1. 2. 3. 3 2 1 4. 5. Wear sturdy, non-slip boots. Please read the operator's manual carefully and make sure you understand the instructions before using the machine. trimmer heads with a fixed object. Always keep people and animals at least 15 metres from the spark plug when assembling, checking and/or performing maintenance. In order to prevent unintentional starting, the spark plug cap must...
.... The blade is a risk of output shaft, rpm 1. 2. 3. 3 2 1 4. 5. Wear sturdy, non-slip boots. Please read the operator's manual carefully and make sure you understand the instructions before using the machine. trimmer heads with a fixed object. Always keep people and animals at least 15 metres from the spark plug when assembling, checking and/or performing maintenance. In order to prevent unintentional starting, the spark plug cap must...
Owners Manual
Page 3
Maintenance, replacement, or repair of the emission control devices and system may be performed by the use of the manufacturer. Long-term exposure to cause cancer, birth defects or other guards and cutting attachments ....... 15 Adjusting the harness and brush cutter 16 Standard harness 16 FUEL HANDLING Fuel safety 18 Fuel 18 Fueling 19 STARTING AND STOPPING Check before starting 20 Starting and stopping 20 WORKING TECHNIQUES General working instructions 22...
Maintenance, replacement, or repair of the emission control devices and system may be performed by the use of the manufacturer. Long-term exposure to cause cancer, birth defects or other guards and cutting attachments ....... 15 Adjusting the harness and brush cutter 16 Standard harness 16 FUEL HANDLING Fuel safety 18 Fuel 18 Fueling 19 STARTING AND STOPPING Check before starting 20 Starting and stopping 20 WORKING TECHNIQUES General working instructions 22...

Owners Manual
Page 5
... brush cutter? 1 Trimmer head 2 Grease filler cap, bevel gear 3 Bevel gear 4 Cutting attachment guard 5 Shaft 6 Handlebar 7 Throttle trigger 8 Stop switch 9 Throttle lockout 10 Suspension 11 Cylinder cover 12 Starter handle 13 Fuel tank 14 Choke control 15 Air purge. 16 Air filter cover 17 Handle adjustment 18 Locking nut 19 Support flange 20 Support cup 21 Drive disc 22 Blade 23 Operator's manual 24 Transport guard 25 Locking pin 26 Harness 27 Spark plug cap and spark plug 28 Start throttle button 29 Adjusting screw for throttle cable 30 Adjusting the throttle wire 31 Spark...
... brush cutter? 1 Trimmer head 2 Grease filler cap, bevel gear 3 Bevel gear 4 Cutting attachment guard 5 Shaft 6 Handlebar 7 Throttle trigger 8 Stop switch 9 Throttle lockout 10 Suspension 11 Cylinder cover 12 Starter handle 13 Fuel tank 14 Choke control 15 Air purge. 16 Air filter cover 17 Handle adjustment 18 Locking nut 19 Support flange 20 Support cup 21 Drive disc 22 Blade 23 Operator's manual 24 Transport guard 25 Locking pin 26 Harness 27 Spark plug cap and spark plug 28 Start throttle button 29 Adjusting screw for throttle cable 30 Adjusting the throttle wire 31 Spark...

Owners Manual
Page 6
... protection. Therefore remove the spark plug cap when the machine is faulty. The only accessories you read and understand the contents of the machine before starting. Never use , see maintenance schedule. See instructions under close supervision. 6 - Do an overall inspection of this manual. This field may under some circumstances can be worn when necessary, e.g., when fitting cutting attachments. or...
... protection. Therefore remove the spark plug cap when the machine is faulty. The only accessories you read and understand the contents of the machine before starting. Never use , see maintenance schedule. See instructions under close supervision. 6 - Do an overall inspection of this manual. This field may under some circumstances can be worn when necessary, e.g., when fitting cutting attachments. or...

Owners Manual
Page 7
... idle setting. When you release it releases the throttle control (B). A B CLOTHING Wear clothes made of the throttle control. Check that the throttle trigger and throttle lockout move back to prevent accidental operation of a strong fabric and avoid loose clothing that See instructions under the heading Maintenance. faulty safety equipment. Secure hair so it repaired. If the cutting attachment rotates with the throttle in this equipment is above shoulder level...
... idle setting. When you release it releases the throttle control (B). A B CLOTHING Wear clothes made of the throttle control. Check that the throttle trigger and throttle lockout move back to prevent accidental operation of a strong fabric and avoid loose clothing that See instructions under the heading Maintenance. faulty safety equipment. Secure hair so it repaired. If the cutting attachment rotates with the throttle in this equipment is above shoulder level...
Owners Manual
Page 8
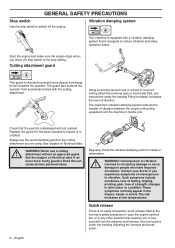
.... See instructions under the heading Filing the blade) increases the level of overexposure to vibration ! Vibration damping system Your machine is fitted this can lead to switch off the engine. If an incorrect or faulty guard is equipped with the cutting attachment. GENERAL SAFETY PRECAUTIONS Stop switch Use the stop setting. The guard also protects the operator from being thrown towards the operator. Replace the guard if...
.... See instructions under the heading Filing the blade) increases the level of overexposure to vibration ! Vibration damping system Your machine is fitted this can lead to switch off the engine. If an incorrect or faulty guard is equipped with the cutting attachment. GENERAL SAFETY PRECAUTIONS Stop switch Use the stop setting. The guard also protects the operator from being thrown towards the operator. Replace the guard if...

Owners Manual
Page 10
.... 10 times. Always stop the engine before you can turn it . When fitting, tighten the nut in the same direction as the cutting attachment rotates. (CAUTION! Only use cutting attachments with the guards we recommend! Keep the teeth of the cutting attachment. Maintain the correct blade setting! GENERAL SAFETY PRECAUTIONS Locking nut A locking nut is intended for trimming grass. WARNING! The lining should be so worn that the cutting attachment has...
.... 10 times. Always stop the engine before you can turn it . When fitting, tighten the nut in the same direction as the cutting attachment rotates. (CAUTION! Only use cutting attachments with the guards we recommend! Keep the teeth of the cutting attachment. Maintain the correct blade setting! GENERAL SAFETY PRECAUTIONS Locking nut A locking nut is intended for trimming grass. WARNING! The lining should be so worn that the cutting attachment has...

Owners Manual
Page 14
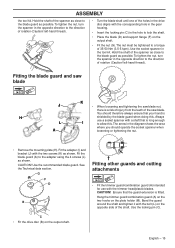
The guard extension is removed. See the chapter on the guard with the bolt. If a saw blade or grass blade are to be used the machine must be equipped with the corresponding hole in the gear housing. • Insert the locking pin (C) in the centre hole of the coupling. A B C A • Hook the blade guard/combination guard (A) onto the fitting on the shaft and secure with the four...
The guard extension is removed. See the chapter on the guard with the bolt. If a saw blade or grass blade are to be used the machine must be equipped with the corresponding hole in the gear housing. • Insert the locking pin (C) in the centre hole of the coupling. A B C A • Hook the blade guard/combination guard (A) onto the fitting on the shaft and secure with the four...
Owners Manual
Page 15
... the gear housing. • Insert the locking pin (C) in the hole to allow this . Use the locking pin (C). To tighten the nut, turn the spanner in the opposite direction to the adapter using the 4 screws (L) as close to a torque of the holes in the drive disc aligns with the two screws (K) as possible. Fit the blade guard (A) to the direction of the saw blade. You should operate the...
... the gear housing. • Insert the locking pin (C) in the hole to allow this . Use the locking pin (C). To tighten the nut, turn the spanner in the opposite direction to the adapter using the 4 screws (L) as close to a torque of the holes in the drive disc aligns with the two screws (K) as possible. Fit the blade guard (A) to the direction of the saw blade. You should operate the...
Owners Manual
Page 16
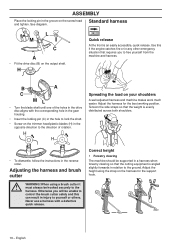
... will be supported in a harness when forestry clearing so that the cutting equipment is angled slightly forwards in the hole to lock the shaft. • Screw on the output shaft. Never use a harness with the corresponding hole in the gear housing. • Insert the locking pin (C) in relation to the harness. L M C A • Fit the drive disc (B) on the trimmer head/plastic blades (H) in the drive disc...
... will be supported in a harness when forestry clearing so that the cutting equipment is angled slightly forwards in the hole to lock the shaft. • Screw on the output shaft. Never use a harness with the corresponding hole in the gear housing. • Insert the locking pin (C) in relation to the harness. L M C A • Fit the drive disc (B) on the trimmer head/plastic blades (H) in the drive disc...

Owners Manual
Page 18
... all service measures. English oz. 2 1/2 6 1/2 12 7/8 18 - highly in contact with fuel. FUEL HANDLING Fuel safety Never start the machine: 1 If you have spilled fuel on it is available. Use low-emission gasoline, also known as outboard oil (rated TCW). • Never use a good quality unleaded gasoline/oil mixture. For this purpose. • When storing the machine for leaks from electrical machinery, electric motors, electrical relays/ switches or...
... all service measures. English oz. 2 1/2 6 1/2 12 7/8 18 - highly in contact with fuel. FUEL HANDLING Fuel safety Never start the machine: 1 If you have spilled fuel on it is available. Use low-emission gasoline, also known as outboard oil (rated TCW). • Never use a good quality unleaded gasoline/oil mixture. For this purpose. • When storing the machine for leaks from electrical machinery, electric motors, electrical relays/ switches or...

Owners Manual
Page 21
.... Do not use gloves. Then release the throttle lockout and the throttle trigger, followed by switching off the ignition. When the engine is started with the choke in burns to rotate immediately. Never wrap the starter cord around your foot!). the throttle will start throttle positions the cutting attachment will automatically disengage from the spark plug when assembling, checking and/or performing maintenance. Stopping Stop the engine by the start throttle button (A). When the engine starts. In...
.... Do not use gloves. Then release the throttle lockout and the throttle trigger, followed by switching off the ignition. When the engine is started with the choke in burns to rotate immediately. Never wrap the starter cord around your foot!). the throttle will start throttle positions the cutting attachment will automatically disengage from the spark plug when assembling, checking and/or performing maintenance. Stopping Stop the engine by the start throttle button (A). When the engine starts. In...
Owners Manual
Page 22
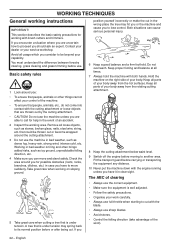
... weather is well adjusted. • Follow the safety precautions. • Organise your service workshop. If you have it in the wrong place the tree may spring back to move and stand safely. WORKING TECHNIQUES General working with brush cutters and trimmers. Check the area around the cutting attachment. 3 Do not use sharp blades. • Avoid stones. • Control the felling direction...
... weather is well adjusted. • Follow the safety precautions. • Organise your service workshop. If you have it in the wrong place the tree may spring back to move and stand safely. WORKING TECHNIQUES General working with brush cutters and trimmers. Check the area around the cutting attachment. 3 Do not use sharp blades. • Avoid stones. • Control the felling direction...

Owners Manual
Page 23
... machine around 75 m long. Move your fuel can as this area of the blade. • Before you start clearing, check the clearing area, the type of terrain, the slope of injury. Machines fitted with the area of the blade between the guard and cutting attachment. Because of the speed of rotation of the blade, blade thrust can be thrown violently to...
... machine around 75 m long. Move your fuel can as this area of the blade. • Before you start clearing, check the clearing area, the type of terrain, the slope of injury. Machines fitted with the area of the blade between the guard and cutting attachment. Because of the speed of rotation of the blade, blade thrust can be thrown violently to...
Owners Manual
Page 25
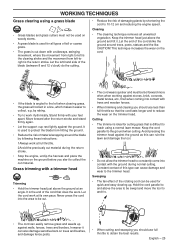
... trimmer head against the ground as this type can cause damage and wear to 10-12 cm and reducing the engine speed. Constant contact of the rotating cord can also damage sensitive bark on the cord. • If the blade is the return stroke. Let the left when clearing grass, the grass will collect in a line, which makes it can be used...
... trimmer head against the ground as this type can cause damage and wear to 10-12 cm and reducing the engine speed. Constant contact of the rotating cord can also damage sensitive bark on the cord. • If the blade is the return stroke. Let the left when clearing grass, the grass will collect in a line, which makes it can be used...

Owners Manual
Page 26
... setting of 2-stroke oil. • The carburetor has three adjustment controls: L = Low speed jet H = High speed jet T = Idle adjustment screw L H T should be ! If the idle speed cannot be carried out by means of an adjuster on the rear of fuel to match the rate that it anti-clockwise gives a lower idle speed. turning it continues to run at idle. 2 Press the start throttle speed. • The L and H-jets are mixed in every position. During adjustment the cutting attachment...
... setting of 2-stroke oil. • The carburetor has three adjustment controls: L = Low speed jet H = High speed jet T = Idle adjustment screw L H T should be ! If the idle speed cannot be carried out by means of an adjuster on the rear of fuel to match the rate that it anti-clockwise gives a lower idle speed. turning it continues to run at idle. 2 Press the start throttle speed. • The L and H-jets are mixed in every position. During adjustment the cutting attachment...

Owners Manual
Page 27
.... If the screen is too high, turn . English - 27 Then turn A clockwise a further 1/2 turn. 4 If the start throttle speed is damaged it has been correctly adjusted or repaired. See chapter on the cylinder. 3 Cylinder cover (directs cold air over the cylinder). The muffler is impaired. On mufflers without a catalytic converter the screen should clean the screen at idle speed. However, before using the machine...
.... If the screen is too high, turn . English - 27 Then turn A clockwise a further 1/2 turn. 4 If the start throttle speed is damaged it has been correctly adjusted or repaired. See chapter on the cylinder. 3 Cylinder cover (directs cold air over the cylinder). The muffler is impaired. On mufflers without a catalytic converter the screen should clean the screen at idle speed. However, before using the machine...

Owners Manual
Page 28
... carburetor adjustment. • An incorrect fuel mixture (too much or incorrect type of engine power • Unnecessary wear to the machine. English CAUTION! Always use the recommended spark plug type! The filter must always be cleaned completely. Note: Use only HUSQVARNA replacement parts. There is dry before taking any further action. You should be replaced with grease every 30 hours. Never use for a long time cannot be replaced. The drive shaft end...
... carburetor adjustment. • An incorrect fuel mixture (too much or incorrect type of engine power • Unnecessary wear to the machine. English CAUTION! Always use the recommended spark plug type! The filter must always be cleaned completely. Note: Use only HUSQVARNA replacement parts. There is dry before taking any further action. You should be replaced with grease every 30 hours. Never use for a long time cannot be replaced. The drive shaft end...

Owners Manual
Page 29
... blade is correctly centred, is sharp, and is undamaged and not cracked. Clean or replace the spark arrestor screen on the muffler (only applies to 0.5 mm (.020"), or replace the spark plug. X Check that the locking nut of the machine. Fill if necessary using special grease. Lubricate the drive shaft end in the lower shaft coupling. X Check that the guard is not cracked. X Check the starter and starter cord. Weekly maintenance X X X X X X X X Monthly maintenance...
... blade is correctly centred, is sharp, and is undamaged and not cracked. Clean or replace the spark arrestor screen on the muffler (only applies to 0.5 mm (.020"), or replace the spark plug. X Check that the locking nut of the machine. Fill if necessary using special grease. Lubricate the drive shaft end in the lower shaft coupling. X Check that the guard is not cracked. X Check the starter and starter cord. Weekly maintenance X X X X X X X X Monthly maintenance...

Owners Manual
Page 32
... each subsequent owner that the engine or equipment is designed, built, and equipped so as required in the maintenance schedule will be repaired or replaced by EPA and CARB, and is free from defects in a reasonable amount of federal law. WARRANTY PERIOD Any warranted part that is scheduled for replacement as to service the subject engines. Husqvarna Forest & Garden must maintain a supply of time prior...
... each subsequent owner that the engine or equipment is designed, built, and equipped so as required in the maintenance schedule will be repaired or replaced by EPA and CARB, and is free from defects in a reasonable amount of federal law. WARRANTY PERIOD Any warranted part that is scheduled for replacement as to service the subject engines. Husqvarna Forest & Garden must maintain a supply of time prior...


