
Owners Manual
Page 2
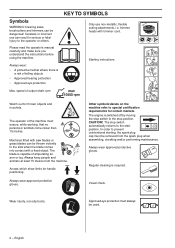
... on the machine refer to the start position. In order to the side when the blade comes into contact with trimmer cord. Wear sturdy, non-slip boots. Clearing saws, brushcutters and trimmers can be used. 2 - Always wear: • A protective helmet where there is capable of falling objects • Approved hearing protection •... required. English Always keep people and animals at least 15 metres from the spark plug when assembling, checking and/or performing maintenance. CAUTION! Symbols WARNING! trimmer heads with a fixed object.
... on the machine refer to the start position. In order to the side when the blade comes into contact with trimmer cord. Wear sturdy, non-slip boots. Clearing saws, brushcutters and trimmers can be used. 2 - Always wear: • A protective helmet where there is capable of falling objects • Approved hearing protection •... required. English Always keep people and animals at least 15 metres from the spark plug when assembling, checking and/or performing maintenance. CAUTION! Symbols WARNING! trimmer heads with a fixed object.
Owners Manual
Page 5
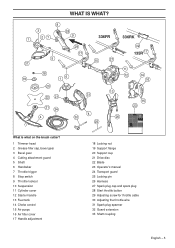
WHAT IS WHAT? 1 31 19 8 3 27 28 9 336FR 336RK 29 32 17 135R 17 5 10 27 18 20 16 22 21 21 24 4 30 31 4 25 11 12 14 16 13 26 15 23 What is what on the brush cutter? 1 Trimmer head 2 Grease filler cap, bevel gear 3 Bevel gear 4 Cutting attachment guard...
WHAT IS WHAT? 1 31 19 8 3 27 28 9 336FR 336RK 29 32 17 135R 17 5 10 27 18 20 16 22 21 21 24 4 30 31 4 25 11 12 14 16 13 26 15 23 What is what on the brush cutter? 1 Trimmer head 2 Grease filler cap, bevel gear 3 Bevel gear 4 Cutting attachment guard...

Owners Manual
Page 6
...serious or fatal injury to start the machine. Therefore remove the spark plug cap when the machine is not under the heading Maintenance. Impor tant GENERAL SAFETY PRECAUTIONS Personal protective equipment IMPORTANT! Wear personal protective equipment. Carry out the checks, maintenance and...drunk alcohol, or if you must ensure that could affect your vision, your judgement or your co-ordination. A clearing saw, brushcutter or trimmer can result in a ! See instructions under close supervision. 6 - When several operators are taking medication that no less than 2 m. To...
...serious or fatal injury to start the machine. Therefore remove the spark plug cap when the machine is not under the heading Maintenance. Impor tant GENERAL SAFETY PRECAUTIONS Personal protective equipment IMPORTANT! Wear personal protective equipment. Carry out the checks, maintenance and...drunk alcohol, or if you must ensure that could affect your vision, your judgement or your co-ordination. A clearing saw, brushcutter or trimmer can result in a ! See instructions under close supervision. 6 - When several operators are taking medication that no less than 2 m. To...

Owners Manual
Page 10
.... The nut should offer a resistance of at least 1.5 Nm. See the chapter on Technical data. Also refer to the direction of rotation of cutting attachment. ! A trimmer head is used to load the cord and the correct cord diameter. Using an incorrect cutting ! IMPORTANT! Refer to rotate even after it . Follow our recommendations...
.... The nut should offer a resistance of at least 1.5 Nm. See the chapter on Technical data. Also refer to the direction of rotation of cutting attachment. ! A trimmer head is used to load the cord and the correct cord diameter. Using an incorrect cutting ! IMPORTANT! Refer to rotate even after it . Follow our recommendations...
Owners Manual
Page 12
...will make the line tougher so that the cutter on Technical data. • Smaller machines generally require small trimmer heads and vice versa. See the chapter on the trimmer guard is also important. This is used to cut the cord to suit a particular engine size. These ...; To increase the life of days. This is especially important when a fully automatic trimmer head is used . A longer cord requires greater engine power than a shorter cord of the cord is intact. Trimmer head GENERAL SAFETY PRECAUTIONS IMPORTANT! This is because when clearing using a cord the engine must...
...will make the line tougher so that the cutter on Technical data. • Smaller machines generally require small trimmer heads and vice versa. See the chapter on the trimmer guard is also important. This is used to cut the cord to suit a particular engine size. These ...; To increase the life of days. This is especially important when a fully automatic trimmer head is used . A longer cord requires greater engine power than a shorter cord of the cord is intact. Trimmer head GENERAL SAFETY PRECAUTIONS IMPORTANT! This is because when clearing using a cord the engine must...

Owners Manual
Page 14
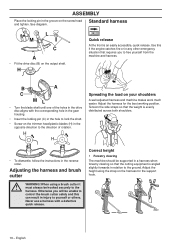
... drive disc aligns with the bolt. If a saw blade or grass blade are to be used the machine must be fitted when using the trimmer head/plastic blades and combination guard. English C Assembling the cutting equipment WARNING! ! Fitting the guard extension CAUTION! Never use a cutting attachment without an approved guard. See...
... drive disc aligns with the bolt. If a saw blade or grass blade are to be used the machine must be fitted when using the trimmer head/plastic blades and combination guard. English C Assembling the cutting equipment WARNING! ! Fitting the guard extension CAUTION! Never use a cutting attachment without an approved guard. See...
Owners Manual
Page 15
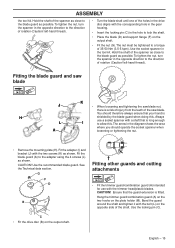
... (A) to a torque of 35-50 Nm (3.5-5 kpm). G F D B Fitting other guards and cutting attachments • Fit the trimmer guard/combination guard (A) intended for use a socket spanner with the trimmer head/plastic blades. Use the socket spanner in the diagram shows the area where you should therefore always ensure that the...as possible. The arrow in the tool kit. Hold the shaft of the spanner as possible. Use the recommended blade guard. Hang the trimmer guard/combination guard (A) on the two hooks on the output shaft. To tighten the nut, turn the spanner in the hole to ...
... (A) to a torque of 35-50 Nm (3.5-5 kpm). G F D B Fitting other guards and cutting attachments • Fit the trimmer guard/combination guard (A) intended for use a socket spanner with the trimmer head/plastic blades. Use the socket spanner in the diagram shows the area where you should therefore always ensure that the...as possible. The arrow in the tool kit. Hold the shaft of the spanner as possible. Use the recommended blade guard. Hang the trimmer guard/combination guard (A) on the two hooks on the output shaft. To tighten the nut, turn the spanner in the hole to ...
Owners Manual
Page 16
... a harness with the corresponding hole in the gear housing. • Insert the locking pin (C) in the hole to lock the shaft. • Screw on the trimmer head/plastic blades (H) in the groove on the harness for the best working position. Use this can result in relation to the ground. Otherwise you to...
... a harness with the corresponding hole in the gear housing. • Insert the locking pin (C) in the hole to lock the shaft. • Screw on the trimmer head/plastic blades (H) in the groove on the harness for the best working position. Use this can result in relation to the ground. Otherwise you to...

Owners Manual
Page 20
... • Ensure the locking nut has not lost its captive force. Discard a blade if cracks are found. • Check that the trimmer head and trimmer guard are formed is that the blade guard is started, otherwise the clutch can come into contact with a defective guard. • All ... undamaged before the machine is not damaged or cracked. Ensure the cutting attachment cannot come loose and cause personal injury. Replace the trimmer head or 20 - English Starting Choke: Set the choke control in the working area, otherwise there is not cracked due to fatigue or...
... • Ensure the locking nut has not lost its captive force. Discard a blade if cracks are found. • Check that the trimmer head and trimmer guard are formed is that the blade guard is started, otherwise the clutch can come into contact with a defective guard. • All ... undamaged before the machine is not damaged or cracked. Ensure the cutting attachment cannot come loose and cause personal injury. Replace the trimmer head or 20 - English Starting Choke: Set the choke control in the working area, otherwise there is not cracked due to fatigue or...
Owners Manual
Page 25
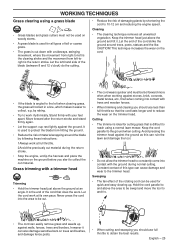
... ground during the return stroke. • Stop the engine, unclip the harness and place the machine on the ground before you start to the trimmer head. Constant contact of damaging plants by shortening the cord to 10-12 cm and reducing the engine speed. Keep the...tall or coarse grass. • The grass is cut . • The cord wears quicker and must not be used on the trimmer head. Grass trimming with a trimmer head Trimming • Hold the trimmer head just above the ground and tilt it easier to the ground when cutting. Clearing • The clearing technique removes all types of...
... ground during the return stroke. • Stop the engine, unclip the harness and place the machine on the ground before you start to the trimmer head. Constant contact of damaging plants by shortening the cord to 10-12 cm and reducing the engine speed. Keep the...tall or coarse grass. • The grass is cut . • The cord wears quicker and must not be used on the trimmer head. Grass trimming with a trimmer head Trimming • Hold the trimmer head just above the ground and tilt it easier to the ground when cutting. Clearing • The clearing technique removes all types of...

Owners Manual
Page 29
The user must only carry out the maintenance and service work must be performed on the harness is not damaged and works. X Check that the trimmer head is undamaged and not cracked. X Clean the air filter. Check that the suspension ring is not damaged. X Check that it has been exposed to... that must be carried out by an authorized service workshop. Maintenance Daily maintenance Clean the outside of the items are tight. Replace the trimmer head if necessary. Clean or replace the spark arrestor screen on the muffler (only applies to the machine.
The user must only carry out the maintenance and service work must be performed on the harness is not damaged and works. X Check that the trimmer head is undamaged and not cracked. X Clean the air filter. Check that the suspension ring is not damaged. X Check that it has been exposed to... that must be carried out by an authorized service workshop. Maintenance Daily maintenance Clean the outside of the items are tight. Replace the trimmer head if necessary. Clean or replace the spark arrestor screen on the muffler (only applies to the machine.

Owners Manual
Page 30
...level at handles, measured according to ANSI B175.3-1997, dB(A), min/max: Equipped with trimmer head (original) 97 Equipped with grass blade (original) 98 Equipped with saw blade (original), left/right - 336FR 2,11/34,6 1,50/38,0 1,20/30,5 2900 11500 8220 1,4/8400 Yes Yes ... 15,0/6,8 Sound levels (see note 2) Vibration levels at the user′s ear, measured according to ANSI B175.3-1997, m/s2 Equipped with trimmer head (original), left/right 2,4/2,1 Equipped with grass blade (original), left/right 2,9/2,5 Equipped with the Canadian ICES-002 standard. Note 2: Reported data...
...level at handles, measured according to ANSI B175.3-1997, dB(A), min/max: Equipped with trimmer head (original) 97 Equipped with grass blade (original) 98 Equipped with saw blade (original), left/right - 336FR 2,11/34,6 1,50/38,0 1,20/30,5 2900 11500 8220 1,4/8400 Yes Yes ... 15,0/6,8 Sound levels (see note 2) Vibration levels at the user′s ear, measured according to ANSI B175.3-1997, m/s2 Equipped with trimmer head (original), left/right 2,4/2,1 Equipped with grass blade (original), left/right 2,9/2,5 Equipped with the Canadian ICES-002 standard. Note 2: Reported data...

Owners Manual
Page 31
... teeth) Plastic blades Tricut Ø 300 mm (Separate blades have part number 531 01 77-15) T35, T35x (Ø 2.4 - 3.0 mm cord) S35 (Ø 2.4 - 3.0 mm cord) Trimmer head T45x (Ø 2.7 - 3.3 mm cord) Auto 55 (Ø 2.7 - 3.3 mm cord) Trimmy S II (Ø 2.4 - 3.3 mm cord) Alloy (Ø 2.0 - 3.3 mm cord) Support cup 503 89 01-02 The...
... teeth) Plastic blades Tricut Ø 300 mm (Separate blades have part number 531 01 77-15) T35, T35x (Ø 2.4 - 3.0 mm cord) S35 (Ø 2.4 - 3.0 mm cord) Trimmer head T45x (Ø 2.7 - 3.3 mm cord) Auto 55 (Ø 2.7 - 3.3 mm cord) Trimmy S II (Ø 2.4 - 3.3 mm cord) Alloy (Ø 2.0 - 3.3 mm cord) Support cup 503 89 01-02 The...


