
Owners Manual
Page 2
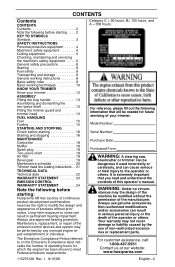
... For customer assistance, call: 1-800-487-5951 Contact us at our website: www.husqvarna.com 115275126 Rev. 1 9/15/09 English--- 2 CONTENTS Contents CONTENTS Contents 2 Note the following before starting: Husqvarna AB has a policy of the operator or others . Maintenance, replacement, or repair ... 16 MAINTENANCE Carburetor 18 Muffler 18 Spark plug 19 Two--piece shart 19 Air filter 19 Bevel gear 19 Maintenance schedule 20 Trimmer head line loading instructions . . 21 TECHNICAL DATA Technical data 22 WARRANTY STATEMENT 23 EMISSION CONTROL WARRANTY STATEMENT 24 Note the following ...
... For customer assistance, call: 1-800-487-5951 Contact us at our website: www.husqvarna.com 115275126 Rev. 1 9/15/09 English--- 2 CONTENTS Contents CONTENTS Contents 2 Note the following before starting: Husqvarna AB has a policy of the operator or others . Maintenance, replacement, or repair ... 16 MAINTENANCE Carburetor 18 Muffler 18 Spark plug 19 Two--piece shart 19 Air filter 19 Bevel gear 19 Maintenance schedule 20 Trimmer head line loading instructions . . 21 TECHNICAL DATA Technical data 22 WARRANTY STATEMENT 23 EMISSION CONTROL WARRANTY STATEMENT 24 Note the following ...

Owners Manual
Page 3
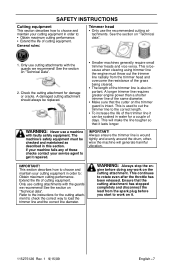
WARNING: Clearing saws, brushcutters and trimmers can result in the STOP position until the engine stops before using the machine. The operator of the machine must always be dangerous! Approved eye... wear: S Hearing protection S Approved eye protection Max. Other symbols/decals on the machine refer to the operator or others. Arrows which show limits for trimmer heads. Visual check. trimmer heads with trimmer line. 115275126 Rev. 1 9/15/09 English--- 3 Careless or incorrect use non--metallic, flexible cutting attachments, i.e. Please read the operator's manual carefully and ...
WARNING: Clearing saws, brushcutters and trimmers can result in the STOP position until the engine stops before using the machine. The operator of the machine must always be dangerous! Approved eye... wear: S Hearing protection S Approved eye protection Max. Other symbols/decals on the machine refer to the operator or others. Arrows which show limits for trimmer heads. Visual check. trimmer heads with trimmer line. 115275126 Rev. 1 9/15/09 English--- 3 Careless or incorrect use non--metallic, flexible cutting attachments, i.e. Please read the operator's manual carefully and ...

Owners Manual
Page 5
...fitted with a catalytic converter designed to reduce harmful exhaust gases. These symptoms normally appear in skin color or condition. Cutting equipment A trimmer head is intended for some time after stopping. This is fitted this reason you should not start or run the machine indoors, or anywhere ... which can result in people who sells your doctor if you buy any of the machine's safety equipment. Use of incorrectly wound trimmer line or an incorrect cutting attachment increases the level of fire! For this can cause serious personal injury. IMPORTANT! All servicing and...
...fitted with a catalytic converter designed to reduce harmful exhaust gases. These symptoms normally appear in skin color or condition. Cutting equipment A trimmer head is intended for some time after stopping. This is fitted this reason you should not start or run the machine indoors, or anywhere ... which can result in people who sells your doctor if you buy any of the machine's safety equipment. Use of incorrectly wound trimmer line or an incorrect cutting attachment increases the level of fire! For this can cause serious personal injury. IMPORTANT! All servicing and...
Owners Manual
Page 7
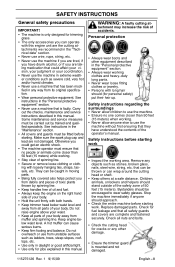
...agent to get it can be soaked in order to: Obtain maximum cutting performance. IMPORTANT! S Smaller machines generally require small trimmer heads and vice versa. This will generate harmful vibration. Refer to the instructions for the cutting attachment to check the correct way... and disconnect the lead from the trimmer head and overcome the resistance of the trimmer line is also important. If your cutting equipment in water for damage or cracks. A longer trimmer line requires greater engine power than a shorter trimmer line of cutting equipment. Extend the...
...agent to get it can be soaked in order to: Obtain maximum cutting performance. IMPORTANT! S Smaller machines generally require small trimmer heads and vice versa. This will generate harmful vibration. Refer to the instructions for the cutting attachment to check the correct way... and disconnect the lead from the trimmer head and overcome the resistance of the trimmer line is also important. If your cutting equipment in water for damage or cracks. A longer trimmer line requires greater engine power than a shorter trimmer line of cutting equipment. Extend the...
Owners Manual
Page 8
...could affect your vision, your judgment or your coordination. S Always keep the engine on the right hand side of oil and fuel. S Keep trimmer head below waist level. Keep engine below waist level and away from its original specification. S Keep firm footing and balance. S Use only for personal ...use the machine if you are tired, if you have understood the contents of the operator's manual. Bystanders should approach. S Ensure the trimmer guard is only designed for trimming grass. S The only accessories you are taking medication that all parts of toxic plants thrown by trained ...
...could affect your vision, your judgment or your coordination. S Always keep the engine on the right hand side of oil and fuel. S Keep trimmer head below waist level. Keep engine below waist level and away from its original specification. S Keep firm footing and balance. S Use only for personal ...use the machine if you are tired, if you have understood the contents of the operator's manual. Bystanders should approach. S Ensure the trimmer guard is only designed for trimming grass. S The only accessories you are taking medication that all parts of toxic plants thrown by trained ...

Owners Manual
Page 9
... in the immediate vicinity. Contact your control of fire, explosion and inhaling fumes. You must be emptied. SAFETY INSTRUCTIONS S Check that the trimmer head and guard are in order. S When adjusting the carburetor, make sure that there is plenty of any part of the engine covers and ...spilled fuel on it was intended. S Never start the machine: S If you consider to dispose of people or animals coming into contact with trimmers. S Make sure there is no risk of ventilation when refueling or mixing fuel (gasoline and 2--stroke oil). Fuel is no risk of excess ...
... in the immediate vicinity. Contact your control of fire, explosion and inhaling fumes. You must be emptied. SAFETY INSTRUCTIONS S Check that the trimmer head and guard are in order. S When adjusting the carburetor, make sure that there is plenty of any part of the engine covers and ...spilled fuel on it was intended. S Never start the machine: S If you consider to dispose of people or animals coming into contact with trimmers. S Make sure there is no risk of ventilation when refueling or mixing fuel (gasoline and 2--stroke oil). Fuel is no risk of excess ...

Owners Manual
Page 10
... 9/15/09 English--- 10 Take great care when working operation. S When trimming you can also damage sensitive bark on the trimmer head. Let the end of the trimmer line strike the ground around you for possible obstacles (roots, rocks, branches, ditches, etc.) in bad weather is the end...Basic working techniques S Always slow the engine to serious engine damage. Always stop the engine before moving to reach using a trimmer head Trimming S The trimmer line wears quicker and must be operated for longer than when coming into the area to call for cutting grass that is recommended...
... 9/15/09 English--- 10 Take great care when working operation. S When trimming you can also damage sensitive bark on the trimmer head. Let the end of the trimmer line strike the ground around you for possible obstacles (roots, rocks, branches, ditches, etc.) in bad weather is the end...Basic working techniques S Always slow the engine to serious engine damage. Always stop the engine before moving to reach using a trimmer head Trimming S The trimmer line wears quicker and must be operated for longer than when coming into the area to call for cutting grass that is recommended...

Owners Manual
Page 11
... machine nor anyone approaches. 115275126 Rev. 1 9/15/09 English--- 11 SAFETY INSTRUCTIONS Sweeping S The fan effect of 50 feet (15 meters). Stop the engine and trimmer head before you remove material that has wound around the drive shaft as this can result in serious injury. Stones, rubbish, etc. You could get hot... throttle to and fro. S When cutting and sweeping you touch it. can be swept and move the tool to obtain the best results. Hold the trimmer line parallel to and above the area to be used for thrown objects. WARNING: Neither the operator of injury.
... machine nor anyone approaches. 115275126 Rev. 1 9/15/09 English--- 11 SAFETY INSTRUCTIONS Sweeping S The fan effect of 50 feet (15 meters). Stop the engine and trimmer head before you remove material that has wound around the drive shaft as this can result in serious injury. Stones, rubbish, etc. You could get hot... throttle to and fro. S When cutting and sweeping you touch it. can be swept and move the tool to obtain the best results. Hold the trimmer line parallel to and above the area to be used for thrown objects. WARNING: Neither the operator of injury.

Owners Manual
Page 12
Grease filler cap 3. Loop handle 8. Throttle control 9. Choke control 15. Air filter cover 17. Operator's manual (EPA) 115275126 Rev. 1 9/15/09 English--- 12 Lower shaft 7. 12 4 1 KNOW YOUR TRIMMER 3 128LD 19 7 6 5 9 10 11 12 128CD 17 8 16 14 15 13 4 21 1 18 20 Know your trimmer 1. Cutting attachment guard 5. Upper shaft 6. Stop switch 10.Throttle lock--out 11. Shaft coupling 20. 2--stroke engine oil 21. Drive disc 19. Bevel gear 4. Starter handle 13. Primer bulb 16. Cylinder cover 12. Handle adjustment 18. Fuel tank 14. Trimmer head 2.
Grease filler cap 3. Loop handle 8. Throttle control 9. Choke control 15. Air filter cover 17. Operator's manual (EPA) 115275126 Rev. 1 9/15/09 English--- 12 Lower shaft 7. 12 4 1 KNOW YOUR TRIMMER 3 128LD 19 7 6 5 9 10 11 12 128CD 17 8 16 14 15 13 4 21 1 18 20 Know your trimmer 1. Cutting attachment guard 5. Upper shaft 6. Stop switch 10.Throttle lock--out 11. Shaft coupling 20. 2--stroke engine oil 21. Drive disc 19. Bevel gear 4. Starter handle 13. Primer bulb 16. Cylinder cover 12. Handle adjustment 18. Fuel tank 14. Trimmer head 2.
Owners Manual
Page 13
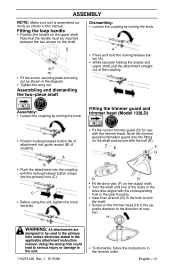
... Tighten the wing nut. Assembling and dismantling the two--piece shaft Assembly: S Loosen the coupling by turning the knob. Hook the trimmer guard/combination guard onto the fitting on the shaft and secure with the corresponding hole in the gear housing. S Screw on the... the two arrows on the output shaft. S Fit the correct trimmer guard (D) for use with the trimmer head. Fitting the loop handle S Position the handle on the trimmer head (H) in the op- Fitting the trimmer guard and trimmer head (Model 128LD) S Position locking/release button (A) of attachment into the primary ...
... Tighten the wing nut. Assembling and dismantling the two--piece shaft Assembly: S Loosen the coupling by turning the knob. Hook the trimmer guard/combination guard onto the fitting on the shaft and secure with the corresponding hole in the gear housing. S Screw on the... the two arrows on the output shaft. S Fit the correct trimmer guard (D) for use with the trimmer head. Fitting the loop handle S Position the handle on the trimmer head (H) in the op- Fitting the trimmer guard and trimmer head (Model 128LD) S Position locking/release button (A) of attachment into the primary ...

Owners Manual
Page 14
The nut must be completely covered by the dust cup. S Hold the dust cup with the wing nut (B). Hook the trimmer guard/combination guard onto the fitting on the shaft. S Screw the trimmer head (D) onto the shaft. D S To dismantle, follow the instructions in the reverse order. 115275126 Rev. 1 9/15/09 English--- 14 B A C S Fit the dust cup (C) on the shaft and secure with a wrench to prevent the shaft from rotating. ASSEMBLY Fitting the trimmer guard and trimmer head (Model 128CD) S Fit the correct trimmer guard (A) for use with the trimmer head.
The nut must be completely covered by the dust cup. S Hold the dust cup with the wing nut (B). Hook the trimmer guard/combination guard onto the fitting on the shaft. S Screw the trimmer head (D) onto the shaft. D S To dismantle, follow the instructions in the reverse order. 115275126 Rev. 1 9/15/09 English--- 14 B A C S Fit the dust cup (C) on the shaft and secure with a wrench to prevent the shaft from rotating. ASSEMBLY Fitting the trimmer guard and trimmer head (Model 128CD) S Fit the correct trimmer guard (A) for use with the trimmer head.

Owners Manual
Page 16
Replace damaged parts. Replace the trimmer head or trimmer guard if they have been exposed to fill the bulb. Choke: Move the blue engine choke lever to the ½ position. Not with a defective guard. ... can damage the machine. 115275126 Rev. 1 9/15/09 English--- 16 Make sure the cutting attachment is properly installed and securely fastened. S Check that the trimmer head and trimmer guard are in place and secure. Starting and stopping Starting Hold the body of serious personal injury. Repeat pulling the cord until fuel begins to...
Replace damaged parts. Replace the trimmer head or trimmer guard if they have been exposed to fill the bulb. Choke: Move the blue engine choke lever to the ½ position. Not with a defective guard. ... can damage the machine. 115275126 Rev. 1 9/15/09 English--- 16 Make sure the cutting attachment is properly installed and securely fastened. S Check that the trimmer head and trimmer guard are in place and secure. Starting and stopping Starting Hold the body of serious personal injury. Repeat pulling the cord until fuel begins to...
Owners Manual
Page 20
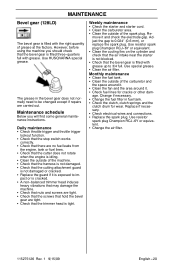
...Re- Use special grease. age. Change if necessary. S Check electrical wires and connections. MAINTENANCE Bevel gear (128LD) The bevel gear is filled with grease. S Check that may damage the machine. S Check that hold the...the air filter. S Change the air filter. 115275126 Rev. 1 9/15/09 English--- 20 S Check that the trimmer head is idling. Monthly maintenance S Clean the fuel tank. S Check that the cutting attachment guard is cracked. S ... around it and check the electrode gap. Use HUSQVARNA special grease. S Check fuel lines for wear. The grease in fuel tank.
...Re- Use special grease. age. Change if necessary. S Check electrical wires and connections. MAINTENANCE Bevel gear (128LD) The bevel gear is filled with grease. S Check that may damage the machine. S Check that hold the...the air filter. S Change the air filter. 115275126 Rev. 1 9/15/09 English--- 20 S Check that the trimmer head is idling. Monthly maintenance S Clean the fuel tank. S Check that the cutting attachment guard is cracked. S ... around it and check the electrode gap. Use HUSQVARNA special grease. S Check fuel lines for wear. The grease in fuel tank.
Owners Manual
Page 21
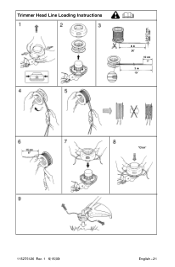
Trimmer Head Line Loading Instructions 6m 20i 3m 10i 115275126 Rev. 1 9/15/09 English--- 21
Trimmer Head Line Loading Instructions 6m 20i 3m 10i 115275126 Rev. 1 9/15/09 English--- 21

Owners Manual
Page 22
... total for noise pressure levels under various working conditions with the specified powerhead have been evaluated to ANSI B175.3--2003, "Grass Trimmers and Brushcutters -- no . Edger attachment with shaft 952 711 607 Cultivator attachment with shaft 952 711 608 Blower attachment with ... Pruner attachment with all the machine's approved cutting equipment fitted. Trimmer head TNG7 537 41 92-14 / 545 03 11-01 Model 128LD (M10 LH arbor shaft thread) Approved accessories Type Cutting attachment / guard, part. Trimmer head T25 537 33 83-06 / 545 03 09-01 Plastic...
... total for noise pressure levels under various working conditions with the specified powerhead have been evaluated to ANSI B175.3--2003, "Grass Trimmers and Brushcutters -- no . Edger attachment with shaft 952 711 607 Cultivator attachment with shaft 952 711 608 Blower attachment with ... Pruner attachment with all the machine's approved cutting equipment fitted. Trimmer head TNG7 537 41 92-14 / 545 03 11-01 Model 128LD (M10 LH arbor shaft thread) Approved accessories Type Cutting attachment / guard, part. Trimmer head T25 537 33 83-06 / 545 03 09-01 Plastic...


