
Operation Manual
Page 1
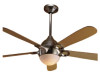
Date Purchased Where Purchased Type 3 Models Owner's Guide and Installation Manual English Español Form# 41467-01 20090930 ©2009 Hunter Fan Co. For Your Records and Warranty Assistance For reference, also attach your receipt or a copy of your receipt to the manual. Model Name Model No.
Date Purchased Where Purchased Type 3 Models Owner's Guide and Installation Manual English Español Form# 41467-01 20090930 ©2009 Hunter Fan Co. For Your Records and Warranty Assistance For reference, also attach your receipt or a copy of your receipt to the manual. Model Name Model No.
Operation Manual
Page 2
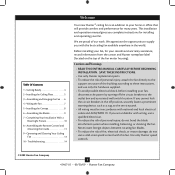
...the circuit breakers to the outlet box and associated wall switch location. Use only Hunter speed controls. © 2009 Hunter Fan Company 2 41467-01 • 09/30/09 • Hunter Fan Company Before installing your fan, for many years. Cautions and Warnings • READ THIS ENTIRE MANUAL CAREFULLY...; Assembling the Remote Control and Mounting the Cradle 11 9 • Operating and Cleaning Your Ceiling Fan 13 10 • Troubleshooting 14 Welcome Your new Hunter® ceiling fan is an addition to your home or office that will provide comfort and performance for your records and...
...the circuit breakers to the outlet box and associated wall switch location. Use only Hunter speed controls. © 2009 Hunter Fan Company 2 41467-01 • 09/30/09 • Hunter Fan Company Before installing your fan, for many years. Cautions and Warnings • READ THIS ENTIRE MANUAL CAREFULLY...; Assembling the Remote Control and Mounting the Cradle 11 9 • Operating and Cleaning Your Ceiling Fan 13 10 • Troubleshooting 14 Welcome Your new Hunter® ceiling fan is an addition to your home or office that will provide comfort and performance for your records and...
Operation Manual
Page 3
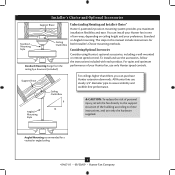
... maximum installation flexibility and ease. Understanding Mounting and Installer's Choice® Hunter's patented 2-position mounting system provides you can install your Hunter fan in this manual include instructions for a vaulted or angled ceiling 3 41467-01 • 09/30/09 • Hunter Fan Company All Hunter fans use sturdy 3/4" diameter pipe to these instructions, and use only the...
... maximum installation flexibility and ease. Understanding Mounting and Installer's Choice® Hunter's patented 2-position mounting system provides you can install your Hunter fan in this manual include instructions for a vaulted or angled ceiling 3 41467-01 • 09/30/09 • Hunter Fan Company All Hunter fans use sturdy 3/4" diameter pipe to these instructions, and use only the...

Operation Manual
Page 4
...; Phillips-head screwdriver (magnetic tip recommended) • Wrench or pliers • Ladder (height dependent upon installation site) Checking Your Fan Parts Carefully unpack your Hunter dealer or call Hunter Technical Support Department at 888-830-1326 (In Canada, call 1-866-268-1936). Proper ceiling... blade irons (if applicable) in sets, as they were shipped. 4 41467-01 • 09/30/09 • Hunter Fan Company If you begin installing the fan, follow all the instructions in ceiling. • Drill holes for safety, reliable operation, maximum efficiency, and energy savings. ...
...; Phillips-head screwdriver (magnetic tip recommended) • Wrench or pliers • Ladder (height dependent upon installation site) Checking Your Fan Parts Carefully unpack your Hunter dealer or call Hunter Technical Support Department at 888-830-1326 (In Canada, call 1-866-268-1936). Proper ceiling... blade irons (if applicable) in sets, as they were shipped. 4 41467-01 • 09/30/09 • Hunter Fan Company If you begin installing the fan, follow all the instructions in ceiling. • Drill holes for safety, reliable operation, maximum efficiency, and energy savings. ...
Operation Manual
Page 5
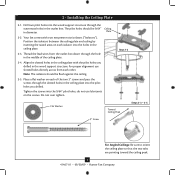
Note: The isolators should be flush against the ceiling. 2-5. Your fan comes with the pilot holes you drilled. 2 • Installing the Ceiling Plate 2-1. Align the slotted holes in the ceiling plate with two neoprene noise isolators ("...: Be sure to orient the ceiling plate so that the two tabs are pointing toward the ceiling peak. 5 41467-01 • 09/30/09 • Hunter Fan Company Tighten the screws into the pilot holes you drilled in the ceiling plate. 2-3.
Note: The isolators should be flush against the ceiling. 2-5. Your fan comes with the pilot holes you drilled. 2 • Installing the Ceiling Plate 2-1. Align the slotted holes in the ceiling plate with two neoprene noise isolators ("...: Be sure to orient the ceiling plate so that the two tabs are pointing toward the ceiling peak. 5 41467-01 • 09/30/09 • Hunter Fan Company Tighten the screws into the pilot holes you drilled in the ceiling plate. 2-3.
Operation Manual
Page 6
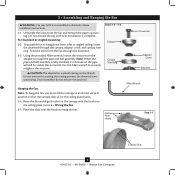
...that the canopy slots sit on the ceiling plate hooks. 3-4. this coating; Steps 3-2 - 3-3 Canopy Canopy Trim Ring Hanging the Fan: Note: To hang the fan, you must tilt the canopy to hang down from unscrewing. Place the slots over the hooks to install the pipe and ball ...assembly. Ceiling Plate Hooks Downrod Adapter Cover Grommet Adapter Cover Setscrew Allen Wrench Step 3-5 6 41467-01 • 09/30/09 • Hunter Fan Company Canopy Slots Note: When the pipe and ball assembly is fully installed, 2-3 threads on the threads. Once assembled, do not remove the downrod...
...that the canopy slots sit on the ceiling plate hooks. 3-4. this coating; Steps 3-2 - 3-3 Canopy Canopy Trim Ring Hanging the Fan: Note: To hang the fan, you must tilt the canopy to hang down from unscrewing. Place the slots over the hooks to install the pipe and ball ...assembly. Ceiling Plate Hooks Downrod Adapter Cover Grommet Adapter Cover Setscrew Allen Wrench Step 3-5 6 41467-01 • 09/30/09 • Hunter Fan Company Canopy Slots Note: When the pipe and ball assembly is fully installed, 2-3 threads on the threads. Once assembled, do not remove the downrod...
Operation Manual
Page 7
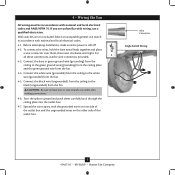
... • Wiring the Fan All wiring must be ...ground wire (grounding) from the ceiling plate and the green ground wire from the fan CAUTION: Be sure no bare wire or wire strands are not included. Connect the... black wire (ungrounded) from the ceiling to the white wire (grounded) from the fan. 4-5. For all these connections use a qualified electrician. Wall switches are visible after making connections...Connect the white wire (grounded) from the ceiling to the black (ungrounded) from the fan. 4-4. Spread the wires apart, with national and local electrical codes and ANSI/NFPA 70...
... • Wiring the Fan All wiring must be ...ground wire (grounding) from the ceiling plate and the green ground wire from the fan CAUTION: Be sure no bare wire or wire strands are not included. Connect the... black wire (ungrounded) from the ceiling to the white wire (grounded) from the fan. 4-5. For all these connections use a qualified electrician. Wall switches are visible after making connections...Connect the white wire (grounded) from the ceiling to the black (ungrounded) from the fan. 4-4. Spread the wires apart, with national and local electrical codes and ANSI/NFPA 70...
Operation Manual
Page 8
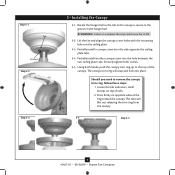
...from the canopy. Step 5-4 Step 5-5 8 41467-01 • 09/30/09 • Hunter Fan Company Press firmly on the ceiling plate. 5-3. Using both screws. 5-5. Should you need to the top of the canopy. Lift the fan and align the canopy screw holes with the mounting holes on opposite sides of tabs.... 2. Locate the tab indicators, small bumps on top of the ring toward the canopy. WARNING: Failure to complete this step could cause fan to fall. 5-2. Securely tighten both hands, push the canopy trim ring up to remove the canopy trim ring, follow these steps: 1. Step 5-1 ...
...from the canopy. Step 5-4 Step 5-5 8 41467-01 • 09/30/09 • Hunter Fan Company Press firmly on the ceiling plate. 5-3. Using both screws. 5-5. Should you need to the top of the canopy. Lift the fan and align the canopy screw holes with the mounting holes on opposite sides of tabs.... 2. Locate the tab indicators, small bumps on top of the ring toward the canopy. WARNING: Failure to complete this step could cause fan to fall. 5-2. Securely tighten both hands, push the canopy trim ring up to remove the canopy trim ring, follow these steps: 1. Step 5-1 ...
Operation Manual
Page 9
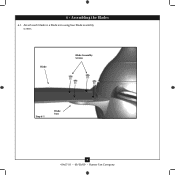
Blade Blade Assembly Screws Step 6-1 Blade Iron 9 41467-01 • 09/30/09 • Hunter Fan Company Attach each blade to a blade iron using four blade assembly screws. 6 • Assembling the Blades 6-1.
Blade Blade Assembly Screws Step 6-1 Blade Iron 9 41467-01 • 09/30/09 • Hunter Fan Company Attach each blade to a blade iron using four blade assembly screws. 6 • Assembling the Blades 6-1.
Operation Manual
Page 10
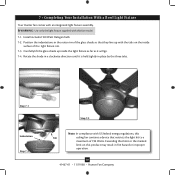
...the light fixture rim. 7-3. Install included 100 Watt Halogen bulb. 7-2. Carefully lift the glass shade up with US federal energy regulations, this fan model. 7-1. Position the indentations in place by the three tabs. Step 7-1 Indentation Step 7-2 Step 7-3 Note: In compliance with the ...fire hazard or improper operation. 10 41467-01 • 11/19/08 • Hunter Fan Company 7 • Completing Your Installation With a Bowl Light Fixture Your Hunter fan comes with this Tab ceiling fan contains a device that they line up inside surface of 190 Watts. WARNING: Use only...
...the light fixture rim. 7-3. Install included 100 Watt Halogen bulb. 7-2. Carefully lift the glass shade up with US federal energy regulations, this fan model. 7-1. Position the indentations in place by the three tabs. Step 7-1 Indentation Step 7-2 Step 7-3 Note: In compliance with the ...fire hazard or improper operation. 10 41467-01 • 11/19/08 • Hunter Fan Company 7 • Completing Your Installation With a Bowl Light Fixture Your Hunter fan comes with this Tab ceiling fan contains a device that they line up inside surface of 190 Watts. WARNING: Use only...
Operation Manual
Page 11
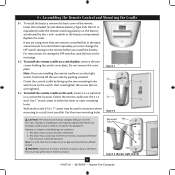
... holes with this equipment. To install the battery, remove the back cover of the FCC rules. Replace the cover. Orient the control cradle by Hunter Fan Company could void your authority to a stud is 100 Watts; Do not remove the cover plate. Removed Tabs Step 8-2 (Rocker Light Switch)... 11 41467-01 • 09/30/09 • Hunter Fan Company Use 1" wood screws in the same area and want to the following two conditions: 1. WARNING: Maximum fan load is not possible. Insert the included 12-volt alkaline battery (Type 23A, MN-21 or...
... holes with this equipment. To install the battery, remove the back cover of the FCC rules. Replace the cover. Orient the control cradle by Hunter Fan Company could void your authority to a stud is 100 Watts; Do not remove the cover plate. Removed Tabs Step 8-2 (Rocker Light Switch)... 11 41467-01 • 09/30/09 • Hunter Fan Company Use 1" wood screws in the same area and want to the following two conditions: 1. WARNING: Maximum fan load is not possible. Insert the included 12-volt alkaline battery (Type 23A, MN-21 or...
Operation Manual
Page 12
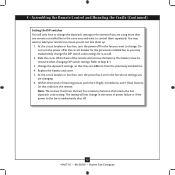
...not change the DIP switch code settings for the previously installed fan, as you want to ensure you are changing. 6. Slide the cover off . 12 41467-01 • 09/30/09 • Hunter Fan Company Do not turn the power off for the fan whose settings you do not mix them separately. Note: ...The receiver (built into the fan) has a memory function that order) on the remote. The setting will only have to...
...not change the DIP switch code settings for the previously installed fan, as you want to ensure you are changing. 6. Slide the cover off . 12 41467-01 • 09/30/09 • Hunter Fan Company Do not turn the power off for the fan whose settings you do not mix them separately. Note: ...The receiver (built into the fan) has a memory function that order) on the remote. The setting will only have to...
Operation Manual
Page 13
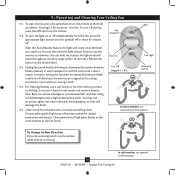
... for high, 2 for medium, 1 for low. In winter, having the fan draw air upward (clockwise blade rotation) will come on at the ceiling around the room without causing a draft. 9-4. Light Fan Medium Fan Low Fan Off Steps 9-1 - 9-2 Fan High Reversing Switch In warm weather, use downward air flow pattern To Change Airflow... gradual off or twice for added protection and beauty. To turn the light on the remote while the fan is running. 13 41467-01 • 09/30/09 • Hunter Fan Company In cold weather, use an artistic agent, but never abrasive cleaning agents, as they will move ...
... for high, 2 for medium, 1 for low. In winter, having the fan draw air upward (clockwise blade rotation) will come on at the ceiling around the room without causing a draft. 9-4. Light Fan Medium Fan Low Fan Off Steps 9-1 - 9-2 Fan High Reversing Switch In warm weather, use downward air flow pattern To Change Airflow... gradual off or twice for added protection and beauty. To turn the light on the remote while the fan is running. 13 41467-01 • 09/30/09 • Hunter Fan Company In cold weather, use an artistic agent, but never abrasive cleaning agents, as they will move ...
Operation Manual
Page 14
..., Tennessee 38016 14 41467-01 • 09/30/09 • Hunter Fan Company If your fan wobbles when operating, use the enclosed balancing kit and instructions to the fan. Check to the fan off , support fan very carefully, and check that the hanger ball is cracked. fan does not move. 1. Turn the power to make sure wattage...
..., Tennessee 38016 14 41467-01 • 09/30/09 • Hunter Fan Company If your fan wobbles when operating, use the enclosed balancing kit and instructions to the fan. Check to the fan off , support fan very carefully, and check that the hanger ball is cracked. fan does not move. 1. Turn the power to make sure wattage...


