
Operation Manual
Page 1
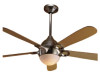
Date Purchased Where Purchased Type 3 Models Owner's Guide and Installation Manual English Español Form# 41467-01 20090930 ©2009 Hunter Fan Co. For Your Records and Warranty Assistance For reference, also attach your receipt or a copy of your receipt to the manual. Model Name Model No.
Date Purchased Where Purchased Type 3 Models Owner's Guide and Installation Manual English Español Form# 41467-01 20090930 ©2009 Hunter Fan Co. For Your Records and Warranty Assistance For reference, also attach your receipt or a copy of your receipt to the manual. Model Name Model No.
Operation Manual
Page 2
... Hanging the Fan . . . . 6 4 • Wiring the Fan 7 5 • Installing the Canopy 8 6 • Assembling the Blades 9 7 • Completing Your Installation With a Bowl Light Fixture 10 8 • Assembling the Remote Control and Mounting the Cradle 11 9 • Operating and Cleaning Your Ceiling Fan 13 10 • Troubleshooting 14 Welcome Your new Hunter® ceiling fan is an addition to the service panel. • All wiring must be in the world. Before installing your fan, for many years. SAVE THESE INSTRUCTIONS. • Use only Hunter replacement parts...
... Hanging the Fan . . . . 6 4 • Wiring the Fan 7 5 • Installing the Canopy 8 6 • Assembling the Blades 9 7 • Completing Your Installation With a Bowl Light Fixture 10 8 • Assembling the Remote Control and Mounting the Cradle 11 9 • Operating and Cleaning Your Ceiling Fan 13 10 • Troubleshooting 14 Welcome Your new Hunter® ceiling fan is an addition to the service panel. • All wiring must be in the world. Before installing your fan, for many years. SAVE THESE INSTRUCTIONS. • Use only Hunter replacement parts...
Operation Manual
Page 3
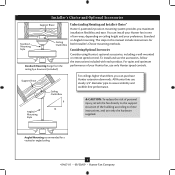
... included with each product. Installer's Choice and Optional Accessories Support Brace Standard Mounting Style Ceiling Outlet Box Standard Mounting hangs from the ceiling by a downrod (included). Understanding Mounting and Installer's Choice® Hunter's patented 2-position mounting system provides you can install your Hunter fan in this manual include instructions for a vaulted or angled ceiling 3 41467-01 • 09/30/09 • Hunter Fan Company Considering Optional Accessories Consider using Hunter's optional accessories, including a wall-mounted or remote speed control.
... included with each product. Installer's Choice and Optional Accessories Support Brace Standard Mounting Style Ceiling Outlet Box Standard Mounting hangs from the ceiling by a downrod (included). Understanding Mounting and Installer's Choice® Hunter's patented 2-position mounting system provides you can install your Hunter fan in this manual include instructions for a vaulted or angled ceiling 3 41467-01 • 09/30/09 • Hunter Fan Company Considering Optional Accessories Consider using Hunter's optional accessories, including a wall-mounted or remote speed control.

Operation Manual
Page 4
.../09 • Hunter Fan Company Refer to the motor or fan blades. If any shipping damage to the included Parts Guide. Gathering the Tools You will need help installing the fan, your Hunter dealer or call Hunter Technical Support Department at 888-830-1326 (In Canada, call 1-866-268-1936). If you begin installing the fan, follow all the instructions in ceiling. • Drill holes for safety, reliable operation, maximum efficiency, and...
.../09 • Hunter Fan Company Refer to the motor or fan blades. If any shipping damage to the included Parts Guide. Gathering the Tools You will need help installing the fan, your Hunter dealer or call Hunter Technical Support Department at 888-830-1326 (In Canada, call 1-866-268-1936). If you begin installing the fan, follow all the instructions in ceiling. • Drill holes for safety, reliable operation, maximum efficiency, and...
Operation Manual
Page 5
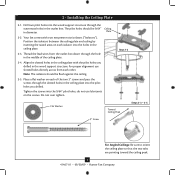
... • 09/30/09 • Hunter Fan Company Thread the lead wires from each isolator into the pilot holes you drilled in the ceiling plate with two neoprene noise isolators ("Isolators"). Align the slotted holes in the wood support structure. Drill two pilot holes into the 9/64" pilot holes; Do not over tighten. 2 • Installing the Ceiling Plate 2-1. Position the isolators between the ceiling plate and ceiling by inserting the raised areas...
... • 09/30/09 • Hunter Fan Company Thread the lead wires from each isolator into the pilot holes you drilled in the ceiling plate with two neoprene noise isolators ("Isolators"). Align the slotted holes in the wood support structure. Drill two pilot holes into the 9/64" pilot holes; Do not over tighten. 2 • Installing the Ceiling Plate 2-1. Position the isolators between the ceiling plate and ceiling by inserting the raised areas...
Operation Manual
Page 6
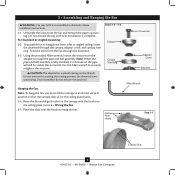
... not remove the downrod. Steps 3-2 - 3-3 Canopy Canopy Trim Ring Hanging the Fan: Note: To hang the fan, you must tilt the canopy to hang down from the fan through the canopy, adapter cover, and canopy trim ring. Ceiling Plate Hooks Downrod Adapter Cover Grommet Adapter Cover Setscrew Allen Wrench Step 3-5 6 41467-01 • 09/30/09 • Hunter Fan Company Canopy Slots Feed the wires from a flat or angled ceiling, insert the downrod through the downrod. 3-3. Raise the fan and align the slots in these installation instructions. 3-1. To assemble fan...
... not remove the downrod. Steps 3-2 - 3-3 Canopy Canopy Trim Ring Hanging the Fan: Note: To hang the fan, you must tilt the canopy to hang down from the fan through the canopy, adapter cover, and canopy trim ring. Ceiling Plate Hooks Downrod Adapter Cover Grommet Adapter Cover Setscrew Allen Wrench Step 3-5 6 41467-01 • 09/30/09 • Hunter Fan Company Canopy Slots Feed the wires from a flat or angled ceiling, insert the downrod through the downrod. 3-3. Raise the fan and align the slots in these installation instructions. 3-1. To assemble fan...
Operation Manual
Page 7
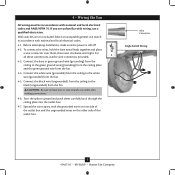
Before attempting installation, make sure the power is still off. 4-2. Select an acceptable general-use switch in accordance with national and local electrical codes and ANSI/NFPA 70. Connect the black wire (ungrounded) from the ceiling to the black (ungrounded) from the fan CAUTION: Be sure no bare wire or wire strands are not included. Spread the wires apart, with wiring, use the wire connectors provided. 4-3. If you are unfamiliar...
Before attempting installation, make sure the power is still off. 4-2. Select an acceptable general-use switch in accordance with national and local electrical codes and ANSI/NFPA 70. Connect the black wire (ungrounded) from the ceiling to the black (ungrounded) from the fan CAUTION: Be sure no bare wire or wire strands are not included. Spread the wires apart, with wiring, use the wire connectors provided. 4-3. If you are unfamiliar...
Operation Manual
Page 8
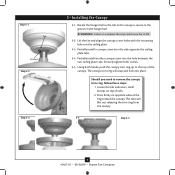
... fan and align the canopy screw holes with the mounting holes on top of the ring toward the canopy. Partially install a canopy screw into place. The canopy trim ring will flex out releasing the trim ring from the canopy. Partially install another canopy screw into the hole between the two ceiling plate tabs. Step 5-4 Step 5-5 8 41467-01 • 09/30/09 • Hunter Fan Company The tabs will snap and lock into the side opposite the ceiling plate...
... fan and align the canopy screw holes with the mounting holes on top of the ring toward the canopy. Partially install a canopy screw into place. The canopy trim ring will flex out releasing the trim ring from the canopy. Partially install another canopy screw into the hole between the two ceiling plate tabs. Step 5-4 Step 5-5 8 41467-01 • 09/30/09 • Hunter Fan Company The tabs will snap and lock into the side opposite the ceiling plate...
Operation Manual
Page 9
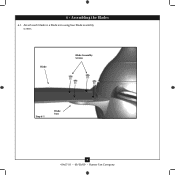
6 • Assembling the Blades 6-1. Blade Blade Assembly Screws Step 6-1 Blade Iron 9 41467-01 • 09/30/09 • Hunter Fan Company Attach each blade to a blade iron using four blade assembly screws.
6 • Assembling the Blades 6-1. Blade Blade Assembly Screws Step 6-1 Blade Iron 9 41467-01 • 09/30/09 • Hunter Fan Company Attach each blade to a blade iron using four blade assembly screws.
Operation Manual
Page 10
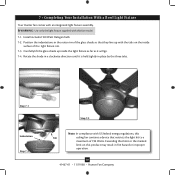
... of the light fixture rim. 7-3. Exceeding that limit or the marked limit on the inside the light fixture as far as it is held tightly in place by the three tabs. Carefully lift the glass shade up with an integrated light fixture assembly. Install included 100 Watt Halogen bulb. 7-2. Rotate the shade in a clockwise direction until it will go. 7-4. 7 • Completing Your Installation With a Bowl Light Fixture Your Hunter fan comes...
... of the light fixture rim. 7-3. Exceeding that limit or the marked limit on the inside the light fixture as far as it is held tightly in place by the three tabs. Carefully lift the glass shade up with an integrated light fixture assembly. Install included 100 Watt Halogen bulb. 7-2. Rotate the shade in a clockwise direction until it will go. 7-4. 7 • Completing Your Installation With a Bowl Light Fixture Your Hunter fan comes...
Operation Manual
Page 11
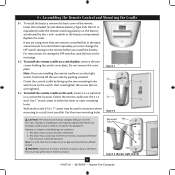
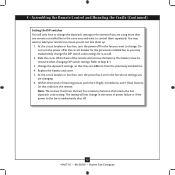
... instructions on setting the DIP switches, read the box on a switch plate, remove the two screws holding the switch cover plate. maximum lamp is 100 Watts; To install the battery, remove the back cover of the FCC rules. If you are using more than one remote controlled fan in a convenient location. Use the inner mounting holes. Do not use any interference received, including interference that incorporates an air gap switch (normal on a rocker light switch, first break off wall switch). Do not remove...
... instructions on setting the DIP switches, read the box on a switch plate, remove the two screws holding the switch cover plate. maximum lamp is 100 Watts; To install the battery, remove the back cover of the FCC rules. If you are using more than one remote controlled fan in a convenient location. Use the inner mounting holes. Do not use any interference received, including interference that incorporates an air gap switch (normal on a rocker light switch, first break off wall switch). Do not remove...
Operation Manual
Page 12
The battery must be removed when changing DIP switch settings. Replace the battery and cover. 5. The setting will only have to change the dipswitch settings in the remote if you are using more than one remote controlled fan in the same area and want to control them up. 1. 8 • Assembling the Remote Control and Mounting the Cradle (Continued) Setting the DIP switches You will not change in the event of power failure or if the power to the fan is...
The battery must be removed when changing DIP switch settings. Replace the battery and cover. 5. The setting will only have to change the dipswitch settings in the remote if you are using more than one remote controlled fan in the same area and want to control them up. 1. 8 • Assembling the Remote Control and Mounting the Cradle (Continued) Setting the DIP switches You will not change in the event of power failure or if the power to the fan is...
Operation Manual
Page 13
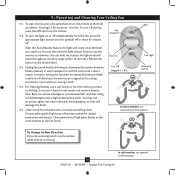
.../30/09 • Hunter Fan Company In cold weather, use downward air flow pattern To Change Airflow Direction Press the reversing switch on the remote at the level you hold the light button down to use a soft brush or lint-free cloth to cool the room with a furniture polishing cloth. Clean wood finish blades with a direct breeze. Light Fan Medium Fan Low Fan Off Steps 9-1 - 9-2 Fan High Reversing Switch In warm weather, use upward air flow pattern With...
.../30/09 • Hunter Fan Company In cold weather, use downward air flow pattern To Change Airflow Direction Press the reversing switch on the remote at the level you hold the light button down to use a soft brush or lint-free cloth to cool the room with a furniture polishing cloth. Clean wood finish blades with a direct breeze. Light Fan Medium Fan Low Fan Off Steps 9-1 - 9-2 Fan High Reversing Switch In warm weather, use upward air flow pattern With...
Operation Manual
Page 14
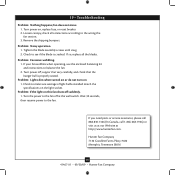
... sure wattage of light bulbs installed match the specifications on , replace fuse, or reset breaker. 2. If you need parts or service assistance, please call 888‑830‑1326 (In Canada, call 1-866-268-1936) or visit us at our Web site at the wall switch. fan does not move. 1. Turn power on the light socket. Problem: Noisy operation. 1. If your fan wobbles when operating, use the enclosed balancing kit and instructions...
... sure wattage of light bulbs installed match the specifications on , replace fuse, or reset breaker. 2. If you need parts or service assistance, please call 888‑830‑1326 (In Canada, call 1-866-268-1936) or visit us at our Web site at the wall switch. fan does not move. 1. Turn power on the light socket. Problem: Noisy operation. 1. If your fan wobbles when operating, use the enclosed balancing kit and instructions...


