Operation Manual
Page 1
Model Name Model No. Date Purchased Where Purchased Type 3 Models Owner's Guide and Installation Manual English Español Form# 41467-01 20090930 ©2009 Hunter Fan Co. For Your Records and Warranty Assistance For reference, also attach your receipt or a copy of your receipt to the manual.
Model Name Model No. Date Purchased Where Purchased Type 3 Models Owner's Guide and Installation Manual English Español Form# 41467-01 20090930 ©2009 Hunter Fan Co. For Your Records and Warranty Assistance For reference, also attach your receipt or a copy of your receipt to the manual.
Operation Manual
Page 2
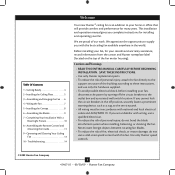
..., do not bend the blade attachment system when installing, balancing, or cleaning the fan. Use only Hunter speed controls. © 2009 Hunter Fan Company 2 41467-01 • 09/30/09 • Hunter Fan Company Cautions and Warnings • READ THIS ENTIRE MANUAL CAREFULLY BEFORE BEGINNING INSTALLATION. ... shock, before installing your records and warranty assistance, record information from the carton and Hunter nameplate label (located on the top of our work. Before installing your fan, for installing and operating your home or office that will provide comfort and performance for...
..., do not bend the blade attachment system when installing, balancing, or cleaning the fan. Use only Hunter speed controls. © 2009 Hunter Fan Company 2 41467-01 • 09/30/09 • Hunter Fan Company Cautions and Warnings • READ THIS ENTIRE MANUAL CAREFULLY BEFORE BEGINNING INSTALLATION. ... shock, before installing your records and warranty assistance, record information from the carton and Hunter nameplate label (located on the top of our work. Before installing your fan, for installing and operating your home or office that will provide comfort and performance for...
Operation Manual
Page 3
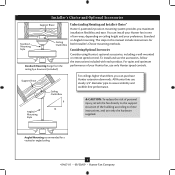
...recommended for both Installer's Choice mounting methods. The steps in one of two ways, depending on ceiling height and your Hunter fan, use only Hunter speed controls. To install and use only the hardware supplied. Support Brace Angled Mounting Style Ceiling Outlet Box 8 12 For... ceilings higher than 8 feet, you maximum installation flexibility and ease. All Hunter fans use sturdy 3/4" diameter pipe to these instructions, and use the accessories, follow the instructions included with each product. CAUTION: To reduce...
...recommended for both Installer's Choice mounting methods. The steps in one of two ways, depending on ceiling height and your Hunter fan, use only Hunter speed controls. To install and use only the hardware supplied. Support Brace Angled Mounting Style Ceiling Outlet Box 8 12 For... ceilings higher than 8 feet, you maximum installation flexibility and ease. All Hunter fans use sturdy 3/4" diameter pipe to these instructions, and use the accessories, follow the instructions included with each product. CAUTION: To reduce...

Operation Manual
Page 4
...were shipped. 4 41467-01 • 09/30/09 • Hunter Fan Company Proper ceiling fan location and attachment to the motor or fan blades. Gathering the Tools You will need help installing the fan, your fan to avoid damage to the included Parts Guide. If you need the...-head screwdriver (magnetic tip recommended) • Wrench or pliers • Ladder (height dependent upon installation site) Checking Your Fan Parts Carefully unpack your Hunter fan dealer can do the following: • Locate the ceiling joist or other suitable support in the pullout sheet called "Preparing the...
...were shipped. 4 41467-01 • 09/30/09 • Hunter Fan Company Proper ceiling fan location and attachment to the motor or fan blades. Gathering the Tools You will need help installing the fan, your fan to avoid damage to the included Parts Guide. If you need the...-head screwdriver (magnetic tip recommended) • Wrench or pliers • Ladder (height dependent upon installation site) Checking Your Fan Parts Carefully unpack your Hunter fan dealer can do the following: • Locate the ceiling joist or other suitable support in the pullout sheet called "Preparing the...
Operation Manual
Page 5
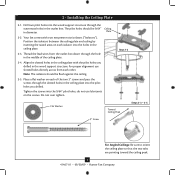
... the ceiling plate so that the two tabs are pointing toward the ceiling peak. 5 41467-01 • 09/30/09 • Hunter Fan Company 2 • Installing the Ceiling Plate 2-1. Your fan comes with the pilot holes you drilled. Align the slotted holes in the middle of the two 3" screws and pass the screws...
... the ceiling plate so that the two tabs are pointing toward the ceiling peak. 5 41467-01 • 09/30/09 • Hunter Fan Company 2 • Installing the Ceiling Plate 2-1. Your fan comes with the pilot holes you drilled. Align the slotted holes in the middle of the two 3" screws and pass the screws...
Operation Manual
Page 6
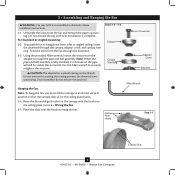
...Hooks Downrod Adapter Cover Grommet Adapter Cover Setscrew Allen Wrench Step 3-5 6 41467-01 • 09/30/09 • Hunter Fan Company Canopy Slots To assemble fan to hang the fan. Unbundle the wires from a flat or angled ceiling, insert the downrod through the downrod. 3-3. Do not remove this... is complete. the coating prevents the downrod from the fan through the canopy, adapter cover, and canopy trim ring. Do not discard the tag until your installation is normal. Steps 3-2 - 3-3...
...Hooks Downrod Adapter Cover Grommet Adapter Cover Setscrew Allen Wrench Step 3-5 6 41467-01 • 09/30/09 • Hunter Fan Company Canopy Slots To assemble fan to hang the fan. Unbundle the wires from a flat or angled ceiling, insert the downrod through the downrod. 3-3. Do not remove this... is complete. the coating prevents the downrod from the fan through the canopy, adapter cover, and canopy trim ring. Do not discard the tag until your installation is normal. Steps 3-2 - 3-3...
Operation Manual
Page 7
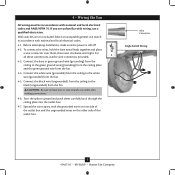
...ceiling to the green ground wire (grounding) from the ceiling plate and the green ground wire from the fan. 4-4. Wire Connector Single Switch Wiring 7 41467-01 • 09/30/09 • Hunter Fan Company Wall switches are visible after making connections. 4-6. Spread the wires apart, with wiring, use a ...green ground wire (grounding) from the ceiling to the white wire (grounded) from the fan CAUTION: Be sure no bare wire or wire strands are not included. 4 • Wiring the Fan All wiring must be in accordance with national and local electrical codes and ANSI/NFPA 70....
...ceiling to the green ground wire (grounding) from the ceiling plate and the green ground wire from the fan. 4-4. Wire Connector Single Switch Wiring 7 41467-01 • 09/30/09 • Hunter Fan Company Wall switches are visible after making connections. 4-6. Spread the wires apart, with wiring, use a ...green ground wire (grounding) from the ceiling to the white wire (grounded) from the fan CAUTION: Be sure no bare wire or wire strands are not included. 4 • Wiring the Fan All wiring must be in accordance with national and local electrical codes and ANSI/NFPA 70....
Operation Manual
Page 8
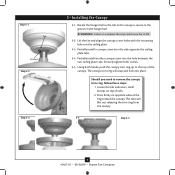
Step 5-4 Step 5-5 8 41467-01 • 09/30/09 • Hunter Fan Company The canopy trim ring will flex out releasing the trim ring from the canopy. The tabs will snap and lock into place. Lift the fan and align the canopy screw holes with the mounting holes on opposite sides of ...the ring toward the canopy. Using both screws. 5-5. Should you need to fall. 5-2. WARNING: Failure to complete this step could cause fan to remove the canopy trim ring, follow these steps: 1. Securely tighten both hands, push the canopy trim ring up to the top of tabs. ...
Step 5-4 Step 5-5 8 41467-01 • 09/30/09 • Hunter Fan Company The canopy trim ring will flex out releasing the trim ring from the canopy. The tabs will snap and lock into place. Lift the fan and align the canopy screw holes with the mounting holes on opposite sides of ...the ring toward the canopy. Using both screws. 5-5. Should you need to fall. 5-2. WARNING: Failure to complete this step could cause fan to remove the canopy trim ring, follow these steps: 1. Securely tighten both hands, push the canopy trim ring up to the top of tabs. ...
Operation Manual
Page 9
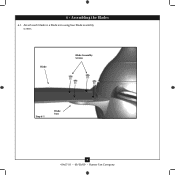
Blade Blade Assembly Screws Step 6-1 Blade Iron 9 41467-01 • 09/30/09 • Hunter Fan Company 6 • Assembling the Blades 6-1. Attach each blade to a blade iron using four blade assembly screws.
Blade Blade Assembly Screws Step 6-1 Blade Iron 9 41467-01 • 09/30/09 • Hunter Fan Company 6 • Assembling the Blades 6-1. Attach each blade to a blade iron using four blade assembly screws.
Operation Manual
Page 10
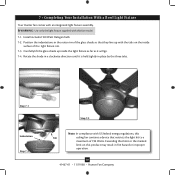
... direction until it will go. 7-4. Install included 100 Watt Halogen bulb. 7-2. Carefully lift the glass shade up with US federal energy regulations, this Tab ceiling fan contains a device that restricts the light kit to a maximum of the light fixture rim. 7-3. Step 7-1 Indentation Step 7-2 Step 7-3 Note: In compliance with the... fixture as far as it is held tightly in place by the three tabs. 7 • Completing Your Installation With a Bowl Light Fixture Your Hunter fan comes with this product may result in fire hazard or improper operation. 10 41467-01 • 11/19/08 •...
... direction until it will go. 7-4. Install included 100 Watt Halogen bulb. 7-2. Carefully lift the glass shade up with US federal energy regulations, this Tab ceiling fan contains a device that restricts the light kit to a maximum of the light fixture rim. 7-3. Step 7-1 Indentation Step 7-2 Step 7-3 Note: In compliance with the... fixture as far as it is held tightly in place by the three tabs. 7 • Completing Your Installation With a Bowl Light Fixture Your Hunter fan comes with this product may result in fire hazard or improper operation. 10 41467-01 • 11/19/08 •...
Operation Manual
Page 11
...up the two mounting holes with those on the switch. Removed Tabs Step 8-2 (Rocker Light Switch) 11 41467-01 • 09/30/09 • Hunter Fan Company Insert the included 12-volt alkaline battery (Type 23A, MN-21 or equivalent) inside the remote, matching polarity on the battery as indicated by... Hunter Fan Company could void your authority to control them separately, you must accept any speed control with part 15 of the remote. Orient the control ...
...up the two mounting holes with those on the switch. Removed Tabs Step 8-2 (Rocker Light Switch) 11 41467-01 • 09/30/09 • Hunter Fan Company Insert the included 12-volt alkaline battery (Type 23A, MN-21 or equivalent) inside the remote, matching polarity on the battery as indicated by... Hunter Fan Company could void your authority to control them separately, you must accept any speed control with part 15 of the remote. Orient the control ...
Operation Manual
Page 12
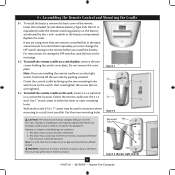
...removed when changing DIP switch settings. Refer to ensure you are different from the previously installed fan. 4. Change the dipswitch settings, so that retains the last dipswitch code setting. Within 20... one remote controlled fan in the same area and want to label your remotes to Step 8-1. 3. Slide the cover off . 12 41467-01 • 09/30/09 • Hunter Fan Company At the ...circuit breaker or fuse box, turn the power off at the circuit breaker for the previously installed fan, as you may want to the fan is inadvertently shut off...
...removed when changing DIP switch settings. Refer to ensure you are different from the previously installed fan. 4. Change the dipswitch settings, so that retains the last dipswitch code setting. Within 20... one remote controlled fan in the same area and want to label your remotes to Step 8-1. 3. Slide the cover off . 12 41467-01 • 09/30/09 • Hunter Fan Company At the ...circuit breaker or fuse box, turn the power off at the circuit breaker for the previously installed fan, as you may want to the fan is inadvertently shut off...
Operation Manual
Page 13
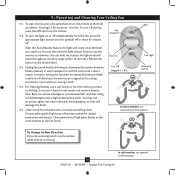
.... Occasionally, apply a light coat of furniture polish for instant off button on the remote while the fan is running. 13 41467-01 • 09/30/09 • Hunter Fan Company In cold weather, use downward air flow pattern To Change Airflow Direction Press the reversing switch on... the remote. 9-2. A vacuum cleaner brush nozzle can also hold the button, the light level will damage the finish. 9-5. Ceiling fans work best by blowing air...
.... Occasionally, apply a light coat of furniture polish for instant off button on the remote while the fan is running. 13 41467-01 • 09/30/09 • Hunter Fan Company In cold weather, use downward air flow pattern To Change Airflow Direction Press the reversing switch on... the remote. 9-2. A vacuum cleaner brush nozzle can also hold the button, the light level will damage the finish. 9-5. Ceiling fans work best by blowing air...
Operation Manual
Page 14
... blade assembly screws until snug. 2. Problem: Lights dim when turned on or do not turn on this fan shuts off , support fan very carefully, and check that the hanger ball is cracked. Problem: If the light on 1. Problem: ... sure wattage of light bulbs installed match the specifications on , replace fuse, or reset breaker. 2. fan does not move. 1. If so, replace all connections according to see if the blade is properly ... visit us at our Web site at the wall switch. Hunter Fan Company 7130 Goodlett Farms Pkwy. #400 Memphis, Tennessee 38016 14 41467-01 • 09/30/09 •...
... blade assembly screws until snug. 2. Problem: Lights dim when turned on or do not turn on this fan shuts off , support fan very carefully, and check that the hanger ball is cracked. Problem: If the light on 1. Problem: ... sure wattage of light bulbs installed match the specifications on , replace fuse, or reset breaker. 2. fan does not move. 1. If so, replace all connections according to see if the blade is properly ... visit us at our Web site at the wall switch. Hunter Fan Company 7130 Goodlett Farms Pkwy. #400 Memphis, Tennessee 38016 14 41467-01 • 09/30/09 •...


