
Installation Guide
Page 1
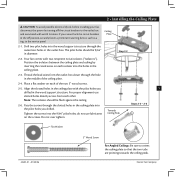
... 8 feet high. • e fan blades have now successfully prepared your fan manual and begin with 2 • Installing the Ceiling Plate. o e bottom of the outlet box is a ceiling joist directly above the floor and the ceiling is positioned to allow you want to use a qualified electrician. 41681-01 • 02/20/04 Fan Support System Fan Support System Suitable Existing Fan Site Wiring Outlet Box Hunter Fan Company Step 2 Cut the Ceiling Hole 2-1. Attach a 2" x 4" support brace...
... 8 feet high. • e fan blades have now successfully prepared your fan manual and begin with 2 • Installing the Ceiling Plate. o e bottom of the outlet box is a ceiling joist directly above the floor and the ceiling is positioned to allow you want to use a qualified electrician. 41681-01 • 02/20/04 Fan Support System Fan Support System Suitable Existing Fan Site Wiring Outlet Box Hunter Fan Company Step 2 Cut the Ceiling Hole 2-1. Attach a 2" x 4" support brace...

Owner's Manual
Page 1
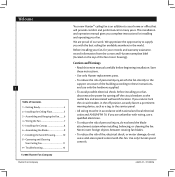
For Your Records and Warranty Assistance Model Name Catalog/Model No Serial No Date Purchased Where Purchased For reference also attach your receipt or a copy of your receipt to the manual. 42405-01 • 01/20/06
For Your Records and Warranty Assistance Model Name Catalog/Model No Serial No Date Purchased Where Purchased For reference also attach your receipt or a copy of your receipt to the manual. 42405-01 • 01/20/06
Owner's Manual
Page 2
... top of Contents 1 • Getting Ready 4 2 • Installing the Ceiling Plate 5 3 • Assembling and Hanging the Fan..........6 4 • Wiring the Fan 7 5 • Installing the Canopy 8 6 • Assembling the Blades 9 7 • Installing the Switch Housing 10 8 • Operating and Cleaning Your Ceiling Fan 11 9 • Troubleshooting 12 © 2006 Hunter Fan Company Hunter Fan Company Your new Hunter® ceiling fan is installation and operation manual gives you complete instructions for installing and operating your home or office that will provide comfort and...
... top of Contents 1 • Getting Ready 4 2 • Installing the Ceiling Plate 5 3 • Assembling and Hanging the Fan..........6 4 • Wiring the Fan 7 5 • Installing the Canopy 8 6 • Assembling the Blades 9 7 • Installing the Switch Housing 10 8 • Operating and Cleaning Your Ceiling Fan 11 9 • Troubleshooting 12 © 2006 Hunter Fan Company Hunter Fan Company Your new Hunter® ceiling fan is installation and operation manual gives you complete instructions for installing and operating your home or office that will provide comfort and...
Owner's Manual
Page 3
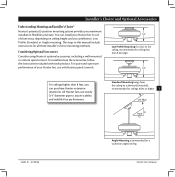
... use sturdy 3/4" diameter pipe to the ceiling, recommended for ceilings less than 8 feet high For ceilings higher than 8 feet, you maximum installation flexibility and ease. You can purchase Hunter extension downrods. Standard Mounting hangs from the ceiling by a downrod (included), recommended for ceilings 8 feet or higher 3 42405-01 • 01/20/06 Angle Mounting recommended for all three Installer's Choice mounting methods. Considering Optional Accessories Consider using Hunter's optional accessories, including a wall-mounted or remote speed control. Low Profile Mounting fits...
... use sturdy 3/4" diameter pipe to the ceiling, recommended for ceilings less than 8 feet high For ceilings higher than 8 feet, you maximum installation flexibility and ease. You can purchase Hunter extension downrods. Standard Mounting hangs from the ceiling by a downrod (included), recommended for ceilings 8 feet or higher 3 42405-01 • 01/20/06 Angle Mounting recommended for all three Installer's Choice mounting methods. Considering Optional Accessories Consider using Hunter's optional accessories, including a wall-mounted or remote speed control. Low Profile Mounting fits...
Owner's Manual
Page 4
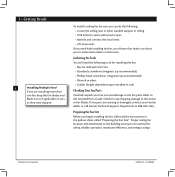
... the motor or fan blades. Refer to the fan parts. Preparing the Fan Site Before you are essential for safety, reliable operation, maximum efficiency, and energy savings. If you begin installing the fan, follow all the instructions in the pullout sheet called "Preparing the Fan Site." To install a ceiling fan, be sure you can direct you need the following : • Locate the ceiling joist or other suitable support in sets...
... the motor or fan blades. Refer to the fan parts. Preparing the Fan Site Before you are essential for safety, reliable operation, maximum efficiency, and energy savings. If you begin installing the fan, follow all the instructions in the pullout sheet called "Preparing the Fan Site." To install a ceiling fan, be sure you can direct you need the following : • Locate the ceiling joist or other suitable support in sets...
Owner's Manual
Page 5
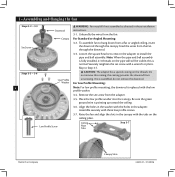
... towards the ceiling peak. 2 • Installing the Ceiling Plate CAUTION: To avoid possible electrical shock, before installing your fan, disconnect the power by inserting the raised areas on each isolator into the wood support structure through the outermost holes in the outlet box. e pilot holes should be 9/64" in the wood support structure. Ceiling Plate 2-1. Step 2-2 2-2. Place a flat washer on the screws. do not use slotted holes directly across from...
... towards the ceiling peak. 2 • Installing the Ceiling Plate CAUTION: To avoid possible electrical shock, before installing your fan, disconnect the power by inserting the raised areas on each isolator into the wood support structure through the outermost holes in the outlet box. e pilot holes should be 9/64" in the wood support structure. Ceiling Plate 2-1. Step 2-2 2-2. Place a flat washer on the screws. do not use slotted holes directly across from...
Owner's Manual
Page 6
... or Angled Mounting: Set Screw 3-2. Feed the wires from the fan through the canopy. this coating; For Low Profile Mounting: 6 Note: For low profile mounting, the downrod is normal. Remove the set screw from the fan. Low Profile Screw Ceiling Plate Tabs Step 3-7 Hunter Fan Company Canopy Slots 42405-01 • 01/20/06 Place the low profile washer into the canopy. Align the holes in the washer with the holes in the canopy with the low profile washer. 3-4. Loosen the square head set screw with three low profile screws. 3-7. Assemble securely with...
... or Angled Mounting: Set Screw 3-2. Feed the wires from the fan through the canopy. this coating; For Low Profile Mounting: 6 Note: For low profile mounting, the downrod is normal. Remove the set screw from the fan. Low Profile Screw Ceiling Plate Tabs Step 3-7 Hunter Fan Company Canopy Slots 42405-01 • 01/20/06 Place the low profile washer into the canopy. Align the holes in the washer with the holes in the canopy with the low profile washer. 3-4. Loosen the square head set screw with three low profile screws. 3-7. Assemble securely with...
Owner's Manual
Page 7
... power to the black wire from the ceiling to the outlet box and associated wall switch location is still OFF. CAUTION: Be sure no bare wire or wire strands are not included. Push all wires and wire nuts into the outlet box. 4 • Wiring the Fan Wire Nut Single Switch Wiring 7 42405-01 • 01/20/06 Hunter Fan Company Wall switches are visible after making connections. Select an acceptable general-use a qualified electrician. All wiring...
... power to the black wire from the ceiling to the outlet box and associated wall switch location is still OFF. CAUTION: Be sure no bare wire or wire strands are not included. Push all wires and wire nuts into the outlet box. 4 • Wiring the Fan Wire Nut Single Switch Wiring 7 42405-01 • 01/20/06 Hunter Fan Company Wall switches are visible after making connections. Select an acceptable general-use a qualified electrician. All wiring...
Owner's Manual
Page 8
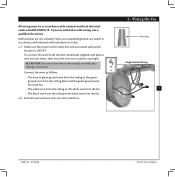
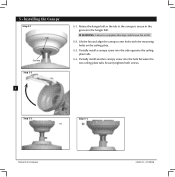
... the canopy screw holes with the mounting holes on the ceiling plate. 5-3. Partially install another canopy screw into the side opposite the ceiling plate tabs. 5-4. Rotate the hanger ball so the tab in the canopy is secure in the groove in the hanger ball. Partially install a canopy screw into the hole between the two ceiling plate tabs. Securely tighten both screws. 8 Step 5-3 Step 5-4 Hunter Fan Company 42405-01 • 01/20/06 5 • Installing the Canopy Step...
... the canopy screw holes with the mounting holes on the ceiling plate. 5-3. Partially install another canopy screw into the side opposite the ceiling plate tabs. 5-4. Rotate the hanger ball so the tab in the canopy is secure in the groove in the hanger ball. Partially install a canopy screw into the hole between the two ceiling plate tabs. Securely tighten both screws. 8 Step 5-3 Step 5-4 Hunter Fan Company 42405-01 • 01/20/06 5 • Installing the Canopy Step...
Owner's Manual
Page 9
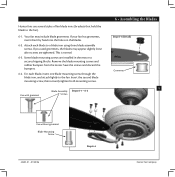
... 6-1 - 6-2 Screws 6 • Assembling the Blades Step 6-1 (Detail) Grommet 9 Use without grommet Blade Mounting Screw 42405-01 • 01/20/06 Step 6-4 Hunter Fan Company For each blade to the fan. Insert the second blade mounting screw, then securely tighten both mounting screws. Save the screws and discard the bumpers. 6-4. Some blade mounting screws are tightened. is is normal. 6-3. If your fan has grommets, insert them by hand into the holes on the blades. 6-2. Remove the blade mounting screws and rubber bumpers from the motor. Hunter fans use...
... 6-1 - 6-2 Screws 6 • Assembling the Blades Step 6-1 (Detail) Grommet 9 Use without grommet Blade Mounting Screw 42405-01 • 01/20/06 Step 6-4 Hunter Fan Company For each blade to the fan. Insert the second blade mounting screw, then securely tighten both mounting screws. Save the screws and discard the bumpers. 6-4. Some blade mounting screws are tightened. is is normal. 6-3. If your fan has grommets, insert them by hand into the holes on the blades. 6-2. Remove the blade mounting screws and rubber bumpers from the motor. Hunter fans use...
Owner's Manual
Page 10
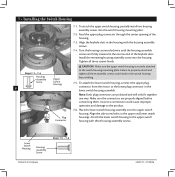
... the keyhole slots in the lower switch housing assembly. Attach the lower switch housing to the switch housing mounting plate. Lower Switch Housing Housing Assembly Screw Steps 7-5 - 7-6 Hunter Fan Company 42405-01 • 01/20/06 CAUTION: Make sure the upper switch housing is securely attached Steps 7-1 - 7-4 Housing Assembly Screw Upper Switch Housing 10 to the upper switch housing with the housing assembly screws. 7-4. To attach the lower switch housing, connect the upper plug connector from the motor to the product. Align the side screw holes in the narrow end of...
... the keyhole slots in the lower switch housing assembly. Attach the lower switch housing to the switch housing mounting plate. Lower Switch Housing Housing Assembly Screw Steps 7-5 - 7-6 Hunter Fan Company 42405-01 • 01/20/06 CAUTION: Make sure the upper switch housing is securely attached Steps 7-1 - 7-4 Housing Assembly Screw Upper Switch Housing 10 to the upper switch housing with the housing assembly screws. 7-4. To attach the lower switch housing, connect the upper plug connector from the motor to the product. Align the side screw holes in the narrow end of...
Owner's Manual
Page 11
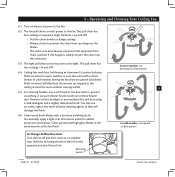
... a draft. 8-5. For cleaning finishes, use upward air flow pattern To Change Airflow Direction Turn the fan off and let it come to cool the room with a furniture polishing cloth. Slide the reversing switch on electrical power to the fan. 8-2. e fan pull chain controls power to the light. e pull chain has two settings: On and Off. 8-4. 8 • Operating and Cleaning Your Ceiling Fan 8-1. Clean wood finish blades with a direct breeze. Ceiling fans work best by blowing air downward (counterclockwise blade rotation) in warm...
... a draft. 8-5. For cleaning finishes, use upward air flow pattern To Change Airflow Direction Turn the fan off and let it come to cool the room with a furniture polishing cloth. Slide the reversing switch on electrical power to the fan. 8-2. e fan pull chain controls power to the light. e pull chain has two settings: On and Off. 8-4. 8 • Operating and Cleaning Your Ceiling Fan 8-1. Clean wood finish blades with a direct breeze. Ceiling fans work best by blowing air downward (counterclockwise blade rotation) in warm...
Owner's Manual
Page 12
... balancing kit and instructions to the "Wiring the Fan" section. 3. Tighten all the blades. Check the plug connection in the switch housing. 4. Problem: Noisy operation. 1. Remove the shipping bumpers. Problem: Excessive wobbling. 1. Check to ensure it is engaged. 5. fan does not move. 1. Turn power off, support fan very carefully, and check that the switch is on , replace fuse, or reset breaker. 2. Turn power on . 6. Loosen canopy, check all connections according to balance the fan. 2. Tighten the blade bracket screws...
... balancing kit and instructions to the "Wiring the Fan" section. 3. Tighten all the blades. Check the plug connection in the switch housing. 4. Problem: Noisy operation. 1. Remove the shipping bumpers. Problem: Excessive wobbling. 1. Check to ensure it is engaged. 5. fan does not move. 1. Turn power off, support fan very carefully, and check that the switch is on , replace fuse, or reset breaker. 2. Turn power on . 6. Loosen canopy, check all connections according to balance the fan. 2. Tighten the blade bracket screws...
Parts Guide
Page 1
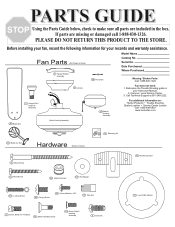
... for your Local Service Center. 3. Serial No. Call Technical Support at 901-248-2222. 7 Hanger Ball / Downrod Assembly 28 Switch / Housing Assembly For additional information on: Hunter Products Trouble Shooting Dealer Location Service Center Locator Call 1-800-448-6837 www.hunterfan.com 46 Blade Set Motor Housing Assembly 75 Balancing Kit 44 Blade Iron Set Hardware (Drawn to Scale) Hanger Bracket Assembly 78 Pull Chain Model Name Catalog No. Date Purchased Where Purchased Missing / Broken Parts: Call 1-888-830-1326 3 Canopy Fan does not work: 1. Call your...
... for your Local Service Center. 3. Serial No. Call Technical Support at 901-248-2222. 7 Hanger Ball / Downrod Assembly 28 Switch / Housing Assembly For additional information on: Hunter Products Trouble Shooting Dealer Location Service Center Locator Call 1-800-448-6837 www.hunterfan.com 46 Blade Set Motor Housing Assembly 75 Balancing Kit 44 Blade Iron Set Hardware (Drawn to Scale) Hanger Bracket Assembly 78 Pull Chain Model Name Catalog No. Date Purchased Where Purchased Missing / Broken Parts: Call 1-888-830-1326 3 Canopy Fan does not work: 1. Call your...
Parts Guide
Page 2
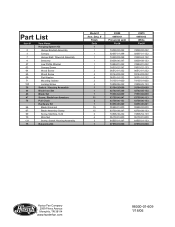
Part List Item # 2 3 7 8 27 62 64 65 68 71 100 28 44 46 47 78 66 67 69 70 131 75 Item Name Hanging System Kit Hanger Bracket Assembly Canopy Hanger Ball / Downrod Assembly Setscrew Low Profile Washer Canopy Screw Wood Screw Wood Screw Flat Washer Mounting Isolator Locking Screw Switch / Housing Assembly Blade Iron Set Blade Set Screw, Blade Iron Armature Pull Chain Hardware Kit Blade Grommet Blade Assembly Screw Screw, Machine, 6-32 Wire Nut Screw, Switch Housing Assembly Balancing Kit Model # Asm. Dwg. # Finish Qnty 1 1 1 1 1 1 2 2 2 4 2 3 1 1 1 11 2 1 15 15 3 4 3 1 23980 94956-01 ...
Part List Item # 2 3 7 8 27 62 64 65 68 71 100 28 44 46 47 78 66 67 69 70 131 75 Item Name Hanging System Kit Hanger Bracket Assembly Canopy Hanger Ball / Downrod Assembly Setscrew Low Profile Washer Canopy Screw Wood Screw Wood Screw Flat Washer Mounting Isolator Locking Screw Switch / Housing Assembly Blade Iron Set Blade Set Screw, Blade Iron Armature Pull Chain Hardware Kit Blade Grommet Blade Assembly Screw Screw, Machine, 6-32 Wire Nut Screw, Switch Housing Assembly Balancing Kit Model # Asm. Dwg. # Finish Qnty 1 1 1 1 1 1 2 2 2 4 2 3 1 1 1 11 2 1 15 15 3 4 3 1 23980 94956-01 ...


