
Installation Guide
Page 1
... wall switch location are aligned with joist or support brace. Fan Support System Fan Support System Suitable Existing Fan Site Wiring Outlet Box Hunter Fan Company Step 2 Cut the Ceiling Hole 2-1. Choose a fan site where: • No object can come in the off every item, prepare a new fan site as walls or posts, within 30 inches of 1/16...
... wall switch location are aligned with joist or support brace. Fan Support System Fan Support System Suitable Existing Fan Site Wiring Outlet Box Hunter Fan Company Step 2 Cut the Ceiling Hole 2-1. Choose a fan site where: • No object can come in the off every item, prepare a new fan site as walls or posts, within 30 inches of 1/16...

Owner's Manual
Page 2
... Ready 4 2 • Installing the Ceiling Plate 5 3 • Assembling and Hanging the Fan..........6 4 • Wiring the Fan 7 5 • Installing the Canopy 8 6 • Assembling the Blades 9 7 • Operating and Cleaning Your Ceiling Fan 10 8 • Troubleshooting 11 © 2006 Hunter Fan Company Hunter Fan Company Your new Hunter® ceiling fan is installation and operation manual gives you with national and local electrical...
... Ready 4 2 • Installing the Ceiling Plate 5 3 • Assembling and Hanging the Fan..........6 4 • Wiring the Fan 7 5 • Installing the Canopy 8 6 • Assembling the Blades 9 7 • Operating and Cleaning Your Ceiling Fan 10 8 • Troubleshooting 11 © 2006 Hunter Fan Company Hunter Fan Company Your new Hunter® ceiling fan is installation and operation manual gives you with national and local electrical...
Owner's Manual
Page 3
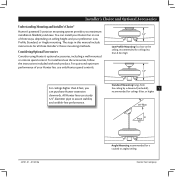
... with each product. Installer's Choice and Optional Accessories Understanding Mounting and Installer's Choice® Hunter's patented 3-position mounting system provides you can install your Hunter fan in one of your preference: Low Profile, Standard, or Angle mounting. e steps in... Hunter's optional accessories, including a wall-mounted or remote speed control. Standard Mounting hangs from the ceiling by a downrod (included), 3 recommended for ceilings 8 feet or higher 42701-01 • 01/25/06 Angle Mounting recommended for a vaulted or angled ceiling Hunter Fan Company
... with each product. Installer's Choice and Optional Accessories Understanding Mounting and Installer's Choice® Hunter's patented 3-position mounting system provides you can install your Hunter fan in one of your preference: Low Profile, Standard, or Angle mounting. e steps in... Hunter's optional accessories, including a wall-mounted or remote speed control. Standard Mounting hangs from the ceiling by a downrod (included), 3 recommended for ceilings 8 feet or higher 42701-01 • 01/25/06 Angle Mounting recommended for a vaulted or angled ceiling Hunter Fan Company

Owner's Manual
Page 4
...; Identify and connect electrical wires. • Lift 40 pounds. Hunter Fan Company 42701-01 • 01/25/06 If any shipping damage to the fan parts. Gathering the Tools You will need help installing the fan, your Hunter fan dealer can do the following tools for installing the fan: • Electric drill with 9/64" bit • Standard screwdriver...
...; Identify and connect electrical wires. • Lift 40 pounds. Hunter Fan Company 42701-01 • 01/25/06 If any shipping damage to the fan parts. Gathering the Tools You will need help installing the fan, your Hunter fan dealer can do the following tools for installing the fan: • Electric drill with 9/64" bit • Standard screwdriver...

Owner's Manual
Page 5
...holes should be 9/64" in the wood support structure. 2 • Installing the Ceiling Plate CAUTION: To avoid possible electrical shock, before installing your fan, disconnect the power by turning off position, securely fasten a prominent warning device, such as a tag, to the outlet box and associated wall switch ... screws and pass the screws through the hole in the ceiling plate are on the lower side. 42701-01 • 01/25/06 Hunter Fan Company Tighten the screws into the pilot holes you drilled in step 2-1. 2-5. read the lead wires from each of the ceiling gasket ...
...holes should be 9/64" in the wood support structure. 2 • Installing the Ceiling Plate CAUTION: To avoid possible electrical shock, before installing your fan, disconnect the power by turning off position, securely fasten a prominent warning device, such as a tag, to the outlet box and associated wall switch ... screws and pass the screws through the hole in the ceiling plate are on the lower side. 42701-01 • 01/25/06 Hunter Fan Company Tighten the screws into the pilot holes you drilled in step 2-1. 2-5. read the lead wires from each of the ceiling gasket ...
Owner's Manual
Page 6
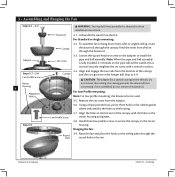
...profile mounting, the downrod is normal. Install three low profile screws to secure the canopy to 3-9. Hanging the fan: 3-9. Note: When the pipe and ball assembly is fully installed, 2-3 threads on the adapter to hang down... grooves in the motor housing and gasket. 3-8. For Standard or Angle mounting: 3-2. Feed the wires from the fan. Set Screw 3-3. Loosen the square head set screw on the pipe will still be visible; this coating; CAUTION... the downrod. Align the holes in the rim. Raise the fan and place the hook on the threads. Hunter Fan Company 42701-01 • 01/25/06
...profile mounting, the downrod is normal. Install three low profile screws to secure the canopy to 3-9. Hanging the fan: 3-9. Note: When the pipe and ball assembly is fully installed, 2-3 threads on the adapter to hang down... grooves in the motor housing and gasket. 3-8. For Standard or Angle mounting: 3-2. Feed the wires from the fan. Set Screw 3-3. Loosen the square head set screw on the pipe will still be visible; this coating; CAUTION... the downrod. Align the holes in the rim. Raise the fan and place the hook on the threads. Hunter Fan Company 42701-01 • 01/25/06
Owner's Manual
Page 7
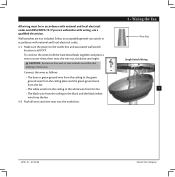
...wall switch location is still OFF. Push all wires and wire nuts into the outlet box. 4 • Wiring the Fan Wire Nut Single Switch Wiring 7 42701-01 • 01/25/06 Hunter Fan Company Connect the wires as follows: • e bare or green ground wire from the ceiling to the green ground... wire from the ceiling plate and the green ground wire from the fan • e white wire from the ceiling to the...
...wall switch location is still OFF. Push all wires and wire nuts into the outlet box. 4 • Wiring the Fan Wire Nut Single Switch Wiring 7 42701-01 • 01/25/06 Hunter Fan Company Connect the wires as follows: • e bare or green ground wire from the ceiling to the green ground... wire from the ceiling plate and the green ground wire from the fan • e white wire from the ceiling to the...
Owner's Manual
Page 8
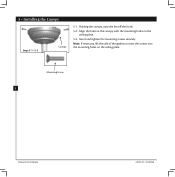
Holding the canopy, raise the fan off the hook. 5-2. Align the holes in the canopy with the mounting holes on the ceiling plate. Note: If necessary, lift the side of the gasket to insert the screws into the mounting holes on the ceiling plate. 5-3. Mounting Screw 8 Hunter Fan Company 42701-01 • 01/25/06 Insert and tighten the mounting screws securely. 5 • Installing the Canopy Steps 5-1- 5-3 Canopy 5-1.
Holding the canopy, raise the fan off the hook. 5-2. Align the holes in the canopy with the mounting holes on the ceiling plate. Note: If necessary, lift the side of the gasket to insert the screws into the mounting holes on the ceiling plate. 5-3. Mounting Screw 8 Hunter Fan Company 42701-01 • 01/25/06 Insert and tighten the mounting screws securely. 5 • Installing the Canopy Steps 5-1- 5-3 Canopy 5-1.

Owner's Manual
Page 9
... the second blade mounting screw, then securely tighten both mounting screws. Your fan may appear slightly loose after screws are installed in the motor to the fan). 6-1. If you used grommets, the blades may include blade grommets. Note...Hunter fans use several styles of fan blade irons (brackets that hold the blade to secure shipping blocks during shipment. 6-4. Use with grommet Blade Assembly Screws 6 • Assembling the Blades Step 6-1 (Detail) Grommet Steps 6-1 - 6-2 9 Use without grommet Blade Mounting Screw 42701-01 • 01/25/06 Step 6-4 Hunter Fan Company...
... the second blade mounting screw, then securely tighten both mounting screws. Your fan may appear slightly loose after screws are installed in the motor to the fan). 6-1. If you used grommets, the blades may include blade grommets. Note...Hunter fans use several styles of fan blade irons (brackets that hold the blade to secure shipping blocks during shipment. 6-4. Use with grommet Blade Assembly Screws 6 • Assembling the Blades Step 6-1 (Detail) Grommet Steps 6-1 - 6-2 9 Use without grommet Blade Mounting Screw 42701-01 • 01/25/06 Step 6-4 Hunter Fan Company...

Owner's Manual
Page 10
.... Clean wood finish blades with a direct breeze. You may use upward air flow pattern To Change Airflow Direction Turn the fan off and let it come to prevent scratching. Reversing Switch Hunter Fan Company 42701-01 • 01/25/06 Occasionally, apply a light coat of furniture polish for added protection and beauty. Slide the...
.... Clean wood finish blades with a direct breeze. You may use upward air flow pattern To Change Airflow Direction Turn the fan off and let it come to prevent scratching. Reversing Switch Hunter Fan Company 42701-01 • 01/25/06 Occasionally, apply a light coat of furniture polish for added protection and beauty. Slide the...
Owner's Manual
Page 11
... Web site at http://www.hunterfan.com. Problem: Noisy operation. 1. If so, replace all blade iron screws. 3. Hunter Fan Company 2500 Frisco Avenue Memphis, Tennessee 38114 8 • Troubleshooting 11 42701-01 • 01/25/06 Hunter Fan Company Check the plug connection in the switch housing. 4. Check to ensure it is engaged. 5. Remove the shipping bumpers...
... Web site at http://www.hunterfan.com. Problem: Noisy operation. 1. If so, replace all blade iron screws. 3. Hunter Fan Company 2500 Frisco Avenue Memphis, Tennessee 38114 8 • Troubleshooting 11 42701-01 • 01/25/06 Hunter Fan Company Check the plug connection in the switch housing. 4. Check to ensure it is engaged. 5. Remove the shipping bumpers...


