
Installation Guide
Page 1
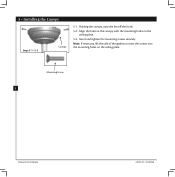
... associated wall switch location are aligned with joist or support brace. Fan Support System o Fan attaches directly to install the support brace and outlet box. o Six inches of the fan and light kit. Steps 2 - 3 Step 3 Install a Support Brace, If Necessary Determine if there is suitable, go to your fan manual and begin with 2 • Installing the Ceiling Plate. Position it will support the full weight of lead wires extend from any hardware store or electrical supply house...
... associated wall switch location are aligned with joist or support brace. Fan Support System o Fan attaches directly to install the support brace and outlet box. o Six inches of the fan and light kit. Steps 2 - 3 Step 3 Install a Support Brace, If Necessary Determine if there is suitable, go to your fan manual and begin with 2 • Installing the Ceiling Plate. Position it will support the full weight of lead wires extend from any hardware store or electrical supply house...

Owner's Manual
Page 1
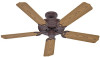
For Your Records and Warranty Assistance Model Name Catalog/Model No Serial No Date Purchased Where Purchased For reference also attach your receipt or a copy of your receipt to the manual. 42701-01 • 01/25/06
For Your Records and Warranty Assistance Model Name Catalog/Model No Serial No Date Purchased Where Purchased For reference also attach your receipt or a copy of your receipt to the manual. 42701-01 • 01/25/06

Owner's Manual
Page 2
... you are proud of our work. Use only Hunter speed controls. 42701-01 • 01/25/06 Welcome 2 Table of Contents 1 • Getting Ready 4 2 • Installing the Ceiling Plate 5 3 • Assembling and Hanging the Fan..........6 4 • Wiring the Fan 7 5 • Installing the Canopy 8 6 • Assembling the Blades 9 7 • Operating and Cleaning Your Ceiling Fan 10 8 • Troubleshooting 11 © 2006 Hunter Fan Company Hunter Fan Company Your new Hunter® ceiling fan is an addition to your home or office that will provide...
... you are proud of our work. Use only Hunter speed controls. 42701-01 • 01/25/06 Welcome 2 Table of Contents 1 • Getting Ready 4 2 • Installing the Ceiling Plate 5 3 • Assembling and Hanging the Fan..........6 4 • Wiring the Fan 7 5 • Installing the Canopy 8 6 • Assembling the Blades 9 7 • Operating and Cleaning Your Ceiling Fan 10 8 • Troubleshooting 11 © 2006 Hunter Fan Company Hunter Fan Company Your new Hunter® ceiling fan is an addition to your home or office that will provide...
Owner's Manual
Page 3
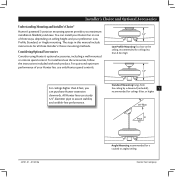
... Consider using Hunter's optional accessories, including a wall-mounted or remote speed control. Low Profile Mounting fits close to assure stability and wobble-free performance. You can purchase Hunter extension downrods. Installer's Choice and Optional Accessories Understanding Mounting and Installer's Choice® Hunter's patented 3-position mounting system provides you can install your Hunter fan in one of your preference: Low Profile, Standard, or Angle mounting. e steps in this manual include instructions for a vaulted or angled ceiling Hunter Fan Company
... Consider using Hunter's optional accessories, including a wall-mounted or remote speed control. Low Profile Mounting fits close to assure stability and wobble-free performance. You can purchase Hunter extension downrods. Installer's Choice and Optional Accessories Understanding Mounting and Installer's Choice® Hunter's patented 3-position mounting system provides you can install your Hunter fan in one of your preference: Low Profile, Standard, or Angle mounting. e steps in this manual include instructions for a vaulted or angled ceiling Hunter Fan Company

Owner's Manual
Page 4
... any parts are installing more than one fan, keep the fan blades and blade irons (if applicable) in the pullout sheet called "Preparing the Fan Site." Hunter Fan Company 42701-01 • 01/25/06 If any shipping damage to a licensed installer or electrician. To install a ceiling fan, be sure you begin installing the fan, follow all the instructions in sets, as they were shipped. Preparing the Fan Site Before you can direct...
... any parts are installing more than one fan, keep the fan blades and blade irons (if applicable) in the pullout sheet called "Preparing the Fan Site." Hunter Fan Company 42701-01 • 01/25/06 If any shipping damage to a licensed installer or electrician. To install a ceiling fan, be sure you begin installing the fan, follow all the instructions in sets, as they were shipped. Preparing the Fan Site Before you can direct...

Owner's Manual
Page 5
... ceiling gasket and hanger bracket. 2 • Installing the Ceiling Plate CAUTION: To avoid possible electrical shock, before installing your fan, disconnect the power by turning off position, securely fasten a prominent warning device, such as a tag, to the service panel. 2-1. Align the slotted holes in the ceiling plate with the slots and holes on the lower side. 42701-01 • 01/25/06 Hunter Fan Company Use a 3" wood screw to pierce two holes...
... ceiling gasket and hanger bracket. 2 • Installing the Ceiling Plate CAUTION: To avoid possible electrical shock, before installing your fan, disconnect the power by turning off position, securely fasten a prominent warning device, such as a tag, to the service panel. 2-1. Align the slotted holes in the ceiling plate with the slots and holes on the lower side. 42701-01 • 01/25/06 Hunter Fan Company Use a 3" wood screw to pierce two holes...
Owner's Manual
Page 6
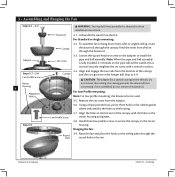
... these installation instructions. Once assembled, do not remove the downrod. Using a sharp pointed tool, pierce three holes in the rubber gasket where indicated by the holes in the rim. Downrod 3-1. To assemble fan to 3-9. Skip to hang down from the bottom of the canopy with a wrench or pliers. 3-4. Remove the set screw on the ceiling plate through the downrod. Hanging the fan: 3-9. Raise the fan and place the hook on the adapter to the motor housing. Set Screw...
... these installation instructions. Once assembled, do not remove the downrod. Using a sharp pointed tool, pierce three holes in the rubber gasket where indicated by the holes in the rim. Downrod 3-1. To assemble fan to 3-9. Skip to hang down from the bottom of the canopy with a wrench or pliers. 3-4. Remove the set screw on the ceiling plate through the downrod. Hanging the fan: 3-9. Raise the fan and place the hook on the adapter to the motor housing. Set Screw...
Owner's Manual
Page 7
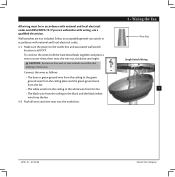
... white wire from the fan • e black wire from the fan 4-2. All wiring must be in accordance with national and local electrical codes and ANSI/NFPA 70. Select an acceptable general-use a qualified electrician. Wall switches are visible after making connections. Make sure the power to the black and the black/white wire from the ceiling to the outlet box and associated wall switch location is still OFF. To connect the wires...
... white wire from the fan • e black wire from the fan 4-2. All wiring must be in accordance with national and local electrical codes and ANSI/NFPA 70. Select an acceptable general-use a qualified electrician. Wall switches are visible after making connections. Make sure the power to the black and the black/white wire from the ceiling to the outlet box and associated wall switch location is still OFF. To connect the wires...
Owner's Manual
Page 8
Note: If necessary, lift the side of the gasket to insert the screws into the mounting holes on the ceiling plate. 5-3. Insert and tighten the mounting screws securely. Mounting Screw 8 Hunter Fan Company 42701-01 • 01/25/06 5 • Installing the Canopy Steps 5-1- 5-3 Canopy 5-1. Holding the canopy, raise the fan off the hook. 5-2. Align the holes in the canopy with the mounting holes on the ceiling plate.
Note: If necessary, lift the side of the gasket to insert the screws into the mounting holes on the ceiling plate. 5-3. Insert and tighten the mounting screws securely. Mounting Screw 8 Hunter Fan Company 42701-01 • 01/25/06 5 • Installing the Canopy Steps 5-1- 5-3 Canopy 5-1. Holding the canopy, raise the fan off the hook. 5-2. Align the holes in the canopy with the mounting holes on the ceiling plate.

Owner's Manual
Page 9
...6-4. Remove the blade mounting screws and rubber shipping bumpers from the motor. Insert the second blade mounting screw, then securely tighten both mounting screws. Use with grommet Blade Assembly Screws 6 • Assembling the Blades Step 6-1 (Detail) Grommet Steps 6-1 - 6-2 9 Use without grommet Blade Mounting Screw 42701-01 • 01/25/06 Step 6-4 Hunter Fan Company Attach each blade, insert one blade mounting screw through the blade iron, and attach lightly to the fan). 6-1. Hunter fans use several styles of fan blade irons (brackets that hold the blade to the fan.
...6-4. Remove the blade mounting screws and rubber shipping bumpers from the motor. Insert the second blade mounting screw, then securely tighten both mounting screws. Use with grommet Blade Assembly Screws 6 • Assembling the Blades Step 6-1 (Detail) Grommet Steps 6-1 - 6-2 9 Use without grommet Blade Mounting Screw 42701-01 • 01/25/06 Step 6-4 Hunter Fan Company Attach each blade, insert one blade mounting screw through the blade iron, and attach lightly to the fan). 6-1. Hunter fans use several styles of fan blade irons (brackets that hold the blade to the fan.

Owner's Manual
Page 10
...; Operating and Cleaning Your Ceiling Fan 7-1. Slide the reversing switch on electrical power to the fan. 7-2. In cold weather, having the fan draw air upward (clockwise blade rotation) will damage the finish. 7-4. Remove surface smudges or accumulated dirt and dust using a mild detergent and a slightly dampened cloth. Clean wood finish blades with a direct breeze. Occasionally, apply a light coat of furniture polish for added protection and beauty. Clean painted and high-gloss blades...
...; Operating and Cleaning Your Ceiling Fan 7-1. Slide the reversing switch on electrical power to the fan. 7-2. In cold weather, having the fan draw air upward (clockwise blade rotation) will damage the finish. 7-4. Remove surface smudges or accumulated dirt and dust using a mild detergent and a slightly dampened cloth. Clean wood finish blades with a direct breeze. Occasionally, apply a light coat of furniture polish for added protection and beauty. Clean painted and high-gloss blades...
Owner's Manual
Page 11
... the plug connection in the switch housing. 4. Problem: Noisy operation. 1. Check to ensure that the hanger ball is cracked. Problem: Excessive wobbling. 1. Remove the shipping bumpers. Turn power on . 6. Push motor reversing switch firmly up or down to see if the blade is properly seated. Tighten the blade bracket screws until snug. 2. If your fan wobbles when operating, use the enclosed balancing kit and instructions to ensure it is engaged. 5. Pull the pull chain to balance the fan. 2. Hunter Fan Company...
... the plug connection in the switch housing. 4. Problem: Noisy operation. 1. Check to ensure that the hanger ball is cracked. Problem: Excessive wobbling. 1. Remove the shipping bumpers. Turn power on . 6. Push motor reversing switch firmly up or down to see if the blade is properly seated. Tighten the blade bracket screws until snug. 2. If your fan wobbles when operating, use the enclosed balancing kit and instructions to ensure it is engaged. 5. Pull the pull chain to balance the fan. 2. Hunter Fan Company...
Parts Guide
Page 1
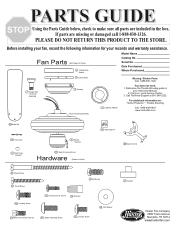
... Model Name Catalog No. Before installing your fan, record the following information for your Instruction Manual. 2. Reference the Trouble Shooting guide in the box. Date Purchased Where Purchased 7 Hanger Ball / Downrod Assembly Ceiling Plate 3 Canopy Motor Housing Assembly 74 Light Kit Adapter Missing / Broken Parts: Call 1-888-830-1326 Fan does not work: 1. Call your Local Service Center. 3. Fan Parts (Not Drawn to Scale) 75 Balancing Kit 44 Blade Iron Set Wood Screw Wood Screw 8 Set Screw 100 Locking Screw 40 Housing Cover Screw Wire Nut Flat Washer Blade Iron...
... Model Name Catalog No. Before installing your fan, record the following information for your Instruction Manual. 2. Reference the Trouble Shooting guide in the box. Date Purchased Where Purchased 7 Hanger Ball / Downrod Assembly Ceiling Plate 3 Canopy Motor Housing Assembly 74 Light Kit Adapter Missing / Broken Parts: Call 1-888-830-1326 Fan does not work: 1. Call your Local Service Center. 3. Fan Parts (Not Drawn to Scale) 75 Balancing Kit 44 Blade Iron Set Wood Screw Wood Screw 8 Set Screw 100 Locking Screw 40 Housing Cover Screw Wire Nut Flat Washer Blade Iron...

Parts Guide
Page 2
Part List Item # Item Name * Hanging System Kit 2 Ceiling Plate 3 Canopy 5 Ceiling Plate Gasket 7 Hanger Ball / Downrod Assembly 8 Set Screw 62 Canopy Screw 64 Wood Screw 65 Wood Screw 68 Flat Washer 71 Isolator 100 Locking Screw 28 Switch Housing 29 Switch Housing Cover 40 Housing Cover Screw 44 Blade Iron Set 46 Blade Set 49 Light Kit Assembly (Not Shown) 74 Light Kit Adapter 76 Pull Chain Pendant 78 Pull Chain 150 Globe / Shade (Not Shown) * Hardware Kit 47 Screw, Blade Iron Armature 67 Blade Assembly Screw 70 Wire Nut 75 Balancing Kit ...
Part List Item # Item Name * Hanging System Kit 2 Ceiling Plate 3 Canopy 5 Ceiling Plate Gasket 7 Hanger Ball / Downrod Assembly 8 Set Screw 62 Canopy Screw 64 Wood Screw 65 Wood Screw 68 Flat Washer 71 Isolator 100 Locking Screw 28 Switch Housing 29 Switch Housing Cover 40 Housing Cover Screw 44 Blade Iron Set 46 Blade Set 49 Light Kit Assembly (Not Shown) 74 Light Kit Adapter 76 Pull Chain Pendant 78 Pull Chain 150 Globe / Shade (Not Shown) * Hardware Kit 47 Screw, Blade Iron Armature 67 Blade Assembly Screw 70 Wire Nut 75 Balancing Kit ...


