

Installation Guide
Page 1
... support the full weight of 1/16" into the ceiling. 3-2. For instructions to install your ceiling fan, go to your new Hunter fan. If you to recess the outlet box a minimum of the fan and light kit. You have no larger than the minor diameter of the wood screws (5/64") through the drywall or plaster of outlet box. Fan Support System o Fan attaches directly to the fan supply line leads and associated wall switch location...
... support the full weight of 1/16" into the ceiling. 3-2. For instructions to install your ceiling fan, go to your new Hunter fan. If you to recess the outlet box a minimum of the fan and light kit. You have no larger than the minor diameter of the wood screws (5/64") through the drywall or plaster of outlet box. Fan Support System o Fan attaches directly to the fan supply line leads and associated wall switch location...

Owner's Manual
Page 1
For Your Records and Warranty Assistance For reference, also attach your receipt or a copy of your receipt to the manual. Date Purchased Where Purchased Type 5 Models Owner's Guide and Installation Manual English Español Form# 42863-01 20110622 ©2011 Hunter Fan Co. Model Name Model No.
For Your Records and Warranty Assistance For reference, also attach your receipt or a copy of your receipt to the manual. Date Purchased Where Purchased Type 5 Models Owner's Guide and Installation Manual English Español Form# 42863-01 20110622 ©2011 Hunter Fan Co. Model Name Model No.
Owner's Manual
Page 2
... 6 2 • Installing the Ceiling Plate 7 3 • Assembling and Hanging the Fan . . . 8 4 • Wiring the Fan 9 5 • Installing the Canopy 10 6 • Assembling the Blades 11 7 • Completing Your Installation 12 8 • Operating and Cleaning Your Ceiling Fan 13 9 • Troubleshooting 15 Cautions and Warnings • READ THIS ENTIRE MANUAL CAREFULLY BEFORE BEGINNING INSTALLATION. If you with national and local electrical codes and ANSI/NFPA 70. If you complete instructions for your fan. Never insert...
... 6 2 • Installing the Ceiling Plate 7 3 • Assembling and Hanging the Fan . . . 8 4 • Wiring the Fan 9 5 • Installing the Canopy 10 6 • Assembling the Blades 11 7 • Completing Your Installation 12 8 • Operating and Cleaning Your Ceiling Fan 13 9 • Troubleshooting 15 Cautions and Warnings • READ THIS ENTIRE MANUAL CAREFULLY BEFORE BEGINNING INSTALLATION. If you with national and local electrical codes and ANSI/NFPA 70. If you complete instructions for your fan. Never insert...
Owner's Manual
Page 3
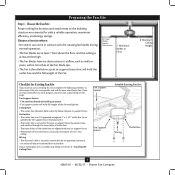
... the fan and light kit. Preparing the Fan Site Step 1 - Choose the Fan Site Proper ceiling fan location and attachment to the building structure are at least 7 feet above the floor and the ceiling is at least 8 feet high. • The fan blades have no obstructions to Section 2 • Installing the Ceiling Plate. Fan Support System Fan Support System Suitable Existing Fan Site Wiring Outlet Box 3 42863-01 • 06/22/11 • Hunter Fan Company Ceiling Hole...
... the fan and light kit. Preparing the Fan Site Step 1 - Choose the Fan Site Proper ceiling fan location and attachment to the building structure are at least 7 feet above the floor and the ceiling is at least 8 feet high. • The fan blades have no obstructions to Section 2 • Installing the Ceiling Plate. Fan Support System Fan Support System Suitable Existing Fan Site Wiring Outlet Box 3 42863-01 • 06/22/11 • Hunter Fan Company Ceiling Hole...
Owner's Manual
Page 4
... screws and washers, available from any hardware store or electrical supply house. 5-4. Prepare the Wiring 5-1. Make sure the circuit breakers to your ceiling fan site. Make certain the wiring meets all national and local standards and ANSI/NFPA 70. For instructions to install your ceiling fan, go to the fan supply line leads and associated wall switch location are unfamiliar with Section 2 • Installing the Ceiling Plate. Check the support...
... screws and washers, available from any hardware store or electrical supply house. 5-4. Prepare the Wiring 5-1. Make sure the circuit breakers to your ceiling fan site. Make certain the wiring meets all national and local standards and ANSI/NFPA 70. For instructions to install your ceiling fan, go to the fan supply line leads and associated wall switch location are unfamiliar with Section 2 • Installing the Ceiling Plate. Check the support...
Owner's Manual
Page 5
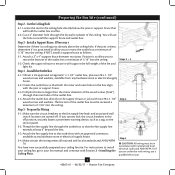
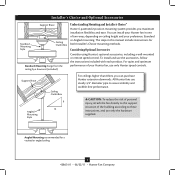
... a wall-mounted or remote speed control. Support Brace Angled Mounting Style Ceiling Outlet Box 8 12 For ceilings higher than 8 feet, you maximum installation flexibility and ease. Installer's Choice and Optional Accessories Support Brace Standard Mounting Style Ceiling Outlet Box Standard Mounting hangs from the ceiling by a downrod (included). Understanding Mounting and Installer's Choice® Hunter's patented 2-position mounting system provides you can install your Hunter fan, use only Hunter speed controls. All Hunter fans use sturdy 3/4" diameter pipe to these instructions...
... a wall-mounted or remote speed control. Support Brace Angled Mounting Style Ceiling Outlet Box 8 12 For ceilings higher than 8 feet, you maximum installation flexibility and ease. Installer's Choice and Optional Accessories Support Brace Standard Mounting Style Ceiling Outlet Box Standard Mounting hangs from the ceiling by a downrod (included). Understanding Mounting and Installer's Choice® Hunter's patented 2-position mounting system provides you can install your Hunter fan, use only Hunter speed controls. All Hunter fans use sturdy 3/4" diameter pipe to these instructions...

Owner's Manual
Page 6
... and install wood screws. • Identify and connect electrical wires. • Lift 40 pounds. Installing Multiple Fans? 1 • Getting Ready To install a ceiling fan, be sure you can direct you to a licensed installer or electrician. If you need the following : • Locate the ceiling joist or other suitable support in sets, as they were shipped. 6 42863-01 • 06/22/11 • Hunter Fan Company If any shipping damage to the included Parts Guide...
... and install wood screws. • Identify and connect electrical wires. • Lift 40 pounds. Installing Multiple Fans? 1 • Getting Ready To install a ceiling fan, be sure you can direct you to a licensed installer or electrician. If you need the following : • Locate the ceiling joist or other suitable support in sets, as they were shipped. 6 42863-01 • 06/22/11 • Hunter Fan Company If any shipping damage to the included Parts Guide...

Owner's Manual
Page 7
... the outlet box and associated wall switch location. For proper alignment use lubricants on the ceiling plate are pointing toward the ceiling peak. 7 42863-01 • 06/22/11 • Hunter Fan Company do not use slotted holes directly across from the outlet box down through the outermost holes in the ceiling plate into thepilot holes you drilled. Drill two pilot holes into the 9/64" pilot holes; Note: e ceiling gasket should...
... the outlet box and associated wall switch location. For proper alignment use lubricants on the ceiling plate are pointing toward the ceiling peak. 7 42863-01 • 06/22/11 • Hunter Fan Company do not use slotted holes directly across from the outlet box down through the outermost holes in the ceiling plate into thepilot holes you drilled. Drill two pilot holes into the 9/64" pilot holes; Note: e ceiling gasket should...
Owner's Manual
Page 8
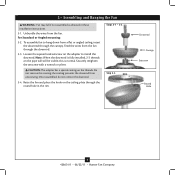
... head setscrew on the pipe will still be visible; the coating prevents the downrod from the fan. Securely retighten the setscrew with a wrench or pliers. Unbundle the wires from unscrewing. CAUTION: The adapter has a special coating on the ceiling plate through the round hole in these installation instructions. 3-1. Steps 3-1 - 3-3 Step 3-4 Downrod Canopy Setscrew Round Hole 8 42863-01 • 06/22/11 • Hunter Fan Company
... head setscrew on the pipe will still be visible; the coating prevents the downrod from the fan. Securely retighten the setscrew with a wrench or pliers. Unbundle the wires from unscrewing. CAUTION: The adapter has a special coating on the ceiling plate through the round hole in these installation instructions. 3-1. Steps 3-1 - 3-3 Step 3-4 Downrod Canopy Setscrew Round Hole 8 42863-01 • 06/22/11 • Hunter Fan Company
Owner's Manual
Page 9
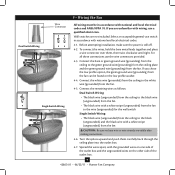
... these connections use switch in accordance with national and local electrical codes. 4-1. Connect the remaining wires as follows: Dual Switch Wiring: • The black wire (ungrounded) from the ceiling to the black wire (ungrounded) from the fan • The black wire with a white stripe (ungrounded) from the fan. 4 • Wiring the Fan Wire Connector Dual Switch Wiring Single Switch Wiring All wiring must be found on the other side of the outlet box. 9 42863-01 • 06/22/11 • Hunter Fan Company Connect...
... these connections use switch in accordance with national and local electrical codes. 4-1. Connect the remaining wires as follows: Dual Switch Wiring: • The black wire (ungrounded) from the ceiling to the black wire (ungrounded) from the fan • The black wire with a white stripe (ungrounded) from the fan. 4 • Wiring the Fan Wire Connector Dual Switch Wiring Single Switch Wiring All wiring must be found on the other side of the outlet box. 9 42863-01 • 06/22/11 • Hunter Fan Company Connect...
Owner's Manual
Page 10
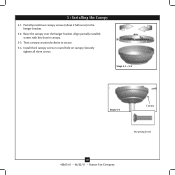
Steps 5-1- 5-3 Steps 5-4 Canopy Mounting Screw 10 42863-01 • 06/22/11 • Hunter Fan Company 5 • Installing the Canopy 5-1. Align partially installed screws with key slots in round hole on canopy. Install third canopy screw in canopy. 5-3. Raise the canopy over the hanger bracket. Partially install two canopy screws (about 2 full turns) in the hanger bracket. 5-2. Twist canopy counterclockwise to secure. 5-4. Securely tighten all three screws.
Steps 5-1- 5-3 Steps 5-4 Canopy Mounting Screw 10 42863-01 • 06/22/11 • Hunter Fan Company 5 • Installing the Canopy 5-1. Align partially installed screws with key slots in round hole on canopy. Install third canopy screw in canopy. 5-3. Raise the canopy over the hanger bracket. Partially install two canopy screws (about 2 full turns) in the hanger bracket. 5-2. Twist canopy counterclockwise to secure. 5-4. Securely tighten all three screws.
Owner's Manual
Page 11
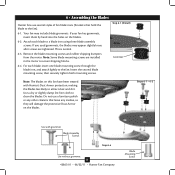
Remove the blade mounting screws and rubber shipping bumpers from the motor. Insert the second blade mounting screw, then securely tighten both mounting screws. Steps 6-1 - 6-2 Use with Hunter's Dust Armor protection, making the blades less likely to clean the blades. If you used grommets, the blades may include blade grommets. Step 6-1 (Detail) Grommet Note: The blades on this fan have been treated with grommet Blade Assembly Screws Step 6-4 Use without grommet 11 42863-01 • 06/22/11 • Hunter Fan Company Blade Mounting Screw Use a dry or slightly damp...
Remove the blade mounting screws and rubber shipping bumpers from the motor. Insert the second blade mounting screw, then securely tighten both mounting screws. Steps 6-1 - 6-2 Use with Hunter's Dust Armor protection, making the blades less likely to clean the blades. If you used grommets, the blades may include blade grommets. Step 6-1 (Detail) Grommet Note: The blades on this fan have been treated with grommet Blade Assembly Screws Step 6-4 Use without grommet 11 42863-01 • 06/22/11 • Hunter Fan Company Blade Mounting Screw Use a dry or slightly damp...

Owner's Manual
Page 12
... operation and damage to the upper switch housing with the two screws. 7-3. Attach the lower switch housing to the product. 7-6. Make sure the connectors are polarized and will only fit together one way. Thread the plug connector from the motor to the mounting plate with three housing assembly screws. 7 • Completing Your Installation Note: If you are installing a light fixture, do NOT install the switch housing without first referring to the instructions included with a number of accessory light kits...
... operation and damage to the upper switch housing with the two screws. 7-3. Attach the lower switch housing to the product. 7-6. Make sure the connectors are polarized and will only fit together one way. Thread the plug connector from the motor to the mounting plate with three housing assembly screws. 7 • Completing Your Installation Note: If you are installing a light fixture, do NOT install the switch housing without first referring to the instructions included with a number of accessory light kits...
Owner's Manual
Page 13
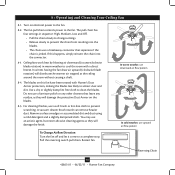
.... Pull the reversing switch pull chain. 8 • Operating and Cleaning Your Ceiling Fan 8-1. If this fan have been treated with a direct breeze. Ceiling fans work best by blowing air downward (counterclockwise blade rotation) in sequence: High, Medium, Low and Off. • Pull the chain slowly to change settings. • Release slowly to prevent the chain from recoiling into the connector. 8-3. Use a dry or slightly damp lint free cloth to the fan. For cleaning finishes, use upward air flow pattern To Change Airflow Direction...
.... Pull the reversing switch pull chain. 8 • Operating and Cleaning Your Ceiling Fan 8-1. If this fan have been treated with a direct breeze. Ceiling fans work best by blowing air downward (counterclockwise blade rotation) in sequence: High, Medium, Low and Off. • Pull the chain slowly to change settings. • Release slowly to prevent the chain from recoiling into the connector. 8-3. Use a dry or slightly damp lint free cloth to the fan. For cleaning finishes, use upward air flow pattern To Change Airflow Direction...

Owner's Manual
Page 14
... specifications set your cooling costs up to 40%. ENERGY STAR labeled ceiling fans save energy because they have the power to cut back on expensive air conditioning...and save up to 40%* on heating bills. * On average at low speed settings. Beat the High Cost of Cooling The air movement created by the Environmental Protection Agency (EPA). For more than typical ceiling fan models...
... specifications set your cooling costs up to 40%. ENERGY STAR labeled ceiling fans save energy because they have the power to cut back on expensive air conditioning...and save up to 40%* on heating bills. * On average at low speed settings. Beat the High Cost of Cooling The air movement created by the Environmental Protection Agency (EPA). For more than typical ceiling fan models...

Owner's Manual
Page 15
... blade iron screws. 3. 9 • Troubleshooting Problem: Nothing happens; Turn power on . 5. Problem: Noisy operation. 1. Check the plug connection in the switch housing. 4. Check to balance the fan. 2. If you need parts or service assistance, please call 888‑830‑1326 (In Canada, call 866-268-1936) or visit us at our Web site at http://www.hunterfan.com. If your fan wobbles when operating, use the enclosed balancing kit and instructions...
... blade iron screws. 3. 9 • Troubleshooting Problem: Nothing happens; Turn power on . 5. Problem: Noisy operation. 1. Check the plug connection in the switch housing. 4. Check to balance the fan. 2. If you need parts or service assistance, please call 888‑830‑1326 (In Canada, call 866-268-1936) or visit us at our Web site at http://www.hunterfan.com. If your fan wobbles when operating, use the enclosed balancing kit and instructions...
Parts Guide
Page 1
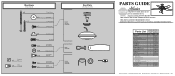
... for assistance. Parts List Item Name Ceiling Plate Canopy Ceiling Plate Gasket Hanger Ball / Downrod Assembly Setscrew Canopy Screw Wood Screw Wood Screw Flat Washer Mounting Isolator Switch Housing Assembly Switch Housing Gasket Blade Iron Set Blade Set Screw, Blade Iron Armature Hardware Kit Blade Grommet Blade Assembly Screw Screw, Machine, 6-32 Wire Connector Screw, Switch Housing Assembly Pull Chain Pendant Pull Chain Balancing Kit Model # 21318 Asm. THIS PARTS GUIDE IS FOR REFERENCE ONLY. REFER TO THE INSTALLATION MANUAL FOR FULL ASSEMBLY INSTRUCTIONS. If parts are included in...
... for assistance. Parts List Item Name Ceiling Plate Canopy Ceiling Plate Gasket Hanger Ball / Downrod Assembly Setscrew Canopy Screw Wood Screw Wood Screw Flat Washer Mounting Isolator Switch Housing Assembly Switch Housing Gasket Blade Iron Set Blade Set Screw, Blade Iron Armature Hardware Kit Blade Grommet Blade Assembly Screw Screw, Machine, 6-32 Wire Connector Screw, Switch Housing Assembly Pull Chain Pendant Pull Chain Balancing Kit Model # 21318 Asm. THIS PARTS GUIDE IS FOR REFERENCE ONLY. REFER TO THE INSTALLATION MANUAL FOR FULL ASSEMBLY INSTRUCTIONS. If parts are included in...


