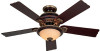

Installation Guide
Page 1
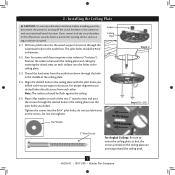
... in the off position, securely fasten a prominent warning device, such as follows: 3-1. o e outer holes of 1/16" into ceiling. Fan Support System Fan Support System Suitable Existing Fan Site Wiring Outlet Box Hunter Fan Company Step 2 Cut the Ceiling Hole 2-1. Cut a 4" diameter hole through the inner holes of outlet box. Position it to allow you cannot lock...
... in the off position, securely fasten a prominent warning device, such as follows: 3-1. o e outer holes of 1/16" into ceiling. Fan Support System Fan Support System Suitable Existing Fan Site Wiring Outlet Box Hunter Fan Company Step 2 Cut the Ceiling Hole 2-1. Cut a 4" diameter hole through the inner holes of outlet box. Position it to allow you cannot lock...
Owner's Manual
Page 2
... the Blades 9 7 • Completing Your Installation With or Without a Bowl Light Fixture 10 8 • Operating and Cleaning Your Ceiling Fan 14 9 • Troubleshooting 15 Welcome Your new Hunter® ceiling fan is an addition to your fan. We appreciate the opportunity to supply you complete instructions for installing and operating your home or office that will...
... the Blades 9 7 • Completing Your Installation With or Without a Bowl Light Fixture 10 8 • Operating and Cleaning Your Ceiling Fan 14 9 • Troubleshooting 15 Welcome Your new Hunter® ceiling fan is an addition to your fan. We appreciate the opportunity to supply you complete instructions for installing and operating your home or office that will...
Owner's Manual
Page 3
... or remote speed control. You can install your Hunter fan in this manual include instructions for ceilings less than 8 feet, you maximum installation flexibility and ease. The steps in one of three ways, depending on ceiling height and your Hunter fan, use only the hardware supplied. 3 45030-01... • 09/11/09 • Hunter Fan Company To install and use sturdy 3/4" diameter pipe to the support structure of your...
... or remote speed control. You can install your Hunter fan in this manual include instructions for ceilings less than 8 feet, you maximum installation flexibility and ease. The steps in one of three ways, depending on ceiling height and your Hunter fan, use only the hardware supplied. 3 45030-01... • 09/11/09 • Hunter Fan Company To install and use sturdy 3/4" diameter pipe to the support structure of your...
Owner's Manual
Page 4
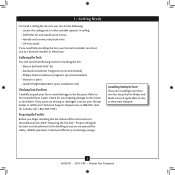
... 1-866-268-1936). If you are installing more than one fan, keep the fan blades and blade irons (if applicable) in the pullout sheet called "Preparing the Fan Site." Proper ceiling fan location and attachment to the building structure are missing or damaged, contact your Hunter fan dealer can do the following tools for any parts are...
... 1-866-268-1936). If you are installing more than one fan, keep the fan blades and blade irons (if applicable) in the pullout sheet called "Preparing the Fan Site." Proper ceiling fan location and attachment to the building structure are missing or damaged, contact your Hunter fan dealer can do the following tools for any parts are...
Owner's Manual
Page 5
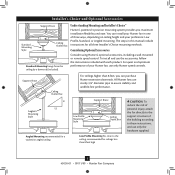
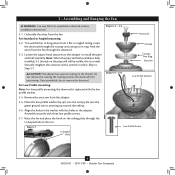
... CAUTION: To avoid possible electrical shock, before installing your fan, disconnect the power by inserting the raised areas on the ceiling plate are pointing toward the ceiling peak. 5 45030-01 • 09/11/09 • Hunter Fan Company The pilot holes should be 9/64" in the wood support structure. ...Place a flat washer on the screws. Do not over tighten. If you cannot lock the circuit breakers in the ceiling plate. 2-3. Your fan comes with the pilot holes you drilled...
... CAUTION: To avoid possible electrical shock, before installing your fan, disconnect the power by inserting the raised areas on the ceiling plate are pointing toward the ceiling peak. 5 45030-01 • 09/11/09 • Hunter Fan Company The pilot holes should be 9/64" in the wood support structure. ...Place a flat washer on the screws. Do not over tighten. If you cannot lock the circuit breakers in the ceiling plate. 2-3. Your fan comes with the pilot holes you drilled...
Owner's Manual
Page 6
... Profile Screw 6 45030-01 • 09/11/09 • Hunter Fan Company Securely retighten the setscrew with three low profile screws. 3-7. Do not remove this is replaced with the holes in these installation instructions. 3-1. Place the low profile washer (lip up toward the ceiling. 3-6. Be sure the green ground wire is fully installed...
... Profile Screw 6 45030-01 • 09/11/09 • Hunter Fan Company Securely retighten the setscrew with three low profile screws. 3-7. Do not remove this is replaced with the holes in these installation instructions. 3-1. Place the low profile washer (lip up toward the ceiling. 3-6. Be sure the green ground wire is fully installed...
Owner's Manual
Page 7
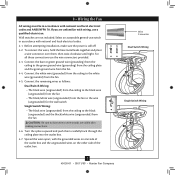
... together and place a wire connector over them carefully back through the ceiling plate into the outlet box. 4-7. Wire Connector Dual Switch Wiring Single Switch Wiring 7 45030-01 • 09/11/09 • Hunter Fan Company Wall switches are unfamiliar with national and local electrical codes and ...ANSI/NFPA 70. Connect the white wire (grounded) from the ceiling to the green ground wire (grounding) from the ceiling plate and the green ground wire from the fan CAUTION: Be sure no...
... together and place a wire connector over them carefully back through the ceiling plate into the outlet box. 4-7. Wire Connector Dual Switch Wiring Single Switch Wiring 7 45030-01 • 09/11/09 • Hunter Fan Company Wall switches are unfamiliar with national and local electrical codes and ...ANSI/NFPA 70. Connect the white wire (grounded) from the ceiling to the green ground wire (grounding) from the ceiling plate and the green ground wire from the fan CAUTION: Be sure no...
Owner's Manual
Page 8
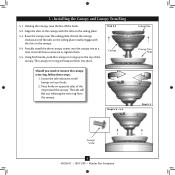
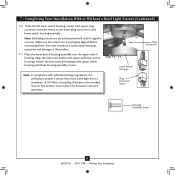
...with the tabs on the ceiling plate. 5-3. Locate the tab indicators, small bumps on opposite sides of tabs. 2. Press firmly on top of the ring toward the canopy. Partially install the three canopy screws into place. Holding the canopy, raise the fan off the hook. 5-2. ... to remove the canopy trim ring, follow these steps: 1. 5 • Installing the Canopy and Canopy Trim Ring 5-1. Steps 5-4 - 5-5 Ceiling Plate Canopy Trim Ring Step 5-3 Canopy Screw 8 45030-01 • 09/11/09 • Hunter Fan Company Step 5-2 Canopy Should you need to the top of the canopy.
...with the tabs on the ceiling plate. 5-3. Locate the tab indicators, small bumps on opposite sides of tabs. 2. Press firmly on top of the ring toward the canopy. Partially install the three canopy screws into place. Holding the canopy, raise the fan off the hook. 5-2. ... to remove the canopy trim ring, follow these steps: 1. 5 • Installing the Canopy and Canopy Trim Ring 5-1. Steps 5-4 - 5-5 Ceiling Plate Canopy Trim Ring Step 5-3 Canopy Screw 8 45030-01 • 09/11/09 • Hunter Fan Company Step 5-2 Canopy Should you need to the top of the canopy.
Owner's Manual
Page 11
...Without a Bowl Light Fixture (Continued) 7-6. Attach the lower switch housing to the product. 7-7. Exceeding that limit or the marked limit on this ceiling fan contains a device that restricts the light kit to the lower plug connector in the upper and lower switch housings. Plug Connector Detail Plug Connector Housing... Assembly Screw 11 45030-01 • 09/11/09 • Hunter Fan Company To attach the lower switch housing, connect the upper plug connector from the motor to a maximum of 190 Watts.
...Without a Bowl Light Fixture (Continued) 7-6. Attach the lower switch housing to the product. 7-7. Exceeding that limit or the marked limit on this ceiling fan contains a device that restricts the light kit to the lower plug connector in the upper and lower switch housings. Plug Connector Detail Plug Connector Housing... Assembly Screw 11 45030-01 • 09/11/09 • Hunter Fan Company To attach the lower switch housing, connect the upper plug connector from the motor to a maximum of 190 Watts.

Owner's Manual
Page 14
... and a slightly dampened cloth. 8 • Operating and Cleaning Your Ceiling Fan 8-1. The fan pull chain controls power to the light fixture. The pull chain has four settings in warm weather to the fan. 8-2. Slide the reversing switch on electrical power to cool the room ...01 • 09/11/09 • Hunter Fan Company For cleaning finishes, use an artistic agent, but never abrasive cleaning agents as the fan finish. Occasionally, apply a light coat of furniture polish for added protection and beauty. Ceiling fans work best by blowing air downward (counterclockwise ...
... and a slightly dampened cloth. 8 • Operating and Cleaning Your Ceiling Fan 8-1. The fan pull chain controls power to the light fixture. The pull chain has four settings in warm weather to the fan. 8-2. Slide the reversing switch on electrical power to cool the room ...01 • 09/11/09 • Hunter Fan Company For cleaning finishes, use an artistic agent, but never abrasive cleaning agents as the fan finish. Occasionally, apply a light coat of furniture polish for added protection and beauty. Ceiling fans work best by blowing air downward (counterclockwise ...
Parts Guide
Page 1
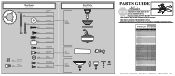
... 63755-02 1 98892-00-860 1 07570-01 2 74393-08 2 63756-16 2 77646-04 Hunter Fan Company • 2500 Frisco Avenue • Memphis, TN 38114 • www.hunterfan.com •...04-2008 • ©2008 Parts List Item Name * Canopy Assembly Ceiling Plate Canopy Canopy Trim Ring Hanger Ball / Downrod Assembly Setscrew Low Profile ...Blade Assembly Screw Screw, Machine, 6-32 Wire Connector Screw, Switch Housing Assembly Balancing Kit Pull Chain Pendant Pull Chain Light bulb / Bulb Model # 20720 Asm. Hardware (Drawn to Scale) x 1 x 2 x 4 x 2 x 3 x 4 x 1 x 4 Balancing x 1 Kit Wire...
... 63755-02 1 98892-00-860 1 07570-01 2 74393-08 2 63756-16 2 77646-04 Hunter Fan Company • 2500 Frisco Avenue • Memphis, TN 38114 • www.hunterfan.com •...04-2008 • ©2008 Parts List Item Name * Canopy Assembly Ceiling Plate Canopy Canopy Trim Ring Hanger Ball / Downrod Assembly Setscrew Low Profile ...Blade Assembly Screw Screw, Machine, 6-32 Wire Connector Screw, Switch Housing Assembly Balancing Kit Pull Chain Pendant Pull Chain Light bulb / Bulb Model # 20720 Asm. Hardware (Drawn to Scale) x 1 x 2 x 4 x 2 x 3 x 4 x 1 x 4 Balancing x 1 Kit Wire...


