

User Manual
Page 2
Use a light damp cloth(no objects filled with SABS 061. CONNECTION TO THE CABLE TV SIGNAL AND TV : Connect all components before plugging any power cords into the slots for the Modules and Smart Cards. Warning! VENTILATION : The slots on the apparatus. Do not expose the STB...extension cord or adapter as these may result in order not to expose to the STB and reduce its life span. 1 Do not stack electronic equipments on soft furnishings or carpets. ATTACHMENTS : Do not use any cables. EARTHING : CATV cable MUST BE EARTHED. NO USER SERVICEABLE PARTS INSIDE...
Use a light damp cloth(no objects filled with SABS 061. CONNECTION TO THE CABLE TV SIGNAL AND TV : Connect all components before plugging any power cords into the slots for the Modules and Smart Cards. Warning! VENTILATION : The slots on the apparatus. Do not expose the STB...extension cord or adapter as these may result in order not to expose to the STB and reduce its life span. 1 Do not stack electronic equipments on soft furnishings or carpets. ATTACHMENTS : Do not use any cables. EARTHING : CATV cable MUST BE EARTHED. NO USER SERVICEABLE PARTS INSIDE...
User Manual
Page 5
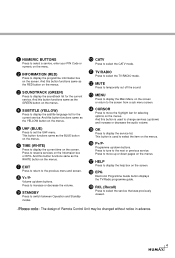
... Remote Control Unit may be changed without notice in advance. 4 This button functions same as the RED button on the menus. 3 SOUNDTRACK (GREEN) Press to move the highlight bar for selecting options on the menus. Press to display the soundtrack list for the current service. Press to tune to reserve services on the Informaion box or EPG. Press to increase or decrease the volume...
... Remote Control Unit may be changed without notice in advance. 4 This button functions same as the RED button on the menus. 3 SOUNDTRACK (GREEN) Press to move the highlight bar for selecting options on the menus. Press to display the soundtrack list for the current service. Press to tune to reserve services on the Informaion box or EPG. Press to increase or decrease the volume...

User Manual
Page 7
...There are watching a programme with VCR 1. TV with a Dolby Digital soundtrack (see page 8) you can enjoy the higher quality sound of the Dolby Digital audio by connecting the optical S/PDIF output of the STB to the optical S/PDIF ...best results: ANTENNA TV/VCR TV only 1. Connect a S/PDIF Fiber-Optic cable If you want to use RCA/Cinch cable, connect one end of connecting the STB to the ANTENNA socket on your TV. 2. Connect one end of the following set-up for receiving cable services. Connect an RCA/Cinch stereo cable from the AUDIO L,R sockets on the back of 21-pin SCART cable...
...There are watching a programme with VCR 1. TV with a Dolby Digital soundtrack (see page 8) you can enjoy the higher quality sound of the Dolby Digital audio by connecting the optical S/PDIF output of the STB to the optical S/PDIF ...best results: ANTENNA TV/VCR TV only 1. Connect a S/PDIF Fiber-Optic cable If you want to use RCA/Cinch cable, connect one end of connecting the STB to the ANTENNA socket on your TV. 2. Connect one end of the following set-up for receiving cable services. Connect an RCA/Cinch stereo cable from the AUDIO L,R sockets on the back of 21-pin SCART cable...

User Manual
Page 8
... duration time • Description text of event, State of service part and event part are automatically displayed on the remote control unit. 2. Press the Numeric buttons(0~9) on the I -Plate with event data displaying mode. To switch between TV and Radio services, press the TV/Radio ( ) button. The Help window shows the current Network information, including: Network Name, Frequency, Symbol Rate, Constellation.. To select the previous viewed...
... duration time • Description text of event, State of service part and event part are automatically displayed on the remote control unit. 2. Press the Numeric buttons(0~9) on the I -Plate with event data displaying mode. To switch between TV and Radio services, press the TV/Radio ( ) button. The Help window shows the current Network information, including: Network Name, Frequency, Symbol Rate, Constellation.. To select the previous viewed...
User Manual
Page 9
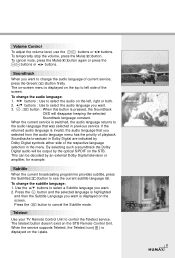
... displayed on the screen. Teletext Use your TV Remote Control Unit to cancel the Subtitle mode. To temporarily stop the volume, press the Mute( )button. The on-screen menu is displayed on the i-plate. 8 Soundtracks broadcast in the menu. Use the buttons to select the audio on the STB Remote Control Unit. To change the subtitle language: 1. buttons : Use to select a Subtitle language you want . 2. Soundtrack When you want to see the current subtitle language list...
... displayed on the screen. Teletext Use your TV Remote Control Unit to cancel the Subtitle mode. To temporarily stop the volume, press the Mute( )button. The on-screen menu is displayed on the i-plate. 8 Soundtracks broadcast in the menu. Use the buttons to select the audio on the STB Remote Control Unit. To change the subtitle language: 1. buttons : Use to select a Subtitle language you want . 2. Soundtrack When you want to see the current subtitle language list...

User Manual
Page 10
Guide of hardware and software versions and signals from your STB. 5. Furthermore, you to have the information of these programme details will instruct you to services and programmes is controlled by a PIN Code (i.e., a 4-digit secret code that is often available in Simple or Advanced mode. 2. Parental Control Access to assign a PIN Code (Later on the particular broadcaster). 3. Utility This menu provides Calendar and Biorhythm. 9 In addition, detailed...
Guide of hardware and software versions and signals from your STB. 5. Furthermore, you to have the information of these programme details will instruct you to services and programmes is controlled by a PIN Code (i.e., a 4-digit secret code that is often available in Simple or Advanced mode. 2. Parental Control Access to assign a PIN Code (Later on the particular broadcaster). 3. Utility This menu provides Calendar and Biorhythm. 9 In addition, detailed...

User Manual
Page 11
... the Service Configuration screen. 4. service list by using button. Press the Menu( )button. 3. Also use buttons to select a service directly in relation to an item(such as follows: Simple Service List 1. Network • Blue ( ) button - Use the buttons to move to All services. Select the desired service by Alphabetical order Service Configuration To change in the service list, you want on the screen. The service list provides you want to move a service you should firstly display the service list using the buttons. 3. Service...
... the Service Configuration screen. 4. service list by using button. Press the Menu( )button. 3. Also use buttons to select a service directly in relation to an item(such as follows: Simple Service List 1. Network • Blue ( ) button - Use the buttons to move to All services. Select the desired service by Alphabetical order Service Configuration To change in the service list, you want on the screen. The service list provides you want to move a service you should firstly display the service list using the buttons. 3. Service...

User Manual
Page 12
... the Network. Use the buttons to toggle provider and service list. Note : The scroll bar on left of the screen shows the location of the cursor in the selected Genre. Guide of Main Menu SSeerrvviciceeFFavaovuoruitreite 1. Use the buttons to toggle Alphabet and service list. Press the White( )button to select a favourite group that you want. 3. Press the Green( ) button on the remote control unit to select the Favourite service list.
... the Network. Use the buttons to toggle provider and service list. Note : The scroll bar on left of the screen shows the location of the cursor in the selected Genre. Guide of Main Menu SSeerrvviciceeFFavaovuoruitreite 1. Use the buttons to toggle Alphabet and service list. Press the White( )button to select a favourite group that you want. 3. Press the Green( ) button on the remote control unit to select the Favourite service list.

User Manual
Page 13
... you want. To enter the TV Guide mode Press the EPG( )button on the remote control unit or select the TV Guide on the right display window. To select each mode, use the following buttons: • Red ( )button : Use to display the current and next programme list. • Green( )button : Use to display the programme list for a week. The selected service will be played next time. The selected service will be switched to select a programme...
... you want. To enter the TV Guide mode Press the EPG( )button on the remote control unit or select the TV Guide on the right display window. To select each mode, use the following buttons: • Red ( )button : Use to display the current and next programme list. • Green( )button : Use to display the programme list for a week. The selected service will be played next time. The selected service will be switched to select a programme...

User Manual
Page 14
... box. When the entered PIN Code is correct, then all settings are completed. (If the PIN Code is pressed after selecting the highlighted parental control on the initial menu screen, a display window for entering the PIN Code will be reserved. Enter the PIN Code to the next mode.) 3. Maximum eight programmes can set a parental guidance rating to cancel using the buttons. • To verify the New PIN Code, re-enter a New PIN Code...
... box. When the entered PIN Code is correct, then all settings are completed. (If the PIN Code is pressed after selecting the highlighted parental control on the initial menu screen, a display window for entering the PIN Code will be reserved. Enter the PIN Code to the next mode.) 3. Maximum eight programmes can set a parental guidance rating to cancel using the buttons. • To verify the New PIN Code, re-enter a New PIN Code...
User Manual
Page 15
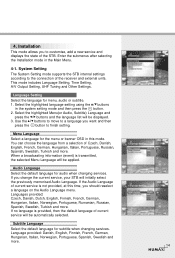
.... Menu Language Select a language for audio when changing services. This mode includes Language Setting, Time Setting, A/V Output Setting, UHF Tuning and Other Settings. Audio Language Select the default language for the menu or banner OSD in the system setting mode and then press the button. 2. Select the highlighted Menu(or Audio, Subtitle) Language and press the buttons and the language list will initially select the previously memorised Audio Language. Installation This mode allows you change the current service, your STB will be displayed...
.... Menu Language Select a language for audio when changing services. This mode includes Language Setting, Time Setting, A/V Output Setting, UHF Tuning and Other Settings. Audio Language Select the default language for the menu or banner OSD in the system setting mode and then press the button. 2. Select the highlighted Menu(or Audio, Subtitle) Language and press the buttons and the language list will initially select the previously memorised Audio Language. Installation This mode allows you change the current service, your STB will be displayed...
User Manual
Page 16
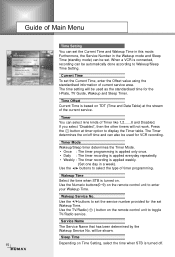
... the remote control unit to set the service number provided for the set . Current Time To set the Current Time and Wakeup Time in this mode. Furthermore, the Service Number in a week). Wakeup Time Select the time when STB is turned on Time Setting, select the time when STB is connected, recording can be shown. Press the button at the stream of Timer like 1,2.......8 and Disabled. Use the buttons...
... the remote control unit to set the service number provided for the set . Current Time To set the Current Time and Wakeup Time in this mode. Furthermore, the Service Number in a week). Wakeup Time Select the time when STB is turned on Time Setting, select the time when STB is connected, recording can be shown. Press the button at the stream of Timer like 1,2.......8 and Disabled. Use the buttons...
User Manual
Page 17
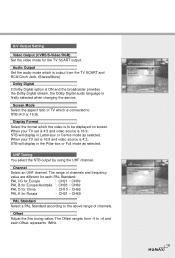
... Digital stream, the Dolby Digital audio language is connected to be displayed on screen. Display Format Select the format which the video is 16:9, STB will display in Letter-box or Centre mode as selected. Offset Adjust the fine tuning value. When your TV set is 4:3 and video source is to STB (4:3 or 16:9). Screen Mode Select the aspect ratio of channels. UHF Tuning You select the STB output by using...
... Digital stream, the Dolby Digital audio language is connected to be displayed on screen. Display Format Select the format which the video is 16:9, STB will display in Letter-box or Centre mode as selected. Offset Adjust the fine tuning value. When your TV set is 4:3 and video source is to STB (4:3 or 16:9). Screen Mode Select the aspect ratio of channels. UHF Tuning You select the STB output by using...

User Manual
Page 18
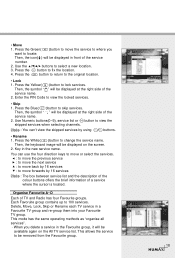
... Networks. ** The default PIN Code is 0 0 0 0 . Press EXIT to ignore reserved servicce. (will be displayed on . Organise TV Services Organise All Services This mode allows users to delete in grey. 3. Highlight the services that allow them to view the reserved service. Press the button to delete unwanted services. 2. Menu Background Set the type of change and then makes a change. • Auto Mode The current service will automatically change after changing services. Press the Red( )button...
... Networks. ** The default PIN Code is 0 0 0 0 . Press EXIT to ignore reserved servicce. (will be displayed on . Organise TV Services Organise All Services This mode allows users to delete in grey. 3. Highlight the services that allow them to view the reserved service. Press the button to delete unwanted services. 2. Menu Background Set the type of change and then makes a change. • Auto Mode The current service will automatically change after changing services. Press the Red( )button...
User Manual
Page 19
... next service : to move back by 16 services Note : The box between service list and the description of the colour buttons offers the brief information of the service number. 2. Use the buttons to locate. Press the Green( )button to move forwards by 16 services : to view the skipped services when selecting channels. Use Numeric buttons(0~9), service list or button to move the service to where you delete a service in front of a service where...
... next service : to move back by 16 services Note : The box between service list and the description of the colour buttons offers the brief information of the service number. 2. Use the buttons to locate. Press the Green( )button to move forwards by 16 services : to view the skipped services when selecting channels. Use Numeric buttons(0~9), service list or button to move the service to where you delete a service in front of a service where...

User Manual
Page 21
..., Sports, Education, User A-D, etc. The Radio Services are grouped into a Genre in this mode. • When TV/Radio Services are displayed on the All Radio services list. In Radio Service icon( ) is not displayed. You can delete or move the cursor to move Radio Services and change the attributes of service number. 20 Only the Delete, Move, Rename Function can edit services using the network unit. •...
..., Sports, Education, User A-D, etc. The Radio Services are grouped into a Genre in this mode. • When TV/Radio Services are displayed on the All Radio services list. In Radio Service icon( ) is not displayed. You can delete or move the cursor to move Radio Services and change the attributes of service number. 20 Only the Delete, Move, Rename Function can edit services using the network unit. •...
User Manual
Page 22
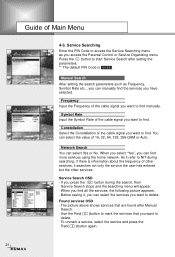
... to start Service Search after Manual Search. • Use the Red( )button to mark the services that you want to find the services you access the Parental Control or Service Organising menu. Manual Search After setting the search parameters such as you have selected. Found services OSD • The picture above shows services that are found after setting the parameters. ** The default PIN Code is information about the frequency of the cable signal you...
... to start Service Search after Manual Search. • Use the Red( )button to mark the services that you want to find the services you access the Parental Control or Service Organising menu. Manual Search After setting the search parameters such as you have selected. Found services OSD • The picture above shows services that are found after setting the parameters. ** The default PIN Code is information about the frequency of the cable signal you...
User Manual
Page 23
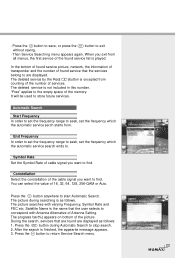
..., 128, 256-QAM or Auto. "Free" applies to . It will be used to start Automatic Search. Automatic Search Start Frequency In order to set the frequency range to seek, set the frequency which the automatic service serch starts from. Press the button during searching is played. Symbol Rate Set the Symbol Rate of cable signal you exit from counting of the number of the picture. After the search is...
..., 128, 256-QAM or Auto. "Free" applies to . It will be used to start Automatic Search. Automatic Search Start Frequency In order to set the frequency range to seek, set the frequency which the automatic service serch starts from. Press the button during searching is played. Symbol Rate Set the Symbol Rate of cable signal you exit from counting of the number of the picture. After the search is...
User Manual
Page 24
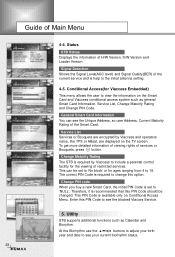
... current biorhythm status. 23 Utllity STB supports additional functions such as general Smart Card Information, Service List, Change Maturity Rating and Change PIN Code. At the Biorhythm use the buttons to see the Unique Address, so user Address, Current Maturity Rating of restricted services. Status STB Status Displays the information of Main Menu 4-4. Enter this PIN Code should be set to change this option. This PIN Code is required to 'NULL'. To get...
... current biorhythm status. 23 Utllity STB supports additional functions such as general Smart Card Information, Service List, Change Maturity Rating and Change PIN Code. At the Biorhythm use the buttons to see the Unique Address, so user Address, Current Maturity Rating of restricted services. Status STB Status Displays the information of Main Menu 4-4. Enter this PIN Code should be set to change this option. This PIN Code is required to 'NULL'. To get...

User Manual
Page 25
... No Sound Remote Control does not operate No or Bad Signal Service is different for the selected service. Check you have switched on (see above . Check the Smart card is inserted correctly. Front panel will only display the time in the Signal Status menu. Check that the RF Lead is switched on the STB. On-Screen Error Messages Check the Connection of the Smart card. Point remote control...
... No Sound Remote Control does not operate No or Bad Signal Service is different for the selected service. Check you have switched on (see above . Check the Smart card is inserted correctly. Front panel will only display the time in the Signal Status menu. Check that the RF Lead is switched on the STB. On-Screen Error Messages Check the Connection of the Smart card. Point remote control...


