

User Manual
Page 1
Please read this manual carefully before setting up your Personal Video Recorder PVR-9150T. Digital Personal Video Recorder User's Manual PVR-9150T The default password is 0000.
Please read this manual carefully before setting up your Personal Video Recorder PVR-9150T. Digital Personal Video Recorder User's Manual PVR-9150T The default password is 0000.

User Manual
Page 2
.... • Alternate Instances If a scheduled recording(s) overlap with other programmes set both parts to record you for purchasing a Humax PVR-9150T product. GB1 User's Manual If the programme changes to a different day or time the PVR-9150T will automatically be given the option to set to record. Freeview Playback explained: • Accurate recording The start and...
.... • Alternate Instances If a scheduled recording(s) overlap with other programmes set both parts to record you for purchasing a Humax PVR-9150T product. GB1 User's Manual If the programme changes to a different day or time the PVR-9150T will automatically be given the option to set to record. Freeview Playback explained: • Accurate recording The start and...
User Manual
Page 3
...user's manual is a trademark of any importance to your product for purchasing a HUMAX product. Meaning of Symbols To reduce the risk of copyright and copyright law. Copyright (Copyright © 2008 HUMAX Corporation) Not to be able to change without HUMAX's prior...problems and information of Telenor Conax AS. This symbol indicates dangerous voltage inside . GB2 User's Manual Please read this manual. The information in this user's manual carefully to qualified service personnel. This symbol indicates important instructions accompanying the product. Trademarks •...
...user's manual is a trademark of any importance to your product for purchasing a HUMAX product. Meaning of Symbols To reduce the risk of copyright and copyright law. Copyright (Copyright © 2008 HUMAX Corporation) Not to be able to change without HUMAX's prior...problems and information of Telenor Conax AS. This symbol indicates dangerous voltage inside . GB2 User's Manual Please read this manual. The information in this user's manual carefully to qualified service personnel. This symbol indicates important instructions accompanying the product. Trademarks •...
User Manual
Page 4
...you bought this product, you should check that you are in a Freeview Coverage area in one of the follow ways: • Contact the Humax Customer Helpline on 0844 669 8800 for environmentally safe recycling. • Business users: Contact your aerial and cabling you can receive Digital TV....1. You can receive Digital TV in your area. • Text your system.) For any further information contact the Humax Customer Helpline: • Tel: 0844 669 8800 • Email : uksupport@humax-digital.co.uk • Open : Lines open Monday to Friday 9:00am to 5:30pm (Excludes Bank Holidays) GB3 ...
...you bought this product, you should check that you are in a Freeview Coverage area in one of the follow ways: • Contact the Humax Customer Helpline on 0844 669 8800 for environmentally safe recycling. • Business users: Contact your aerial and cabling you can receive Digital TV....1. You can receive Digital TV in your area. • Text your system.) For any further information contact the Humax Customer Helpline: • Tel: 0844 669 8800 • Email : uksupport@humax-digital.co.uk • Open : Lines open Monday to Friday 9:00am to 5:30pm (Excludes Bank Holidays) GB3 ...
User Manual
Page 5
... the cable from the mains before cleaning. • Use a light damp cloth (no objects filled with any object, and do so can fall. GB4 User's Manual ATTACHMENTS • Do not use any maintenance or installation procedures. 2. CONNECTION TO THE TV • Disconnect the product from the TV. CONNECTION TO THE AERIAL...
... the cable from the mains before cleaning. • Use a light damp cloth (no objects filled with any object, and do so can fall. GB4 User's Manual ATTACHMENTS • Do not use any maintenance or installation procedures. 2. CONNECTION TO THE TV • Disconnect the product from the TV. CONNECTION TO THE AERIAL...
User Manual
Page 6
... the product or turn the power off suddenly while the hard disk drive is out of lightning. 3. To avoid damage of order. Warning 1. GB5 User's Manual REPLACEMENT of PARTS • When replacement of parts is out of product; • Do not use the product when defective, serious damage can touch dangerous...
... the product or turn the power off suddenly while the hard disk drive is out of lightning. 3. To avoid damage of order. Warning 1. GB5 User's Manual REPLACEMENT of PARTS • When replacement of parts is out of product; • Do not use the product when defective, serious damage can touch dangerous...
User Manual
Page 7
... GB20 4. Record GB39 7.1 Recorded Programme GB39 7.2 Recording Schedule GB42 7.3 HDD Control GB45 7.4 Recording's Start/End Time GB45 GB6 User's Manual Programme Guide GB35 6.1 Viewing Programme Guide Information GB35 6.2 Selecting Channel Group GB36 6.3 Using Time Bar GB37 6.4 Schedule GB37 6.5 Finding Programmes ...Contents GB8 1.2 Front Panel GB9 1.3 Conditional Access GB10 1.4 Rear Panel GB11 1.5 Remote Control GB12 2. PVR GB29 5.1 Time Shifted Recording (TSR GB29 5.2 Recording GB31 5.3 Programme Playback in -Picture) Screen GB27 4.8 Game GB28 5. Contents 1.
... GB20 4. Record GB39 7.1 Recorded Programme GB39 7.2 Recording Schedule GB42 7.3 HDD Control GB45 7.4 Recording's Start/End Time GB45 GB6 User's Manual Programme Guide GB35 6.1 Viewing Programme Guide Information GB35 6.2 Selecting Channel Group GB36 6.3 Using Time Bar GB37 6.4 Schedule GB37 6.5 Finding Programmes ...Contents GB8 1.2 Front Panel GB9 1.3 Conditional Access GB10 1.4 Rear Panel GB11 1.5 Remote Control GB12 2. PVR GB29 5.1 Time Shifted Recording (TSR GB29 5.2 Recording GB31 5.3 Programme Playback in -Picture) Screen GB27 4.8 Game GB28 5. Contents 1.
User Manual
Page 8
Specification GB68 13.5 Glossary GB70 13.6 Service and Support GB71 GB7 User's Manual System GB61 12.1 Status GB61 12.2 Signal Detection GB61 12.3 Common Interface GB61 13. Appendix GB62 13.1 Menu Map GB62 13.2 Trouble Shooting GB63....1 OTA (Over the Air GB57 11.2 Updating Software from Menu GB58 11.3 Software Update from PC GB60 12. Installation GB54 10.1 Automatic Search GB54 10.2 Manual Search GB55 10.3 Default Setting GB56 10.4 Antenna Power GB56 11. Preferences GB46 8.1 Parental Control GB46 8.2 Language Setting GB47 8.3 Time Setting GB48 8.4 A/V Control GB49 ...
Specification GB68 13.5 Glossary GB70 13.6 Service and Support GB71 GB7 User's Manual System GB61 12.1 Status GB61 12.2 Signal Detection GB61 12.3 Common Interface GB61 13. Appendix GB62 13.1 Menu Map GB62 13.2 Trouble Shooting GB63....1 OTA (Over the Air GB57 11.2 Updating Software from Menu GB58 11.3 Software Update from PC GB60 12. Installation GB54 10.1 Automatic Search GB54 10.2 Manual Search GB55 10.3 Default Setting GB56 10.4 Antenna Power GB56 11. Preferences GB46 8.1 Parental Control GB46 8.2 Language Setting GB47 8.3 Time Setting GB48 8.4 A/V Control GB49 ...
User Manual
Page 9
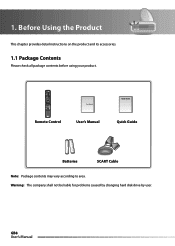
GB8 User's Manual Warning: The company shall not be liable for problems caused by changing hard disk drive by user. 1. Before Using the Product This chapter provides detail instructions on the product and its accessories. 1.1 Package Contents Please check all package contents before using your product. User's Manual Remote Control User's Manual Quick Guide Quick Guide Batteries SCART Cable Note: Package contents may vary according to area.
GB8 User's Manual Warning: The company shall not be liable for problems caused by changing hard disk drive by user. 1. Before Using the Product This chapter provides detail instructions on the product and its accessories. 1.1 Package Contents Please check all package contents before using your product. User's Manual Remote Control User's Manual Quick Guide Quick Guide Batteries SCART Cable Note: Package contents may vary according to area.
User Manual
Page 10
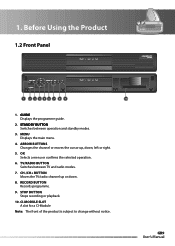
... recording or playback. 10. CI-MODULE SLOT A slot for a CI-Module Note: The front of the product is subject to change without notice. GB9 User's Manual Before Using the Product 1.2 Front Panel 1 23456 7 8 9 10 1. MENU Displays the main menu. 4. 1. CH-/CH+ BUTTON Moves the TV/radio channel up , down . 8. STANDBY BUTTON...
... recording or playback. 10. CI-MODULE SLOT A slot for a CI-Module Note: The front of the product is subject to change without notice. GB9 User's Manual Before Using the Product 1.2 Front Panel 1 23456 7 8 9 10 1. MENU Displays the main menu. 4. 1. CH-/CH+ BUTTON Moves the TV/radio channel up , down . 8. STANDBY BUTTON...
User Manual
Page 11
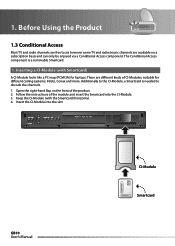
Inserting a CI-Module (with the Smartcard) horizontal. 4. Additionally to the CI-Module, a Smartcard is a removable Smartcard. 1. GB10 User's Manual CI-Module Smartcard Open the right-hand flap on a subscription basis and can only be enjoyed via a Conditional Access component. There are different kinds of ...
Inserting a CI-Module (with the Smartcard) horizontal. 4. Additionally to the CI-Module, a Smartcard is a removable Smartcard. 1. GB10 User's Manual CI-Module Smartcard Open the right-hand flap on a subscription basis and can only be enjoyed via a Conditional Access component. There are different kinds of ...
User Manual
Page 12
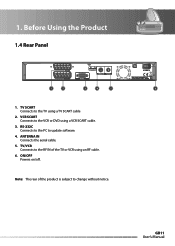
TV/VCR Connects to the RF IN of the product is subject to update software. 4. VCR SCART Connects to the TV using a TV SCART cable 2. Note: The rear of the TV or VCR using a VCR SCART cable. 3. ON/OFF Powers on/off. RS-232C Connects to the PC to change without notice. 1. GB11 User's Manual TV SCART Connects to the VCR or DVD using an RF cable. 6. Before Using the Product 1.4 Rear Panel 1 2 3 4 5 6 1. ANTENNA IN Connects the aerial cable. 5.
TV/VCR Connects to the RF IN of the product is subject to update software. 4. VCR SCART Connects to the TV using a TV SCART cable 2. Note: The rear of the TV or VCR using a VCR SCART cable. 3. ON/OFF Powers on/off. RS-232C Connects to the PC to change without notice. 1. GB11 User's Manual TV SCART Connects to the VCR or DVD using an RF cable. 6. Before Using the Product 1.4 Rear Panel 1 2 3 4 5 6 1. ANTENNA IN Connects the aerial cable. 5.
User Manual
Page 13
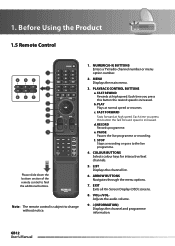
... for interactive/text channels. 5. PLAY Plays at normal speed or resumes. MENU Displays the main menu. 3. ARROW BUTTONS Navigates through the menu options. 7. d. 1. GB12 User's Manual
... for interactive/text channels. 5. PLAY Plays at normal speed or resumes. MENU Displays the main menu. 3. ARROW BUTTONS Navigates through the menu options. 7. d. 1. GB12 User's Manual
User Manual
Page 14
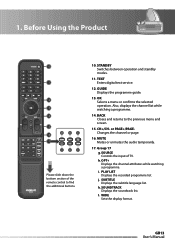
... of TV. OK Selects a menu or confirms the selected operation. PLAY LIST Displays the recorded programme list. j. SUBTITLE Displays the subtitle language list. GB13 User's Manual
... of TV. OK Selects a menu or confirms the selected operation. PLAY LIST Displays the recorded programme list. j. SUBTITLE Displays the subtitle language list. GB13 User's Manual

User Manual
Page 15
...+/CHChanges the PIP channel. SLOW MOTION Plays the programme in Picture) screen. PIP BUTTONS s. MOVE PIP Changes the position of saved viewing positions. v. GB14 User's Manual INSTANT REPLAY Jumps back and plays from that location. (See section 5.6) q. PIP Displays the PIP (Picture in slow motion. 1. TV/RADIO Switches between the main...
...+/CHChanges the PIP channel. SLOW MOTION Plays the programme in Picture) screen. PIP BUTTONS s. MOVE PIP Changes the position of saved viewing positions. v. GB14 User's Manual INSTANT REPLAY Jumps back and plays from that location. (See section 5.6) q. PIP Displays the PIP (Picture in slow motion. 1. TV/RADIO Switches between the main...

User Manual
Page 16
RF Cable TV Antenna IN GB15 User's Manual Note: If you have. 2. Select the most appropriate procedure depending on the equipment you encounter any problems setting up your product, please contact your local ...
RF Cable TV Antenna IN GB15 User's Manual Note: If you have. 2. Select the most appropriate procedure depending on the equipment you encounter any problems setting up your product, please contact your local ...

User Manual
Page 17
SCART Cable TV SCART GB16 User's Manual Using SCART Cable Connect the product and the TV using a SCART cable. Setup 2.2 Connecting the TV 1. 2.
SCART Cable TV SCART GB16 User's Manual Using SCART Cable Connect the product and the TV using a SCART cable. Setup 2.2 Connecting the TV 1. 2.
User Manual
Page 18
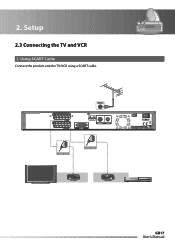
2. SCART Cable SCART Cable TV SCART VCR SCART GB17 User's Manual Using SCART Cable Connect the product and the TV/VCR using a SCART cable. Setup 2.3 Connecting the TV and VCR 1.
2. SCART Cable SCART Cable TV SCART VCR SCART GB17 User's Manual Using SCART Cable Connect the product and the TV/VCR using a SCART cable. Setup 2.3 Connecting the TV and VCR 1.
User Manual
Page 19
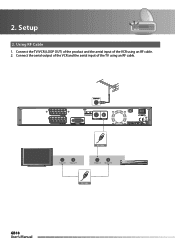
Using RF Cable 1. 2. Connect the TV/VCR (LOOP OUT) of the product and the aerial input of the TV using an RF cable. 2. Connect the aerial output of the VCR and the aerial input of the VCR using an RF cable. TV Antenna IN TV Antenna OUT RF Cable VCR Antenna IN VCR Antenna OUT RF Cable GB18 User's Manual Setup 2.
Using RF Cable 1. 2. Connect the TV/VCR (LOOP OUT) of the product and the aerial input of the TV using an RF cable. 2. Connect the aerial output of the VCR and the aerial input of the VCR using an RF cable. TV Antenna IN TV Antenna OUT RF Cable VCR Antenna IN VCR Antenna OUT RF Cable GB18 User's Manual Setup 2.
User Manual
Page 20
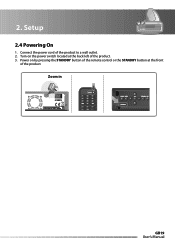
Turn on by pressing the STANDBY button of the remote control or the STANDBY button at the back left of the product. Power on the power switch located at the front of the product. 3. Connect the power cord of the product to a wall outlet. 2. Setup 2.4 Powering On 1. Zoom in 1 4 7 MENU STANDBY 2 3 5 6 8 9 0 TEXT GB19 User's Manual 2.
Turn on by pressing the STANDBY button of the remote control or the STANDBY button at the back left of the product. Power on the power switch located at the front of the product. 3. Connect the power cord of the product to a wall outlet. 2. Setup 2.4 Powering On 1. Zoom in 1 4 7 MENU STANDBY 2 3 5 6 8 9 0 TEXT GB19 User's Manual 2.


