

User Manual
Page 1
HD Digital Receiver User's Manual The default password is 0000.
HD Digital Receiver User's Manual The default password is 0000.

User Manual
Page 2
...information in writing except approval of ownership of copyright and copyright law. Copyright (Copyright © 2010 HUMAX Corporation) Not to be able to change without HUMAX's prior consent in this manual. Warranty The warranty does not cover parts which may become defective due...of Irdeto Access B.V. • Manufactured under license from Dolby Laboratories. Keep this user's manual carefully to your product for purchasing a HUMAX product. Trademarks • Irdeto is subject to safely install, use and maintain the product at maximum performance. Thank you for future ...
...information in writing except approval of ownership of copyright and copyright law. Copyright (Copyright © 2010 HUMAX Corporation) Not to be able to change without HUMAX's prior consent in this manual. Warranty The warranty does not cover parts which may become defective due...of Irdeto Access B.V. • Manufactured under license from Dolby Laboratories. Keep this user's manual carefully to your product for purchasing a HUMAX product. Trademarks • Irdeto is subject to safely install, use and maintain the product at maximum performance. Thank you for future ...

User Manual
Page 3
No user serviceable parts inside the product that indicate hazardous situations. • Warning Indicates a hazardous situation which could result in serious injury. • Caution Indicates a situation which could damage the equipment or other types of wastes and recycle it responsibly to promote the sustainable reuse of material resources. This product should not be mixed with other commercial wastes for environmentally safe recycling. • Business users: Contact your supplier and check the terms and conditions of the purchase contract. This symbol indicates dangerous ...
No user serviceable parts inside the product that indicate hazardous situations. • Warning Indicates a hazardous situation which could result in serious injury. • Caution Indicates a situation which could damage the equipment or other types of wastes and recycle it responsibly to promote the sustainable reuse of material resources. This product should not be mixed with other commercial wastes for environmentally safe recycling. • Business users: Contact your supplier and check the terms and conditions of the purchase contract. This symbol indicates dangerous ...

User Manual
Page 4
VENTILATION • The slots on top of the product must be left uncovered to allow proper airflow into the unit. • Do not stand the product on soft furnishings or carpets. • Do not stack electronic equipments on top of the product. 6. Please read the following safety precautions carefully. If you are not sure of the type of power supplied to your home, consult your local power company. • Disconnect the product from the wall outlet before you start any maintenance or installation procedures. 2. OVERLOADING • Do not overload a wall outlet, extension cord or...
VENTILATION • The slots on top of the product must be left uncovered to allow proper airflow into the unit. • Do not stand the product on soft furnishings or carpets. • Do not stack electronic equipments on top of the product. 6. Please read the following safety precautions carefully. If you are not sure of the type of power supplied to your home, consult your local power company. • Disconnect the product from the wall outlet before you start any maintenance or installation procedures. 2. OVERLOADING • Do not overload a wall outlet, extension cord or...

User Manual
Page 5
This will prevent damage to the unit due to lightning and power-surges. 12.EXTRANEOUS OBJECTS • Do not insert anything through the openings in additional damage to electromagnetic influences, such as a TV or a VCR. • Do not block the openings with any object, and do not place the product on a bed, sofa, rug, or other similar surface. • If you have followed the manufacturer's instructions for long periods of parts is adequate ventilation and that you place the product on an unstable cart, stand, tripod, bracket, or table where it can fall. • A falling product can...
This will prevent damage to the unit due to lightning and power-surges. 12.EXTRANEOUS OBJECTS • Do not insert anything through the openings in additional damage to electromagnetic influences, such as a TV or a VCR. • Do not block the openings with any object, and do not place the product on a bed, sofa, rug, or other similar surface. • If you have followed the manufacturer's instructions for long periods of parts is adequate ventilation and that you place the product on an unstable cart, stand, tripod, bracket, or table where it can fall. • A falling product can...

User Manual
Page 6
If you continue to use the product when it . Make sure to the product and reduce its life span. To avoid damage of product; • Do not use the product when defective, serious damage can be caused to prevent the cover vinyl from the power cord in case of lightning. 3. It may cause damage to contact your local product distributor if the product is out of order. To avoid damage of the power cord or plug; • Do not modify or process the power cord or plug arbitrarily. • Do not bend or twist the power cord. • Make sure to disconnect the power cord holding the ...
If you continue to use the product when it . Make sure to the product and reduce its life span. To avoid damage of product; • Do not use the product when defective, serious damage can be caused to prevent the cover vinyl from the power cord in case of lightning. 3. It may cause damage to contact your local product distributor if the product is out of order. To avoid damage of the power cord or plug; • Do not modify or process the power cord or plug arbitrarily. • Do not bend or twist the power cord. • Make sure to disconnect the power cord holding the ...
User Manual
Page 7
Basic Operation GB21 4.1 Switching Channel GB21 4.2 Volume Control GB21 4.3 Resolution GB21 4.4 Sleep GB21 4.5 Wide GB21 4.6 Audio GB21 4.7 Subtitle GB22 4.8 Teletext GB22 4.9 Programme Information (i-plate GB22 5. Channel List GB23 6. TV Guide GB24 6.1 Table Guide GB24 6.2 List Guide GB24 6.3 Schedule GB24 6.4 Find GB25 7. Menu GB26 7.1 Preferences GB26 7.2 Edit Channels GB27 7.3 Installation GB28 7.4 System GB32 8. Software Update GB33 8.1 OTA (Over the Air GB33 9. Installation Wizard GB18 3.1 Language GB18 3.2 Time Zone GB18 3.3 Antenna Type GB18 3.4 Antenna ...
Basic Operation GB21 4.1 Switching Channel GB21 4.2 Volume Control GB21 4.3 Resolution GB21 4.4 Sleep GB21 4.5 Wide GB21 4.6 Audio GB21 4.7 Subtitle GB22 4.8 Teletext GB22 4.9 Programme Information (i-plate GB22 5. Channel List GB23 6. TV Guide GB24 6.1 Table Guide GB24 6.2 List Guide GB24 6.3 Schedule GB24 6.4 Find GB25 7. Menu GB26 7.1 Preferences GB26 7.2 Edit Channels GB27 7.3 Installation GB28 7.4 System GB32 8. Software Update GB33 8.1 OTA (Over the Air GB33 9. Installation Wizard GB18 3.1 Language GB18 3.2 Time Zone GB18 3.3 Antenna Type GB18 3.4 Antenna ...

User Manual
Page 8
Please check all package contents before using your product. ** Note: • Faults may vary according to area. Always keep the battery inserted in the remote control. • Package contents may occur if the remote control is left without battery for a long time. This chapter provides detailed instructions on the product and its accessories.
Please check all package contents before using your product. ** Note: • Faults may vary according to area. Always keep the battery inserted in the remote control. • Package contents may occur if the remote control is left without battery for a long time. This chapter provides detailed instructions on the product and its accessories.

User Manual
Page 9
TV/RADIO BUTTON Switches between operation and standby modes. 2. Displays the channel list while watching a programme. 5. MENU BUTTON Displays the main menu. 9. Open the right-hand flap on the front panel of the product is subject to expose the card slots. ** ** 1. STANDBY/TV/RADIO LED The light is emitted when the product is displayed. 4. STATUS DISPLAY The product status is in each mode. 3. SMARTCARD SLOTS Slots for Smartcard ** Note: The front panel of the product to change without notice. STANDBY BUTTON Switches between TV and radio modes. 6. OK BUTTON Selects a ...
TV/RADIO BUTTON Switches between operation and standby modes. 2. Displays the channel list while watching a programme. 5. MENU BUTTON Displays the main menu. 9. Open the right-hand flap on the front panel of the product is subject to expose the card slots. ** ** 1. STANDBY/TV/RADIO LED The light is emitted when the product is displayed. 4. STATUS DISPLAY The product status is in each mode. 3. SMARTCARD SLOTS Slots for Smartcard ** Note: The front panel of the product to change without notice. STANDBY BUTTON Switches between TV and radio modes. 6. OK BUTTON Selects a ...

User Manual
Page 10
The Smartcard looks similar to a credit card and is inserted into the slot. A valid Smartcard entitles you to view and listen to all the channels you choose to subscribe to. 1. Insert the Smartcard into the slot behind the right-hand front flap of the product to expose the card slots. 2. Open the right-hand flap on a subscription basis and can only be enjoyed via a Conditional Access component. Although some TV and radio services are free to air, others are available on the front panel of the product. Hold the Smartcard horizontally with the electronic chip (small square-shaped, ...
The Smartcard looks similar to a credit card and is inserted into the slot. A valid Smartcard entitles you to view and listen to all the channels you choose to subscribe to. 1. Insert the Smartcard into the slot behind the right-hand front flap of the product to expose the card slots. 2. Open the right-hand flap on a subscription basis and can only be enjoyed via a Conditional Access component. Although some TV and radio services are free to air, others are available on the front panel of the product. Hold the Smartcard horizontally with the electronic chip (small square-shaped, ...
User Manual
Page 11
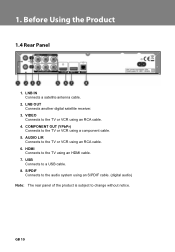
S/PDIF Connects to change without notice. USB Connects to the TV or VCR using an RCA cable. 6. ** 1. LNB IN Connects a satellite antenna cable. 2. COMPONENT OUT (YPbPr) Connects to the TV or VCR using an S/PDIF cable. (digital audio) ** Note: The rear panel of the product is subject to the audio system using a component cable. 5. HDMI Connects to the TV or VCR using an HDMI cable. 7. VIDEO Connects to the TV using an RCA cable. 4. LNB OUT Connects another digital satellite receiver. 3. AUDIO L/R Connects to a USB cable. 8.
S/PDIF Connects to change without notice. USB Connects to the TV or VCR using an RCA cable. 6. ** 1. LNB IN Connects a satellite antenna cable. 2. COMPONENT OUT (YPbPr) Connects to the TV or VCR using an S/PDIF cable. (digital audio) ** Note: The rear panel of the product is subject to the audio system using a component cable. 5. HDMI Connects to the TV or VCR using an HDMI cable. 7. VIDEO Connects to the TV using an RCA cable. 4. LNB OUT Connects another digital satellite receiver. 3. AUDIO L/R Connects to a USB cable. 8.

User Manual
Page 12
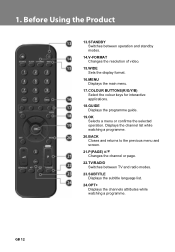
MUTE Mutes or unmutes the audio temporarily. 2. SOURCE (currently not supported) 4. i (Information) Displays the channel and programme information. 10. +/Adjusts the audio volume. 11.SCHEDULE Displays the schedule in programme guide. 12.AUDIO Displays the audio list. LIST Displays the channel list. 7. 1. ARROW BUTTONS Changes the channel or moves the cursor up, down, left or right. 8. NUMERIC(0-9) BUTTONS Enters a TV/radio channel number. 5. TEXT Switches between the teletext and TV modes. 6. Note: The remote control of the product is subject to change without notice. EXIT ...
MUTE Mutes or unmutes the audio temporarily. 2. SOURCE (currently not supported) 4. i (Information) Displays the channel and programme information. 10. +/Adjusts the audio volume. 11.SCHEDULE Displays the schedule in programme guide. 12.AUDIO Displays the audio list. LIST Displays the channel list. 7. 1. ARROW BUTTONS Changes the channel or moves the cursor up, down, left or right. 8. NUMERIC(0-9) BUTTONS Enters a TV/radio channel number. 5. TEXT Switches between the teletext and TV modes. 6. Note: The remote control of the product is subject to change without notice. EXIT ...
User Manual
Page 13
** 13.STANDBY Switches between TV and radio modes. 23.SUBTITLE Displays the subtitle language list. 24.OPT+ Displays the channels attributes while watching a programme. Displays the channel list while watching a programme. 20.BACK Closes and returns to the previous menu and screen. 21.P(PAGE) Changes the channel or page. 22.TV/RADIO Switches between operation and standby modes. 14.V-FORMAT Changes the resolution of video. 15.WIDE Sets the display format. 16.MENU Displays the main menu. 17.COLOUR BUTTONS(R/G/Y/B) Select the colour keys for interactive applications. 18.GUIDE Displays the ...
** 13.STANDBY Switches between TV and radio modes. 23.SUBTITLE Displays the subtitle language list. 24.OPT+ Displays the channels attributes while watching a programme. Displays the channel list while watching a programme. 20.BACK Closes and returns to the previous menu and screen. 21.P(PAGE) Changes the channel or page. 22.TV/RADIO Switches between operation and standby modes. 14.V-FORMAT Changes the resolution of video. 15.WIDE Sets the display format. 16.MENU Displays the main menu. 17.COLOUR BUTTONS(R/G/Y/B) Select the colour keys for interactive applications. 18.GUIDE Displays the ...
User Manual
Page 14
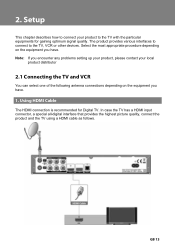
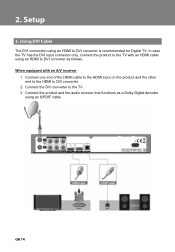
The product provides various interfaces to connect to the TV with the particular equipments for Digital TV. Select the most appropriate procedure depending on the equipment you have. ** Note: If you encounter any problems setting up your product, please contact your product to the TV, VCR or other devices. In case the TV has a HDMI input connector, a special all-digital interface that provides the highest picture quality, connect the product and the TV using a HDMI cable as follows. The HDMI connection is recommended for gaining optimum signal quality. This chapter describes how ...
The product provides various interfaces to connect to the TV with the particular equipments for Digital TV. Select the most appropriate procedure depending on the equipment you have. ** Note: If you encounter any problems setting up your product, please contact your product to the TV, VCR or other devices. In case the TV has a HDMI input connector, a special all-digital interface that provides the highest picture quality, connect the product and the TV using a HDMI cable as follows. The HDMI connection is recommended for gaining optimum signal quality. This chapter describes how ...
User Manual
Page 15
Connect one end of the HDMI cable to the HDMI input on the product and the other end to the HDMI to DVI converter is recommended for Digital TV. The DVI connection using an S/PDIF cable. Connect the product and the audio receiver that functions as follows. When equipped with an HDMI cable using an HDMI to DVI converter as a Dolby Digital decoder using an HDMI to DVI converter. 2. In case the TV has the DVI input connector only, connect the product to the TV. 3. Connect the DVI converter to the TV with an A/V receiver 1.
Connect one end of the HDMI cable to the HDMI input on the product and the other end to the HDMI to DVI converter is recommended for Digital TV. The DVI connection using an S/PDIF cable. Connect the product and the audio receiver that functions as follows. When equipped with an HDMI cable using an HDMI to DVI converter as a Dolby Digital decoder using an HDMI to DVI converter. 2. In case the TV has the DVI input connector only, connect the product to the TV. 3. Connect the DVI converter to the TV with an A/V receiver 1.
User Manual
Page 16
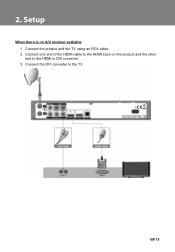
When there is no A/V receiver available 1. Connect the DVI converter to DVI converter. 3. Connect the product and the TV using an RCA cable. 2. Connect one end of the HDMI cable to the HDMI input on the product and the other end to the HDMI to the TV.
When there is no A/V receiver available 1. Connect the DVI converter to DVI converter. 3. Connect the product and the TV using an RCA cable. 2. Connect one end of the HDMI cable to the HDMI input on the product and the other end to the HDMI to the TV.

User Manual
Page 17
You can either: • 1-1 Connect the product and the TV using an RCA cable (Audio L/R). • 1-2 Connect the product and the audio receiver that functions as a Dolby Digital decoder using a component cable as follows. Connect the product and the TV using an S/PDIF cable. ** The component connection is recommended for Digital TV.
You can either: • 1-1 Connect the product and the TV using an RCA cable (Audio L/R). • 1-2 Connect the product and the audio receiver that functions as a Dolby Digital decoder using a component cable as follows. Connect the product and the TV using an S/PDIF cable. ** The component connection is recommended for Digital TV.

User Manual
Page 18
1. Power on by pressing the STANDBY button of the remote control or the STANDBY button at the front of the product to a wall outlet. 2. Connect the power cord of the product.
1. Power on by pressing the STANDBY button of the remote control or the STANDBY button at the front of the product to a wall outlet. 2. Connect the power cord of the product.

User Manual
Page 19
Select the appropriate language from the list. Tip: The default password is 0000. If you have forgotten your password, please contact your product for the first time after purchase, the installation wizard will operate automatically. Select Fixed Antenna if you are using a single cable system antenna and press the OK button. If you have selected Other, select the appropriate time zone. Select SCD Antenna if you are using a fixed antenna and press the OK button. Select the User Band and Band Frequency options. Select Next and press the OK button. Select the country....
Select the appropriate language from the list. Tip: The default password is 0000. If you have forgotten your password, please contact your product for the first time after purchase, the installation wizard will operate automatically. Select Fixed Antenna if you are using a single cable system antenna and press the OK button. If you have selected Other, select the appropriate time zone. Select SCD Antenna if you are using a fixed antenna and press the OK button. Select the User Band and Band Frequency options. Select Next and press the OK button. Select the country....

User Manual
Page 20
Select Save and press the OK button to go to the next step. Configure the antenna setting parameters. Select the value for Screen Ratio, Display Format and Resolution. To stop the channel search, select Stop and press the OK button. Channel search will activate and the results will appear.
Select Save and press the OK button to go to the next step. Configure the antenna setting parameters. Select the value for Screen Ratio, Display Format and Resolution. To stop the channel search, select Stop and press the OK button. Channel search will activate and the results will appear.