

User Manual
Page 3
... other apparatus. • Note Indicates additional information to make the user aware of possible problems and information of any importance to help understand, use, and maintain the installation. This symbol indicates important instructions accompanying the product. Meaning of Symbols To reduce the risk of electric shock, do not remove cover(or back). No user serviceable parts inside the product that indicate hazardous...
... other apparatus. • Note Indicates additional information to make the user aware of possible problems and information of any importance to help understand, use, and maintain the installation. This symbol indicates important instructions accompanying the product. Meaning of Symbols To reduce the risk of electric shock, do not remove cover(or back). No user serviceable parts inside the product that indicate hazardous...

User Manual
Page 4
...product. 5. VENTILATION • The slots on the apparatus. 4. CONNECTION TO THE SATELLITE DISH LNB • Disconnect the product from the mains before cleaning. • Use a light damp cloth (no objects filled with international safety standards. Failure to do so can damage the TV. 9. LIQUID ...If you are not sure of the type of power supplied to your home, consult your local power company. • Disconnect the product from the mains before connecting or disconnecting the cable from the mains before you start any maintenance or installation procedures. 2. OVERLOADING • Do ...
...product. 5. VENTILATION • The slots on the apparatus. 4. CONNECTION TO THE SATELLITE DISH LNB • Disconnect the product from the mains before cleaning. • Use a light damp cloth (no objects filled with international safety standards. Failure to do so can damage the TV. 9. LIQUID ...If you are not sure of the type of power supplied to your home, consult your local power company. • Disconnect the product from the mains before connecting or disconnecting the cable from the mains before you start any maintenance or installation procedures. 2. OVERLOADING • Do ...
User Manual
Page 7
... 3.2 Time Zone GB18 3.3 Humax Auto Search GB18 3.4 Display GB19 3.5 Result GB19 4. Software Update GB33 8.1 OTA (Over the Air GB33 9. Menu GB25 7.1 Preferences GB25 7.2 Edit Channels GB26 7.3 Installation GB27 7.4 System GB32 8. Before Using the Product GB7 1.1 Package Contents GB7 1.2 Front Panel GB8 1.3 Conditional Access GB9 1.4 Rear Panel GB10 1.5 Remote Control GB11 2. Channel List GB22 6. Appendix GB34 9.1 Specification GB34 9.2 Service and Support GB36 9.3 OPEN SOURCE SOFTWARE NOTICE GB37 1. TV Guide GB23 6.1 Table Guide GB23 6.2 List Guide GB23...
... 3.2 Time Zone GB18 3.3 Humax Auto Search GB18 3.4 Display GB19 3.5 Result GB19 4. Software Update GB33 8.1 OTA (Over the Air GB33 9. Menu GB25 7.1 Preferences GB25 7.2 Edit Channels GB26 7.3 Installation GB27 7.4 System GB32 8. Before Using the Product GB7 1.1 Package Contents GB7 1.2 Front Panel GB8 1.3 Conditional Access GB9 1.4 Rear Panel GB10 1.5 Remote Control GB11 2. Channel List GB22 6. Appendix GB34 9.1 Specification GB34 9.2 Service and Support GB36 9.3 OPEN SOURCE SOFTWARE NOTICE GB37 1. TV Guide GB23 6.1 Table Guide GB23 6.2 List Guide GB23...
User Manual
Page 11
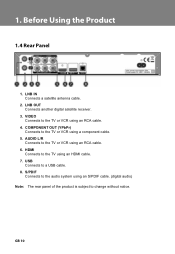
VIDEO Connects to the TV or VCR using an RCA cable. 4. AUDIO L/R Connects to the TV or VCR using an RCA cable. 6. USB Connects to the TV using a component cable. 5. HDMI Connects to a USB cable. 8. ** 1. LNB IN Connects a satellite antenna cable. 2. LNB OUT Connects another digital satellite receiver. 3. S/PDIF Connects to the audio system using an S/PDIF cable. (digital audio) ** Note: The rear panel of the product is subject to the TV or VCR using an HDMI cable. 7. COMPONENT OUT (YPbPr) Connects to change without notice.
VIDEO Connects to the TV or VCR using an RCA cable. 4. AUDIO L/R Connects to the TV or VCR using an RCA cable. 6. USB Connects to the TV using a component cable. 5. HDMI Connects to a USB cable. 8. ** 1. LNB IN Connects a satellite antenna cable. 2. LNB OUT Connects another digital satellite receiver. 3. S/PDIF Connects to the audio system using an S/PDIF cable. (digital audio) ** Note: The rear panel of the product is subject to the TV or VCR using an HDMI cable. 7. COMPONENT OUT (YPbPr) Connects to change without notice.

User Manual
Page 12
NUMERIC(0-9) BUTTONS Enters a TV/radio channel number. 5. LIST Displays the channel list. 7. MUTE Mutes or unmutes the audio temporarily. 2. SOURCE (currently not supported) 4. ARROW BUTTONS Changes the channel or moves the cursor up, down, left or right. 8. i (Information) Displays the channel and programme information. 10. +/Adjusts the audio volume. 11.SCHEDULE Displays the schedule in programme guide. 12.AUDIO Displays the audio list. EXIT Exits all On-Screen Display (OSD) screens. 9. 1. TEXT Switches between the teletext and TV modes. 6. Note: The remote control of...
NUMERIC(0-9) BUTTONS Enters a TV/radio channel number. 5. LIST Displays the channel list. 7. MUTE Mutes or unmutes the audio temporarily. 2. SOURCE (currently not supported) 4. ARROW BUTTONS Changes the channel or moves the cursor up, down, left or right. 8. i (Information) Displays the channel and programme information. 10. +/Adjusts the audio volume. 11.SCHEDULE Displays the schedule in programme guide. 12.AUDIO Displays the audio list. EXIT Exits all On-Screen Display (OSD) screens. 9. 1. TEXT Switches between the teletext and TV modes. 6. Note: The remote control of...

User Manual
Page 13
... modes. 23.SUBTITLE Displays the subtitle language list. 24.OPT+ Displays the channels attributes while watching a programme. Displays the channel list while watching a programme. 20.BACK Closes and returns to the previous menu and screen. 21.P(PAGE) Changes the channel or page. 22.TV/RADIO Switches between operation and standby modes. 14.V-FORMAT Changes the resolution of video. 15.WIDE Sets the display format. 16.MENU Displays the main menu. 17.COLOUR BUTTONS(R/G/Y/B) Select the colour keys for interactive applications. 18.GUIDE Displays...
... modes. 23.SUBTITLE Displays the subtitle language list. 24.OPT+ Displays the channels attributes while watching a programme. Displays the channel list while watching a programme. 20.BACK Closes and returns to the previous menu and screen. 21.P(PAGE) Changes the channel or page. 22.TV/RADIO Switches between operation and standby modes. 14.V-FORMAT Changes the resolution of video. 15.WIDE Sets the display format. 16.MENU Displays the main menu. 17.COLOUR BUTTONS(R/G/Y/B) Select the colour keys for interactive applications. 18.GUIDE Displays...
User Manual
Page 14
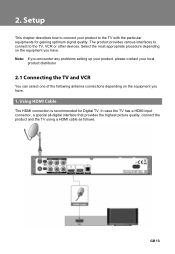
... You can select one of the following antenna connections depending on the equipment you have. ** Note: If you have. In case the TV has a HDMI input connector, a special all-digital interface that provides the highest picture quality, connect the product and the TV using a HDMI cable as follows. The HDMI connection is recommended for gaining optimum signal quality. The product provides various interfaces...
... You can select one of the following antenna connections depending on the equipment you have. ** Note: If you have. In case the TV has a HDMI input connector, a special all-digital interface that provides the highest picture quality, connect the product and the TV using a HDMI cable as follows. The HDMI connection is recommended for gaining optimum signal quality. The product provides various interfaces...
User Manual
Page 17
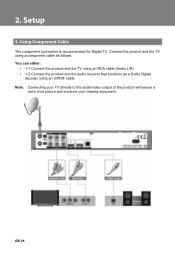
The component connection is recommended for Digital TV. You can either: • 1-1 Connect the product and the TV using an S/PDIF cable. ** Note: Connecting your TV directly to the audio/video output of the product will assure a more vivid picture and enhance your viewing enjoyment. Connect the product and the TV using a component cable as a Dolby Digital decoder using an RCA cable (Audio L/R). • 1-2 Connect the product and the audio receiver that functions as follows.
The component connection is recommended for Digital TV. You can either: • 1-1 Connect the product and the TV using an S/PDIF cable. ** Note: Connecting your TV directly to the audio/video output of the product will assure a more vivid picture and enhance your viewing enjoyment. Connect the product and the TV using a component cable as a Dolby Digital decoder using an RCA cable (Audio L/R). • 1-2 Connect the product and the audio receiver that functions as follows.

User Manual
Page 21
... button, the display format changes. Each time you press the V-FORMAT button, the resolution changes. Select audio direction (left, right, stereo) using the NUMERIC(0-9) buttons. You can set the sleep time. Each time you prefer. This chapter describes the basic functions the product provides such as switching channel, volume control and other common features. button to stop the audio temporarily. Press the V-FORMAT button while watching a programme. You can switch the current channel by pressing the P number directly using the button...
... button, the display format changes. Each time you press the V-FORMAT button, the resolution changes. Select audio direction (left, right, stereo) using the NUMERIC(0-9) buttons. You can set the sleep time. Each time you prefer. This chapter describes the basic functions the product provides such as switching channel, volume control and other common features. button to stop the audio temporarily. Press the V-FORMAT button while watching a programme. You can switch the current channel by pressing the P number directly using the button...

User Manual
Page 26
In this chapter you can set parental control, language setting, time setting, A/V setting and other configuration items to keep limitations where you want them for the viewers. Age Limit, Change Password, Installation Lock Menu Language, Subtitle Display, Subtitle Font Country, GMT Offset, Daylight Saving Time, Power ON, Power On Channel, Power OFF Audio Output, Dolby Digital Auto Selection, Lip-Sync, Screen Ratio, Display Format, Letter and Pillar Box Colour Info Display Time, OSD Transparency
In this chapter you can set parental control, language setting, time setting, A/V setting and other configuration items to keep limitations where you want them for the viewers. Age Limit, Change Password, Installation Lock Menu Language, Subtitle Display, Subtitle Font Country, GMT Offset, Daylight Saving Time, Power ON, Power On Channel, Power OFF Audio Output, Dolby Digital Auto Selection, Lip-Sync, Screen Ratio, Display Format, Letter and Pillar Box Colour Info Display Time, OSD Transparency
User Manual
Page 27
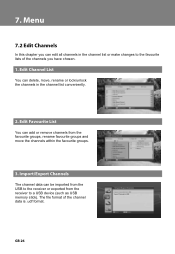
You can add or remove channels from the receiver to the favourite lists of the channel data is .udf format. The channel data can be imported from the USB to the receiver or exported from the favourite groups, rename favourite groups and move , rename or lock/unlock the channels in the channel list or make changes to a USB device (such as USB memory stick). In this chapter you can edit all channels in the channel list conveniently. The file format of the channels you have chosen. You can delete, move the channels within the favourite groups.
You can add or remove channels from the receiver to the favourite lists of the channel data is .udf format. The channel data can be imported from the USB to the receiver or exported from the favourite groups, rename favourite groups and move , rename or lock/unlock the channels in the channel list or make changes to a USB device (such as USB memory stick). In this chapter you can edit all channels in the channel list conveniently. The file format of the channels you have chosen. You can delete, move the channels within the favourite groups.
User Manual
Page 28
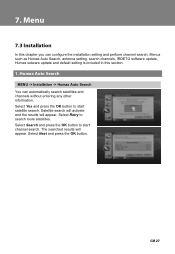
...to start satellite search. Menus such as Humax Auto Search, antenna setting, search channels, IRDETO software update, Humax sotware update and default setting is included in this chapter you can automatically search satellites and channels without entering any other information. In this section. Satellite search will activate and the results will appear. The searched results will appear. Select Yes and press the OK button to start ** channel search. Select Search and press the OK button to search more satellites. MENU -> Installation -> Humax Auto Search You can configure...
...to start satellite search. Menus such as Humax Auto Search, antenna setting, search channels, IRDETO software update, Humax sotware update and default setting is included in this chapter you can automatically search satellites and channels without entering any other information. In this section. Satellite search will activate and the results will appear. The searched results will appear. Select Yes and press the OK button to start ** channel search. Select Search and press the OK button to search more satellites. MENU -> Installation -> Humax Auto Search You can configure...
User Manual
Page 29
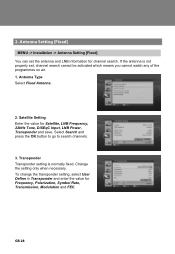
... channel search. Select Search and press the OK button to go to search channels. ** 3. To change the transponder setting, select User Define in Transponder and enter the value for Satellite, LNB Frequency, 22kHz Tone, DiSEqC Input, LNB Power, Transponder and save. If the antenna is normally fixed. Antenna Type Select Fixed Antenna. ** 2. Change the setting only when necessary. MENU -> Installation -> Antenna Setting [Fixed] ** You can set , channel search cannot be activated which means you cannot watch any of the programmes on air...
... channel search. Select Search and press the OK button to go to search channels. ** 3. To change the transponder setting, select User Define in Transponder and enter the value for Satellite, LNB Frequency, 22kHz Tone, DiSEqC Input, LNB Power, Transponder and save. If the antenna is normally fixed. Antenna Type Select Fixed Antenna. ** 2. Change the setting only when necessary. MENU -> Installation -> Antenna Setting [Fixed] ** You can set , channel search cannot be activated which means you cannot watch any of the programmes on air...
User Manual
Page 30
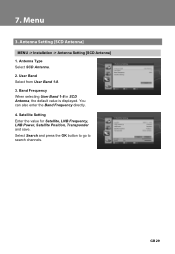
User Band Select from User Band 1-8. ** 3. Select Search and press the OK button to go to search channels. Band Frequency When selecting User Band 1-8 in SCD Antenna, the default value is displayed. Satellite Setting Enter the value for Satellite, LNB Frequency, LNB Power, Satellite Position, Transponder and save. You can also enter the Band Frequency directly. ** 4. Antenna Type Select SCD Antenna. ** 2. MENU -> Installation -> Antenna Setting [SCD Antenna] ** 1.
User Band Select from User Band 1-8. ** 3. Select Search and press the OK button to go to search channels. Band Frequency When selecting User Band 1-8 in SCD Antenna, the default value is displayed. Satellite Setting Enter the value for Satellite, LNB Frequency, LNB Power, Satellite Position, Transponder and save. You can also enter the Band Frequency directly. ** 4. Antenna Type Select SCD Antenna. ** 2. MENU -> Installation -> Antenna Setting [SCD Antenna] ** 1.
User Manual
Page 32
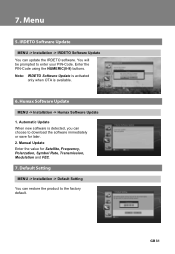
Enter the PIN-Code using the NUMERIC(0-9) buttons. Note: IRDETO Software Update is activated only when OTA is detected, you can choose to download the software immediately or save for Satellite, Frequency, Polarzation, Symbol Rate, Transmission, Modulation and FEC. MENU -> Installation -> Default Setting ** You can update the IRDETO software. You will be prompted to the factory default. Automatic Update When new software is available. Manual Update Enter the value for later. 2. MENU -> Installation -> IRDETO Software Update You can restore the product...
Enter the PIN-Code using the NUMERIC(0-9) buttons. Note: IRDETO Software Update is activated only when OTA is detected, you can choose to download the software immediately or save for Satellite, Frequency, Polarzation, Symbol Rate, Transmission, Modulation and FEC. MENU -> Installation -> Default Setting ** You can update the IRDETO software. You will be prompted to the factory default. Automatic Update When new software is available. Manual Update Enter the value for later. 2. MENU -> Installation -> IRDETO Software Update You can restore the product...
User Manual
Page 34
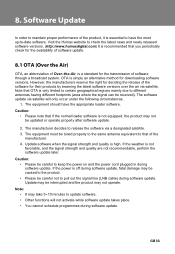
... the Humax website to keep the power on and the power cord plugged in during software update. Note that of the software for deciding the release of the manufacturer. 4. The manufacturer decides to different antennas having different footprints (area where the signal can be interrupted and the product may take 5~10 minutes to pull out the signal line (LNB cable) during software update. Update may be received).
... the Humax website to keep the power on and the power cord plugged in during software update. Note that of the software for deciding the release of the manufacturer. 4. The manufacturer decides to different antennas having different footprints (area where the signal can be interrupted and the product may take 5~10 minutes to pull out the signal line (LNB cable) during software update. Update may be received).
User Manual
Page 38
... Software uClibc libexif HUMAX products use certain open source operating system software distributed pursuant to GNU GENERAL PUBLIC LICENSE Version 2 and GNU LESSER GENERAL LICENSE Version 2.1 each as defined and published by the Free Software Foundation, Inc. ** The following GPL and LGPL software source codes used in this product can be provided. Please contact us at [email protected]. GPL Software...
... Software uClibc libexif HUMAX products use certain open source operating system software distributed pursuant to GNU GENERAL PUBLIC LICENSE Version 2 and GNU LESSER GENERAL LICENSE Version 2.1 each as defined and published by the Free Software Foundation, Inc. ** The following GPL and LGPL software source codes used in this product can be provided. Please contact us at [email protected]. GPL Software...

User Manual
Page 40
... this , we have made by software patents. To prevent this License; The precise terms and conditions for everyone's free use or not licensed at your option offer warranty protection in exchange for such interactive use in effect making the program proprietary. This License applies to any derivative work under the terms of the Program's source code as a whole at no...
... this , we have made by software patents. To prevent this License; The precise terms and conditions for everyone's free use or not licensed at your option offer warranty protection in exchange for such interactive use in effect making the program proprietary. This License applies to any derivative work under the terms of the Program's source code as a whole at no...

User Manual
Page 46
... will not be affected by problems that a company cannot effectively restrict the users of any patent license obtained for linking other code with the full freedom of free software. It also provides other free software developers Less of an advantage over competing non-free programs. These disadvantages are the reason we use the whole GNU operating system, as well as widely...
... will not be affected by problems that a company cannot effectively restrict the users of any patent license obtained for linking other code with the full freedom of free software. It also provides other free software developers Less of an advantage over competing non-free programs. These disadvantages are the reason we use the whole GNU operating system, as well as widely...

User Manual
Page 47
... does and what the program that you changed the files and the date of those functions and data) to all modules it contains, plus any associated interface definition files, plus the scripts used to any warranty; they are not covered by an application program that is to say, a work containing the Library or a portion of any software library or other...
... does and what the program that you changed the files and the date of those functions and data) to all modules it contains, plus any associated interface definition files, plus the scripts used to any warranty; they are not covered by an application program that is to say, a work containing the Library or a portion of any software library or other...


