
User Manual
Page 2
... law. ** The information in writing except approval of ownership of any importance to help the user to understand, to your product for purchasing a HUMAX Digital Satellite Receiver. GB 1 ** Thank you for future reference. Please read this user manual carefully, to be able to safely install, use... and to maintain the installation. ** Copyright © 2005 HUMAX Corporation ** Not to be copied, used or translated in part or whole without HUMAX's prior consent in this user manual next to use and maintain the product at maximum performance.
... law. ** The information in writing except approval of ownership of any importance to help the user to understand, to your product for purchasing a HUMAX Digital Satellite Receiver. GB 1 ** Thank you for future reference. Please read this user manual carefully, to be able to safely install, use... and to maintain the installation. ** Copyright © 2005 HUMAX Corporation ** Not to be copied, used or translated in part or whole without HUMAX's prior consent in this user manual next to use and maintain the product at maximum performance.
User Manual
Page 3
The buried cable of the system must be buried in additional damage to the appliance. • Unplug the product from any maintenance or installation procedures. • Do not overload a wall outlet, extension cord or adapter as this may result in the ground. ** The product has been manufactured to electromagnetic influences, such as a TV or a VCR. Do not place the product on an unstable cart, stand, tripod, bracket, or table where it has more than 10 cm clearance from the wall outlet and disconnect the antenna during a thunderstorm or when left unattended and unused for ...
The buried cable of the system must be buried in additional damage to the appliance. • Unplug the product from any maintenance or installation procedures. • Do not overload a wall outlet, extension cord or adapter as this may result in the ground. ** The product has been manufactured to electromagnetic influences, such as a TV or a VCR. Do not place the product on an unstable cart, stand, tripod, bracket, or table where it has more than 10 cm clearance from the wall outlet and disconnect the antenna during a thunderstorm or when left unattended and unused for ...

User Manual
Page 4
Basic Operation 4.1 Viewing Programme 4.2 Changing Language 4.3 Teletext 4.4 Setting Property of Service GB5 ** GB5 GB6 GB8 GB9 GB10 GB12 ** GB12 GB13 GB14 GB15 ** GB15 GB15 GB21 GB22 ** GB22 GB23 GB23 GB24 GB 3 Installation 3.1 Selecting Language 3.2 Searching Services 3.3 Default Setting 4. ** 1. Before Using the Product 1.1 Package Contents 1.2 Front Panel 1.3 Rear Panel 1.4 Conditional Access 1.5 Remote Controller 2. Setup 2.1 Connecting Antenna/TV 2.2 Connecting Hi-Fi System 2.3 Powering On 3.
Basic Operation 4.1 Viewing Programme 4.2 Changing Language 4.3 Teletext 4.4 Setting Property of Service GB5 ** GB5 GB6 GB8 GB9 GB10 GB12 ** GB12 GB13 GB14 GB15 ** GB15 GB15 GB21 GB22 ** GB22 GB23 GB23 GB24 GB 3 Installation 3.1 Selecting Language 3.2 Searching Services 3.3 Default Setting 4. ** 1. Before Using the Product 1.1 Package Contents 1.2 Front Panel 1.3 Rear Panel 1.4 Conditional Access 1.5 Remote Controller 2. Setup 2.1 Connecting Antenna/TV 2.2 Connecting Hi-Fi System 2.3 Powering On 3.
User Manual
Page 6
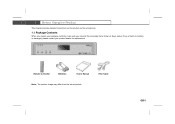
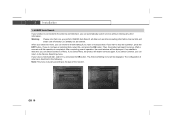
** This chapter provides detailed instructions on the product and its accessories. 1.1 Package Contents When you unpack your product dealer for replacement. ** ** Remote Controller ** ** ** Batteries User's Manual ** Note: The product image may differ from the actual product. RCA Cable ** GB 5 If any of items is missing or damaged, please contact your package contents, make sure you have all the necessary items shown in figure below.
** This chapter provides detailed instructions on the product and its accessories. 1.1 Package Contents When you unpack your product dealer for replacement. ** ** Remote Controller ** ** ** Batteries User's Manual ** Note: The product image may differ from the actual product. RCA Cable ** GB 5 If any of items is missing or damaged, please contact your package contents, make sure you have all the necessary items shown in figure below.
User Manual
Page 7
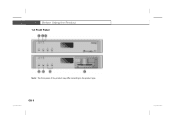
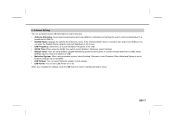
** 1.2 Front Panel ** ** Note: The front panel of the product may differ according to the product type. GB 6
** 1.2 Front Panel ** ** Note: The front panel of the product may differ according to the product type. GB 6
User Manual
Page 8
RADIO LED ** Amber light is emitted when the product is in Radio mode. ** 4. GB 7 Green light is emitted when the product is in operation. (The second front panel only) ** 2. CH-/CH+ or VOL-/VOL+ ** Moves the TV/Radio service or volume up/down. ** 7. ** 1. SMART CARD SLOT ** Slot for a smart card. ** ** Note: See 1.4 Conditional Access when you insert the smartcard. VOL Button ** Display the volume bar. ** 6. TV LED ** Green light is emitted when the product is in TV mode. ** 3. STANDBY LED ** Red light is emitted when the product is in standby mode. STANDBY Button ** ...
RADIO LED ** Amber light is emitted when the product is in Radio mode. ** 4. GB 7 Green light is emitted when the product is in operation. (The second front panel only) ** 2. CH-/CH+ or VOL-/VOL+ ** Moves the TV/Radio service or volume up/down. ** 7. ** 1. SMART CARD SLOT ** Slot for a smart card. ** ** Note: See 1.4 Conditional Access when you insert the smartcard. VOL Button ** Display the volume bar. ** 6. TV LED ** Green light is emitted when the product is in TV mode. ** 3. STANDBY LED ** Red light is emitted when the product is in standby mode. STANDBY Button ** ...
User Manual
Page 9
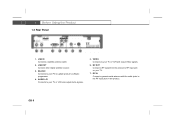
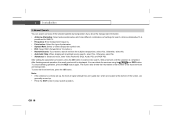
AUDIO L/R ** Connects to your TV or VCR and output Video signals. ** 6. VIDEO ** Connects to update product's software programme. ** 4. RF IN ** Connect a general aerial antenna with the cable jacks to your TV. ** 7. LNB OUT ** Connect other digital satellite receiver. ** 3. GB 8 RF OUT ** Connect a RF signal from the product to RF input jack on the product. ** 1.3 Rear Panel ** ** 1. RS-232C ** Connects to the RF input jack on your PC to your TV or VCR and output Audio signals. ** 5. LNB IN ** Connects a satellite antenna cable. ** 2.
AUDIO L/R ** Connects to your TV or VCR and output Video signals. ** 6. VIDEO ** Connects to update product's software programme. ** 4. RF IN ** Connect a general aerial antenna with the cable jacks to your TV. ** 7. LNB OUT ** Connect other digital satellite receiver. ** 3. GB 8 RF OUT ** Connect a RF signal from the product to RF input jack on the product. ** 1.3 Rear Panel ** ** 1. RS-232C ** Connects to the RF input jack on your PC to your TV or VCR and output Audio signals. ** 5. LNB IN ** Connects a satellite antenna cable. ** 2.
User Manual
Page 10
Insert the Smartcard into the top slot until the card is removable Smartcard. ** Inserting Smartcard ** A Smartcard looks similar to a credit card and entitles you to view and listen to all the services you choose to subscribe to air, most TV and Radio/Music services are free to . ** 1.4 Conditional Access Although some TV and Radio services are available on a subscription basis and can be enjoyed via Conditional Access component. Open the right-hand flap on the product can only be used for Irdeto Smartcard only. ** 1. The Conditional Access component is completely in colour) ...
Insert the Smartcard into the top slot until the card is removable Smartcard. ** Inserting Smartcard ** A Smartcard looks similar to a credit card and entitles you to view and listen to all the services you choose to subscribe to air, most TV and Radio/Music services are free to . ** 1.4 Conditional Access Although some TV and Radio services are available on a subscription basis and can be enjoyed via Conditional Access component. Open the right-hand flap on the product can only be used for Irdeto Smartcard only. ** 1. The Conditional Access component is completely in colour) ...
User Manual
Page 11
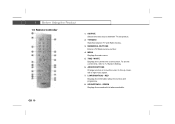
SOURCE ** Selects the input source between TV and Radio modes. ** 3. i (INFORMATION) - MENU ** Displays the main menu. ** 5. TIME - SOUNDTRACK - GREEN ** Displays the soundtrack list where available. ** 1.5 Remote Controller GB 10 1. WHITE ** Displays the current time on the screen. TV/RADIO ** Switches between TV and product. ** 2. RED ** Displays the information about the service and programme. ** 8. NUMERICAL BUTTONS ** Enters a TV/Radio service number. ** 4. To set the current time, refer to the up, down, left or right menu option. ** 7. ARROW BUTTONS ** Change ...
SOURCE ** Selects the input source between TV and Radio modes. ** 3. i (INFORMATION) - MENU ** Displays the main menu. ** 5. TIME - SOUNDTRACK - GREEN ** Displays the soundtrack list where available. ** 1.5 Remote Controller GB 10 1. WHITE ** Displays the current time on the screen. TV/RADIO ** Switches between TV and product. ** 2. RED ** Displays the information about the service and programme. ** 8. NUMERICAL BUTTONS ** Enters a TV/Radio service number. ** 4. To set the current time, refer to the up, down, left or right menu option. ** 7. ARROW BUTTONS ** Change ...
User Manual
Page 12
CH - / CH + ** Changes the Service. ** 10. Play the audio continuously. ** 12. OK ** Selects a menu or confirms the selection. SUBTITLE - V - / V + ** Adjusts the audio volume. ** 20. STANDBY ** Switches between Operation and Standby modes. ** 14. ZOOM - That is, volumes on the screen. The help box shows the information of the current service. ** ** COLOUR BUTTONS (R/G/B/Y/W) ** Select color keys for interactive applications. WIDE ** Changes the Display Format. ** 13. ** 9. RECALL ** Returns to the previous menu and exits all OSD screens. ** 16. GUIDE ** Displays the ...
CH - / CH + ** Changes the Service. ** 10. Play the audio continuously. ** 12. OK ** Selects a menu or confirms the selection. SUBTITLE - V - / V + ** Adjusts the audio volume. ** 20. STANDBY ** Switches between Operation and Standby modes. ** 14. ZOOM - That is, volumes on the screen. The help box shows the information of the current service. ** ** COLOUR BUTTONS (R/G/B/Y/W) ** Select color keys for interactive applications. WIDE ** Changes the Display Format. ** 13. ** 9. RECALL ** Returns to the previous menu and exits all OSD screens. ** 16. GUIDE ** Displays the ...
User Manual
Page 13
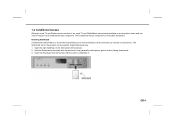
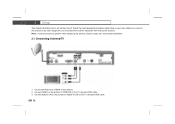
Before you connect the product to any other equipment, you encounter any problem when setting up the product. Connect an Antenna to LNB IN on the TV using the RCA cable. Connect AUDIO L/R on the product to AUDIO IN L/R on your local product distributor. 2.1 Connecting Antenna/TV ** ** 1. Select the most appropriate procedure depending on the TV using the RCA cable. 3. GB 12 Note: If you must disconnect all the equipment from their power sources. Connect VIDEO on the product to VIDEO IN on the product. 2. ** This chapter describes how to set up the product, please ...
Before you connect the product to any other equipment, you encounter any problem when setting up the product. Connect an Antenna to LNB IN on the TV using the RCA cable. Connect AUDIO L/R on the product to AUDIO IN L/R on your local product distributor. 2.1 Connecting Antenna/TV ** ** 1. Select the most appropriate procedure depending on the TV using the RCA cable. 3. GB 12 Note: If you must disconnect all the equipment from their power sources. Connect VIDEO on the product to VIDEO IN on the product. 2. ** This chapter describes how to set up the product, please ...
User Manual
Page 14
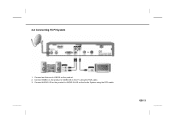
** 2.2 Connecting Hi-Fi System ** ** 1. Connect VIDEO on the product to LNB IN on the product. 2. GB 13 Connect an Antenna to VIDEO IN on the Audio System using the RCA cable. 3. Connect AUDIO L/R on the product to AUDIO IN L/R on the TV using the RCA cable.
** 2.2 Connecting Hi-Fi System ** ** 1. Connect VIDEO on the product to LNB IN on the product. 2. GB 13 Connect an Antenna to VIDEO IN on the Audio System using the RCA cable. 3. Connect AUDIO L/R on the product to AUDIO IN L/R on the TV using the RCA cable.
User Manual
Page 15
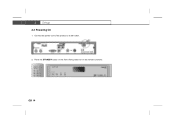
** 2.3 Powering On ** 1. Press the STANDBY button on the remote controller. ** GB 14 Connect the power cord of the product or on the front of the product to a wall outlet. ** ** 2.
** 2.3 Powering On ** 1. Press the STANDBY button on the remote controller. ** GB 14 Connect the power cord of the product or on the front of the product to a wall outlet. ** ** 2.
User Manual
Page 16
... to enter the Pin Code. When accessing to the protected menu, you will be prompted to exit the menu screen. The default Pin Code is HUMAX Auto Search. The following instructions: ** 1. Press the button to enter the option values. 6. Note: • The searching services may differ depending on your desired language...
... to enter the Pin Code. When accessing to the protected menu, you will be prompted to exit the menu screen. The default Pin Code is HUMAX Auto Search. The following instructions: ** 1. Press the button to enter the option values. 6. Note: • The searching services may differ depending on your desired language...
User Manual
Page 17
... displayed. If you already set are deleted. Note: This menu may vary according to the Service Searching menu. Warning: Please note that once you perform HUMAX Auto Search, all data such as Antenna setting information channel lists and smart card information you have a motorized dish, select Yes, and press the OK... the antenna and television, you can return to the type of antenna is detected, you have a motorized dish, select No, and press the OK button. HUMAX Auto Search If your product is completed. ** 1.
... displayed. If you already set are deleted. Note: This menu may vary according to the Service Searching menu. Warning: Please note that once you perform HUMAX Auto Search, all data such as Antenna setting information channel lists and smart card information you have a motorized dish, select Yes, and press the OK... the antenna and television, you can return to the type of antenna is detected, you have a motorized dish, select No, and press the OK button. HUMAX Auto Search If your product is completed. ** 1.
User Manual
Page 18
Antenna Alternative 16 is set antenna and LNB information to antenna or LNB. • Motorised System: When using motorised system, select Enabled. You can enter the Satellite Name using the keyboard displayed on or off. ** When you are using the 22HKz tone switch, select Enabled. When Motorised System is predefined for search. Otherwise, select Disabled. ** 2. GB 17 If the desired satellite name is disabled. • LNB Voltage: You can select Standard voltage or High voltage. • LNB Power: You can set to the Manual Search menu. Antenna Setting You can turn LNB...
Antenna Alternative 16 is set antenna and LNB information to antenna or LNB. • Motorised System: When using motorised system, select Enabled. You can enter the Satellite Name using the keyboard displayed on or off. ** When you are using the 22HKz tone switch, select Enabled. When Motorised System is predefined for search. Otherwise, select Disabled. ** 2. GB 17 If the desired satellite name is disabled. • LNB Voltage: You can select Standard voltage or High voltage. • LNB Power: You can set to the Manual Search menu. Antenna Setting You can turn LNB...
User Manual
Page 19
Otherwise, select No. • Automatic Skip: When skipping all scrambled service search, select Yes. GB 18 ** 3. To save the found services and transponder. Manual Search You can delete the services using the and RED button. After finishing search operation, the result window will be displayed. Wait a moment until the operation is predefined for SMATV. • Frequency: Enter transponder frequency. • Polarisation: Select the type of polarisation. • Symbol Rate: Select or enter transponder symbol rate. • FEC: Select FEC (Forward Error Correction...
Otherwise, select No. • Automatic Skip: When skipping all scrambled service search, select Yes. GB 18 ** 3. To save the found services and transponder. Manual Search You can delete the services using the and RED button. After finishing search operation, the result window will be displayed. Wait a moment until the operation is predefined for SMATV. • Frequency: Enter transponder frequency. • Polarisation: Select the type of polarisation. • Symbol Rate: Select or enter transponder symbol rate. • FEC: Select FEC (Forward Error Correction...
User Manual
Page 20
Store: Saves the current position of the motor setting options. ** DiSEqC Command Mode Movement Motor Control Installer East / Stop / West Search / Goto / Store / Reset User Stop(60E) ~Stop(0) ~Stop(60W) Search / Goto / Store GB 19 Reset: Resets all saved positions of the motor relative to the 0 position. (Installer Mode Only) • DiSEqC Command Mode: Select Installer or User mode. ** The following table shows the value of the motor for the selected satellite. - Satellite Setting This menu appears only when you enable Motorised System in Antenna Setting menu and press ...
Store: Saves the current position of the motor setting options. ** DiSEqC Command Mode Movement Motor Control Installer East / Stop / West Search / Goto / Store / Reset User Stop(60E) ~Stop(0) ~Stop(60W) Search / Goto / Store GB 19 Reset: Resets all saved positions of the motor relative to the 0 position. (Installer Mode Only) • DiSEqC Command Mode: Select Installer or User mode. ** The following table shows the value of the motor for the selected satellite. - Satellite Setting This menu appears only when you enable Motorised System in Antenna Setting menu and press ...

User Manual
Page 21
** To initialise satellite position saved at the bottom of the screen will see a warning message. To set the motor position for both East and West to prevent damage to the antenna. ** • Limit Setting: When Limit setting is used to fine-tune the position of the satellite, select your desired Satellite Name, set DiSEqC Command Mode to User, set Motor Control to Goto, and set Movement to your desired Satellite Name, set DiSEqC Command Mode to one among East, Stop, or West. The movement is set Motor Control to save the West Limit. Motor Limit Setting To enter this menu, press ...
** To initialise satellite position saved at the bottom of the screen will see a warning message. To set the motor position for both East and West to prevent damage to the antenna. ** • Limit Setting: When Limit setting is used to fine-tune the position of the satellite, select your desired Satellite Name, set DiSEqC Command Mode to User, set Motor Control to Goto, and set Movement to your desired Satellite Name, set DiSEqC Command Mode to one among East, Stop, or West. The movement is set Motor Control to save the West Limit. Motor Limit Setting To enter this menu, press ...
User Manual
Page 22
Automatic Search If you select the satellite to search services according to the Antenna Setting, you can restore the product to the factory settings using the Default Setting menu (MENU-INSTALLATION-DEFAULT SETTING). When you want to the factory settings except customised password. Antenna Alternative 16 is automatically displayed. Otherwise, select No. Otherwise, select No. • Search Type: If you complete the setting, press the OK button to start service search. ** Note: The menu structure may vary according to search services through all data will be restored ...
Automatic Search If you select the satellite to search services according to the Antenna Setting, you can restore the product to the factory settings using the Default Setting menu (MENU-INSTALLATION-DEFAULT SETTING). When you want to the factory settings except customised password. Antenna Alternative 16 is automatically displayed. Otherwise, select No. Otherwise, select No. • Search Type: If you complete the setting, press the OK button to start service search. ** Note: The menu structure may vary according to search services through all data will be restored ...