

User Manual
Page 1
HD Digital Recorder User's Manual HDPVR-5000T The default password is 0000.
HD Digital Recorder User's Manual HDPVR-5000T The default password is 0000.
User Manual
Page 2
... and maintain the installation. 1 Warning Indicates a hazardous situation which may become defective due to your product for purchasing a HUMAX product. Keep this user's manual carefully to be copied, used or translated in this user's manual is subject to help understand, use and maintain the product at maximum performance. Warranty The warranty does not...
... and maintain the installation. 1 Warning Indicates a hazardous situation which may become defective due to your product for purchasing a HUMAX product. Keep this user's manual carefully to be copied, used or translated in this user's manual is subject to help understand, use and maintain the product at maximum performance. Warranty The warranty does not...
User Manual
Page 4
... Using Music List Using Photo List Preferences Parental Control Language Setting Setting Power On/Off Timer Video Setting Audio Setting Screen Display 4 Installation 4 Automatic Search 4 Manual Search 8 Software Update (OTA) 9 Antenna Power 10 Factory Default 12 System 13 System Information 13 Signal Detection 13 Power Management 14 Conditional Access 15 Data...
... Using Music List Using Photo List Preferences Parental Control Language Setting Setting Power On/Off Timer Video Setting Audio Setting Screen Display 4 Installation 4 Automatic Search 4 Manual Search 8 Software Update (OTA) 9 Antenna Power 10 Factory Default 12 System 13 System Information 13 Signal Detection 13 Power Management 14 Conditional Access 15 Data...
User Manual
Page 5
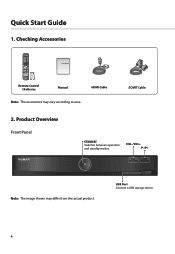
Quick Start Guide 1. USB Port Connect a USB storage device. 4 VOL-/VOL+ P-/P+ Note: The image shown may vary according to area. Checking Accessories User's Manual Remote Control / Batteries Manual HDMI Cable Note: The accessories may differ from the actual product. Product Overview Front Panel STANDBY Switches between operation and standby modes. SCART Cable 2.
Quick Start Guide 1. USB Port Connect a USB storage device. 4 VOL-/VOL+ P-/P+ Note: The image shown may vary according to area. Checking Accessories User's Manual Remote Control / Batteries Manual HDMI Cable Note: The accessories may differ from the actual product. Product Overview Front Panel STANDBY Switches between operation and standby modes. SCART Cable 2.
User Manual
Page 13
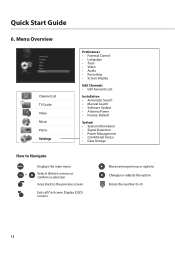
... Control • Language • Time • Video • Audio • Recording • Screen Display Edit Channels • Edit Favourite List Installation • Automatic Search • Manual Search • Software Update • Antenna Power • Factory Default System • System Information • Signal Detection • Power Management • Conditional Access • Data...
... Control • Language • Time • Video • Audio • Recording • Screen Display Edit Channels • Edit Favourite List Installation • Automatic Search • Manual Search • Software Update • Antenna Power • Factory Default System • System Information • Signal Detection • Power Management • Conditional Access • Data...

User Manual
Page 27
.... Recording and Playback You can record programmes in less than ten minutes, it will continue till the end of the next programme. Set the duration manually or select till the end of the current prorgramme or the next programme. Record 26 Select Confirm Enter 0~9 Changing Recording Duration 1. Press the...
.... Recording and Playback You can record programmes in less than ten minutes, it will continue till the end of the next programme. Set the duration manually or select till the end of the current prorgramme or the next programme. Record 26 Select Confirm Enter 0~9 Changing Recording Duration 1. Press the...
User Manual
Page 49
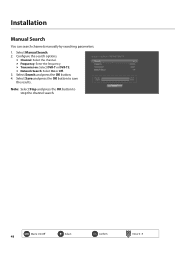
Installation Manual Search You can search channels manually by searching parameters. 1. Select Search and press the OK button. 4. Note: Select Stop and press the OK button to save the results. h Frequency: Enter the frequency. h Network Search: Select On or Off. 3. h Channel: Select the channel. Configure the search options. h Transmission: Select DVB-T or DVB-T2. Select Save and press the OK button to stop the channel search. Menu On/Off 48 Select Confirm Enter 0~9 Select Manual Search. 2.
Installation Manual Search You can search channels manually by searching parameters. 1. Select Search and press the OK button. 4. Note: Select Stop and press the OK button to save the results. h Frequency: Enter the frequency. h Network Search: Select On or Off. 3. h Channel: Select the channel. Configure the search options. h Transmission: Select DVB-T or DVB-T2. Select Save and press the OK button to stop the channel search. Menu On/Off 48 Select Confirm Enter 0~9 Select Manual Search. 2.
User Manual
Page 50
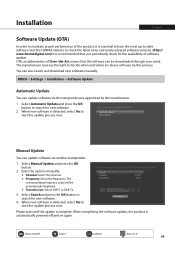
...via another transponder. 1. MENU J Settings J Installation J Software Update Automatic Update You can also search and download new software manually. Enter the options manually. The corresponding frequency value will be downloaded through your aerial. OTA, an abbreviation of Over-the-Air, means that you periodically...to start the update process now. Select Automatic Update and press the OK button to search for new software. 4. Visit the HUMAX website to check the latest news and newly released software versions. (http:// www.humaxdigital.com) It is detected, select Yes ...
...via another transponder. 1. MENU J Settings J Installation J Software Update Automatic Update You can also search and download new software manually. Enter the options manually. The corresponding frequency value will be downloaded through your aerial. OTA, an abbreviation of Over-the-Air, means that you periodically...to start the update process now. Select Automatic Update and press the OK button to search for new software. 4. Visit the HUMAX website to check the latest news and newly released software versions. (http:// www.humaxdigital.com) It is detected, select Yes ...


