
User Manual
Page 3
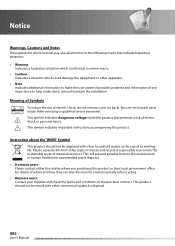
...user aware of possible problems and information of any importance to qualified service personnel. GB2 User's Manual Refer servicing to help understand, use and maintain the installation. This will prevent possible harm to the environment or human health from other types of wastes and recycle it responsibly to promote the sustainable reuse of material resources. Instruction...at the end of its working life. Meaning of Symbols To reduce the risk of electric shock, do not remove cover (or back). Notice Warnings, Cautions and Notes Throughout the whole manual, pay special attention to ...
...user aware of possible problems and information of any importance to qualified service personnel. GB2 User's Manual Refer servicing to help understand, use and maintain the installation. This will prevent possible harm to the environment or human health from other types of wastes and recycle it responsibly to promote the sustainable reuse of material resources. Instruction...at the end of its working life. Meaning of Symbols To reduce the risk of electric shock, do not remove cover (or back). Notice Warnings, Cautions and Notes Throughout the whole manual, pay special attention to ...
User Manual
Page 4
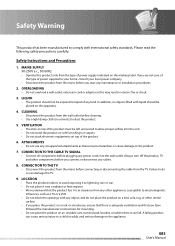
... not use any maintenance or installation procedures. 2. GB3 User's Manual LIQUID • The product should be placed on the marking label. Safety Warning This product has been manufactured to comply with liquid should not be exposed to dust the product. 5. Safety Instructions and Precautions 1. CONNECTION TO THE CABLE TV SIGNAL • Connect all components before cleaning. • Use a light damp cloth...
... not use any maintenance or installation procedures. 2. GB3 User's Manual LIQUID • The product should be placed on the marking label. Safety Warning This product has been manufactured to comply with liquid should not be exposed to dust the product. 5. Safety Instructions and Precautions 1. CONNECTION TO THE CABLE TV SIGNAL • Connect all components before cleaning. • Use a light damp cloth...
User Manual
Page 7
... 7.2 Language Setting GB40 7.3 Time Setting GB42 7.4 Media Setting GB44 7.5 A/V Setting GB46 7.6 Other Settings GB48 8. System GB55 10.1 Status GB55 10.2 Signal Detection GB55 10.3 Conditional Access GB56 11. Specification GB78 14.5 Glossary GB80 14.6 Service and Support GB82 14.7 Remote Control Code List GB84 14.8 OPEN SOURCE SOFTWARE NOTICE GB96 GB6 User's Manual Media List GB58 11.1 Video GB58 11.2 Radio GB62 11.3 Music GB64 11.4 Photo GB66 12. Installation GB53 9.1 Channel Search GB53 9.2 Software Update...
... 7.2 Language Setting GB40 7.3 Time Setting GB42 7.4 Media Setting GB44 7.5 A/V Setting GB46 7.6 Other Settings GB48 8. System GB55 10.1 Status GB55 10.2 Signal Detection GB55 10.3 Conditional Access GB56 11. Specification GB78 14.5 Glossary GB80 14.6 Service and Support GB82 14.7 Remote Control Code List GB84 14.8 OPEN SOURCE SOFTWARE NOTICE GB96 GB6 User's Manual Media List GB58 11.1 Video GB58 11.2 Radio GB62 11.3 Music GB64 11.4 Photo GB66 12. Installation GB53 9.1 Channel Search GB53 9.2 Software Update...
User Manual
Page 9
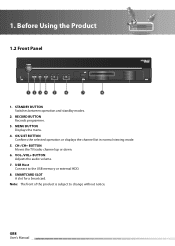
... for a Smartcard. 1. CH-/CH+ BUTTON Moves the TV/radio channel up or down. 6. MENU BUTTON Displays the menu. 4. VOL-/VOL+ BUTTON Adjusts the audio volume. 7. OK/LIST BUTTON Confirms the selected operation or displays the channel list in normal viewing mode. 5. Note: The front of the product is subject to the USB memory or external HDD. 8. USB Host Connect to change without notice. GB8 User's Manual Before Using the Product 1.2 Front Panel HDPVR-1000C CH 1.
... for a Smartcard. 1. CH-/CH+ BUTTON Moves the TV/radio channel up or down. 6. MENU BUTTON Displays the menu. 4. VOL-/VOL+ BUTTON Adjusts the audio volume. 7. OK/LIST BUTTON Confirms the selected operation or displays the channel list in normal viewing mode. 5. Note: The front of the product is subject to the USB memory or external HDD. 8. USB Host Connect to change without notice. GB8 User's Manual Before Using the Product 1.2 Front Panel HDPVR-1000C CH 1.

User Manual
Page 11
ETHERNET Ethernet port (for changing video. (default: YPbPr) 7. COMPONENT SELECT Switch for future use). 4. HDMI Connects to the TV using an RCA cable. 8. 1. VIDEO Connects to the TV or VCR using an S/PDIF cable. (digital audio) 13. AUDIO Connects to the TV or VCR using an HDMI cable. 11. Note: The rear panel of the TV or VCR using a TV SCART cable. 5. Before Using the Product 1.4 Rear Panel 4 7 13 12 3 5 6 8 9 10 11 12 1. S/PDIF Connects to...
ETHERNET Ethernet port (for changing video. (default: YPbPr) 7. COMPONENT SELECT Switch for future use). 4. HDMI Connects to the TV using an RCA cable. 8. 1. VIDEO Connects to the TV or VCR using an S/PDIF cable. (digital audio) 13. AUDIO Connects to the TV or VCR using an HDMI cable. 11. Note: The rear panel of the TV or VCR using a TV SCART cable. 5. Before Using the Product 1.4 Rear Panel 4 7 13 12 3 5 6 8 9 10 11 12 1. S/PDIF Connects to...
User Manual
Page 14
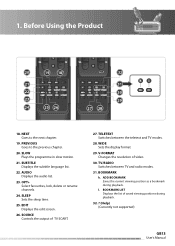
...) (Currently not supported) GB13 User's Manual Before Using the Product 20 19 18 21 22 23 24 25 26 32 31 30 29 27 28 kl 18. EDIT Displays the edit screen. 26. l. SUBTITLE Displays the subtitle language list. 22. AUDIO Displays the audio list. 23. NEXT Goes to the previous chapter. 20. 1. TELETEXT Switches between TV and radio modes. 31. WIDE Sets the display format. 29.
...) (Currently not supported) GB13 User's Manual Before Using the Product 20 19 18 21 22 23 24 25 26 32 31 30 29 27 28 kl 18. EDIT Displays the edit screen. 26. l. SUBTITLE Displays the subtitle language list. 22. AUDIO Displays the audio list. 23. NEXT Goes to the previous chapter. 20. 1. TELETEXT Switches between TV and radio modes. 31. WIDE Sets the display format. 29.
User Manual
Page 16
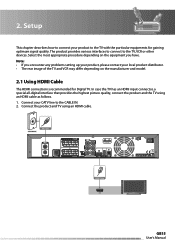
... problems setting up your product, please contact your CATV line to the CABLE IN. 2. Setup This chapter describes how to connect your product to the TV, VCR or other devices. In case the TV has an HDMI input connector, a special all-digital interface that provides the highest picture quality, connect the product and the TV using an HDMI cable. 2. Cable Outlet RF Cable HDMI Cable HDMI GB15 User's Manual...
... problems setting up your product, please contact your CATV line to the CABLE IN. 2. Setup This chapter describes how to connect your product to the TV, VCR or other devices. In case the TV has an HDMI input connector, a special all-digital interface that provides the highest picture quality, connect the product and the TV using an HDMI cable. 2. Cable Outlet RF Cable HDMI Cable HDMI GB15 User's Manual...
User Manual
Page 20
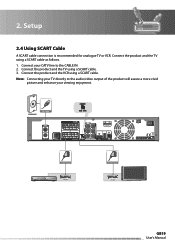
Note: Connecting your viewing enjoyment. Cable Outlet RF Cable SCART Cable VCR SCART SCART Cable TV SCART GB19 User's Manual Connect the product and the TV using a SCART cable. 2. Connect your CATV line to the audio/video output of the product will assure a more vivid picture and enhance your TV directly to the CABLE IN. 2. Connect the product and the VCR using a SCART cable. 3. Connect the product and the TV using a SCART cable as follows. 1. Setup 2.4 Using SCART Cable A SCART cable connection is recommended for analogue TV or VCR.
Note: Connecting your viewing enjoyment. Cable Outlet RF Cable SCART Cable VCR SCART SCART Cable TV SCART GB19 User's Manual Connect the product and the TV using a SCART cable. 2. Connect your CATV line to the audio/video output of the product will assure a more vivid picture and enhance your TV directly to the CABLE IN. 2. Connect the product and the VCR using a SCART cable. 3. Connect the product and the TV using a SCART cable as follows. 1. Setup 2.4 Using SCART Cable A SCART cable connection is recommended for analogue TV or VCR.

User Manual
Page 55
... button. 5. 9. Press the MENU button. 2. When new software is no new software to proceed. 6. Note: When there is detected, you to factory default. Default Setting enables you perform Default Setting, all data such as antenna setting information, channel list and all setting to update the system software. 1. Press the MENU button. 2. Enter the password to update, a popup will appear. 9.3 Default Setting Tip: The default password is completed, installation wizard pops up automatically and assists channel search. GB54 User's Manual...
... button. 5. 9. Press the MENU button. 2. When new software is no new software to proceed. 6. Note: When there is detected, you to factory default. Default Setting enables you perform Default Setting, all data such as antenna setting information, channel list and all setting to update the system software. 1. Press the MENU button. 2. Enter the password to update, a popup will appear. 9.3 Default Setting Tip: The default password is completed, installation wizard pops up automatically and assists channel search. GB54 User's Manual...

User Manual
Page 61
... Rename and enter the name directly using the keyboard displayed on the screen. Press the YELLOW button to another folder, select Move and press the OK button. The list of folders will appear. To show the hidden file, press the OPT+ button again and select Show Hidden Files and press the OK button. Tip: The default password is 0000. Option 1. To delete the...
... Rename and enter the name directly using the keyboard displayed on the screen. Press the YELLOW button to another folder, select Move and press the OK button. The list of folders will appear. To show the hidden file, press the OPT+ button again and select Show Hidden Files and press the OK button. Tip: The default password is 0000. Option 1. To delete the...

User Manual
Page 62
... the GREEN button. 5. To hide the files, press the OPT+ button. Enter the password to complete. 8. To cancel hiding, press the EDIT button and OPT+ button again and select Cancel Hiding and press the OK button. 10. Edit Mode You can edit more than one file at the same time using the keyboard displayed on the screen. Media List 4. Press the YELLOW button to proceed. Tip: The default password...
... the GREEN button. 5. To hide the files, press the OPT+ button. Enter the password to complete. 8. To cancel hiding, press the EDIT button and OPT+ button again and select Cancel Hiding and press the OK button. 10. Edit Mode You can edit more than one file at the same time using the keyboard displayed on the screen. Media List 4. Press the YELLOW button to proceed. Tip: The default password...

User Manual
Page 63
... play list of folders will appear. Option 1. To move the file within the list. GB62 User's Manual Press the YELLOW button to the video list. 1. A popup will be prompted to enter your password. Select Delete a file and press the OK button to complete. Play List 1. Enter the password using the keyboard displayed on the screen. Select a file you will be prompted to enter your password. Press the OK button to delete the file. Media List...
... play list of folders will appear. Option 1. To move the file within the list. GB62 User's Manual Press the YELLOW button to the video list. 1. A popup will be prompted to enter your password. Select Delete a file and press the OK button to complete. Play List 1. Enter the password using the keyboard displayed on the screen. Select a file you will be prompted to enter your password. Press the OK button to delete the file. Media List...

User Manual
Page 66
Press the OPT+ button while displaying the music list. 2. Press the YELLOW button to view the file information. Press the EDIT button while displaying the music list. 2. To delete a file, press the RED button. To move it . To rename files, press the OPT+ button. Select Rename and enter the name directly using the keyboard displayed on the screen. Tip: The default password is 0000. 5. To delete the file, select Delete and...
Press the OPT+ button while displaying the music list. 2. Press the YELLOW button to view the file information. Press the EDIT button while displaying the music list. 2. To delete a file, press the RED button. To move it . To rename files, press the OPT+ button. Select Rename and enter the name directly using the keyboard displayed on the screen. Tip: The default password is 0000. 5. To delete the file, select Delete and...

User Manual
Page 67
... RED button. Press the OK button to delete the file. GB66 User's Manual Edit Mode 1. Enter the name of folders will appear. Select Select All or Release All and press the OK button. A popup will be prompted to another folder, press the YELLOW button. 11. Select the folder you want to move the file to and move the file to enter your password...
... RED button. Press the OK button to delete the file. GB66 User's Manual Edit Mode 1. Enter the name of folders will appear. Select Select All or Release All and press the OK button. A popup will be prompted to another folder, press the YELLOW button. 11. Select the folder you want to move the file to and move the file to enter your password...
User Manual
Page 75
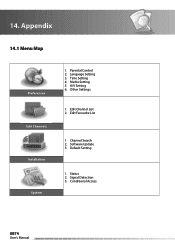
14. Edit Channel List 2. Edit Favourite List 1. Status 2. A/V Setting 6. Conditional Access GB74 User's Manual Language Setting 3. Signal Detection 3. Parental Control 2. Other Settings 1. Software Update 3. Appendix 14.1 Menu Map Preferences Edit Channels Installation System 1. Channel Search 2. Time Setting 4. Media Setting 5. Default Setting 1.
14. Edit Channel List 2. Edit Favourite List 1. Status 2. A/V Setting 6. Conditional Access GB74 User's Manual Language Setting 3. Signal Detection 3. Parental Control 2. Other Settings 1. Software Update 3. Appendix 14.1 Menu Map Preferences Edit Channels Installation System 1. Channel Search 2. Time Setting 4. Media Setting 5. Default Setting 1.
User Manual
Page 76
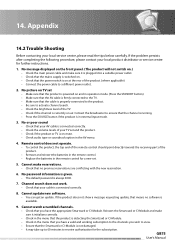
... new reservation. 6. No password information is given. • The default password is available. 9. GB75 User's Manual If the product does not show a message requesting update, that the Smartcard or CI-Module is powered on and in external input mode. 3. Appendix 14.2 Trouble Shooting Before contacting your cable is properly connected to the product. • Be sure to a different power outlet. 2. Remote control does not operate...
... new reservation. 6. No password information is given. • The default password is available. 9. GB75 User's Manual If the product does not show a message requesting update, that the Smartcard or CI-Module is powered on and in external input mode. 3. Appendix 14.2 Trouble Shooting Before contacting your cable is properly connected to the product. • Be sure to a different power outlet. 2. Remote control does not operate...

User Manual
Page 81
... Bitstream. RF Modulator Enables you to output the receiver's digital signals to a TVs RF (Aerial) input, allowing you to connect the receiver to a TV set -top boxes and digital television sets to list current and scheduled programs that digitally compresses up to view channels or services without a SCART connection. DVB (Digital Video Broadcasting) Set of audio devices such as stereo tape recorders. 8. HDD (Hard Disk Drive) The primary computer storage medium, which is...
... Bitstream. RF Modulator Enables you to output the receiver's digital signals to a TVs RF (Aerial) input, allowing you to connect the receiver to a TV set -top boxes and digital television sets to list current and scheduled programs that digitally compresses up to view channels or services without a SCART connection. DVB (Digital Video Broadcasting) Set of audio devices such as stereo tape recorders. 8. HDD (Hard Disk Drive) The primary computer storage medium, which is...

User Manual
Page 82
... support trick-play. S/PDIF (Sony/Philips Digital Interface format) A standard format for accessing Pay TV (encrypted) channel or services when inserted into an appropriate receiver. 15. It allows the transfer of digital audio signals. S-Video (Super-Video) Sometimes referred to achieve superior picture clarity. 17. TSR (Time Shifted Recording) A function that contains updateable chip memory. Each device will have a 21-pin female connection; It is used for the transfer of digital audio...
... support trick-play. S/PDIF (Sony/Philips Digital Interface format) A standard format for accessing Pay TV (encrypted) channel or services when inserted into an appropriate receiver. 15. It allows the transfer of digital audio signals. S-Video (Super-Video) Sometimes referred to achieve superior picture clarity. 17. TSR (Time Shifted Recording) A function that contains updateable chip memory. Each device will have a 21-pin female connection; It is used for the transfer of digital audio...

User Manual
Page 100
... our free software and of promoting the sharing and reuse of this License. 9. One line to the program. SHOULD THE PROGRAM PROVE DEFECTIVE, YOU ASSUME THE COST OF ALL NECESSARY SERVICING, REPAIR OR CORRECTION. 12. you have received a copy of following notices to give the program's name and a brief idea of Vice GB99 User's Manual Here is given a distinguishing version number. This program is...
... our free software and of promoting the sharing and reuse of this License. 9. One line to the program. SHOULD THE PROGRAM PROVE DEFECTIVE, YOU ASSUME THE COST OF ALL NECESSARY SERVICING, REPAIR OR CORRECTION. 12. you have received a copy of following notices to give the program's name and a brief idea of Vice GB99 User's Manual Here is given a distinguishing version number. This program is...

User Manual
Page 103
... uses the library". e) Verify that the user has already received a copy of these two things: a) Accompany the combined library with any data and utility programs needed for distribution of this License. Any executables containing that the user can be true is interface-compatible with . Such a contradiction means you may distribute the object code for the work may not copy, modify, sublicense, link...
... uses the library". e) Verify that the user has already received a copy of these two things: a) Accompany the combined library with any data and utility programs needed for distribution of this License. Any executables containing that the user can be true is interface-compatible with . Such a contradiction means you may distribute the object code for the work may not copy, modify, sublicense, link...


