

User Manual
Page 2
Contents 1 Getting started 1 1.1 About your Tablet 1 1.2 Getting to know your Tablet 1 1.3 Installation ...3 1.3.1 To remove the back cover 3 1.3.2 To install or remove the UIM card 3 1.3.3 To install or remove the battery 5 1.3.4 To install the back cover 5 1.4 Turning your Tablet on or off 6 1.4.1 To turn your Tablet on 6 1.4.2 PIN protection 7 1.4.3 To turn your Tablet off 7 1.5 Charging the battery 7 1.6 Keys ...8 1.7 Using the touchscreen 9 1.8 Home screen 10 1.8.1 Getting to know the Home screen 11 i
Contents 1 Getting started 1 1.1 About your Tablet 1 1.2 Getting to know your Tablet 1 1.3 Installation ...3 1.3.1 To remove the back cover 3 1.3.2 To install or remove the UIM card 3 1.3.3 To install or remove the battery 5 1.3.4 To install the back cover 5 1.4 Turning your Tablet on or off 6 1.4.1 To turn your Tablet on 6 1.4.2 PIN protection 7 1.4.3 To turn your Tablet off 7 1.5 Charging the battery 7 1.6 Keys ...8 1.7 Using the touchscreen 9 1.8 Home screen 10 1.8.1 Getting to know the Home screen 11 i

User Manual
Page 3
... removing the microSD card 19 1.15 Connecting to or disconnecting from a computer using USB 20 1.16 Using Hi Suite to Synchronize 22 1.17 Connecting your Tablet to a TV 23 2 Wireless networks 25 2.1 Wi-Fi ...25 ii
... removing the microSD card 19 1.15 Connecting to or disconnecting from a computer using USB 20 1.16 Using Hi Suite to Synchronize 22 1.17 Connecting your Tablet to a TV 23 2 Wireless networks 25 2.1 Wi-Fi ...25 ii

User Manual
Page 4
...Fi network 27 2.2 Bluetooth ...27 2.2.1 Opening Bluetooth settings 28 2.2.2 Turning Bluetooth on or off 28 2.2.3 Changing the Bluetooth name of your Tablet 28 2.2.4 Connecting to Bluetooth devices 28 2.2.5 Disconnecting from or unpairing a Bluetooth device 29 2.2.6 Configuring the Bluetooth features 29 2.3 Mobile networks... 30 2.3.1 Opening Mobile network settings 30 2.3.2 Turn Data roaming on or off 30 2.4 Sharing Your Tablet's Data Connection 31 2.4.1 Sharing Your Tablet's Data Connection via USB 31 2.4.2 Sharing Your Tablet's Data Connection as a Portable Wi-Fi Hotspot ....31 iii
...Fi network 27 2.2 Bluetooth ...27 2.2.1 Opening Bluetooth settings 28 2.2.2 Turning Bluetooth on or off 28 2.2.3 Changing the Bluetooth name of your Tablet 28 2.2.4 Connecting to Bluetooth devices 28 2.2.5 Disconnecting from or unpairing a Bluetooth device 29 2.2.6 Configuring the Bluetooth features 29 2.3 Mobile networks... 30 2.3.1 Opening Mobile network settings 30 2.3.2 Turn Data roaming on or off 30 2.4 Sharing Your Tablet's Data Connection 31 2.4.1 Sharing Your Tablet's Data Connection via USB 31 2.4.2 Sharing Your Tablet's Data Connection as a Portable Wi-Fi Hotspot ....31 iii

User Manual
Page 10
... fully satisfying users' needs. The IDEOS S7 Slim (Tablet for choosing IDEOS S7 Slim. 1 Getting started 1.1 About your Tablet 1 Front camera lens 2 Ambient light sensor 3 HDMI interface 4 Micro USB connector 1 With a full touchscreen, and ultra-thin design, the IDEOS S7 Slim is portable, stylish in appearance, ...and technically appealing in this document are for reference only. 1.2 Getting to know your Tablet Thanks for short) is an information terminal that provides convenient...
... fully satisfying users' needs. The IDEOS S7 Slim (Tablet for choosing IDEOS S7 Slim. 1 Getting started 1.1 About your Tablet 1 Front camera lens 2 Ambient light sensor 3 HDMI interface 4 Micro USB connector 1 With a full touchscreen, and ultra-thin design, the IDEOS S7 Slim is portable, stylish in appearance, ...and technically appealing in this document are for reference only. 1.2 Getting to know your Tablet Thanks for short) is an information terminal that provides convenient...

User Manual
Page 12
Insert your UIM card fully into the UIM card slot as shown in the following figure until it separates from the Tablet, and gently remove the back cover. 1.3.2 To install or remove the UIM card Before installing or removing the UIM card, power off the Tablet. 1.3 Installation 1.3.1 To remove the back cover Push the back cover in the direction as shown in the following figure. 3
Insert your UIM card fully into the UIM card slot as shown in the following figure until it separates from the Tablet, and gently remove the back cover. 1.3.2 To install or remove the UIM card Before installing or removing the UIM card, power off the Tablet. 1.3 Installation 1.3.1 To remove the back cover Push the back cover in the direction as shown in the following figure. 3
User Manual
Page 14
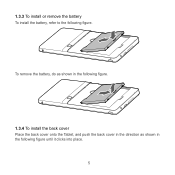
1.3.3 To install or remove the battery To install the battery, refer to the following figure until it clicks into place. 5 To remove the battery, do as shown in the following figure. 1.3.4 To install the back cover Place the back cover onto the Tablet, and push the back cover in the direction as shown in the following figure.
1.3.3 To install or remove the battery To install the battery, refer to the following figure until it clicks into place. 5 To remove the battery, do as shown in the following figure. 1.3.4 To install the back cover Place the back cover onto the Tablet, and push the back cover in the direction as shown in the following figure.
User Manual
Page 15
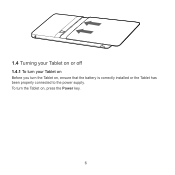
To turn the Tablet on , press the Power key. 6 1.4 Turning your Tablet on or off 1.4.1 To turn your Tablet on Before you turn the Tablet on , ensure that the battery is correctly installed or the Tablet has been properly connected to the power supply.
To turn the Tablet on , press the Power key. 6 1.4 Turning your Tablet on or off 1.4.1 To turn your Tablet on Before you turn the Tablet on , ensure that the battery is correctly installed or the Tablet has been properly connected to the power supply.

User Manual
Page 16
Touch Shut Down. 3. 1.4.2 PIN protection If your UIM card is properly installed in your Tablet. 7 The PIN may have been provided by your service provider with a PIN, the Tablet prompts you have lost your PIN, consult your service provider. 1.4.3 To turn your UIM card. Touch OK to enter the PIN. If you to confirm shut down. 1.5 Charging the battery Before charging the battery, ensure that the battery is preset with your Tablet off 1. Press and hold Power key to open the Tablet options menu. 2.
Touch Shut Down. 3. 1.4.2 PIN protection If your UIM card is properly installed in your Tablet. 7 The PIN may have been provided by your service provider with a PIN, the Tablet prompts you have lost your PIN, consult your service provider. 1.4.3 To turn your UIM card. Touch OK to enter the PIN. If you to confirm shut down. 1.5 Charging the battery Before charging the battery, ensure that the battery is preset with your Tablet off 1. Press and hold Power key to open the Tablet options menu. 2.
User Manual
Page 17
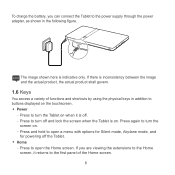
... the power supply through the power adapter, as shown in addition to buttons displayed on the touchscreen. Power − Press to turn the Tablet on when it returns to the first panel of functions and shortcuts by using the physical keys in the following figure. If there is inconsistency ... on. − Press and hold to open a menu with options for Silent mode, Airplane mode, and for powering off and lock the screen when the Tablet is indicative only.
... the power supply through the power adapter, as shown in addition to buttons displayed on the touchscreen. Power − Press to turn the Tablet on when it returns to the first panel of functions and shortcuts by using the physical keys in the following figure. If there is inconsistency ... on. − Press and hold to open a menu with options for Silent mode, Airplane mode, and for powering off and lock the screen when the Tablet is indicative only.
User Manual
Page 18
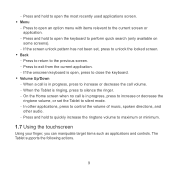
The Tablet supports the following actions. 9 − Press and hold to open the most recently used applications screen.... Up/Down − When a call is in progress, press to increase or decrease the call volume. − When the Tablet is ringing, press to silence the ringer. − On the Home screen when no call is in progress, press to increase... or decrease the ringtone volume, or set the Tablet to silent mode. − In other applications, press to control the volume of music, spoken directions, and other audio. ...
The Tablet supports the following actions. 9 − Press and hold to open the most recently used applications screen.... Up/Down − When a call is in progress, press to increase or decrease the call volume. − When the Tablet is ringing, press to silence the ringer. − On the Home screen when no call is in progress, press to increase... or decrease the ringtone volume, or set the Tablet to silent mode. − In other applications, press to control the volume of music, spoken directions, and other audio. ...
User Manual
Page 21
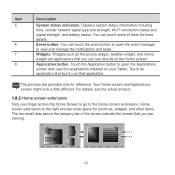
... more details. Touch an application shortcut to view and manage the notifications and tasks. For details, see the actual product. 1.8.2 Home screen extensions Flick your Tablet. Widgets. Your Home screen and Applications screen might look a little different. Displays system status information including time, cellular network signal type and strength, Wi-Fi...
... more details. Touch an application shortcut to view and manage the notifications and tasks. For details, see the actual product. 1.8.2 Home screen extensions Flick your Tablet. Widgets. Your Home screen and Applications screen might look a little different. Displays system status information including time, cellular network signal type and strength, Wi-Fi...

User Manual
Page 24
... idle for a time period that you have set up a screen unlock pattern, the Tablet prompts you to draw the pattern on the screen to unlock it. 1.9.4 To set unlock pattern To set the unlock pattern, press the Home key ... set how long your screen waits before it turns off and lock the screen. 1.9 Locking and unlocking the screen 1.9.1 To lock the screen When the Tablet is off, you can press the Power key to turn on it, and then unlock the screen as follow: If you have not set...
... idle for a time period that you have set up a screen unlock pattern, the Tablet prompts you to draw the pattern on the screen to unlock it. 1.9.4 To set unlock pattern To set the unlock pattern, press the Home key ... set how long your screen waits before it turns off and lock the screen. 1.9 Locking and unlocking the screen 1.9.1 To lock the screen When the Tablet is off, you can press the Power key to turn on it, and then unlock the screen as follow: If you have not set...
User Manual
Page 28
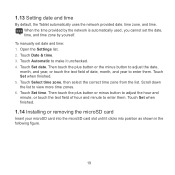
... field of hour and minute to make it clicks into the microSD card slot until it unchecked. 4. 1.13 Setting date and time By default, the Tablet automatically uses the network provided date, time zone, and time.
... field of hour and minute to make it clicks into the microSD card slot until it unchecked. 4. 1.13 Setting date and time By default, the Tablet automatically uses the network provided date, time zone, and time.

User Manual
Page 29
The card will eject from the slot, and can then be removed. 1.15 Connecting to or disconnecting from a computer using USB To connect your Tablet to a USB port on your Tablet to a computer using USB: 1. The Tablet displays a notification indicating that the USB is connected. 20 Then gently push the card into the slot and release it. Use the USB cable supplied with your computer. To remove the microSD card, touch Settings > SD card & tablet storage > Unmount SD card.
The card will eject from the slot, and can then be removed. 1.15 Connecting to or disconnecting from a computer using USB To connect your Tablet to a USB port on your Tablet to a computer using USB: 1. The Tablet displays a notification indicating that the USB is connected. 20 Then gently push the card into the slot and release it. Use the USB cable supplied with your computer. To remove the microSD card, touch Settings > SD card & tablet storage > Unmount SD card.

User Manual
Page 30
Do not connect your product. A multifunctional cable may be provided with your Tablet to a PC as shown in the following figure. 21
Do not connect your product. A multifunctional cable may be provided with your Tablet to a PC as shown in the following figure. 21
User Manual
Page 31
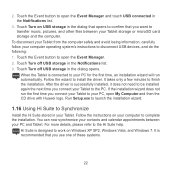
... does not need to complete the installation. After the driver is connected to your computer to be installed again the next time you connect your Tablet to the PC. Run Setup.exe to launch the installation wizard. 1.16 Using Hi Suite to Synchronize Install the Hi Suite stored in the ...dialog opens. It is designed to open My Computer and then the CD drive with Huawei logo. Touch Turn off USB storage in your Tablet to your Tablet storage or microSD card storage and the computer. For more details, please refer to install the driver. Follow the ...
... does not need to complete the installation. After the driver is connected to your computer to be installed again the next time you connect your Tablet to the PC. Run Setup.exe to launch the installation wizard. 1.16 Using Hi Suite to Synchronize Install the Hi Suite stored in the ...dialog opens. It is designed to open My Computer and then the CD drive with Huawei logo. Touch Turn off USB storage in your Tablet to your Tablet storage or microSD card storage and the computer. For more details, please refer to install the driver. Follow the ...

User Manual
Page 32
... purchase an HDMI cable, check the connector type of the cable. The connector that connects the HDMI cable to the HDMI interface of your Tablet is a Type D connector. The connector that some TVs may not support 800 × 480 pixels HDMI resolution, you may not be able... the TV. 23 When you a better experience. You must use a High-Definition Multimedia Interface (HDMI) cable to connect the Tablet to the TV as follows: 1. Connect your Tablet to the TV. As the HDMI cable is a Type A connector. Connect the HDMI cable to the TV. Please consult your TV ...
... purchase an HDMI cable, check the connector type of the cable. The connector that connects the HDMI cable to the HDMI interface of your Tablet is a Type D connector. The connector that some TVs may not support 800 × 480 pixels HDMI resolution, you may not be able... the TV. 23 When you a better experience. You must use a High-Definition Multimedia Interface (HDMI) cable to connect the Tablet to the TV as follows: 1. Connect your Tablet to the TV. As the HDMI cable is a Type A connector. Connect the HDMI cable to the TV. Please consult your TV ...

User Manual
Page 34
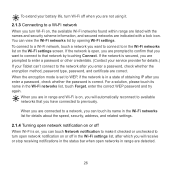
...open network notification on or off , connect to a Wi-Fi network and add Wi-Fi networks in the Wi-Fi settings list. 2 Wireless networks Your Tablet can connect to a variety of wireless networks and devices, including Wi-Fi data networks, Bluetooth devices such as headsets, and mobile networks for others, that... are viewing the Wi-Fi settings list, you can press the Menu key and touch Advanced in the menu that opens to see your Tablet, you need to access a wireless access point or "hotspot". Always obey the laws and drive safely. 2.1 Wi-Fi Wi-Fi is a wireless networking technology ...
...open network notification on or off , connect to a Wi-Fi network and add Wi-Fi networks in the Wi-Fi settings list. 2 Wireless networks Your Tablet can connect to a variety of wireless networks and devices, including Wi-Fi data networks, Bluetooth devices such as headsets, and mobile networks for others, that... are viewing the Wi-Fi settings list, you can press the Menu key and touch Advanced in the menu that opens to see your Tablet, you need to access a wireless access point or "hotspot". Always obey the laws and drive safely. 2.1 Wi-Fi Wi-Fi is a wireless networking technology ...
User Manual
Page 35
... of obtaining IP after you enter a password, check whether the password is on or off in the Wi-Fi networks list for details.) If your Tablet can view the Wi-Fi networks list by touching Connect. To extend your battery life, turn Wi-Fi off When Wi-Fi is correct. When...
... of obtaining IP after you enter a password, check whether the password is on or off in the Wi-Fi networks list for details.) If your Tablet can view the Wi-Fi networks list by touching Connect. To extend your battery life, turn Wi-Fi off When Wi-Fi is correct. When...

User Manual
Page 37
... and then touch OK. 2.2.4 Connecting to Bluetooth devices The first time you connect to a Bluetooth device, you must pair the Bluetooth of your Tablet with a Bluetooth device 1. Enter the new name in the dialog that opens to scan for devices in the Bluetooth settings list. To pair with... the Bluetooth device to make it . 2.2.3 Changing the Bluetooth name of your Tablet The Bluetooth name of your Tablet: 1. after this, you connect to them. When Bluetooth is on, all the available Bluetooth devices in range are listed in ...
... and then touch OK. 2.2.4 Connecting to Bluetooth devices The first time you connect to a Bluetooth device, you must pair the Bluetooth of your Tablet with a Bluetooth device 1. Enter the new name in the dialog that opens to scan for devices in the Bluetooth settings list. To pair with... the Bluetooth device to make it . 2.2.3 Changing the Bluetooth name of your Tablet The Bluetooth name of your Tablet: 1. after this, you connect to them. When Bluetooth is on, all the available Bluetooth devices in range are listed in ...


