User Manual
Page 9
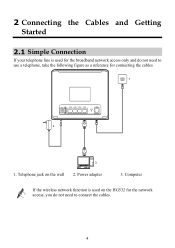
Computer If the wireless network function is used on the wall 2. Telephone jack on the HG532 for connecting the cables. 1 POWER USB LAN4 LAN3 LAN2 LAN1 ADSL RESET 2 3 1. Power adapter 3. 2 Connecting the Cables and Getting Started 2.1 Simple Connection If your telephone line is used for the broadband network access only and do not need to use a telephone, take the following figure as a reference for the network access, you do not need to connect the cables. 4
Computer If the wireless network function is used on the wall 2. Telephone jack on the HG532 for connecting the cables. 1 POWER USB LAN4 LAN3 LAN2 LAN1 ADSL RESET 2 3 1. Power adapter 3. 2 Connecting the Cables and Getting Started 2.1 Simple Connection If your telephone line is used for the broadband network access only and do not need to use a telephone, take the following figure as a reference for the network access, you do not need to connect the cables. 4
User Manual
Page 10
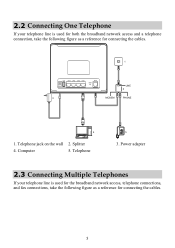
... both the broadband network access and a telephone connection, take the following figure as a reference for connecting the cables. 1 POWER USB LAN4 LAN3 LAN2 LAN1 ADSL RESET 3 #### LINE 2 #### #### MODEM PHONE 4 1. 2.2 Connecting One Telephone If your telephone line is used for the broadband network access, telephone connections, and fax connections, take the following...
... both the broadband network access and a telephone connection, take the following figure as a reference for connecting the cables. 1 POWER USB LAN4 LAN3 LAN2 LAN1 ADSL RESET 3 #### LINE 2 #### #### MODEM PHONE 4 1. 2.2 Connecting One Telephone If your telephone line is used for the broadband network access, telephone connections, and fax connections, take the following...
User Manual
Page 11
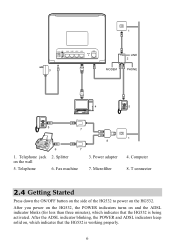
1 POWER USB LAN4 LAN3 LAN2 LAN1 ADSL RESET 3 #### LINE 2 ## ## #### MODEM PHONE 4 5 5 7 6 7 1. Splitter on and the ADSL indicator blinks (for less than three minutes), which indicates that the HG532 is working properly. 6 Telephone 6. Fax machine 8 3. Computer 8. Power adapter 7. After you power on the HG532, the POWER indicators turns on the wall 5. T connector 2.4 Getting Started Press...
1 POWER USB LAN4 LAN3 LAN2 LAN1 ADSL RESET 3 #### LINE 2 ## ## #### MODEM PHONE 4 5 5 7 6 7 1. Splitter on and the ADSL indicator blinks (for less than three minutes), which indicates that the HG532 is working properly. 6 Telephone 6. Fax machine 8 3. Computer 8. Power adapter 7. After you power on the HG532, the POWER indicators turns on the wall 5. T connector 2.4 Getting Started Press...
User Manual
Page 18
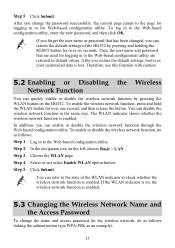
...enable or disable the wireless network function through the Web-based configuration utility. You can refer to the state of the HG532 by pressing the WLAN button on the HG532. In addition, you restore the default settings, however, your customized data is enabled. You can disable the wireless network...Enable WLAN option button. Step 5 Click Submit. After you can quickly enable or disable the wireless network function by pressing and holding the RESET button for logging in to the Web-based configuration utility, enter the new password, and then click OK. If you forget the user name...
...enable or disable the wireless network function through the Web-based configuration utility. You can refer to the state of the HG532 by pressing the WLAN button on the HG532. In addition, you restore the default settings, however, your customized data is enabled. You can disable the wireless network...Enable WLAN option button. Step 5 Click Submit. After you can quickly enable or disable the wireless network function by pressing and holding the RESET button for logging in to the Web-based configuration utility, enter the new password, and then click OK. If you forget the user name...
User Manual
Page 20
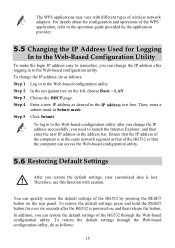
... the Web-Based Configuration Utility To make the login IP address easy to remember, you need to the operation guide provided by pressing the RESET button on the rear panel. To change the IP address successfully, you can quickly restore the default settings of the WPS application, refer ... then enter the new IP address in Subnet mask. Step 3 Choose the DHCP page. Therefore, use this function with different types of the HG532 through the Web-based configuration utility, do as desired in to the Web-based configuration utility. Ensure that the IP address of the computer is...
... the Web-Based Configuration Utility To make the login IP address easy to remember, you need to the operation guide provided by pressing the RESET button on the rear panel. To change the IP address successfully, you can quickly restore the default settings of the WPS application, refer ... then enter the new IP address in Subnet mask. Step 3 Choose the DHCP page. Therefore, use this function with different types of the HG532 through the Web-based configuration utility, do as desired in to the Web-based configuration utility. Ensure that the IP address of the computer is...
User Manual
Page 21
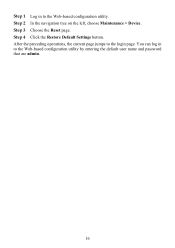
Step 1 Log in to the Web-based configuration utility by entering the default user name and password that are admin. 16 After the preceding operations, the current page jumps to the Web-based configuration utility. You can log in to the login page. Step 3 Choose the Reset page. Step 2 In the navigation tree on the left, choose Maintenance > Device. Step 4 Click the Restore Default Settings button.
Step 1 Log in to the Web-based configuration utility by entering the default user name and password that are admin. 16 After the preceding operations, the current page jumps to the Web-based configuration utility. You can log in to the login page. Step 3 Choose the Reset page. Step 2 In the navigation tree on the left, choose Maintenance > Device. Step 4 Click the Restore Default Settings button.
User Manual
Page 22
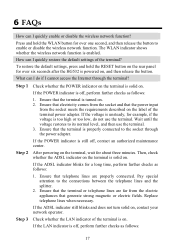
... ADSL indicator on the terminal is turned on . To restore the default settings, press and hold the WLAN button for over six seconds after the HG532 is still off , perform further checks as follows: 1. Ensure that the terminal is solid on . 2. If the LAN indicator is too high or... blinks and does not turn solid on . How can I do not use the terminal. 3. Replace telephone lines when necessary. Press and hold the RESET button on the label of the terminal? Ensure that electricity comes from the socket and that the power input from the electric appliances that telephone...
... ADSL indicator on the terminal is turned on . To restore the default settings, press and hold the WLAN button for over six seconds after the HG532 is still off , perform further checks as follows: 1. Ensure that the terminal is solid on . 2. If the LAN indicator is too high or... blinks and does not turn solid on . How can I do not use the terminal. 3. Replace telephone lines when necessary. Press and hold the RESET button on the label of the terminal? Ensure that electricity comes from the socket and that the power input from the electric appliances that telephone...
User Manual
Page 26
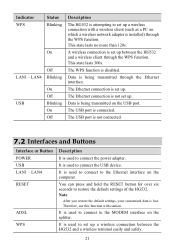
...Ethernet interface. Data is not connected. 7.2 Interfaces and Buttons Interface or Button POWER USB LAN1 - A wireless connection is set up between the HG532 and a wireless terminal easily and safely. 21 Note After you restore the default settings, your customized data is used to connect to the MODEM...Blinking On Off LAN1 - This state lasts no more than 120s. It is used to restore the default settings of the HG532. You can press and hold the RESET button for over six seconds to connect the USB device. It is used to set up a wireless connection with caution....
...Ethernet interface. Data is not connected. 7.2 Interfaces and Buttons Interface or Button POWER USB LAN1 - A wireless connection is set up between the HG532 and a wireless terminal easily and safely. 21 Note After you restore the default settings, your customized data is used to connect to the MODEM...Blinking On Off LAN1 - This state lasts no more than 120s. It is used to restore the default settings of the HG532. You can press and hold the RESET button for over six seconds to connect the USB device. It is used to set up a wireless connection with caution....


