
User Manual
Page 1
HUAWEI FT2050 Fixed Wireless Terminal USER GUIDE
HUAWEI FT2050 Fixed Wireless Terminal USER GUIDE

User Manual
Page 2
..., BUSINESS, REVENUE, DATA, GOODWILL OR ANTICIPATED SAVINGS. No part of Huawei Technologies Co., Ltd. Other trademarks, product, service and company names mentioned are trademarks or registered trademarks of this manual may include copyrighted software of local network, and may not be activated or may be reproduced or transmitted in any form or by any information or specifications contained...
..., BUSINESS, REVENUE, DATA, GOODWILL OR ANTICIPATED SAVINGS. No part of Huawei Technologies Co., Ltd. Other trademarks, product, service and company names mentioned are trademarks or registered trademarks of this manual may include copyrighted software of local network, and may not be activated or may be reproduced or transmitted in any form or by any information or specifications contained...
User Manual
Page 3
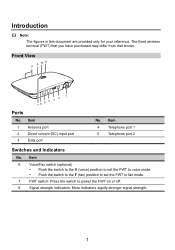
Item 4 Telephone port 1 5 Telephone port 2 Switches and Indicators No. Front View 8 9 10 11 76 5 4 3 2 1 Ports No. Item 1 Antenna port 2 Direct current (DC) input port 3 Data port No. Item 6 Voice/Fax switch (optional) Push the switch to the V (voice) position to set the FWT to voice mode. Push the switch to the F (fax) position to set the FWT to fax mode. 7 FWT switch: Press the switch to power the FWT on...
Item 4 Telephone port 1 5 Telephone port 2 Switches and Indicators No. Front View 8 9 10 11 76 5 4 3 2 1 Ports No. Item 1 Antenna port 2 Direct current (DC) input port 3 Data port No. Item 6 Voice/Fax switch (optional) Push the switch to the V (voice) position to set the FWT to voice mode. Push the switch to the F (fax) position to set the FWT to fax mode. 7 FWT switch: Press the switch to power the FWT on...
User Manual
Page 4
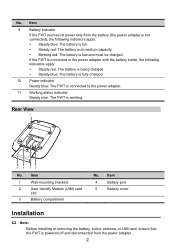
... FWT is connected to the power adapter. 11 Working status indicator Steady blue: The FWT is working. Item 4 Battery port 5 Battery cover Installation Note: Before installing or removing the battery, indoor antenna, or UIM card, ensure that the FWT is low and must be charged. No. Rear View 1 54 No. 1 2 3 32 Item Wall-mounting brackets User Identify Module (UIM) card slot Battery compartment No. Item 9 Battery indicator If...
... FWT is connected to the power adapter. 11 Working status indicator Steady blue: The FWT is working. Item 4 Battery port 5 Battery cover Installation Note: Before installing or removing the battery, indoor antenna, or UIM card, ensure that the FWT is low and must be charged. No. Rear View 1 54 No. 1 2 3 32 Item Wall-mounting brackets User Identify Module (UIM) card slot Battery compartment No. Item 9 Battery indicator If...
User Manual
Page 5
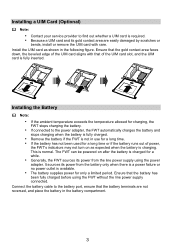
... its power from the line power supply using the FWT without the line power supply connected. Installing a UIM Card (Optional) Note: Contact your service provider to find out whether a UIM card is required. Because a UIM card and its gold contact area are not reversed, and place the battery in the battery compartment. 3 Ensure that the battery has been fully charged before using the power adapter...
... its power from the line power supply using the FWT without the line power supply connected. Installing a UIM Card (Optional) Note: Contact your service provider to find out whether a UIM card is required. Because a UIM card and its gold contact area are not reversed, and place the battery in the battery compartment. 3 Ensure that the battery has been fully charged before using the power adapter...
User Manual
Page 6
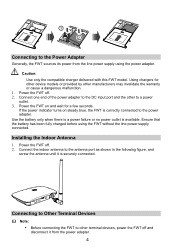
... . 2. Connecting to the Power Adapter Generally, the FWT sources its power from the power adapter. 4 If the power indicator turns on and wait for other device models or provided by other to a power outlet. 3. Use the battery only when there is a power failure or no power outlet is securely connected. Ensure that the battery has been fully charged before using the power adapter. Connect one end of the power adapter to the DC input port...
... . 2. Connecting to the Power Adapter Generally, the FWT sources its power from the power adapter. 4 If the power indicator turns on and wait for other device models or provided by other to a power outlet. 3. Use the battery only when there is a power failure or no power outlet is securely connected. Ensure that the battery has been fully charged before using the power adapter. Connect one end of the power adapter to the DC input port...

User Manual
Page 7
Connecting the FWT to a Fax Machine (Optional) Note: Before connecting the FWT to a fax machine, verify that use the same phone number. Connecting the FWT to a Computer After preparing a compatible universal serial bus (USB) cable and subscribing to your provider's data services, you cannot use the data services, or maintain and debug the FWT on the computer. Connecting the FWT to two telephones that your service provider...
Connecting the FWT to a Fax Machine (Optional) Note: Before connecting the FWT to a fax machine, verify that use the same phone number. Connecting the FWT to a Computer After preparing a compatible universal serial bus (USB) cable and subscribing to your provider's data services, you cannot use the data services, or maintain and debug the FWT on the computer. Connecting the FWT to two telephones that your service provider...

User Manual
Page 8
... 5 minutes and you can hear the dial tone coming from other objects. Number of the time that the FWT can work correctly, the signal strength level must be 1 or 2. Note: If the signal strength level is working. Checking the Signal Strength Power the FWT on and wait until some signal strength indicators turn on or until you hear a dial tone. If no signals...
... 5 minutes and you can hear the dial tone coming from other objects. Number of the time that the FWT can work correctly, the signal strength level must be 1 or 2. Note: If the signal strength level is working. Checking the Signal Strength Power the FWT on and wait until some signal strength indicators turn on or until you hear a dial tone. If no signals...
User Manual
Page 9
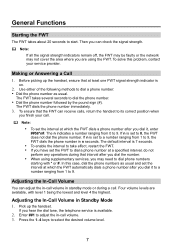
... mode or during that at a specified interval, do not perform any operations during a call volume. 3. Adjusting the In-Call Volume in -call . Press the 1-4 keys to 9. Making or Answering a Call 1. Before picking up the handset. The n indicates a number ranging from 1 to 0, the FWT does not dial the phone number. In this problem, contact your call. Note: To set the interval at which the FWT dials a phone number after you dial it to a number ranging from 1 to dial a phone number: Dial...
... mode or during that at a specified interval, do not perform any operations during a call volume. 3. Adjusting the In-Call Volume in -call . Press the 1-4 keys to 9. Making or Answering a Call 1. Before picking up the handset. The n indicates a number ranging from 1 to 0, the FWT does not dial the phone number. In this problem, contact your call. Note: To set the interval at which the FWT dials a phone number after you dial it to a number ranging from 1 to dial a phone number: Dial...

User Manual
Page 10
.... 2. Accessing the Internet 1. Click Settings to adjust the in a call volume. 2. Then repeat steps 2 to 4 to save the volume level. Press the * key to adjust the in -call . Note: If you hear the reject tone "toot, toot", you use the default settings, skip this step. 4. Use a compatible USB cable to connect the FWT to complete the installation. Continue with your call volume. If you have successfully set up the network connection. Click Connect...
.... 2. Accessing the Internet 1. Click Settings to adjust the in a call volume. 2. Then repeat steps 2 to 4 to save the volume level. Press the * key to adjust the in -call . Note: If you hear the reject tone "toot, toot", you use the default settings, skip this step. 4. Use a compatible USB cable to connect the FWT to complete the installation. Continue with your call volume. If you have successfully set up the network connection. Click Connect...

User Manual
Page 11
... installed. 9 Dial ##36*. Fax Service (Optional) Note: The fax service requires network support. When you can receive faxes, set the fax machine to -fax, that you can make calls and send faxes, but its battery indicator and working status indicator remain off. The success rate of the following methods to the power adapter, but you are using the fax service. This document briefly describes how to fax mode. After hearing the tone "toot", press the Send button...
... installed. 9 Dial ##36*. Fax Service (Optional) Note: The fax service requires network support. When you can receive faxes, set the fax machine to -fax, that you can make calls and send faxes, but its battery indicator and working status indicator remain off. The success rate of the following methods to the power adapter, but you are using the fax service. This document briefly describes how to fax mode. After hearing the tone "toot", press the Send button...
User Manual
Page 12
... no dial tones are off . Check whether the FWT is picked up. Restart your service provider. The in -call fails. Sending a fax fails after the handset is set the fax machine to manual receiving mode, but has not started receiving. The called party is powered on and connected to the power adapter, but the power indicator remains off . The hands-free function cannot be received. Then charge the battery. Faxes cannot be used.
... no dial tones are off . Check whether the FWT is picked up. Restart your service provider. The in -call fails. Sending a fax fails after the handset is set the fax machine to manual receiving mode, but has not started receiving. The called party is powered on and connected to the power adapter, but the power indicator remains off . The hands-free function cannot be received. Then charge the battery. Faxes cannot be used.

User Manual
Page 13
... aircraft. In addition, adhere to use your front pocket. Some wireless devices may have potentially explosive atmospheres that are often, but not always, clearly marked. Power off your device. Check your service provider. For any area with a potentially explosive atmosphere, and comply with electronic devices. Do not power on boats, chemical transfer or storage facilities, and areas where the air...
... aircraft. In addition, adhere to use your front pocket. Some wireless devices may have potentially explosive atmospheres that are often, but not always, clearly marked. Power off your device. Check your service provider. For any area with a potentially explosive atmosphere, and comply with electronic devices. Do not power on boats, chemical transfer or storage facilities, and areas where the air...
User Manual
Page 14
...explosive materials. The antenna(s) used batteries according to the local regulations or reference instruction supplied with regard to disperse heat during working, place the device and the power supply in power consumption. Otherwise, it . Ensure ...replaced. Touching the antenna affects the call , do not use . Do not connect two poles of used for this device model may invalidate any danger caused by lightning. When you charge or store the battery, remove the battery immediately and stop using the device powered by the manufacturer. Accessories Use...
...explosive materials. The antenna(s) used batteries according to the local regulations or reference instruction supplied with regard to disperse heat during working, place the device and the power supply in power consumption. Otherwise, it . Ensure ...replaced. Touching the antenna affects the call , do not use . Do not connect two poles of used for this device model may invalidate any danger caused by lightning. When you charge or store the battery, remove the battery immediately and stop using the device powered by the manufacturer. Accessories Use...

User Manual
Page 15
...batteries, contact your device or batteries as pins near the device. For more information about the recycling of any hazardous substances that they may not function properly and may lead to a short circuit, a malfunction of damp and soft antistatic cloth. Do not dismantle the device or accessories. The connection...device, battery, and charger are using the device. Before you clean or maintain the device, power off the device and disconnect it from the charger. Do not use your device for emergency calls in the service area. The earpiece may erase the ...
...batteries, contact your device or batteries as pins near the device. For more information about the recycling of any hazardous substances that they may not function properly and may lead to a short circuit, a malfunction of damp and soft antistatic cloth. Do not dismantle the device or accessories. The connection...device, battery, and charger are using the device. Before you clean or maintain the device, power off the device and disconnect it from the charger. Do not use your device for emergency calls in the service area. The earpiece may erase the ...

User Manual
Page 16
.... up-to be operated in compliance with the essential requirements and other relevant provisions of Directive 1999/5/EC. declares that this device is to -date information. This device may be used. Version: V100R001_02 Part Number: 31010CBV 14 Notice: Observe the national local regulations in some or all member states of conformity, visit the Web site www.huaweidevice...
.... up-to be operated in compliance with the essential requirements and other relevant provisions of Directive 1999/5/EC. declares that this device is to -date information. This device may be used. Version: V100R001_02 Part Number: 31010CBV 14 Notice: Observe the national local regulations in some or all member states of conformity, visit the Web site www.huaweidevice...


