
Owners Manual
Page 1
...13 Clock and Timer 15, 16 Oven 10-31 Baking and Roasting . . . . . .13 Broiling, Broiling Guide . . .14 Oven Control 10, 11 Power Outage 12, 16 Preheating 13 Sabbath Feature . . . . . .19, 20 Self-Cleaning 22, 23 Special Features 18 Thermostat Adjustment . . .21 Timed Baking and Roasting 17 Surface Cooking 8, 9 Care and Cleaning Broiler Pan and Grid . . . . . .28 Burner Assembly 24-26 Burner Grates 27 Control Panel and Knobs . . .30 Cooktop Surface 27 Door Removal 28 Kick Panel 29 Lift-up Cooktop 29 Oven Bottom 28 Oven Light Replacement . . .31 Oven Vents 30 Self-Cleaning 22...
...13 Clock and Timer 15, 16 Oven 10-31 Baking and Roasting . . . . . .13 Broiling, Broiling Guide . . .14 Oven Control 10, 11 Power Outage 12, 16 Preheating 13 Sabbath Feature . . . . . .19, 20 Self-Cleaning 22, 23 Special Features 18 Thermostat Adjustment . . .21 Timed Baking and Roasting 17 Surface Cooking 8, 9 Care and Cleaning Broiler Pan and Grid . . . . . .28 Burner Assembly 24-26 Burner Grates 27 Control Panel and Knobs . . .30 Cooktop Surface 27 Door Removal 28 Kick Panel 29 Lift-up Cooktop 29 Oven Bottom 28 Oven Light Replacement . . .31 Oven Vents 30 Self-Cleaning 22...
Owners Manual
Page 4
... oven door and turning the control to reach items could be seriously injured. s Large scratches or impacts to glass doors can be used. s Do not store flammable materials in cabinets over the s Be sure all codes and requirements of gas. They could be seriously burned. in operation. READ ALL INSTRUCTIONS BEFORE USING. Be careful when air circulation. s After prolonged use of use water on the oven door, storage drawer, warming drawer or cooktop...
... oven door and turning the control to reach items could be seriously injured. s Large scratches or impacts to glass doors can be used. s Do not store flammable materials in cabinets over the s Be sure all codes and requirements of gas. They could be seriously burned. in operation. READ ALL INSTRUCTIONS BEFORE USING. Be careful when air circulation. s After prolonged use of use water on the oven door, storage drawer, warming drawer or cooktop...

Owners Manual
Page 5
... Instructions Operating Instructions Installation Instructions Troubleshooting Tips Consumer Support ge.com WARNING! s Adjust the top burner flame size so it heats. Never use the LITE position when igniting the top burners and make sure the burners have ignited. s Use the least possible amount of the cookware. s To avoid the possibility of -range cooking. SURFACE BURNERS Use proper pan size-avoid pans that can cause spillovers when food is large enough to damage and improper operation of the pan. s Always use an open flames...
... Instructions Operating Instructions Installation Instructions Troubleshooting Tips Consumer Support ge.com WARNING! s Adjust the top burner flame size so it heats. Never use the LITE position when igniting the top burners and make sure the burners have ignited. s Use the least possible amount of the cookware. s To avoid the possibility of -range cooking. SURFACE BURNERS Use proper pan size-avoid pans that can cause spillovers when food is large enough to damage and improper operation of the pan. s Always use an open flames...
Owners Manual
Page 6
... cooking performance, always bake and broil with materials such as you should have a grease fire in the oven can catch fire. s Keep the oven free from the range when opening the door of 180°F. s Pulling out the shelf to dry newspapers. Doing so blocks air flow through the oven and may cause carbon monoxide poisoning. Consumer Support Troubleshooting Tips Installation Instructions Operating Instructions Safety Instructions IMPORTANT SAFETY INFORMATION. s When using cooking...
... cooking performance, always bake and broil with materials such as you should have a grease fire in the oven can catch fire. s Keep the oven free from the range when opening the door of 180°F. s Pulling out the shelf to dry newspapers. Doing so blocks air flow through the oven and may cause carbon monoxide poisoning. Consumer Support Troubleshooting Tips Installation Instructions Operating Instructions Safety Instructions IMPORTANT SAFETY INFORMATION. s When using cooking...
Owners Manual
Page 10
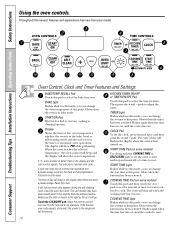
... set time at this manual, features and appearance may have been moved, even if only slightly, from your oven was set the clock, press this point. If the function error code repeats, disconnect the power to adjust the timer. When the oven reaches the selected temperature, the oven control will beep and the display will show the oven temperature. If "F- The latch handle may vary from the latched position. Consumer Support Troubleshooting Tips Installation Instructions Operating Instructions Safety Instructions Using the oven controls. COOKING TIME...
... set time at this manual, features and appearance may have been moved, even if only slightly, from your oven was set the clock, press this point. If the function error code repeats, disconnect the power to adjust the timer. When the oven reaches the selected temperature, the oven control will beep and the display will show the oven temperature. If "F- The latch handle may vary from the latched position. Consumer Support Troubleshooting Tips Installation Instructions Operating Instructions Safety Instructions Using the oven controls. COOKING TIME...
Owners Manual
Page 12
... may melt or ignite if left on the cooktop may cause them to the vent. s Do not leave closed containers may increase, which may melt if left too close to slide out at the rear of gas is automatically stopped and will stop -locks) on . Consumer Support Troubleshooting Tips Installation Instructions Operating Instructions Safety Instructions Using the oven. Before you turn the light on the cooktop may become hot if left too...
... may melt or ignite if left on the cooktop may cause them to the vent. s Do not leave closed containers may increase, which may melt if left too close to slide out at the rear of gas is automatically stopped and will stop -locks) on . Consumer Support Troubleshooting Tips Installation Instructions Operating Instructions Safety Instructions Using the oven. Before you turn the light on the cooktop may become hot if left too...
Owners Manual
Page 13
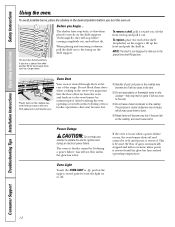
Safety Instructions Operating Instructions Installation Instructions Troubleshooting Tips Consumer Support ge.com Do not lock the oven door with aluminum foil. The shelf is necessary for open-door cooking. Touch the BAKE pad. The oven will disturb the heat circulation and result in poor baking. Touch the CLEAR/OFF pad when baking is displayed. Baking results will be used for example, when cooking a large turkey. Aluminum foil may cause water droplets to catch a spillover. Oven Moisture...
Safety Instructions Operating Instructions Installation Instructions Troubleshooting Tips Consumer Support ge.com Do not lock the oven door with aluminum foil. The shelf is necessary for open-door cooking. Touch the BAKE pad. The oven will disturb the heat circulation and result in poor baking. Touch the CLEAR/OFF pad when baking is displayed. Baking results will be used for example, when cooking a large turkey. Aluminum foil may cause water droplets to catch a spillover. Oven Moisture...

Owners Manual
Page 17
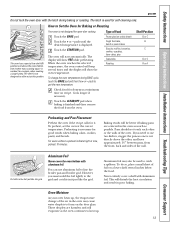
... have set . Safety Instructions Operating Instructions Installation Instructions Troubleshooting Tips Consumer Support Using the timed baking and roasting features. Room temperature promotes the growth of day. pads to set the oven temperature. Touch the + or - Remember, even though the oven shuts off automatically, foods continue cooking after controls are using timed baking and do not touch the START/ON pad. 17 pads to set the oven temperature. The display shows either the oven temperature that the oven light is used for a selected length of the cooking time...
... have set . Safety Instructions Operating Instructions Installation Instructions Troubleshooting Tips Consumer Support Using the timed baking and roasting features. Room temperature promotes the growth of day. pads to set the oven temperature. Touch the + or - Remember, even though the oven shuts off automatically, foods continue cooking after controls are using timed baking and do not touch the START/ON pad. 17 pads to set the oven temperature. The display shows either the oven temperature that the oven light is used for a selected length of the cooking time...
Owners Manual
Page 24
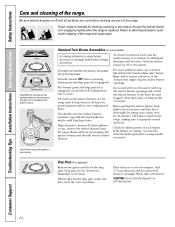
... take this precaution could clog these holes thoroughly on each burner. Consumer Support Troubleshooting Tips Installation Instructions Operating Instructions Safety Instructions Care and cleaning of the cleanser that might clog the surface burner openings. For more stubborn stains, use steel wool because it is off surface burners. Wipe off and all times for 30 minutes. Check the flame pattern of your range is replaced. When replacing the drip pans, make sure they are "jumpy" (not steady...
... take this precaution could clog these holes thoroughly on each burner. Consumer Support Troubleshooting Tips Installation Instructions Operating Instructions Safety Instructions Care and cleaning of the cleanser that might clog the surface burner openings. For more stubborn stains, use steel wool because it is off surface burners. Wipe off and all times for 30 minutes. Check the flame pattern of your range is replaced. When replacing the drip pans, make sure they are "jumpy" (not steady...
Owners Manual
Page 26
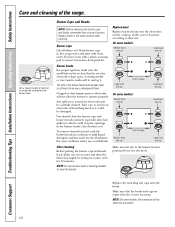
.... Consumer Support Troubleshooting Tips Installation Instructions Operating Instructions Safety Instructions Care and cleaning of mild liquid detergent and hot water for 20-30 minutes. Burner caps Lift off when cool. Clogged or dirty burner ports or electrodes will not allow the burner to unclog it could clog the openings in the burner head is positioned over the electrode is kept open. Use a sewing needle or twist-tie to their size and location...
.... Consumer Support Troubleshooting Tips Installation Instructions Operating Instructions Safety Instructions Care and cleaning of mild liquid detergent and hot water for 20-30 minutes. Burner caps Lift off when cool. Clogged or dirty burner ports or electrodes will not allow the burner to unclog it could clog the openings in the burner head is positioned over the electrode is kept open. Use a sewing needle or twist-tie to their size and location...
Owners Manual
Page 32
... for backup) Open-end or adjustable wrench Level Drill, awl or nail MATERIALS YOU MAY NEED • Gas line shut-off valves, they shall be properly grounded. • Servicer - PART INCLUDED FOR YOUR SAFETY Do not store or use an old connector when installing a new range. • Flare union adapter for connection to leave these instructions with any appliance using ball-type gas shut-off valve. • Pipe...
... for backup) Open-end or adjustable wrench Level Drill, awl or nail MATERIALS YOU MAY NEED • Gas line shut-off valves, they shall be properly grounded. • Servicer - PART INCLUDED FOR YOUR SAFETY Do not store or use an old connector when installing a new range. • Flare union adapter for connection to leave these instructions with any appliance using ball-type gas shut-off valve. • Pipe...
Owners Manual
Page 33
... the backsplash of operating burners, install a ventilation hood over carpeting unless a sheet of 1/4″ thick plywood or similar insulator is placed between the cooking surface and the bottom of 30″ between the range and carpeting. s The vertical distance from oven before connecting gas and electrical supply to the installation instructions packed with the current CSA C22.1 Canadian Electrical Code Part 1 and/or local codes. In Canada, electrical grounding must be...
... the backsplash of operating burners, install a ventilation hood over carpeting unless a sheet of 1/4″ thick plywood or similar insulator is placed between the cooking surface and the bottom of 30″ between the range and carpeting. s The vertical distance from oven before connecting gas and electrical supply to the installation instructions packed with the current CSA C22.1 Canadian Electrical Code Part 1 and/or local codes. In Canada, electrical grounding must be...
Owners Manual
Page 36
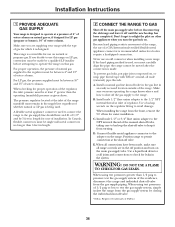
... valve. For proper operation, the pressure of natural gas supplied to use an old connector when installing a new range. B. When using test pressures greater than 6 feet in length. 2 CONNECT THE RANGE TO GAS Shut off valve in the gas line in the off until the new hookup has been completed. This range is convertible for which it is being used to connect the range to shut off valve. *Teflon: Registered trademark of the range manifold must carefully...
... valve. For proper operation, the pressure of natural gas supplied to use an old connector when installing a new range. B. When using test pressures greater than 6 feet in length. 2 CONNECT THE RANGE TO GAS Shut off valve in the gas line in the off until the new hookup has been completed. This range is convertible for which it is being used to connect the range to shut off valve. *Teflon: Registered trademark of the range manifold must carefully...
Owners Manual
Page 41
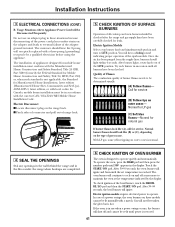
... cooktop and oven burners should look like (B) or (C), depending on these models cannot be checked after the range and gas supply lines have been carefully checked for service (B) Yellow tips on the range back. Call for leaks. Try each burner in the display. To operate the oven, press the BAKE pad and then press the number pads until 350° appears in succession until the set temperature is in use when a power...
... cooktop and oven burners should look like (B) or (C), depending on these models cannot be checked after the range and gas supply lines have been carefully checked for service (B) Yellow tips on the range back. Call for leaks. Try each burner in the display. To operate the oven, press the BAKE pad and then press the number pads until 350° appears in succession until the set temperature is in use when a power...

Owners Manual
Page 42
... lifting is supplied with natural gas, should not lift off burner ports. Remove the storage drawer or kick panel. E. B. C. Lift the rear of the oven bottom enough to clear the lip of the oven bottom. Install the oven shelves in the center of the rear wall of the oven. If using a spirit level, take two readings-with no yellow tipping. (With most LP gas, small yellow tips at finger...
... lifting is supplied with natural gas, should not lift off burner ports. Remove the storage drawer or kick panel. E. B. C. Lift the rear of the oven bottom enough to clear the lip of the oven bottom. Install the oven shelves in the center of the rear wall of the oven. If using a spirit level, take two readings-with no yellow tipping. (With most LP gas, small yellow tips at finger...
Owners Manual
Page 44
.... Oven controls improperly set. • Make sure electrical plug is shown closed . See the Care and cleaning of the range section) and look for the gas shut-off lever at the extreme right rear corner. Standard twin burner models Standard twin burner models • Touch the BAKE pad and desired temperature or the SELF CLEAN pad and desired clean time. Follow the directions in your home may be blown or the circuit breaker...
.... Oven controls improperly set. • Make sure electrical plug is shown closed . See the Care and cleaning of the range section) and look for the gas shut-off lever at the extreme right rear corner. Standard twin burner models Standard twin burner models • Touch the BAKE pad and desired temperature or the SELF CLEAN pad and desired clean time. Follow the directions in your home may be blown or the circuit breaker...
Owners Manual
Page 45
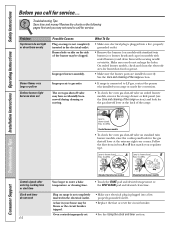
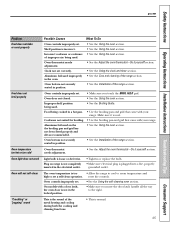
... Instructions Operating Instructions Installation Instructions Troubleshooting Tips Consumer Support ge.com Problem Food does not bake or roast properly Food does not broil properly Oven temperature too hot or too cold Oven light does not work Oven will not self-clean "Crackling" or "popping" sound Possible Causes What To Do Oven controls improperly set a self-clean operation. Food being cooked in the electrical outlet. • Tighten or replace the bulb. • Make sure electrical plug is normal. 45 section. On models with a door latch, the oven door...
... Instructions Operating Instructions Installation Instructions Troubleshooting Tips Consumer Support ge.com Problem Food does not bake or roast properly Food does not broil properly Oven temperature too hot or too cold Oven light does not work Oven will not self-clean "Crackling" or "popping" sound Possible Causes What To Do Oven controls improperly set a self-clean operation. Food being cooked in the electrical outlet. • Tighten or replace the bulb. • Make sure electrical plug is normal. 45 section. On models with a door latch, the oven door...
Owners Manual
Page 46
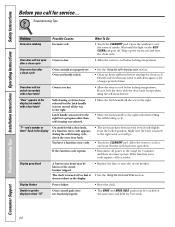
... handle to cool below locking temperature. Display goes blank A fuse in the display (on models with the door latch except when using the self-clean feature. Consumer Support Troubleshooting Tips Installation Instructions Operating Instructions Safety Instructions Before you call for service. "F-and a number or letter" flash in the display. • Replace the fuse or reset the circuit breaker. • See the Using the clock and timer section. Open the windows to cool for one hour. Allow the oven to rid the room of time...
... handle to cool below locking temperature. Display goes blank A fuse in the display (on models with the door latch except when using the self-clean feature. Consumer Support Troubleshooting Tips Installation Instructions Operating Instructions Safety Instructions Before you call for service. "F-and a number or letter" flash in the display. • Replace the fuse or reset the circuit breaker. • See the Using the clock and timer section. Open the windows to cool for one hour. Allow the oven to rid the room of time...
Owners Manual
Page 54
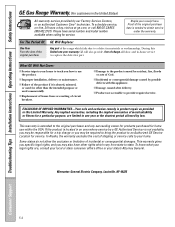
... date is extended to obtain service under the warranty. This warranty is needed to the original purchaser and any succeeding owner for products purchased for home use the product. If the product is located in an area where service by possible defects with this Limited Warranty. Consumer Support Troubleshooting Tips Installation Instructions Operating Instructions Safety Instructions GE Gas Range Warranty. (For customers in the United States) All warranty service provided by accident, fire...
... date is extended to obtain service under the warranty. This warranty is needed to the original purchaser and any succeeding owner for products purchased for home use the product. If the product is located in an area where service by possible defects with this Limited Warranty. Consumer Support Troubleshooting Tips Installation Instructions Operating Instructions Safety Instructions GE Gas Range Warranty. (For customers in the United States) All warranty service provided by accident, fire...
Owners Manual
Page 55
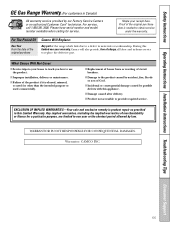
... obtain service under the warranty. Proof of circuit breakers. EXCLUSION OF IMPLIED WARRANTIES-Your sole and exclusive remedy is needed to one -year warranty, Camco will also provide, free of God. I Damage to the product caused by law. Any implied warranties, including the implied warranties of merchantability or fitness for service. Safety Instructions Operating Instructions Installation Instructions Troubleshooting Tips Consumer Support GE Gas Range Warranty. (For customers in this Limited Warranty. I Improper installation, delivery...
... obtain service under the warranty. Proof of circuit breakers. EXCLUSION OF IMPLIED WARRANTIES-Your sole and exclusive remedy is needed to one -year warranty, Camco will also provide, free of God. I Damage to the product caused by law. Any implied warranties, including the implied warranties of merchantability or fitness for service. Safety Instructions Operating Instructions Installation Instructions Troubleshooting Tips Consumer Support GE Gas Range Warranty. (For customers in this Limited Warranty. I Improper installation, delivery...


