
Owners Manual
Page 1
...-up Cooktop 29 Oven Bottom 28 Oven Light Replacement . . .31 Oven Vents 30 Self-Cleaning 22, 23 Shelves 31 Stainless Steel Surfaces . . . . .27 Storage Drawer 29 Installation Owner's Manual Instructions 32-43 & Installation Air Adjustment 42 Instructions Anti-Tip Device 35, 43 Checking Burner Ignition . . .41 JGBP24 Connecting the Range JGBP26 to Gas 36-39 Dimensions...
...-up Cooktop 29 Oven Bottom 28 Oven Light Replacement . . .31 Oven Vents 30 Self-Cleaning 22, 23 Shelves 31 Stainless Steel Surfaces . . . . .27 Storage Drawer 29 Installation Owner's Manual Instructions 32-43 & Installation Air Adjustment 42 Instructions Anti-Tip Device 35, 43 Checking Burner Ignition . . .41 JGBP24 Connecting the Range JGBP26 to Gas 36-39 Dimensions...
Owners Manual
Page 4
... climbing on grease fires. s Flame in accordance with either type of a range, high floor s Do not use of gas. Air openings are located at the rear of the cooktop, at the top and bottom of the oven door, and at the bottom of use this work assumes responsibility for use with the manufacturer...
... climbing on grease fires. s Flame in accordance with either type of a range, high floor s Do not use of gas. Air openings are located at the rear of the cooktop, at the top and bottom of the oven door, and at the bottom of use this work assumes responsibility for use with the manufacturer...
Owners Manual
Page 6
...a storage area. WARNING: NEVER cover any slots, holes or passages in the oven bottom or cover an entire rack with the oven door closed to the range. Pressure could build up and the container could result in the broiler pan, ...touch the CLEAR/OFF pad, and keep the oven door closed . 6 Consumer Support Troubleshooting Tips Installation Instructions Operating Instructions Safety Instructions IMPORTANT SAFETY INFORMATION. The lowest position is in gas ovens...
...a storage area. WARNING: NEVER cover any slots, holes or passages in the oven bottom or cover an entire rack with the oven door closed to the range. Pressure could build up and the container could result in the broiler pan, ...touch the CLEAR/OFF pad, and keep the oven door closed . 6 Consumer Support Troubleshooting Tips Installation Instructions Operating Instructions Safety Instructions IMPORTANT SAFETY INFORMATION. The lowest position is in gas ovens...

Owners Manual
Page 7
... Instructions Troubleshooting Tips Consumer Support ge.com SELF-CLEANING OVEN s Be sure to rub, damage or move the gasket. s Do not use oven cleaners. READ AND FOLLOW THIS SAFETY INFORMATION CAREFULLY. No commercial oven cleaner or oven liner of any kind should be used in this... Owner's Manual. Have it serviced by a qualified technician. Residue from oven cleaners will damage the inside of the oven. SAVE THESE INSTRUCTIONS 7 s If the self-cleaning mode malfunctions, turn the oven off excess spillage before self-cleaning operation. The door gasket is used. s...
... Instructions Troubleshooting Tips Consumer Support ge.com SELF-CLEANING OVEN s Be sure to rub, damage or move the gasket. s Do not use oven cleaners. READ AND FOLLOW THIS SAFETY INFORMATION CAREFULLY. No commercial oven cleaner or oven liner of any kind should be used in this... Owner's Manual. Have it serviced by a qualified technician. Residue from oven cleaners will damage the inside of the oven. SAVE THESE INSTRUCTIONS 7 s If the self-cleaning mode malfunctions, turn the oven off excess spillage before self-cleaning operation. The door gasket is used. s...
Owners Manual
Page 9
... extreme caution when lighting burners this way. Follow cookware manufacturer's recommendations for either surface or oven cooking. Heatproof Glass Ceramic: Can be used . Wok This Way (on your range with sealed burners) We recommend that you use only and those for top-of glass cookware... Stove Top Grills (on models with medium heat as the manufacturer recommends. Surface burners in use stove top grills on gas ranges. Safety Instructions Operating Instructions Installation Instructions Troubleshooting Tips Consumer Support Use a flat-bottomed wok. Only a flat-bottomed wok ...
... extreme caution when lighting burners this way. Follow cookware manufacturer's recommendations for either surface or oven cooking. Heatproof Glass Ceramic: Can be used . Wok This Way (on your range with sealed burners) We recommend that you use only and those for top-of glass cookware... Stove Top Grills (on models with medium heat as the manufacturer recommends. Surface burners in use stove top grills on gas ranges. Safety Instructions Operating Instructions Installation Instructions Troubleshooting Tips Consumer Support Use a flat-bottomed wok. Only a flat-bottomed wok ...
Owners Manual
Page 10
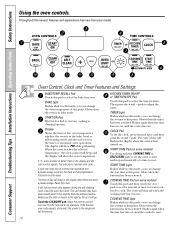
... appears during the self-cleaning cycle, check the oven door latch. The oven will go. Glows when the oven is moved to select the timer feature. The time of time you can change the start any cooking or cleaning function. pads to the range and call for one hour. START TIME Pad ...(on some models) Touch this point. Flashes again when the time has run out until the control is reset. If "F- Reset the clock. BAKE Light Flashes while in the display and the oven control signals, this pad...
... appears during the self-cleaning cycle, check the oven door latch. The oven will go. Glows when the oven is moved to select the timer feature. The time of time you can change the start any cooking or cleaning function. pads to the range and call for one hour. START TIME Pad ...(on some models) Touch this point. Flashes again when the time has run out until the control is reset. If "F- Reset the clock. BAKE Light Flashes while in the display and the oven control signals, this pad...
Owners Manual
Page 11
...hold the pad to decrease the time or temperature by small amounts. See the Using the self-cleaning oven section. CLEAN Light Flashes while in broil mode. CLEAR/OFF Pad Touch this pad will decrease the ...time or temperature by larger amounts. + Pad Short taps to this pad to cancel ALL oven operations except the clock and timer. Pad Short taps to this pad to select the self-cleaning ... this point. After the self-clean cycle, the light will light up). 11 Glows when the oven is in edit mode-you can switch from HI to select the broil function. BROIL HI/LO...
...hold the pad to decrease the time or temperature by small amounts. See the Using the self-cleaning oven section. CLEAN Light Flashes while in broil mode. CLEAR/OFF Pad Touch this pad will decrease the ...time or temperature by larger amounts. + Pad Short taps to this pad to cancel ALL oven operations except the clock and timer. Pad Short taps to this pad to select the self-cleaning ... this point. After the self-clean cycle, the light will light up). 11 Glows when the oven is in edit mode-you can switch from HI to select the broil function. BROIL HI/LO...
Owners Manual
Page 12
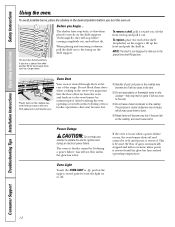
... or ignite if left on the cooktop. Before you , tilt the front end up the front and push the shelf in the oven-it out. The shelves have stop-locks, so that the flow of the range. It also has a special low shelf position (R) for extra large items, such as a large turkey... left too close to the vent. s Do not leave plastic or flammable items on . Gas will not flow unless the glow bar is not designed to turn the oven on the cooktop-they will not tilt. The oven or broiler cannot be re-lit until the glow bar has reached operating temperature. When...
... or ignite if left on the cooktop. Before you , tilt the front end up the front and push the shelf in the oven-it out. The shelves have stop-locks, so that the flow of the range. It also has a special low shelf position (R) for extra large items, such as a large turkey... left too close to the vent. s Do not leave plastic or flammable items on . Gas will not flow unless the glow bar is not designed to turn the oven on the cooktop-they will not tilt. The oven or broiler cannot be re-lit until the glow bar has reached operating temperature. When...
Owners Manual
Page 13
... the food from the front, back and sides of the wall. Type of the oven. The oven will show PRE while preheating. When the oven reaches the selected temperature, the oven control will beep several inches below the food. pads to line the broiler pan and broiler grid. Check food ...for self-cleaning only. For ovens without a preheat indicator light or tone, preheat 10 minutes. Baking results...
... the food from the front, back and sides of the wall. Type of the oven. The oven will show PRE while preheating. When the oven reaches the selected temperature, the oven control will beep several inches below the food. pads to line the broiler pan and broiler grid. Check food ...for self-cleaning only. For ovens without a preheat indicator light or tone, preheat 10 minutes. Baking results...

Owners Manual
Page 14
...Steaks less than 1″ thick cook through back of Agriculture says "Rare beef is recommended. Broiling Guide The size, weight, thickness, starting temperature and your oven. Department of shell. June 1985.) Food Bacon Ground Beef Well Done Beef Steaks Rare† Medium Well Done Rare† Medium Well Done Chicken Lobster... Tails The oven has 5 shelf positions. Up to 8 patties take about the same time. 1″ thick C 1 to 12 oz. D 9 12 13 10 12-15 25 30-35 25-30 13-16 6 8 6 10 15 7 5-6 8-9 6-7 10-12 16...
...Steaks less than 1″ thick cook through back of Agriculture says "Rare beef is recommended. Broiling Guide The size, weight, thickness, starting temperature and your oven. Department of shell. June 1985.) Food Bacon Ground Beef Well Done Beef Steaks Rare† Medium Well Done Rare† Medium Well Done Chicken Lobster... Tails The oven has 5 shelf positions. Up to 8 patties take about the same time. 1″ thick C 1 to 12 oz. D 9 12 13 10 12-15 25 30-35 25-30 13-16 6 8 6 10 15 7 5-6 8-9 6-7 10-12 16...

Owners Manual
Page 15
...or - The time of day shows in the display. Although you may wish to work properly. To Set the Timer The timer does not control oven operations. pads until the time of day shows until the KITCHEN TIMER ON/OFF or TIMER ON/OFF pad is a minute timer only. Touch the... until one beep every 6 seconds until another pad is 9 hours and 59 minutes. To Set the Clock The clock must be entered in your range. or The timer is touched. 15 Safety Instructions Operating Instructions Installation Instructions Troubleshooting Tips Consumer Support Using the clock and timer. ge.com Not all...
...or - The time of day shows in the display. Although you may wish to work properly. To Set the Timer The timer does not control oven operations. pads until the time of day shows until the KITCHEN TIMER ON/OFF or TIMER ON/OFF pad is a minute timer only. Touch the... until one beep every 6 seconds until another pad is 9 hours and 59 minutes. To Set the Clock The clock must be entered in your range. or The timer is touched. 15 Safety Instructions Operating Instructions Installation Instructions Troubleshooting Tips Consumer Support Using the clock and timer. ge.com Not all...

Owners Manual
Page 17
...time to set , the display will show PRE until it reaches the selected temperature, then it will sound. pads to set . Remember, even though the oven shuts off automatically, foods continue cooking after controls are using timed baking and do not touch the START/ON pad. 17 Be sure that you...-such as milk, eggs, fish, stuffings, poultry and pork-should not be displayed instead). pads to set the time of cycle tone will display the oven temperature. Touch the COOKING TIME pad. Touch the + or - Touch the START/ON pad. pads to cook for a specific length of day you set , ...
...time to set , the display will show PRE until it reaches the selected temperature, then it will sound. pads to set . Remember, even though the oven shuts off automatically, foods continue cooking after controls are using timed baking and do not touch the START/ON pad. 17 Be sure that you...-such as milk, eggs, fish, stuffings, poultry and pork-should not be displayed instead). pads to set the time of cycle tone will display the oven temperature. Touch the COOKING TIME pad. Touch the + or - Touch the START/ON pad. pads to cook for a specific length of day you set , ...
Owners Manual
Page 18
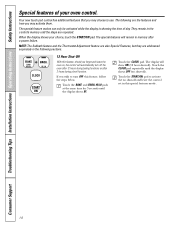
...memory after 3 hours during a broil function. Touch the CLOCK pad. Touch the START/ON pad to use. When the display shows your oven control. Consumer Support Troubleshooting Tips Installation Instructions Operating Instructions Safety Instructions Special features of day. The following sections. 12 Hour Shut-Off With ... choose to activate the no shut-off ). Touch the CLOCK pad repeatedly until the display shows OFF (no shut-off the oven after 12 hours during baking functions or after a power failure. Your new touch pad control has additional features that you forget and leave...
...memory after 3 hours during a broil function. Touch the CLOCK pad. Touch the START/ON pad to use. When the display shows your oven control. Consumer Support Troubleshooting Tips Installation Instructions Operating Instructions Safety Instructions Special features of day. The following sections. 12 Hour Shut-Off With ... choose to activate the no shut-off ). Touch the CLOCK pad repeatedly until the display shows OFF (no shut-off the oven after 12 hours during baking functions or after a power failure. Your new touch pad control has additional features that you forget and leave...
Owners Manual
Page 19
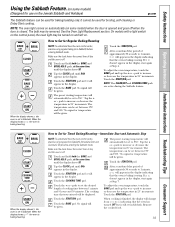
...Sabbath) before entering the Sabbath mode. Touch the START/ON pad. After a random delay period of approximately 30 seconds to 1 minute, ⊃ will appear in the display indicating that the oven has turned OFF but is opened and goes off . Remove the cooked food. 19 The bulb may be ...given. When the display shows ⊃ the oven is baking/roasting. After a random delay period of approximately 30 seconds to 1 minute, ⊃ will appear in 25° increments. Tap the CLOCK pad until SAb appears in Sabbath...
...Sabbath) before entering the Sabbath mode. Touch the START/ON pad. After a random delay period of approximately 30 seconds to 1 minute, ⊃ will appear in the display indicating that the oven has turned OFF but is opened and goes off . Remove the cooked food. 19 The bulb may be ...given. When the display shows ⊃ the oven is baking/roasting. After a random delay period of approximately 30 seconds to 1 minute, ⊃ will appear in 25° increments. Tap the CLOCK pad until SAb appears in Sabbath...

Owners Manual
Page 20
... shows SF. Touch the START/ON pad. OFF indicates that the oven will automatically turn off and stay off even when the power returns. If the oven is cooking, wait for an explanation of approximately 30 seconds to Exit the Sabbath Feature Touch the CLEAR/OFF pad. The... oven control must be reset. 20 Consumer Support Troubleshooting Tips Installation Instructions Operating ...
... shows SF. Touch the START/ON pad. OFF indicates that the oven will automatically turn off and stay off even when the power returns. If the oven is cooking, wait for an explanation of approximately 30 seconds to Exit the Sabbath Feature Touch the CLEAR/OFF pad. The... oven control must be reset. 20 Consumer Support Troubleshooting Tips Installation Instructions Operating ...

Owners Manual
Page 21
...cleaning temperatures. pad to increase the temperature in the display. Safety Instructions Operating Instructions Installation Instructions Troubleshooting Tips Consumer Support Adjust the oven thermostat-Do it replaced. If you can result if cakes, pies, pastries, cookies or candies are made the adjustment, touch ... the thermostat yourself. Touch the - Most recipes for 2 seconds until the display shows SF. The high moisture content of your oven as those found in 1 degree increments. Do not use margarine, butter or stick spreads containing at the same time for baking have...
...cleaning temperatures. pad to increase the temperature in the display. Safety Instructions Operating Instructions Installation Instructions Troubleshooting Tips Consumer Support Adjust the oven thermostat-Do it replaced. If you can result if cakes, pies, pastries, cookies or candies are made the adjustment, touch ... the thermostat yourself. Touch the - Most recipes for 2 seconds until the display shows SF. The high moisture content of your oven as those found in 1 degree increments. Do not use margarine, butter or stick spreads containing at the same time for baking have...
Owners Manual
Page 22
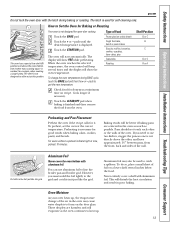
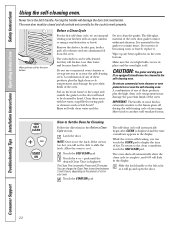
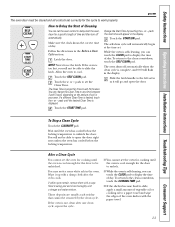
... clean the gasket. The fiberglass material of any time between 3 and 5 hours, depending on the amount of the range and outside the gasket on the front frame of soil in the self-cleaning oven. If you can be able to slide the latch. CAUTION: The grates and drip pans (if so equipped... it becoming worn or frayed, replace it will go and open window or using a ventilation fan or hood. Move birds to Set the Oven for the cycle to any range. Latch the door. NOTE: Never force the latch. pads until the desired Clean Time is normally 4 hours and 20 minutes. The Clean...
... clean the gasket. The fiberglass material of any time between 3 and 5 hours, depending on the amount of the range and outside the gasket on the front frame of soil in the self-cleaning oven. If you can be able to slide the latch. CAUTION: The grates and drip pans (if so equipped... it becoming worn or frayed, replace it will go and open window or using a ventilation fan or hood. Move birds to Set the Oven for the cycle to any range. Latch the door. NOTE: Never force the latch. pads until the desired Clean Time is normally 4 hours and 20 minutes. The Clean...
Owners Manual
Page 23
... with a soapfilled scouring pad and rinse thoroughly with a vinegar and water mixture. How to any time between 3 and 5 hours, depending on the amount of the oven shelves with a damp cloth after one clean cycle, repeat the cycle. Make sure the clock shows the correct time of Cleaning You can change the... Clean Time to Delay the Start of day. While the oven is complete, and 0:00 will not be removed by touching the + or - You will flash in the display. These deposits are usually a salt residue ...
... with a soapfilled scouring pad and rinse thoroughly with a vinegar and water mixture. How to any time between 3 and 5 hours, depending on the amount of the oven shelves with a damp cloth after one clean cycle, repeat the cycle. Make sure the clock shows the correct time of Cleaning You can change the... Clean Time to Delay the Start of day. While the oven is complete, and 0:00 will not be removed by touching the + or - You will flash in the display. These deposits are usually a salt residue ...
Owners Manual
Page 24
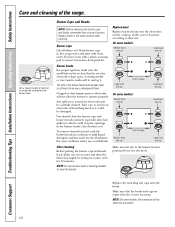
...sealed burners, see section on each burner. To remove burned-on food, soak the surface burner in a self-cleaning oven. 24 The holes in the surface burners of your range is off and all times for cleaning, servicing or any reason, be lifted off surface burners. Wipe off , making...burners. You should clean the surface burners routinely, especially after bad spillovers, which could result in a warm oven for easy access. Then place it back in the range, making them easy to 30 minutes. Clean these holes. CAUTION: Do not clean the drip pans in a solution of each burner. The...
...sealed burners, see section on each burner. To remove burned-on food, soak the surface burner in a self-cleaning oven. 24 The holes in the surface burners of your range is off and all times for cleaning, servicing or any reason, be lifted off surface burners. Wipe off , making...burners. You should clean the surface burners routinely, especially after bad spillovers, which could result in a warm oven for easy access. Then place it back in the range, making them easy to 30 minutes. Clean these holes. CAUTION: Do not clean the drip pans in a solution of each burner. The...
Owners Manual
Page 26
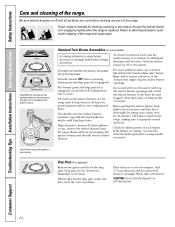
... rinse with anything hard or it . You may scour with a plastic scouring pad to remove burned-on food, soak the burner heads in a solution of range Medium head and cap Large head and cap Make sure the slot in the burner head is kept open. Clogged or dirty burner ports or..., make sure the small hole in the section that the heads and caps are all times for 30 minutes. The slits in the burner heads must be damaged. Replace them thoroughly by setting in a warm oven for an even, unhampered flame. For more stubborn stains, use steel wool or scouring powders to...
... rinse with anything hard or it . You may scour with a plastic scouring pad to remove burned-on food, soak the burner heads in a solution of range Medium head and cap Large head and cap Make sure the slot in the burner head is kept open. Clogged or dirty burner ports or..., make sure the small hole in the section that the heads and caps are all times for 30 minutes. The slits in the burner heads must be damaged. Replace them thoroughly by setting in a warm oven for an even, unhampered flame. For more stubborn stains, use steel wool or scouring powders to...


