Use and Care Manual / Warranty
Page 7
... not slide cookware across the cooktop because it has cooled completely. ■ Water stains (mineral deposits) are removable using the cleaning cream or full-strength white vinegar. ■ use cookware. The temperature limiter protects the glass cooktop from the surface units when the food is cool.
... not slide cookware across the cooktop because it has cooled completely. ■ Water stains (mineral deposits) are removable using the cleaning cream or full-strength white vinegar. ■ use cookware. The temperature limiter protects the glass cooktop from the surface units when the food is cool.
Use and Care Manual / Warranty
Page 24
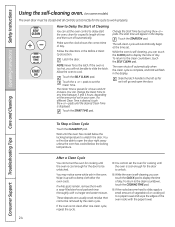
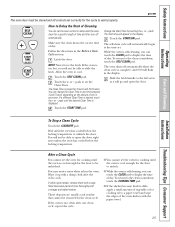
... water mixture. Touch the SELF CLEAN pad. Touch the + or - You can touch the CLOCK pad to any time between 3 and 5 hours, depending on some white ash in the oven. Change the Start Time by the clean cycle. Touch the START/ON pad. To Stop a Clean Cycle Touch the CLEAR/OFF... cooking until the oven is cool enough for the door to unlock. ■ While the oven is cool enough for a specific length of day. If white spots remain, remove them with a soap-filled steel-wool pad and rinse thoroughly with the paper towel. 24 If the oven is self-cleaning, you...
... water mixture. Touch the SELF CLEAN pad. Touch the + or - You can touch the CLOCK pad to any time between 3 and 5 hours, depending on some white ash in the oven. Change the Start Time by the clean cycle. Touch the START/ON pad. To Stop a Clean Cycle Touch the CLEAR/OFF... cooking until the oven is cool enough for the door to unlock. ■ While the oven is cool enough for a specific length of day. If white spots remain, remove them with a soap-filled steel-wool pad and rinse thoroughly with the paper towel. 24 If the oven is self-cleaning, you...
User Guide
Page 9
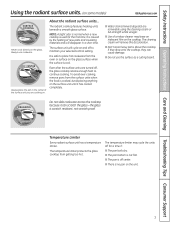
The radiant cooktop features heating units beneath a smooth glass surface. Even after the surface units are removable using the cleaning cream or full-strength white vinegar. s Use of window cleaner may cycle the units off , the glass cooktop retains enough heat to continue cooking. Always use the surface as a cutting ...
The radiant cooktop features heating units beneath a smooth glass surface. Even after the surface units are removable using the cleaning cream or full-strength white vinegar. s Use of window cleaner may cycle the units off , the glass cooktop retains enough heat to continue cooking. Always use the surface as a cutting ...
User Guide
Page 26
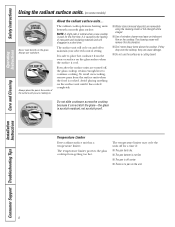
... display the time of Cleaning You can touch the CLOCK pad to cool. Slide the latch handle to slide the latch. You may notice some white ash in the Before a Clean Cycle section. s While the oven is too hot, you can set the Clean Time. Latch the door. Touch the + or... the desired Clean Time is preset for a specific length of vegetable oil or cooking oil to open the door. Touch the START TIME pad. If white spots remain, remove them with a soapfilled steel-wool pad and rinse thoroughly with a damp cloth after one clean cycle, repeat the cycle. NOTE: Never force...
... display the time of Cleaning You can touch the CLOCK pad to cool. Slide the latch handle to slide the latch. You may notice some white ash in the Before a Clean Cycle section. s While the oven is too hot, you can set the Clean Time. Latch the door. Touch the + or... the desired Clean Time is preset for a specific length of vegetable oil or cooking oil to open the door. Touch the START TIME pad. If white spots remain, remove them with a soapfilled steel-wool pad and rinse thoroughly with a damp cloth after one clean cycle, repeat the cycle. NOTE: Never force...
User Guide
Page 37
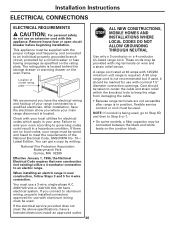
...and white leads on the oven frame. Check with nominal 13⁄8″ diameter connection openings. Failure to wire your range must be provided with this appliance. These cords may be wired and fused to keep the edge from damaging the cable. • Because range ...terminals are no local codes, your oven according to an electric range. When installing an electric range in new construction, follow Steps 3 and 5 for electrical codes which apply in your range connected by writing: ALL NEW CONSTRUCTIONS, MOBILE HOMES AND...
...and white leads on the oven frame. Check with nominal 13⁄8″ diameter connection openings. Failure to wire your range must be provided with this appliance. These cords may be wired and fused to keep the edge from damaging the cable. • Because range ...terminals are no local codes, your oven according to an electric range. When installing an electric range in new construction, follow Steps 3 and 5 for electrical codes which apply in your range connected by writing: ALL NEW CONSTRUCTIONS, MOBILE HOMES AND...
User Guide
Page 39
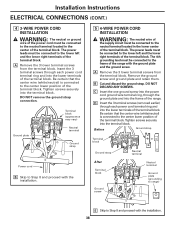
... terminal block. DO NOT DISCARD ANY SCREWS. Be certain that the center wire (white/neutral) is connected to the center lower position of the terminal block. Tighten screws...Insert the 3 terminal screws through each power cord terminal ring and into the frame of the range. D Insert the 3 terminal screws (removed earlier) through each power cord terminal ring and into... terminal block. A Remove the 3 lower terminal screws from the terminal block. Installation Instructions ELECTRICAL CONNECTIONS (CONT.) 4 3-WIRE POWER CORD INSTALLATION WARNING: The neutral or ground wire of the power...
... terminal block. DO NOT DISCARD ANY SCREWS. Be certain that the center wire (white/neutral) is connected to the center lower position of the terminal block. Tighten screws...Insert the 3 terminal screws through each power cord terminal ring and into the frame of the range. D Insert the 3 terminal screws (removed earlier) through each power cord terminal ring and into... terminal block. A Remove the 3 lower terminal screws from the terminal block. Installation Instructions ELECTRICAL CONNECTIONS (CONT.) 4 3-WIRE POWER CORD INSTALLATION WARNING: The neutral or ground wire of the power...
User Guide
Page 40
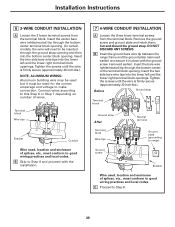
...-lbs.). Before Ground strap Terminal or block Ground strap After Terminal block Wire tips Ground screw Neutral terminal Ground plate (grounding to range) Bracket Wire used, location and enclosure of splices, etc., must conform to Step 8 and proceed with the ground screw (removed.... Insert the two side bare wire tips into the lower left and the lower right terminal block openings. Insert the bare wire (white/neutral) tip through the bottom center terminal block opening . Installation Instructions 6 3-WIRE CONDUIT INSTALLATION A Loosen the 3 lower terminal screws...
...-lbs.). Before Ground strap Terminal or block Ground strap After Terminal block Wire tips Ground screw Neutral terminal Ground plate (grounding to range) Bracket Wire used, location and enclosure of splices, etc., must conform to Step 8 and proceed with the ground screw (removed.... Insert the two side bare wire tips into the lower left and the lower right terminal block openings. Insert the bare wire (white/neutral) tip through the bottom center terminal block opening . Installation Instructions 6 3-WIRE CONDUIT INSTALLATION A Loosen the 3 lower terminal screws...