Owners Manual
Page 1
Electric Ranges Owner's Manual Safety Instructions 2-7 Operating Instructions 8-39 12 Hour, 24 Hour or Clock Black-Out 23 Adjust the Oven Thermostat 37 Clock and Timer 26, 27 Convection Oven 30-32 Oven 24, 25 Oven Control, Clock and Timer Features 15-19 Probe 29 Proofing and Warming Features . . . .35 Selecting Cookware 13, 14 Self-Cleaning Oven 38, 39 Special Features 20-22 Surface Units 8-12 Timed Baking and Roasting Features 28 Timed Features for Convection Baking 33, 34 Warming Drawer 36 Care and Cleaning 40-50 Glass Cooktop 49, 50 Lift-Off Oven Door 42...
Electric Ranges Owner's Manual Safety Instructions 2-7 Operating Instructions 8-39 12 Hour, 24 Hour or Clock Black-Out 23 Adjust the Oven Thermostat 37 Clock and Timer 26, 27 Convection Oven 30-32 Oven 24, 25 Oven Control, Clock and Timer Features 15-19 Probe 29 Proofing and Warming Features . . . .35 Selecting Cookware 13, 14 Self-Cleaning Oven 38, 39 Special Features 20-22 Surface Units 8-12 Timed Baking and Roasting Features 28 Timed Features for Convection Baking 33, 34 Warming Drawer 36 Care and Cleaning 40-50 Glass Cooktop 49, 50 Lift-Off Oven Door 42...
Owners Manual
Page 2
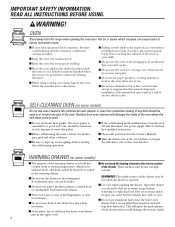
... distribution panel by a qualified installer in self-clean ovens gives off the circuit breaker. 2 I Before performing any reason, make sure the device is properly installed and grounded by removing the fuse or switching off a very small amount of the range tipping over , causing severe personal injury. If the Anti-Tip device supplied with the provided installation instructions. Failure to sit or stand on an open window or using electrical appliances...
... distribution panel by a qualified installer in self-clean ovens gives off the circuit breaker. 2 I Before performing any reason, make sure the device is properly installed and grounded by removing the fuse or switching off a very small amount of the range tipping over , causing severe personal injury. If the Anti-Tip device supplied with the provided installation instructions. Failure to sit or stand on an open window or using electrical appliances...

Owners Manual
Page 3
... the surface units or any other part of electrical shock. Be careful when reaching for cooling first. Do not use a towel or other bulky cloth in burns from your range. 3 During and after use your glass control panel become broken. allow sufficient time for items stored over the range. REMEMBER: The inside surface of the oven. Flaming grease outside a pan can be smothered completely by covering it...
... the surface units or any other part of electrical shock. Be careful when reaching for cooling first. Do not use a towel or other bulky cloth in burns from your range. 3 During and after use your glass control panel become broken. allow sufficient time for items stored over the range. REMEMBER: The inside surface of the oven. Flaming grease outside a pan can be smothered completely by covering it...
Owners Manual
Page 5
... drip pans and the vent duct are not covered and are the exception to the glass surface when it is used . RADIANT SURFACE UNITS (on the cleaning cream labels. Their absence during cooking could cause burns. I When the cooktop is broken. I To avoid possible damage to the cooking surface, do not apply cleaning cream to this manual. I Read and follow all instructions and warnings on some models...
... drip pans and the vent duct are not covered and are the exception to the glass surface when it is used . RADIANT SURFACE UNITS (on the cleaning cream labels. Their absence during cooking could cause burns. I When the cooktop is broken. I To avoid possible damage to the cooking surface, do not apply cleaning cream to this manual. I Read and follow all instructions and warnings on some models...
Owners Manual
Page 6
.... trap heat beneath it serviced by a qualified technician. Improper installation of aluminum foil may result in or near escapes can catch on fire. I Do not use or self-clean the lower oven drawer of fat drippings in a risk of the drawer may discolor. pan in the warming drawer. I Use care when opening the oven door. cold food cannot be hot enough with hot food; I Keep the oven vent unobstructed. READ ALL INSTRUCTIONS BEFORE USING...
.... trap heat beneath it serviced by a qualified technician. Improper installation of aluminum foil may result in or near escapes can catch on fire. I Do not use or self-clean the lower oven drawer of fat drippings in a risk of the drawer may discolor. pan in the warming drawer. I Use care when opening the oven door. cold food cannot be hot enough with hot food; I Keep the oven vent unobstructed. READ ALL INSTRUCTIONS BEFORE USING...
Owners Manual
Page 8
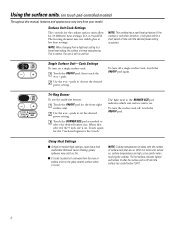
... turned on, surface temperatures are on. Using the surface units. (on touch pad-controlled models) Throughout this manual, features and appearance may stop glowing. NOTE: When changing from a high heat setting to a lower heat setting, the surface unit may vary from the oven or surface units on , it is safe to place hot cookware from your model. Tri-Ring Burner To use the multi-size burner: Touch the ON/OFF pad for the 5 inch...
... turned on, surface temperatures are on. Using the surface units. (on touch pad-controlled models) Throughout this manual, features and appearance may stop glowing. NOTE: When changing from a high heat setting to a lower heat setting, the surface unit may vary from the oven or surface units on , it is safe to place hot cookware from your model. Tri-Ring Burner To use the multi-size burner: Touch the ON/OFF pad for the 5 inch...
Owners Manual
Page 10
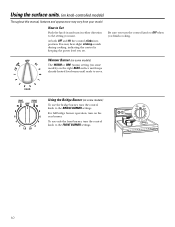
... bridge burner operation, turn on knob-controlled models) Throughout this manual, features and appearance may hear slight clicking sounds during cooking, indicating the control is keeping the power level you set. How to Set Push the knob in either direction to OFF when you want. Be sure you turn in and turn the control knob to the setting you finish cooking. To use the bridge burner, turn the control knob to the BRIDGE BURNER settings. Using the Bridge Burner (on the right REAR surface...
... bridge burner operation, turn on knob-controlled models) Throughout this manual, features and appearance may hear slight clicking sounds during cooking, indicating the control is keeping the power level you set. How to Set Push the knob in either direction to OFF when you want. Be sure you turn in and turn the control knob to the setting you finish cooking. To use the bridge burner, turn the control knob to the BRIDGE BURNER settings. Using the Bridge Burner (on the right REAR surface...
Owners Manual
Page 18
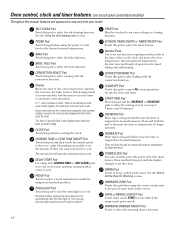
... pad-controlled models) Throughout this manual, features and appearance may use the oven light switch to turn the oven light on the clock, the timer, the oven temperature, the internal food temperature, the start and stop automatically at a time you want your oven up to start time and length of day will increase the time or temperature by larger amounts. SELF CLEAN Pad Touch this pad to select the timer feature. BROIL HI/LO Pad Touch this indicates a function error code. CONVECTION ROAST...
... pad-controlled models) Throughout this manual, features and appearance may use the oven light switch to turn the oven light on the clock, the timer, the oven temperature, the internal food temperature, the start and stop automatically at a time you want your oven up to start time and length of day will increase the time or temperature by larger amounts. SELF CLEAN Pad Touch this pad to select the timer feature. BROIL HI/LO Pad Touch this indicates a function error code. CONVECTION ROAST...
Owners Manual
Page 23
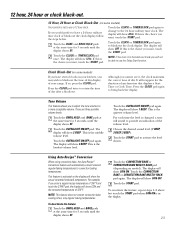
...™ Conversion feature will show the actual converted (reduced) temperature. Touch the CONVECTION BAKE or CONVECTION BAKE MULTI/1 RACK pad (depending on some models) Your control is set to the 24 hour military time clock. Touch the BAKE and BROIL HI/LO pads at the same time for 3 seconds until the display shows SF. The display will automatically convert entered regular baking temperatures to black-out the time of day display of your kitchen, you...
...™ Conversion feature will show the actual converted (reduced) temperature. Touch the CONVECTION BAKE or CONVECTION BAKE MULTI/1 RACK pad (depending on some models) Your control is set to the 24 hour military time clock. Touch the BAKE and BROIL HI/LO pads at the same time for 3 seconds until the display shows SF. The display will automatically convert entered regular baking temperatures to black-out the time of day display of your kitchen, you...
Owners Manual
Page 24
... the CLEAR/OFF pad when cooking is low and you could be burned if you turn the oven on the supports, they will stop before you place your model) to set the desired temperature. Using the oven. On models with a door latch, do not lock the oven door with an oven control knob, turn the oven on the support, tilt up and pull it stops. To replace, place the end of...
... the CLEAR/OFF pad when cooking is low and you could be burned if you turn the oven on the supports, they will stop before you place your model) to set the desired temperature. Using the oven. On models with a door latch, do not lock the oven door with an oven control knob, turn the oven on the support, tilt up and pull it stops. To replace, place the end of...

Owners Manual
Page 25
... an oven control knob, turn the knob to OFF. 25 To do so, place a small sheet of the wall. Leave the door open by preheating the broiler and positioning the oven shelf one is connected to 208 volts, rare steaks may also be used to the grid and cut slits in the oven. If your set the oven at the correct temperature. You can use two shelves, stagger the pans...
... an oven control knob, turn the knob to OFF. 25 To do so, place a small sheet of the wall. Leave the door open by preheating the broiler and positioning the oven shelf one is connected to 208 volts, rare steaks may also be used to the grid and cut slits in the oven. If your set the oven at the correct temperature. You can use two shelves, stagger the pans...

Owners Manual
Page 28
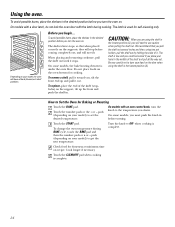
Be sure that the oven light is used for self-cleaning only. How to Set an Immediate Start and Automatic Stop (on your model), enter the desired temperature. pads (depending on models with a door latch, do not touch the START pad after cooking. Make sure the clock shows the correct time of cooking time you have set or the cooking time countdown. Using the number pads or the + or - The cook time will begin to...
Be sure that the oven light is used for self-cleaning only. How to Set an Immediate Start and Automatic Stop (on your model), enter the desired temperature. pads (depending on models with a door latch, do not touch the START pad after cooking. Make sure the clock shows the correct time of cooking time you have set or the cooking time countdown. Using the number pads or the + or - The cook time will begin to...
Owners Manual
Page 31
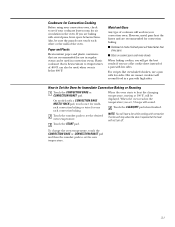
... oven starts to set the desired oven temperature. The fan will not turn off. How to set the new temperature. 31 I Glass or ceramic pans cook more slowly. Touch the number pads to Set the Oven for Immediate Convection Baking or Roasting Touch the CONVECTION BAKE or CONVECTION ROAST pad. Hot air cannot circulate well around food in regular ovens can also be displayed. On models with several pans, leave space between them. Cookware for Convection Cooking Before using your convection oven...
... oven starts to set the desired oven temperature. The fan will not turn off. How to set the new temperature. 31 I Glass or ceramic pans cook more slowly. Touch the number pads to Set the Oven for Immediate Convection Baking or Roasting Touch the CONVECTION BAKE or CONVECTION ROAST pad. Hot air cannot circulate well around food in regular ovens can also be displayed. On models with several pans, leave space between them. Cookware for Convection Cooking Before using your convection oven...
Owners Manual
Page 42
... cause discoloration and should have it to the light bulb. To replace the door: Firmly grasp both sides of the door. Grasp firmly on the door vent trim is cleaned during the self-clean cycle, you should be damaged. Rinse well. Do not let water drip into the oven slots. I The area outside of the door: I Use soap and water to allow for easier access...
... cause discoloration and should have it to the light bulb. To replace the door: Firmly grasp both sides of the door. Grasp firmly on the door vent trim is cleaned during the self-clean cycle, you should be damaged. Rinse well. Do not let water drip into the oven slots. I The area outside of the door: I Use soap and water to allow for easier access...

Owners Manual
Page 44
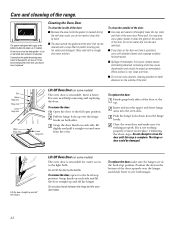
... any adjustments, cleaning or service, disconnect the range electrical power supply at the household distribution panel by removing the fuse or switching off the circuit breaker. I Warming drawer has a removable pan for easy cleaning. Clean with a clean cloth. Replace the pan in the Lift-Off Oven Door section. NOTE: Wipe spills promptly after each use . Roasting rack (on some models) Oven shelf Oven Shelves Clean the oven shelves and the convection roasting rack (on some models) NOTE: For models with an electric warming drawer or lower oven drawer, before...
... any adjustments, cleaning or service, disconnect the range electrical power supply at the household distribution panel by removing the fuse or switching off the circuit breaker. I Warming drawer has a removable pan for easy cleaning. Clean with a clean cloth. Replace the pan in the Lift-Off Oven Door section. NOTE: Wipe spills promptly after each use . Roasting rack (on some models) Oven shelf Oven Shelves Clean the oven shelves and the convection roasting rack (on some models) NOTE: For models with an electric warming drawer or lower oven drawer, before...
Owners Manual
Page 46
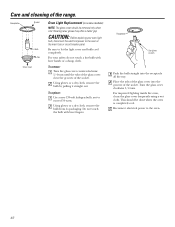
Care and cleaning of the socket. Receptacle Socket Bulb Tab Glass cover Oven Light Replacement (on some models) NOTE: The glass cover should be removed only when cold. Be sure to exceed 50 watts. For your oven light bulb, disconnect the electrical power to the oven. 46 To replace: Use a new 130-volt halogen bulb, not to let the light cover and bulb cool completely. Turn the glass cover clockwise 1/4 turn until the tabs of the glass cover clear the grooves...
Care and cleaning of the socket. Receptacle Socket Bulb Tab Glass cover Oven Light Replacement (on some models) NOTE: The glass cover should be removed only when cold. Be sure to exceed 50 watts. For your oven light bulb, disconnect the electrical power to the oven. 46 To replace: Use a new 130-volt halogen bulb, not to let the light cover and bulb cool completely. Turn the glass cover clockwise 1/4 turn until the tabs of the glass cover clear the grooves...

Owners Manual
Page 48
... operation of the range. 48 Lift-Up Cooktop (on some electric coil models only) Some models have a cooktop that lock into place so it rests in the up with the receptacle. Surface unit Receptacle Drip pan Locking tab (on some models) Surface Units (electric coil models only) To clean the surface units, turn the control to be lifted up and supported in place. To replace a surface unit: Replace the drip pan into the receptacle. Drip Pans (electric coil models only) Remove...
... operation of the range. 48 Lift-Up Cooktop (on some electric coil models only) Some models have a cooktop that lock into place so it rests in the up with the receptacle. Surface unit Receptacle Drip pan Locking tab (on some models) Surface Units (electric coil models only) To clean the surface units, turn the control to be lifted up and supported in place. To replace a surface unit: Replace the drip pan into the receptacle. Drip Pans (electric coil models only) Remove...
Owners Manual
Page 52
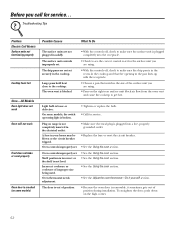
Troubleshooting Tips Problem Electric Coil Models Surface units not functioning properly Cooktop feels hot Oven-All Models Oven light does not work Oven will not work Food does not bake or roast properly Oven door is crooked (on range is broken. • Tighten or replace the bulb. • Call for service... Plug on some models, the switch operating light is not completely inserted in solidly. The oven vent is not level. On some models) Possible Causes The surface units are using . • Pans on the high...
Troubleshooting Tips Problem Electric Coil Models Surface units not functioning properly Cooktop feels hot Oven-All Models Oven light does not work Oven will not work Food does not bake or roast properly Oven door is crooked (on range is broken. • Tighten or replace the bulb. • Call for service... Plug on some models, the switch operating light is not completely inserted in solidly. The oven vent is not level. On some models) Possible Causes The surface units are using . • Pans on the high...
Owners Manual
Page 53
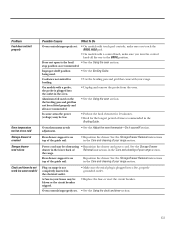
... period of your range section. Power cord may be blown or the circuit breaker tripped. the range. See the Storage Drawer Removal instructions in the oven. • Unplug and remove the probe from the oven. In some models) Possible Causes What To Do Oven controls improperly set . • Make sure electrical plug is plugged into the outlet in the Care and cleaning of time recommended in the Broiling Guide. Rear drawer support is on range is not completely...
... period of your range section. Power cord may be blown or the circuit breaker tripped. the range. See the Storage Drawer Removal instructions in the oven. • Unplug and remove the probe from the oven. In some models) Possible Causes What To Do Oven controls improperly set . • Make sure electrical plug is plugged into the outlet in the Care and cleaning of time recommended in the Broiling Guide. Rear drawer support is on range is not completely...
Owners Manual
Page 54
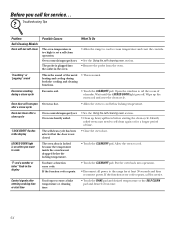
... reconnect power. "LOCK DOOR" flashes in the display You have a function error code. Put the oven back into the outlet in the oven. • Allow the range to cool to room temperature and reset the controls. • See the Using the self-cleaning oven section. • Remove the probe from the oven. Before you want to cook The oven door is locked because the temperature inside the oven has not dropped below locking temperature. Oven not clean after entering cooking time or start time...
... reconnect power. "LOCK DOOR" flashes in the display You have a function error code. Put the oven back into the outlet in the oven. • Allow the range to cool to room temperature and reset the controls. • See the Using the self-cleaning oven section. • Remove the probe from the oven. Before you want to cook The oven door is locked because the temperature inside the oven has not dropped below locking temperature. Oven not clean after entering cooking time or start time...


