Manual
Page 2
...; Do not use with wet hands. • The use of body away from electrical outlet before connecting or disconnecting hose. • Do not use to a Hoover Factory Service Center or Authorized Hoover Warranty Service Dealer (Depot). • Use vacuum cleaner only for choosing a HOOVER® product. others may be required for warranty service of dust, lint...
...; Do not use with wet hands. • The use of body away from electrical outlet before connecting or disconnecting hose. • Do not use to a Hoover Factory Service Center or Authorized Hoover Warranty Service Dealer (Depot). • Use vacuum cleaner only for choosing a HOOVER® product. others may be required for warranty service of dust, lint...
Manual
Page 4
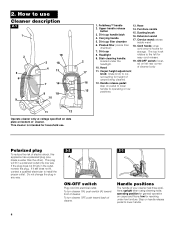
... furniture. Hose 14. To turn cleaner ON, push switch (A) toward back of your cleaner has three positions; Handle positions The handle of cleaner. upright when using cleaning tools; low for easy cord release. 19. Furniture nozzle 15. Cord hooks: wrap cord around hooks for household use Cleaner description 2-1 1 2 5 6 ... it still does not fit, contact a qualified electrician to the left rear corner of cleaner. Do not change the plug in the outlet, reverse the plug. Pleated filter (inside wand 18. Extension wand 17. Handle release pedal: step on handle release pedal...
... furniture. Hose 14. To turn cleaner ON, push switch (A) toward back of your cleaner has three positions; Handle positions The handle of cleaner. upright when using cleaning tools; low for easy cord release. 19. Furniture nozzle 15. Cord hooks: wrap cord around hooks for household use Cleaner description 2-1 1 2 5 6 ... it still does not fit, contact a qualified electrician to the left rear corner of cleaner. Do not change the plug in the outlet, reverse the plug. Pleated filter (inside wand 18. Extension wand 17. Handle release pedal: step on handle release pedal...
Manual
Page 7
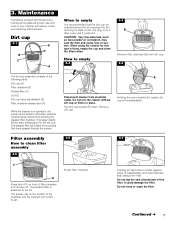
...the dirt reaches the dirt opening on the bottom of dirt cup (Fig. 4-2) or after every use the cleaner without dirt cup or filters in place. The pleated filter is in the the dirt cup. CAUTION: Very fine materials, such as proper use and care of suction...home maintenance tasks as face powder or cornstarch, may seal the filter and cause loss of your cleaner will stop falling from entering the pleated filter chamber. It could damage the filter. 3. Dirt cup 3-1 F B E D C A When to empty 3-2 3-3 B Remove filter chamber (B) from dirt cup. 3-4 The dirt cup assembly ...
...the dirt reaches the dirt opening on the bottom of dirt cup (Fig. 4-2) or after every use the cleaner without dirt cup or filters in place. The pleated filter is in the the dirt cup. CAUTION: Very fine materials, such as proper use and care of suction...home maintenance tasks as face powder or cornstarch, may seal the filter and cause loss of your cleaner will stop falling from entering the pleated filter chamber. It could damage the filter. 3. Dirt cup 3-1 F B E D C A When to empty 3-2 3-3 B Remove filter chamber (B) from dirt cup. 3-4 The dirt cup assembly ...

Manual
Page 8
... removed from electrical outlet. Do not operate cleaner without any of filter. Pull filter off lid and tap bottom of the filters in cold water with a mild detergent. Let filter air dry then reposition. Should you want to buy This cleaner uses a 12 volt, wedge base type 912 bulb, HOOVER part No. 27313107. 3-14 3-15 3-16 K Disconnect...
... removed from electrical outlet. Do not operate cleaner without any of filter. Pull filter off lid and tap bottom of the filters in cold water with a mild detergent. Let filter air dry then reposition. Should you want to buy This cleaner uses a 12 volt, wedge base type 912 bulb, HOOVER part No. 27313107. 3-14 3-15 3-16 K Disconnect...
Manual
Page 10
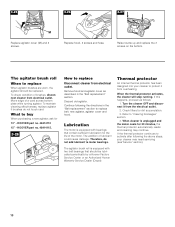
... motor cools for dirt accumulation. 3. Turn the cleaner OFF and disconnect it from electrical outlet. When cleaner is equipped with bearings that should be lubricated periodically by a Hoover Factory Service Center or an Authorized Hoover Warranty Service Dealer (Depot). Replace hood, 2 ...4. When the thermal protector activates, the cleaner will stop running. Continue following the above steps, your cleaner to replace Disconnect cleaner from overheating. Raise nozzle up and replace the 2 screws on the bottom. Check filters for 30 minutes, the thermal protector automatically ...
... motor cools for dirt accumulation. 3. Turn the cleaner OFF and disconnect it from electrical outlet. When cleaner is equipped with bearings that should be lubricated periodically by a Hoover Factory Service Center or an Authorized Hoover Warranty Service Dealer (Depot). Replace hood, 2 ...4. When the thermal protector activates, the cleaner will stop running. Continue following the above steps, your cleaner to replace Disconnect cleaner from overheating. Raise nozzle up and replace the 2 screws on the bottom. Check filters for 30 minutes, the thermal protector automatically ...
Manual
Page 11
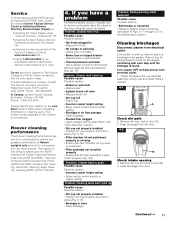
...is found by : • checking the Yellow Pages under "Vacuum Cleaners - In Canada, contact Hoover Canada, Burlington, Ontario L7R 4A8, Phone: 1-800-263-6376. Prob Problem: Cleaner won't pick up Possible cause Possible solution • Broken ...filter assembly; Remove dirt cup and look in duct (B). 5. Remove dirt cup, look in duct (A). 3. Service To obtain approved HOOVER service and genuine HOOVER parts, locate the nearest Hoover Factory Service Center or Authorized Hoover Warranty Service Dealer (Depot) by using the check list below. Check fullness of Hoover uprights...
...is found by : • checking the Yellow Pages under "Vacuum Cleaners - In Canada, contact Hoover Canada, Burlington, Ontario L7R 4A8, Phone: 1-800-263-6376. Prob Problem: Cleaner won't pick up Possible cause Possible solution • Broken ...filter assembly; Remove dirt cup and look in duct (B). 5. Remove dirt cup, look in duct (A). 3. Service To obtain approved HOOVER service and genuine HOOVER parts, locate the nearest Hoover Factory Service Center or Authorized Hoover Warranty Service Dealer (Depot) by using the check list below. Check fullness of Hoover uprights...


