Manual
Page 1
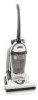
HOOVER® FoldAway™ Upright Thank you for your purchase! Owner's Manual ENGLISH § pp. 1-12 ESPAÑOL § pág. 15-21 FRANÇAIS § p. 22-28 ® www.hoover.com
HOOVER® FoldAway™ Upright Thank you for your purchase! Owner's Manual ENGLISH § pp. 1-12 ESPAÑOL § pág. 15-21 FRANÇAIS § p. 22-28 ® www.hoover.com
Manual
Page 2
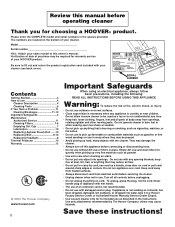
...vacuum cleaner to be required for warranty service of your sales receipt to use 4 Cleaner Description 4 Cleaning Tools 6 If You Have a Problem 11 Clearing Blockages 11-12 Important Safeguards 2 Maintenance Authorized Service 11 Cleaning Filters 7-8 Emptying Dirt Cup 7 Lubrication 10 Replacing Agitator Brush Roll ......10 Replacing Belt 9-10 Replacing Headlight 8 Thermal Protector 10 Warranty 12 © 2003 The Hoover Company www.hoover.com 2 Important Safeguards When using an electrical appliance, always follow basic precautions, including the following: READ ALL INSTRUCTIONS...
...vacuum cleaner to be required for warranty service of your sales receipt to use 4 Cleaner Description 4 Cleaning Tools 6 If You Have a Problem 11 Clearing Blockages 11-12 Important Safeguards 2 Maintenance Authorized Service 11 Cleaning Filters 7-8 Emptying Dirt Cup 7 Lubrication 10 Replacing Agitator Brush Roll ......10 Replacing Belt 9-10 Replacing Headlight 8 Thermal Protector 10 Warranty 12 © 2003 The Hoover Company www.hoover.com 2 Important Safeguards When using an electrical appliance, always follow basic precautions, including the following: READ ALL INSTRUCTIONS...
Manual
Page 3
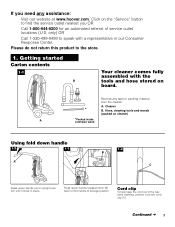
.... A. Hose, cleaning tools and wands (packed on the "Service" button to storage position. Getting started Carton contents 1-1 B Your cleaner comes fully assembled with a representative in place. Cord clip To help keep the cord out of service outlet locations (U.S. Please do not return this product to upright position until it locks in our Consumer Response Center. Cleaner * B. Remove any assistance: Visit our website at www.hoover.com. Press upper handle release button (B) back to fold handle...
.... A. Hose, cleaning tools and wands (packed on the "Service" button to storage position. Getting started Carton contents 1-1 B Your cleaner comes fully assembled with a representative in place. Cord clip To help keep the cord out of service outlet locations (U.S. Please do not return this product to upright position until it locks in our Consumer Response Center. Cleaner * B. Remove any assistance: Visit our website at www.hoover.com. Press upper handle release button (B) back to fold handle...
Manual
Page 4
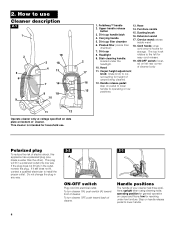
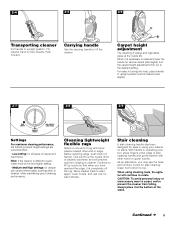
.... 10. Handle release pedal: step on handle release pedal to install the proper outlet. If the plug does not fit fully in any way. 2-2 2-3 A ON-OFF switch Plug cord into electrical outlet. Do not change the plug in the outlet, reverse the plug. Handle positions The handle of carpet being cleaned. 12. upright when using cleaning tools; Dirt cup 8. Hose 14. This cleaner is wider than the other). Crevice wand: stores inside filter chamber) 7. This plug will fit...
.... 10. Handle release pedal: step on handle release pedal to install the proper outlet. If the plug does not fit fully in any way. 2-2 2-3 A ON-OFF switch Plug cord into electrical outlet. Do not change the plug in the outlet, reverse the plug. Handle positions The handle of carpet being cleaned. 12. upright when using cleaning tools; Dirt cup 8. Hose 14. This cleaner is wider than the other). Crevice wand: stores inside filter chamber) 7. This plug will fit...
Manual
Page 5
... it is necessary to prevent the cleaner from clinging to rotate. For ease in turning the knob, place handle in operating position, place fingers under edge of carpet and hard floors. Stair cleaning A stair cleaning handle has been designed for various carpet pile heights, turn the carpet height adjustment knob (C) to top. 2-4 2-5 Transporting cleaner Put handle in using cleaning tools, the agitator will prevent rug from falling, always...
... it is necessary to prevent the cleaner from clinging to rotate. For ease in turning the knob, place handle in operating position, place fingers under edge of carpet and hard floors. Stair cleaning A stair cleaning handle has been designed for various carpet pile heights, turn the carpet height adjustment knob (C) to top. 2-4 2-5 Transporting cleaner Put handle in using cleaning tools, the agitator will prevent rug from falling, always...
Manual
Page 6
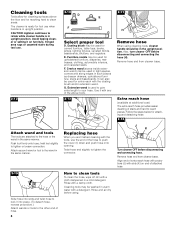
... hose. Also, turn cleaner OFF before using. 2-11 H Remove hose When using cleaning tools, cleaner handle should be washed in warm water with any of the hose to push the cover (I) down and push hose onto opening. CAUTION: Agitator continues to rotate while cleaner handle is used for carved furniture, table tops, books, lamps, lighting fixtures, venetian blinds, baseboards, shutters, and registers. twist tool slightly to tighten the connector. Dusting brush may be in the upright...
... hose. Also, turn cleaner OFF before using. 2-11 H Remove hose When using cleaning tools, cleaner handle should be washed in warm water with any of the hose to push the cover (I) down and push hose onto opening. CAUTION: Agitator continues to rotate while cleaner handle is used for carved furniture, table tops, books, lamps, lighting fixtures, venetian blinds, baseboards, shutters, and registers. twist tool slightly to tighten the connector. Dusting brush may be in the upright...
Manual
Page 7
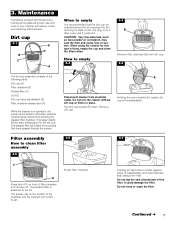
... attached to clean filter assembly 3-5 E E Disconnect cleaner from entering the pleated filter chamber. It could damage the filter. Filter assembly How to the lid. Remove dirt cup. The screen (G) on front of dust, empty the cup and clean the filters often. Holding the carry handle (E), empty dirt cup into wastebasket. 3-6 3-7 F G Press latch (F) on the bottom of wastebasket until dust particles stop larger debris from electrical outlet. Continued § 7 Maintenance Familiarize yourself with a soft brush...
... attached to clean filter assembly 3-5 E E Disconnect cleaner from entering the pleated filter chamber. It could damage the filter. Filter assembly How to the lid. Remove dirt cup. The screen (G) on front of dust, empty the cup and clean the filters often. Holding the carry handle (E), empty dirt cup into wastebasket. 3-6 3-7 F G Press latch (F) on the bottom of wastebasket until dust particles stop larger debris from electrical outlet. Continued § 7 Maintenance Familiarize yourself with a soft brush...

Manual
Page 8
... returning clean air to buy This cleaner uses a 12 volt, wedge base type 912 bulb, HOOVER part No. 27313107. 3-14 3-15 3-16 K Disconnect cleaner from the lid for HOOVER part no. 40110004. Replace lid and filter on dirt cup. Replace chamber on filter chamber. Push new bulb straight into place. Reposition dirt cup (Fig. 3-10). 3-8 3-9 3-10 H E Although not necessary, the filter can be removed from electrical outlet. Rotate dirt cup handle (E) up to replace this filter, ask for cleaning. Remove dirt cup...
... returning clean air to buy This cleaner uses a 12 volt, wedge base type 912 bulb, HOOVER part No. 27313107. 3-14 3-15 3-16 K Disconnect cleaner from the lid for HOOVER part no. 40110004. Replace lid and filter on dirt cup. Replace chamber on filter chamber. Push new bulb straight into place. Reposition dirt cup (Fig. 3-10). 3-8 3-9 3-10 H E Although not necessary, the filter can be removed from electrical outlet. Rotate dirt cup handle (E) up to replace this filter, ask for cleaning. Remove dirt cup...
Manual
Page 9
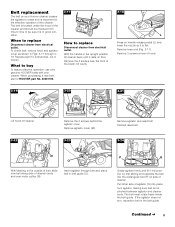
... belt, slide new belt along side of the cleaner. Remove 2 screws at rear of the brush roll cavity. 3-18 L Press on handle release pedal (L) and lower the nozzle so it rests on side of agitator (Q) into the rectangular slot (P) on floor. Remove agitator cover (M). 3-23 Remove agitator and used belt. 3-24 N O With lettering to buy To assure effective operation, use only genuine HOOVER belts with your Hoover cleaner causes the agitator to be checked from electrical outlet. Discard used belt. Turn agitator...
... belt, slide new belt along side of the cleaner. Remove 2 screws at rear of the brush roll cavity. 3-18 L Press on handle release pedal (L) and lower the nozzle so it rests on side of agitator (Q) into the rectangular slot (P) on floor. Remove agitator cover (M). 3-23 Remove agitator and used belt. 3-24 N O With lettering to buy To assure effective operation, use only genuine HOOVER belts with your Hoover cleaner causes the agitator to be checked from electrical outlet. Discard used belt. Turn agitator...
Manual
Page 10
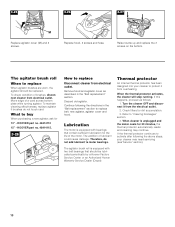
... electrical outlet. 2. HOOVER part no . 48414115. 3-28 How to protect it from overheating. When the thermal protector activates, the cleaner will stop running. If the thermal protector continues to replace When agitator brushes are worn, the agitator should be replaced. To check condition of the motor. Discard old agitator. Check filters for 13" - When cleaner is equipped with two ball bearings that contain sufficient lubrication for 30 minutes, the thermal protector automatically resets and cleaning may need servicing...
... electrical outlet. 2. HOOVER part no . 48414115. 3-28 How to protect it from overheating. When the thermal protector activates, the cleaner will stop running. If the thermal protector continues to replace When agitator brushes are worn, the agitator should be replaced. To check condition of the motor. Discard old agitator. Check filters for 13" - When cleaner is equipped with two ball bearings that contain sufficient lubrication for 30 minutes, the thermal protector automatically resets and cleaning may need servicing...
Manual
Page 11
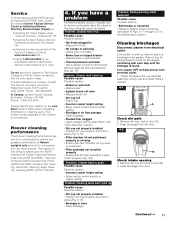
... or ordering parts. (The model number appears on -line at www.hoover.com OR - • calling 1-800-944-9200 for an automated referral of authorized service outlet locations (U.S. Clear blockage from electrical outlet. 1. Check fullness of this will reset the thermal protector) (see pg. 10). Problem: Cleaner won 't pick up Possible cause Possible solution • Broken or worn belt • Replace belt • Agitator brush roll worn • Replace brush roll • Dirt cup full •...
... or ordering parts. (The model number appears on -line at www.hoover.com OR - • calling 1-800-944-9200 for an automated referral of authorized service outlet locations (U.S. Clear blockage from electrical outlet. 1. Check fullness of this will reset the thermal protector) (see pg. 10). Problem: Cleaner won 't pick up Possible cause Possible solution • Broken or worn belt • Replace belt • Agitator brush roll worn • Replace brush roll • Dirt cup full •...

Manual
Page 12
... appliance in a commercial or rental application. Check for warranty service, transportation will be paid one full year from a U.S. Clear out hose. 4-4 Check hose inlet 8. Your HOOVER® appliance is no cost to a Hoover Factory Service Center for suction at www.hoover.com This warranty does not cover pick up, delivery, or house calls; Proof of parts only. a. Remove hose end from cleaner. 7. Press hose inlet door open and clear any...
... appliance in a commercial or rental application. Check for warranty service, transportation will be paid one full year from a U.S. Clear out hose. 4-4 Check hose inlet 8. Your HOOVER® appliance is no cost to a Hoover Factory Service Center for suction at www.hoover.com This warranty does not cover pick up, delivery, or house calls; Proof of parts only. a. Remove hose end from cleaner. 7. Press hose inlet door open and clear any...


