
Manual
Page 1
® Upright Vacuum Cleaner ® Congratulations on your purchase! www.hoover.com Owner's Manual ENGLISH § pp. 1-13 ESPAÑOL § pág 15-22 FRANÇAIS § p. 23-30 This product was designed for easy assembly (see page 3) This vacuum cleaner takes HOOVER® Type "Z" Allergen Filtration filter bags Review this manual before operating the cleaner.
® Upright Vacuum Cleaner ® Congratulations on your purchase! www.hoover.com Owner's Manual ENGLISH § pp. 1-13 ESPAÑOL § pág 15-22 FRANÇAIS § p. 23-30 This product was designed for easy assembly (see page 3) This vacuum cleaner takes HOOVER® Type "Z" Allergen Filtration filter bags Review this manual before operating the cleaner.

Manual
Page 2
... Cleaning Tools 7-8 If You Have a Problem 12 Important Safeguards 2 Lubrication 11 Maintenance 8-11 Authorized Service 12 Cleaning Filters 9 Clearing Blockages 12 Replacing Agitator Brush Roll ......11 Replacing Belt 10 Replacing Edge Groomers 11 Replacing Headlight 10 Replacing Filter Bag 8-9 Thermal Protector 11 Warranty 13 © 2004 The Hoover Company www.hoover.com Important Safeguards! Use only attachments recommended by or near children. When using an electrical appliance, always follow basic precautions, including the following: READ ALL INSTRUCTIONS BEFORE USING...
... Cleaning Tools 7-8 If You Have a Problem 12 Important Safeguards 2 Lubrication 11 Maintenance 8-11 Authorized Service 12 Cleaning Filters 9 Clearing Blockages 12 Replacing Agitator Brush Roll ......11 Replacing Belt 10 Replacing Edge Groomers 11 Replacing Headlight 10 Replacing Filter Bag 8-9 Thermal Protector 11 Warranty 13 © 2004 The Hoover Company www.hoover.com Important Safeguards! Use only attachments recommended by or near children. When using an electrical appliance, always follow basic precautions, including the following: READ ALL INSTRUCTIONS BEFORE USING...

Manual
Page 3
... our Consumer Response Center. Cleaner assemblyNot Carton contents 1-1 Accessories packed on back of cleaner body. Continued § 3 Please do not return this product to handle) D. Hose, cleaning tools and wands (packed on the "Service" button to speak with a Phillips screwdriver. Push screw into hole on cleaner A. Cleaner body C C. If you OR Call 1-800-944-9200 for an automated referral of authorized service outlet locations (U.S.
... our Consumer Response Center. Cleaner assemblyNot Carton contents 1-1 Accessories packed on back of cleaner body. Continued § 3 Please do not return this product to handle) D. Hose, cleaning tools and wands (packed on the "Service" button to speak with a Phillips screwdriver. Push screw into hole on cleaner A. Cleaner body C C. If you OR Call 1-800-944-9200 for an automated referral of authorized service outlet locations (U.S.

Manual
Page 4
... lower handle. Do not change the plug in the outlet, reverse the plug. Carrying cleaner The cleaner can be moved by using cleaning tools; Furniture guard: helps prevent cleaner from room to room, put handle in cord clip (A) located on rear wheels and push forward. To turn cleaner ON, push switch up. Dusting brush 6. Carrying handle 9. Nozzle control knob: slide knob to correct setting for general operation on handle release lever to install the proper outlet. Bag door...
... lower handle. Do not change the plug in the outlet, reverse the plug. Carrying cleaner The cleaner can be moved by using cleaning tools; Furniture guard: helps prevent cleaner from room to room, put handle in cord clip (A) located on rear wheels and push forward. To turn cleaner ON, push switch up. Dusting brush 6. Carrying handle 9. Nozzle control knob: slide knob to correct setting for general operation on handle release lever to install the proper outlet. Bag door...

Manual
Page 5
... or carpeted stairs during tool use only forward strokes. Continue to the operating position (D). The cleaner is ready for reaching hard to top. Move cleaner back to clean tools To clean the hose, wipe off the rug. How to start again, lower nozzle, and use . When it on handle. This will prevent rug from clinging to the desired setting. CAUTION: Agitator continues to rotate while cleaner handle is...
... or carpeted stairs during tool use only forward strokes. Continue to the operating position (D). The cleaner is ready for reaching hard to top. Move cleaner back to clean tools To clean the hose, wipe off the rug. How to start again, lower nozzle, and use . When it on handle. This will prevent rug from clinging to the desired setting. CAUTION: Agitator continues to rotate while cleaner handle is...

Manual
Page 6
... the bag opening; Slide hose into slots and twist hose to become completely red: 1. If there is full; B C Attach wand and tools Attach tool or wand to tighten or loosen the connection. 2-12 D G E F Select proper tool D. Crevice tool may be used for upholstered furniture, draperies, mattresses, clothing, automobile interiors, and carpeted stairs. If very fine materials have been picked up, clogging the bag pores; 2-10 2-11 A Removing hose When using cleaning tools, cleaner handle should...
... the bag opening; Slide hose into slots and twist hose to become completely red: 1. If there is full; B C Attach wand and tools Attach tool or wand to tighten or loosen the connection. 2-12 D G E F Select proper tool D. Crevice tool may be used for upholstered furniture, draperies, mattresses, clothing, automobile interiors, and carpeted stairs. If very fine materials have been picked up, clogging the bag pores; 2-10 2-11 A Removing hose When using cleaning tools, cleaner handle should...
Manual
Page 7
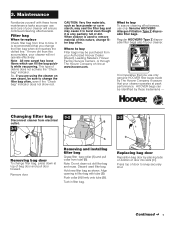
... assure cleaning effectiveness, use and care of your cleaner will not operate effectively. Where to change filter bag often. HOOVER bags can fill the bag quickly while vacuuming. Continued § 7 Note: All new carpet has loose fibers which can be purchased from electrical outlet. CAUTION: Very fine materials, such as shown. Removing and installing filter bag Grasp filter bag collar (A) and pull collar from time to snap securely shut. Align opening in filter bag. 3-3 C Replacing bag...
... assure cleaning effectiveness, use and care of your cleaner will not operate effectively. Where to change filter bag often. HOOVER bags can fill the bag quickly while vacuuming. Continued § 7 Note: All new carpet has loose fibers which can be purchased from electrical outlet. CAUTION: Very fine materials, such as shown. Removing and installing filter bag Grasp filter bag collar (A) and pull collar from time to snap securely shut. Align opening in filter bag. 3-3 C Replacing bag...
Manual
Page 8
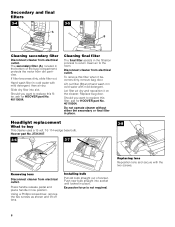
..., then air dry. If filter becomes dirty, slide filter out. Disconnect cleaner from electrical outlet. Press handle release pedal and place handle in place. Should you want to replace this filter when it becomes dirty, remove bag door. Using a Phillips screwdriver, remove the two screws as shown and lift off lens. The secondary filter (A), located in cold water with mild detergent. Hand wash filter in place. To remove this filter, ask for HOOVER part No...
..., then air dry. If filter becomes dirty, slide filter out. Disconnect cleaner from electrical outlet. Press handle release pedal and place handle in place. Should you want to replace this filter when it becomes dirty, remove bag door. Using a Phillips screwdriver, remove the two screws as shown and lift off lens. The secondary filter (A), located in cold water with mild detergent. Hand wash filter in place. To remove this filter, ask for HOOVER part No...

Manual
Page 9
... between agitator and agitator shield. 3-14 F G Replacing hood Align tabs (F) on hood with your Hoover cleaner causes the agitator to buy To assure effective operation, use only genuine HOOVER belts with slots (G) on outside of belt, slide new belt over motor pulley (B). To check belt, remove hood as shown. What to rotate and is stretched, cut or broken. Using a coin, turn the two slots on your cleaner. Discard used belt. To maintain cleaning effectiveness, replace agitator if brushes...
... between agitator and agitator shield. 3-14 F G Replacing hood Align tabs (F) on hood with your Hoover cleaner causes the agitator to buy To assure effective operation, use only genuine HOOVER belts with slots (G) on outside of belt, slide new belt over motor pulley (B). To check belt, remove hood as shown. What to rotate and is stretched, cut or broken. Using a coin, turn the two slots on your cleaner. Discard used belt. To maintain cleaning effectiveness, replace agitator if brushes...
Manual
Page 10
... overheating. Turn the cleaner OFF and disconnect it from the electrical outlet. 2. Check secondary and final filters for an automated referral of Factory Service Centers provided with bearings that contain sufficient lubrication for service, this will reset the thermal protector) Problem: Cleaner/ tools won't pick up Possible Cause Possible Solution • Broken or worn belt • Replace belt • Agitator brush roll worn • Replace brush roll • Filter bag full • Change filter bag • Incorrect carpet height setting • Move nozzle...
... overheating. Turn the cleaner OFF and disconnect it from the electrical outlet. 2. Check secondary and final filters for an automated referral of Factory Service Centers provided with bearings that contain sufficient lubrication for service, this will reset the thermal protector) Problem: Cleaner/ tools won't pick up Possible Cause Possible Solution • Broken or worn belt • Replace belt • Agitator brush roll worn • Replace brush roll • Filter bag full • Change filter bag • Incorrect carpet height setting • Move nozzle...

Manual
Page 11
... following authorized warranty service outlets. Full One Year Warranty (Domestic Use) Your HOOVER® appliance is found: 1. Low suction or pick up , delivery, or house calls; Check fullness of parts only. Plug cleaner in a commercial or rental application. If there is suction, continue with each step until the blockage is warranted in normal household use, in accordance with the Owner's Manual against original defects in correct operating condition...
... following authorized warranty service outlets. Full One Year Warranty (Domestic Use) Your HOOVER® appliance is found: 1. Low suction or pick up , delivery, or house calls; Check fullness of parts only. Plug cleaner in a commercial or rental application. If there is suction, continue with each step until the blockage is warranted in normal household use, in accordance with the Owner's Manual against original defects in correct operating condition...


