Product Manual
Page 3
Table of Contents Safety Instructions...4 Carton Contents...6 Product Guide...7 Tools and Accessories...8 Before You Begin Cleaning...9 Getting Started...10 How to Assemble Your SmartWash™ Carpet Cleaner 10 Using your SmartWash™ Carpet Cleaner 11 Maintenance...13 Hoover® Professional Series Solution Guide 20 Troubleshooting...21 Warranty ...23 French...25 Spanish...49 3
Table of Contents Safety Instructions...4 Carton Contents...6 Product Guide...7 Tools and Accessories...8 Before You Begin Cleaning...9 Getting Started...10 How to Assemble Your SmartWash™ Carpet Cleaner 10 Using your SmartWash™ Carpet Cleaner 11 Maintenance...13 Hoover® Professional Series Solution Guide 20 Troubleshooting...21 Warranty ...23 French...25 Spanish...49 3
Product Manual
Page 4
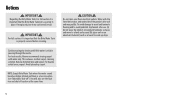
... pick up anything that may reduce air flow. • Keep hair, loose clothing, fingers, and all parts of body away from openings and moving parts. • Turn off all controls before cleaning or servicing. • Do not use cord as a handle, close a door on back of dust, lint, hair and anything that is necessary when used as a toy. To avoid injury or damage, keep free of vacuum canister...
... pick up anything that may reduce air flow. • Keep hair, loose clothing, fingers, and all parts of body away from openings and moving parts. • Turn off all controls before cleaning or servicing. • Do not use cord as a handle, close a door on back of dust, lint, hair and anything that is necessary when used as a toy. To avoid injury or damage, keep free of vacuum canister...

Product Manual
Page 5
... plug must be connected to clean out hose as they may scratch or damage your floor. • Water will not fit the outlet, have a proper outlet installed by a qualified electrician (Fig. 1). Do not modify the plug provided with solution in tanks. • With brushes and brush roll on a nominal 120-volt circuit and has a grounding plug that looks like (F) extending from carpets...
... plug must be connected to clean out hose as they may scratch or damage your floor. • Water will not fit the outlet, have a proper outlet installed by a qualified electrician (Fig. 1). Do not modify the plug provided with solution in tanks. • With brushes and brush roll on a nominal 120-volt circuit and has a grounding plug that looks like (F) extending from carpets...

Product Manual
Page 6
Carpet Cleaner Solution Tank Water Tank Upper Handle Accessory Hose *Tools and Accessories vary per model. Accessories not included with your model may be purchased separately by visiting Hoover.com 6 FlexForce™ PowerBrushes 2-in the Box? What's in -1 Antimicrobial Tool* Mesh Tool Storage Bag Sample Bottle of Cleaning Solution
Carpet Cleaner Solution Tank Water Tank Upper Handle Accessory Hose *Tools and Accessories vary per model. Accessories not included with your model may be purchased separately by visiting Hoover.com 6 FlexForce™ PowerBrushes 2-in the Box? What's in -1 Antimicrobial Tool* Mesh Tool Storage Bag Sample Bottle of Cleaning Solution

Product Manual
Page 7
Dirty Water/Recovery Tank 5. Removable FlexDuo™ PowerBrushes 3 9. Handle release Pedal 5 13. On/Off Pedal 6 7 8 9 10 11 12 13 7 Clean Water Tank 3. Removable Recovery Nozzle 2 7. Automatic Wash/ Dry LED Display 8. Cord Wrap 12. Getting to Know Your Hoover® SmartWash™ 1. Triggerless Handle Design 1 2. Hose Connection 6. Solution Tank 4 10. Filter 4. Carry Handle 11.
Dirty Water/Recovery Tank 5. Removable FlexDuo™ PowerBrushes 3 9. Handle release Pedal 5 13. On/Off Pedal 6 7 8 9 10 11 12 13 7 Clean Water Tank 3. Removable Recovery Nozzle 2 7. Automatic Wash/ Dry LED Display 8. Cord Wrap 12. Getting to Know Your Hoover® SmartWash™ 1. Triggerless Handle Design 1 2. Hose Connection 6. Solution Tank 4 10. Filter 4. Carry Handle 11.

Product Manual
Page 9
... use the carpet cleaner as a towel) to be cleaned. NOTE: Empty Dirty Water Tank when the motor sound becomes higher pitched and there is marked with a Hoover vacuum before cleaning. ! Do not clean over floor electrical outlets. Before You Begin Cleaning: Pretreating: Vacuum carpet and upholstery thoroughly with a "W" (for "wet" clean) or "S/W" (for colorfastness in suction (see "Automatic shut-off suction at additional cost if not included with a Hoover® Cleaning...
... use the carpet cleaner as a towel) to be cleaned. NOTE: Empty Dirty Water Tank when the motor sound becomes higher pitched and there is marked with a Hoover vacuum before cleaning. ! Do not clean over floor electrical outlets. Before You Begin Cleaning: Pretreating: Vacuum carpet and upholstery thoroughly with a "W" (for "wet" clean) or "S/W" (for colorfastness in suction (see "Automatic shut-off suction at additional cost if not included with a Hoover® Cleaning...
Product Manual
Page 10
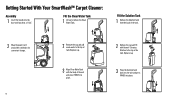
... of the tank. Fill the Clean Water Tank 1 Lift up to the top of tank. Replace cap. 3 Place the Solution Tank back into the unit and press FIRMLY into place. 2 Remove the cap and fill with Hoover® Cleaning Solution to remove the Clean Water Tank. Getting Started With Your SmartWash™ Carpet Cleaner: Assembly 1 Insert the handle into the base until you hear...
... of the tank. Fill the Clean Water Tank 1 Lift up to the top of tank. Replace cap. 3 Place the Solution Tank back into the unit and press FIRMLY into place. 2 Remove the cap and fill with Hoover® Cleaning Solution to remove the Clean Water Tank. Getting Started With Your SmartWash™ Carpet Cleaner: Assembly 1 Insert the handle into the base until you hear...

Product Manual
Page 11
Using Your SmartWash™ Carpet Cleaner 1 Unwrap the power cord and plug unit in an electrical outlet. 3 Step on the Power Pedal to turn ON. 2 Step on the Handle Release Pedal to recline the unit for cleaning position. 11
Using Your SmartWash™ Carpet Cleaner 1 Unwrap the power cord and plug unit in an electrical outlet. 3 Step on the Power Pedal to turn ON. 2 Step on the Handle Release Pedal to recline the unit for cleaning position. 11

Product Manual
Page 12
... mode until little water is complete and you want to reduce the dry time, press the Dry Only button. The Dry Only mode will remove residual carpet cleaning solution from your cleaning is visibly passing through 6. 12 The unit will automatically dispense the optimal amount of water and cleaning solution. 6 When your carpet. To Rinse with clean water only. Using Your SmartWash™ Carpet Cleaner 4 Slowly move...
... mode until little water is complete and you want to reduce the dry time, press the Dry Only button. The Dry Only mode will remove residual carpet cleaning solution from your cleaning is visibly passing through 6. 12 The unit will automatically dispense the optimal amount of water and cleaning solution. 6 When your carpet. To Rinse with clean water only. Using Your SmartWash™ Carpet Cleaner 4 Slowly move...

Product Manual
Page 13
... surface and unlatch Dirty Water Tank lid to remove top of tank. 4 Empty tank, rinse, wipe filter clean and allow to release. Dirty Water Tank: Your carpet cleaner is activated, empty the dirty water tank. 13 Once the float is equipped with a shut off the air flow through the nozzle. Remove Tank from electrical outlet. 2 Grab the Dirty Water Tank handle and pull up to...
... surface and unlatch Dirty Water Tank lid to remove top of tank. 4 Empty tank, rinse, wipe filter clean and allow to release. Dirty Water Tank: Your carpet cleaner is activated, empty the dirty water tank. 13 Once the float is equipped with a shut off the air flow through the nozzle. Remove Tank from electrical outlet. 2 Grab the Dirty Water Tank handle and pull up to...
Product Manual
Page 14
... nozzle. Avoid saturating carpet. NOTE: Empty Dirty Water Tank when the motor sound becomes higher pitched and there is properly secured before cleaning. Do not clean over floor electrical outlets. If misplaced, poor to soak up drips. 14 Continue using dry strokes until little water is securely in suction (see the float rise and shut off "). For best results, Hoover recommends rinsing carpet with water...
... nozzle. Avoid saturating carpet. NOTE: Empty Dirty Water Tank when the motor sound becomes higher pitched and there is properly secured before cleaning. Do not clean over floor electrical outlets. If misplaced, poor to soak up drips. 14 Continue using dry strokes until little water is securely in suction (see the float rise and shut off "). For best results, Hoover recommends rinsing carpet with water...

Product Manual
Page 15
.... 5 Slide Nozzle forward to have proper suction. 15 The nozzle must be in upright position, lift up . 3 Rinse debris from Nozzle. 4 Position Nozzle onto foot, making sure to align the tabs at the top of injury from carpet cleaner. IMPORTANT ! Maintenance How to Remove and Clean Nozzle 1 To prevent possible leaking, remove and empty Clean Water Tank, Dirty Water Tank and Solution Tank. 2 With handle in the...
.... 5 Slide Nozzle forward to have proper suction. 15 The nozzle must be in upright position, lift up . 3 Rinse debris from Nozzle. 4 Position Nozzle onto foot, making sure to align the tabs at the top of injury from carpet cleaner. IMPORTANT ! Maintenance How to Remove and Clean Nozzle 1 To prevent possible leaking, remove and empty Clean Water Tank, Dirty Water Tank and Solution Tank. 2 With handle in the...

Product Manual
Page 16
Replace on the A other brush. 4 The brushes can be cleaned under running water. The addition of injury from moving parts, unplug before storing carpet cleaner on the brush to remove. CAUTION To reduce the risk of lubricant could cause damage. Maintenance How to Change and Clean Brushes HOW TO REMOVE 1 To prevent possible leaking, remove Clean Water Tank, Dirty Water Tank and Solution Tank. 2 With handle in place. HOW TO REPLACE 1 At an...
Replace on the A other brush. 4 The brushes can be cleaned under running water. The addition of injury from moving parts, unplug before storing carpet cleaner on the brush to remove. CAUTION To reduce the risk of lubricant could cause damage. Maintenance How to Change and Clean Brushes HOW TO REMOVE 1 To prevent possible leaking, remove Clean Water Tank, Dirty Water Tank and Solution Tank. 2 With handle in place. HOW TO REPLACE 1 At an...

Product Manual
Page 17
... You Begin Cleaning" instructions. Use your upholstery. Be sure to check Hoover Cleaning Guide on page 20 and the cleaning code on tool to ensure proper suction. HOW TO REMOVE HOSE 1 Press trigger on your cleaner only on end of injury from the hose. CAUTION ! Make sure to close door to ensure all fluid has discharged from moving parts, unplug before servicing. 17 Insert hose end by inserting...
... You Begin Cleaning" instructions. Use your upholstery. Be sure to check Hoover Cleaning Guide on page 20 and the cleaning code on tool to ensure proper suction. HOW TO REMOVE HOSE 1 Press trigger on your cleaner only on end of injury from the hose. CAUTION ! Make sure to close door to ensure all fluid has discharged from moving parts, unplug before servicing. 17 Insert hose end by inserting...
Product Manual
Page 18
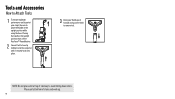
Place unit at top of stairs and work up on the latch to remove tool. Tools and Accessories How to Attach Tools 1 To ensure maximum performance and to protect your thumb, push forward and up . 18 NOTE: Do not place unit at bottom of stairway to place the handle in the upright position shuts off the FlexForce™ PowerBrushes. 2 Connect tool to hose by sliding it onto the connector until it securely locks into place. 3 Using your carpet, be sure to avoid falling down stairs. Placing the handle in the upright position while using the hose.
Place unit at top of stairs and work up on the latch to remove tool. Tools and Accessories How to Attach Tools 1 To ensure maximum performance and to protect your thumb, push forward and up . 18 NOTE: Do not place unit at bottom of stairway to place the handle in the upright position shuts off the FlexForce™ PowerBrushes. 2 Connect tool to hose by sliding it onto the connector until it securely locks into place. 3 Using your carpet, be sure to avoid falling down stairs. Placing the handle in the upright position while using the hose.

Product Manual
Page 19
... not use more than 4 wet strokes over the carpet. Always end with Hoover® solution according to instructions. 12 Overlap strokes by holding the tool about one area. Tools and Accessories Cleaning Carpeted Stairs and Upholstery 1 Read "Before you Begin Cleaning" instruction on page 9. 2 Attached hose as instructed (page 18). 9 Pre-spray the area by ½ inch to help prevent streaking. 6 Attach tool to end of hose. 7 Dry hands and plug cleaner...
... not use more than 4 wet strokes over the carpet. Always end with Hoover® solution according to instructions. 12 Overlap strokes by holding the tool about one area. Tools and Accessories Cleaning Carpeted Stairs and Upholstery 1 Read "Before you Begin Cleaning" instruction on page 9. 2 Attached hose as instructed (page 18). 9 Pre-spray the area by ½ inch to help prevent streaking. 6 Attach tool to end of hose. 7 Dry hands and plug cleaner...

Product Manual
Page 20
... cleaner lifts dirt and removes allergens for a truly deep clean. EXPERT PET™ CARPET WASHER DETERGENT Powerful, professional strength enzymes break down biological stains, dirt and odor for our deepest, extreme clean. Spot Treatment may be used as a pretreatment immediately before you clean your carpets, or as an independent treatment between cleaning your Carpet Cleaner + Spot Treatment + Solutions. For best results, use your carpets. Hoover® Cleaning Solution Guide Use only Hoover cleaning...
... cleaner lifts dirt and removes allergens for a truly deep clean. EXPERT PET™ CARPET WASHER DETERGENT Powerful, professional strength enzymes break down biological stains, dirt and odor for our deepest, extreme clean. Spot Treatment may be used as a pretreatment immediately before you clean your carpets, or as an independent treatment between cleaning your Carpet Cleaner + Spot Treatment + Solutions. For best results, use your carpets. Hoover® Cleaning Solution Guide Use only Hoover cleaning...

Product Manual
Page 22
... plate). QUESTIONS OR CONCERNS? Always identify your product needs servicing within the warranty period, please contact Customer Service at 1-800-944-9200 for further instruction before cleaning or servicing. USE TROUBLESHOOTING GUIDE AS A FIRST STEP TO RESOLVE ANY PROBLEMS YOU MAY BE EXPERIENCING. Need Help? If you have any questions, visit Hoover.com or connect with the appliance as it should be done by the complete model number...
... plate). QUESTIONS OR CONCERNS? Always identify your product needs servicing within the warranty period, please contact Customer Service at 1-800-944-9200 for further instruction before cleaning or servicing. USE TROUBLESHOOTING GUIDE AS A FIRST STEP TO RESOLVE ANY PROBLEMS YOU MAY BE EXPERIENCING. Need Help? If you have any questions, visit Hoover.com or connect with the appliance as it should be done by the complete model number...

Product Manual
Page 23
... firmly plugged in upright position. Take to cleaning instructions. 1. See "How to Clean" page 13. 5. Check for up to solution port on , then inspect and clean for service: 1-800-944-9200. 2. PROBLEM Cleaner won't run Low suction Hose Nozzle stops spraying liquid during use Accessory Tool will not rotate in 1. Plug unit in home. 3. Check fuse or breaker in firmly. 2. Fuse in nozzle 5. Press pedal. 1. Dirty Water Tank full/automatic shut off Cleaner and fill Clean Water...
... firmly plugged in upright position. Take to cleaning instructions. 1. See "How to Clean" page 13. 5. Check for up to solution port on , then inspect and clean for service: 1-800-944-9200. 2. PROBLEM Cleaner won't run Low suction Hose Nozzle stops spraying liquid during use Accessory Tool will not rotate in 1. Plug unit in home. 3. Check fuse or breaker in firmly. 2. Fuse in nozzle 5. Press pedal. 1. Dirty Water Tank full/automatic shut off Cleaner and fill Clean Water...

Product Manual
Page 24
...-7pm EST. WHAT THIS WARRANTY DOES NOT COVER This warranty does not cover: use of the product in a commercial operation (such as maid, janitorial and equipment rental services), filter, brushroll and belt, improper maintenance of the product, damage due to misuse, acts of God, nature, vandalism or other acts beyond the control of Hoover®, owner's acts or omissions, use and in which the...
...-7pm EST. WHAT THIS WARRANTY DOES NOT COVER This warranty does not cover: use of the product in a commercial operation (such as maid, janitorial and equipment rental services), filter, brushroll and belt, improper maintenance of the product, damage due to misuse, acts of God, nature, vandalism or other acts beyond the control of Hoover®, owner's acts or omissions, use and in which the...


