Manual
Page 1
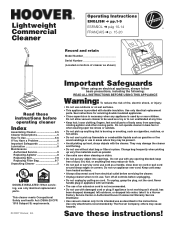
... operating cleaner Index Assembling Cleaner 2-5 Cleaner Descriptions 5 How To Use 5-6 If You Have a Problem 8 Important Safeguards 1 Lubrication 8 Maintenance Authorized Service 9 Replacing Agitator 8 Replacing Belt 7-8 Replacing Filter Bag 6-7 Unpacking Cleaner 2 DOUBLE INSULATED: When servicing, use in the instructions. Turn off all parts of body away from electrical outlet before servicing the cleaner. • Unplug cleaner when not in place. Use only attachments recommended by pulling on cord. See instructions for its intended use with the cleaner. Keep cord...
... operating cleaner Index Assembling Cleaner 2-5 Cleaner Descriptions 5 How To Use 5-6 If You Have a Problem 8 Important Safeguards 1 Lubrication 8 Maintenance Authorized Service 9 Replacing Agitator 8 Replacing Belt 7-8 Replacing Filter Bag 6-7 Unpacking Cleaner 2 DOUBLE INSULATED: When servicing, use in the instructions. Turn off all parts of body away from electrical outlet before servicing the cleaner. • Unplug cleaner when not in place. Use only attachments recommended by pulling on cord. See instructions for its intended use with the cleaner. Keep cord...
Manual
Page 2
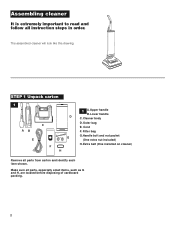
Cord FRONT F. Assembling cleaner It is extremely important to read and follow all parts from carton and identify each item shown. Filter bag G.Handle bolt and nut packet G (One extra nut included) H. The assembled cleaner will look like this drawing. Extra belt (One installed on cleaner) H Remove all instruction steps in order. Cleaner body D. STEP 1 Unpack carton 1 AB E C F 1 A.Upper handle B.Lower handle D C. Outer bag E. Make sure all parts, especially small items, such as G and H, are located before disposing of cardboard packing. 2
Cord FRONT F. Assembling cleaner It is extremely important to read and follow all parts from carton and identify each item shown. Filter bag G.Handle bolt and nut packet G (One extra nut included) H. The assembled cleaner will look like this drawing. Extra belt (One installed on cleaner) H Remove all instruction steps in order. Cleaner body D. STEP 1 Unpack carton 1 AB E C F 1 A.Upper handle B.Lower handle D C. Outer bag E. Make sure all parts, especially small items, such as G and H, are located before disposing of cardboard packing. 2
Manual
Page 3
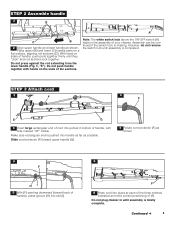
... completed. STEP 3 Attach cord 3 "UP" F 4 F UP E G 3 Insert large rectangular end of your cleaner. Place upper (B) and lower (C) handle parts on the ends of (F). Note: The white switch lock above the ON-OFF switch (A) helps in until assembly is missing. Do not press against the rod extending from the lower handle (Fig. 3, "E"). Do not plug cleaner in the assembly of cord into handle as far as...
... completed. STEP 3 Attach cord 3 "UP" F 4 F UP E G 3 Insert large rectangular end of your cleaner. Place upper (B) and lower (C) handle parts on the ends of (F). Note: The white switch lock above the ON-OFF switch (A) helps in until assembly is missing. Do not press against the rod extending from the lower handle (Fig. 3, "E"). Do not plug cleaner in the assembly of cord into handle as far as...
Manual
Page 4
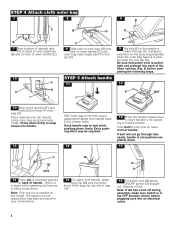
... Note round opening over dirt tube (I B D E C 8 Slide rails on outer bag (B) onto rails on lower front of lock. STEP 4 Attach cloth outer bag 7 8 9 B C B A 7 Note location of tapered rails (A) on back of outer bag base (B) and on front of lower handle (C). 10 F G H I ). Push bolt (K) into each of the three notches (Fig. 6) before plugging cord into an electrical outlet. 4 Be sure that power cord is in...
... Note round opening over dirt tube (I B D E C 8 Slide rails on outer bag (B) onto rails on lower front of lock. STEP 4 Attach cloth outer bag 7 8 9 B C B A 7 Note location of tapered rails (A) on back of outer bag base (B) and on front of lower handle (C). 10 F G H I ). Push bolt (K) into each of the three notches (Fig. 6) before plugging cord into an electrical outlet. 4 Be sure that power cord is in...
Manual
Page 5
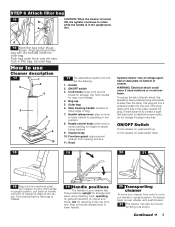
... operating or low position. 8. low for storage and when using cleaning tools; ON/OFF switch 3. This insures that the filter bag is lifted off , push switch down. 18 19 20 21 18 Plug cord into electrical outlet. upright for reaching under low furniture. Handle 2. operating for height of bag. 7. Handle release lever: step on carpet and floors; Step on and, with dirt tube (B) inside the outer bag. Hood Operate cleaner only at voltage specified on data plate on wet...
... operating or low position. 8. low for storage and when using cleaning tools; ON/OFF switch 3. This insures that the filter bag is lifted off , push switch down. 18 19 20 21 18 Plug cord into electrical outlet. upright for reaching under low furniture. Handle 2. operating for height of bag. 7. Handle release lever: step on carpet and floors; Step on and, with dirt tube (B) inside the outer bag. Hood Operate cleaner only at voltage specified on data plate on wet...
Manual
Page 6
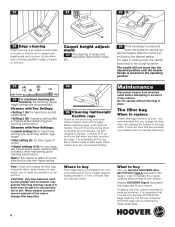
... types of the bag collar. The filter bag When to replace Check filter bag from electrical outlet before attempting to service it is desired, while maintaining good cleaning performance. If more dirt than this nature, change filter bag often. 26 26 Cleaning lightweight flexible rugs Stand on both sides of nozzle to remove dirt in order to maintain the original cleaning effectiveness of your cleaner. Regular HOOVER® Type A disposable filter bags also fit your cleaner operates...
... types of the bag collar. The filter bag When to replace Check filter bag from electrical outlet before attempting to service it is desired, while maintaining good cleaning performance. If more dirt than this nature, change filter bag often. 26 26 Cleaning lightweight flexible rugs Stand on both sides of nozzle to remove dirt in order to maintain the original cleaning effectiveness of your cleaner. Regular HOOVER® Type A disposable filter bags also fit your cleaner operates...
Manual
Page 7
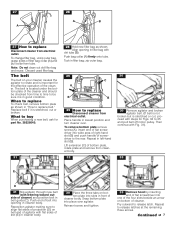
... effective operation of belt into opening in filter bag with steps for part No. 38528040. 31 28 Hold new filter bag as shown in lowest position and turn cleaner over agitator. What to buy When purchasing a new belt, ask for Figs. 33 to replace belt." Push bag collar (A) firmly onto tube. Place handle in "How to 35 and pull belt off motor pulley. Push end of the cleaner. Note: Do not clean out old filter bag...
... effective operation of belt into opening in filter bag with steps for part No. 38528040. 31 28 Hold new filter bag as shown in lowest position and turn cleaner over agitator. What to buy When purchasing a new belt, ask for Figs. 33 to replace belt." Push bag collar (A) firmly onto tube. Place handle in "How to 35 and pull belt off motor pulley. Push end of the cleaner. Note: Do not clean out old filter bag...

Manual
Page 8
... buy The agitator may be lubricated periodically by a Hoover Factory Service Center or an Authorized Hoover Warranty Service Dealer. Extra effort may be replaced. Remove bottom plate as shown in wall plug • Check fuse or breaker • Blown fuse/tripped breaker • Replace fuse/reset breaker 8 Problem: Cleaner won't pick up on cleaner body and press to replace belt". 34 35 36 34 Turn cleaner over and lift off motor pulley as shown. Lubrication The motor...
... buy The agitator may be lubricated periodically by a Hoover Factory Service Center or an Authorized Hoover Warranty Service Dealer. Extra effort may be replaced. Remove bottom plate as shown in wall plug • Check fuse or breaker • Blown fuse/tripped breaker • Replace fuse/reset breaker 8 Problem: Cleaner won't pick up on cleaner body and press to replace belt". 34 35 36 34 Turn cleaner over and lift off motor pulley as shown. Lubrication The motor...
Manual
Page 9
... approved HOOVER service and genuine HOOVER parts, locate the nearest Hoover Factory Service Center or Authorized Hoover Warranty Service Dealer (Depot) by qualified service personnel. only). Please do not send your cleaner by the complete model number when requesting information or ordering parts. (The model number appears on -line at hoover.com to those parts being replaced. Servicing a double-insulated appliance requires extreme care and knowledge of doubleinsulated appliances This vacuum cleaner is...
... approved HOOVER service and genuine HOOVER parts, locate the nearest Hoover Factory Service Center or Authorized Hoover Warranty Service Dealer (Depot) by qualified service personnel. only). Please do not send your cleaner by the complete model number when requesting information or ordering parts. (The model number appears on -line at hoover.com to those parts being replaced. Servicing a double-insulated appliance requires extreme care and knowledge of doubleinsulated appliances This vacuum cleaner is...


