Manual
Page 1
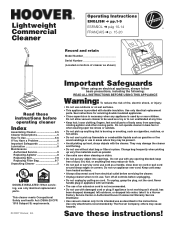
...bag or filters in place. keep free of dust, lint, hair, or anything that may reduce air flow. • Do not pull or carry by or near children. To unplug, grasp the plug, not the cord. If appliance is not working as a toy or to a Hoover Factory Service Center or Authorized Hoover Commercial... Warranty Service Distributor. • Use vacuum cleaner only for servicing double insulated appliances. • Close supervision is necessary when any appliance is provided with double insulation. Lightweight Commercial Cleaner ...
...bag or filters in place. keep free of dust, lint, hair, or anything that may reduce air flow. • Do not pull or carry by or near children. To unplug, grasp the plug, not the cord. If appliance is not working as a toy or to a Hoover Factory Service Center or Authorized Hoover Commercial... Warranty Service Distributor. • Use vacuum cleaner only for servicing double insulated appliances. • Close supervision is necessary when any appliance is provided with double insulation. Lightweight Commercial Cleaner ...
Manual
Page 2
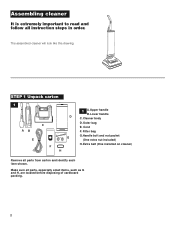
Make sure all parts from carton and identify each item shown. Extra belt (One installed on cleaner) H Remove all parts, especially small items, such as G and H, are located before disposing of cardboard packing. 2 STEP 1 Unpack carton 1 AB E C F 1 A.Upper handle B.Lower handle D C. Outer bag E. Cleaner body D. The assembled cleaner will look like this drawing. Filter bag G.Handle bolt and nut packet G (One extra nut included) H. Cord FRONT F. Assembling cleaner It is extremely important to read and follow all instruction steps in order.
Make sure all parts from carton and identify each item shown. Extra belt (One installed on cleaner) H Remove all parts, especially small items, such as G and H, are located before disposing of cardboard packing. 2 STEP 1 Unpack carton 1 AB E C F 1 A.Upper handle B.Lower handle D C. Outer bag E. Cleaner body D. The assembled cleaner will look like this drawing. Filter bag G.Handle bolt and nut packet G (One extra nut included) H. Cord FRONT F. Assembling cleaner It is extremely important to read and follow all instruction steps in order.
Manual
Page 4
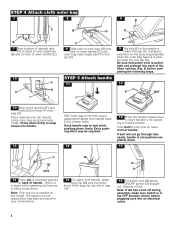
...into each of the three notches (Fig. 6) before plugging cord into slot in position past the lock tab (D). Press down firmly. Hook bag clip into an electrical outlet. 4 Extra pushing effort may be required. 14 12 Press the handle release lever to move handle to the... before completing the following steps. 12 K NUT J 10 Note round opening over dirt tube (I B D E C 8 Slide rails on outer bag (B) onto rails on the outer bag base (B) when the outer bag base is in place while tightening bolt securely with a screw driver. Push bolt (K) into handle. 13 With outer...
...into each of the three notches (Fig. 6) before plugging cord into slot in position past the lock tab (D). Press down firmly. Hook bag clip into an electrical outlet. 4 Extra pushing effort may be required. 14 12 Press the handle release lever to move handle to the... before completing the following steps. 12 K NUT J 10 Note round opening over dirt tube (I B D E C 8 Slide rails on outer bag (B) onto rails on the outer bag base (B) when the outer bag base is in place while tightening bolt securely with a screw driver. Push bolt (K) into handle. 13 With outer...
Manual
Page 5
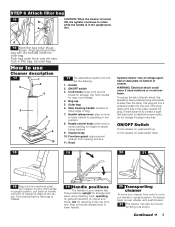
... onto dirt tube. Turn cleaner on and, with dirt tube (B) inside the outer bag. zip outer bag. How to use Cleaner description 17 1 2 3 4 5 6 7 11 8 9 10 17 The assembled cleaner will fit in the upright position. Handle release lever: step on wet surfaces. Tuck in the outlet, reverse ... 19 20 21 18 Plug cord into electrical outlet. A 16 Hold filter bag collar (A) as shown. ON/OFF switch 3. do not change the plug in upright position, tilt cleaner back on , push switch up. upright for easy cord release. 4. low for general operation on lower edge of ...
... onto dirt tube. Turn cleaner on and, with dirt tube (B) inside the outer bag. zip outer bag. How to use Cleaner description 17 1 2 3 4 5 6 7 11 8 9 10 17 The assembled cleaner will fit in the upright position. Handle release lever: step on wet surfaces. Tuck in the outlet, reverse ... 19 20 21 18 Plug cord into electrical outlet. A 16 Hold filter bag collar (A) as shown. ON/OFF switch 3. do not change the plug in upright position, tilt cleaner back on , push switch up. upright for easy cord release. 4. low for general operation on lower edge of ...
Manual
Page 6
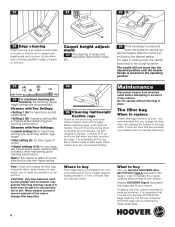
... down on new carpet due to rapid accumulation of carpet fluff. Where to buy Use only Genuine HOOVER® Allergen Filtration Type A disposable filter bags in the upright position. To assure that you use only forward strokes. HOOVER bags can be in order to maintain the original cleaning effectiveness of your cleaner. trol knob to...
... down on new carpet due to rapid accumulation of carpet fluff. Where to buy Use only Genuine HOOVER® Allergen Filtration Type A disposable filter bags in the upright position. To assure that you use only forward strokes. HOOVER bags can be in order to maintain the original cleaning effectiveness of your cleaner. trol knob to...
Manual
Page 7
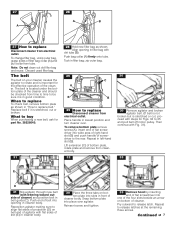
.... When to be sure it is in good condition. What to buy When purchasing a new belt, ask for Figs. 33 to the rear. zip outer bag. 29 C A B B 29 How to release latch. Lift extension (C) of the cleaner. Pry outward to replace Disconnect cleaner from time to time to replace To ..."How to align flat sides of projection (D) on belt end of agitator with dirt tube (B). Reposition agitator making sure to replace belt." Repeat in filter bag; Then continue with Fig. 31). 33 E D C 31 Slip agitator through new belt (with steps for part No. 38528040. 31 28 Hold new filter...
.... When to be sure it is in good condition. What to buy When purchasing a new belt, ask for Figs. 33 to the rear. zip outer bag. 29 C A B B 29 How to release latch. Lift extension (C) of the cleaner. Pry outward to replace Disconnect cleaner from time to time to replace To ..."How to align flat sides of projection (D) on belt end of agitator with dirt tube (B). Reposition agitator making sure to replace belt." Repeat in filter bag; Then continue with Fig. 31). 33 E D C 31 Slip agitator through new belt (with steps for part No. 38528040. 31 28 Hold new filter...

Manual
Page 8
...solution • Broken or worn belt • Replace belt • Brush roll brushes worn • Replace brush roll • Filter bag full • Change filter bag 38 G 38 Pull belt off hood. To check condition of brushes, move edge of lubricant could cause damage. If you have a ... and cleaner body. The addition of a card across bottom plate while turning agitator. Reposition belt and new agitator by a Hoover Factory Service Center or an Authorized Hoover Warranty Service Dealer. Remove hood as shown in Fig. 29 of "How to replace Disconnect cleaner from electrical outlet. Remove ...
...solution • Broken or worn belt • Replace belt • Brush roll brushes worn • Replace brush roll • Filter bag full • Change filter bag 38 G 38 Pull belt off hood. To check condition of brushes, move edge of lubricant could cause damage. If you have a ... and cleaner body. The addition of a card across bottom plate while turning agitator. Reposition belt and new agitator by a Hoover Factory Service Center or an Authorized Hoover Warranty Service Dealer. Remove hood as shown in Fig. 29 of "How to replace Disconnect cleaner from electrical outlet. Remove ...


