User Manual
Page 1
HONEYWELL TE831W-2 COMPLETE WIRELESS WEATHER STATION USER MANUAL TE831W-2
HONEYWELL TE831W-2 COMPLETE WIRELESS WEATHER STATION USER MANUAL TE831W-2
User Manual
Page 2
... of Contents Introduction 3 Standard Package Contents 3 Installation 3 Before you begin 4 Thermo-Hygrometer Sensors TS33C 5 Rain Gauge TS906 6 Anemometer (wind sensor) TS805 8 Main Unit 10 Power 11 Buttons and Controls 12 Initial Set up 14 Connecting the Weather Station to a PC 14 Operation and Window Selection 15 Custom Weather Station Settings 16 LED Backlight Options 25 Time Alarm Settings 25 Memory Reset procedure 27 Maintenance 27 Troubleshooting 28 PRECAUTIONS 29 Appendix -
... of Contents Introduction 3 Standard Package Contents 3 Installation 3 Before you begin 4 Thermo-Hygrometer Sensors TS33C 5 Rain Gauge TS906 6 Anemometer (wind sensor) TS805 8 Main Unit 10 Power 11 Buttons and Controls 12 Initial Set up 14 Connecting the Weather Station to a PC 14 Operation and Window Selection 15 Custom Weather Station Settings 16 LED Backlight Options 25 Time Alarm Settings 25 Memory Reset procedure 27 Maintenance 27 Troubleshooting 28 PRECAUTIONS 29 Appendix -

User Manual
Page 3
... compact and easy-to-use product uniquely measures and monitors weather data right at 433MHz radio frequency, so no wire installation is transmitted to the main unit wirelessly, with operating range up to 100 feet (30 meters). The remote weather sensors include (2) thermo-hygrometer (temperature and humidity) sensors, anemometer (wind sensor) and a rain gauge (rain sensor). Anemometer mounting pole - Installation The Honeywell Complete Wireless Weather Station operates at...
... compact and easy-to-use product uniquely measures and monitors weather data right at 433MHz radio frequency, so no wire installation is transmitted to the main unit wirelessly, with operating range up to 100 feet (30 meters). The remote weather sensors include (2) thermo-hygrometer (temperature and humidity) sensors, anemometer (wind sensor) and a rain gauge (rain sensor). Anemometer mounting pole - Installation The Honeywell Complete Wireless Weather Station operates at...
User Manual
Page 4
...-Hygrometer sensors is pre-set to be reduced or interrupted • Avoid using rechargeable batteries. (Rechargeable batteries do not provide correct power levels). • ALWAYS install batteries in the remote sensors before the main unit. • Insert batteries matching the polarity in the battery compartment • Remove plastic sleeve from the battery compartment in this Honeywell Complete Wireless Weather Station operate at 433MHz radio frequency. Power up and test...
...-Hygrometer sensors is pre-set to be reduced or interrupted • Avoid using rechargeable batteries. (Rechargeable batteries do not provide correct power levels). • ALWAYS install batteries in the remote sensors before the main unit. • Insert batteries matching the polarity in the battery compartment • Remove plastic sleeve from the battery compartment in this Honeywell Complete Wireless Weather Station operate at 433MHz radio frequency. Power up and test...
User Manual
Page 6
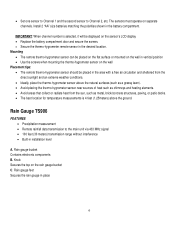
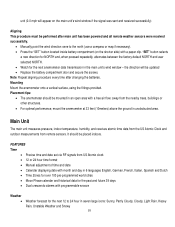
... in installation level A. Mounting • The remote thermo-hygrometer sensor can be placed on the flat surface or mounted on the wall in vertical position • Use the screws when mounting the thermo-hygrometer sensor on the sensor's LCD display • Replace the battery compartment door and secure the screws. • Secure the thermo-hygrometer remote sensor in place 6 • Set one...
... in installation level A. Mounting • The remote thermo-hygrometer sensor can be placed on the flat surface or mounted on the wall in vertical position • Use the screws when mounting the thermo-hygrometer sensor on the sensor's LCD display • Replace the battery compartment door and secure the screws. • Secure the thermo-hygrometer remote sensor in place 6 • Set one...
User Manual
Page 10
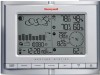
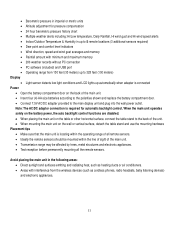
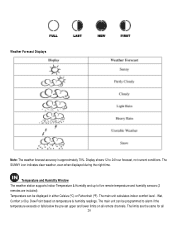
... after changing the batteries. FEATURES Time • Precise time and date set via RF signals from US Atomic clock • 12 or 24 hour time format • Manual adjustment of time and date • Calendar displaying date with month and day in seven large icons: Sunny, Partly Cloudy, Cloudy, Light Rain, Heavy Rain, Unstable Weather and Snowy 10 Note: Repeat aligning procedure every time after main unit has been powered and all remote weather sensors...
... after changing the batteries. FEATURES Time • Precise time and date set via RF signals from US Atomic clock • 12 or 24 hour time format • Manual adjustment of time and date • Calendar displaying date with month and day in seven large icons: Sunny, Partly Cloudy, Cloudy, Light Rain, Heavy Rain, Unstable Weather and Snowy 10 Note: Repeat aligning procedure every time after main unit has been powered and all remote weather sensors...
User Manual
Page 11
... adjustment for automatic backlight control. When the main unit operates solely on the battery power, the auto backlight control functions are disabled. • When placing the main unit on the table or other horizontal surface, connect the table stand to the back of the unit. • When mounting the main unit on the wall or vertical surface, detach the table stand and use the mounting hardware...
... adjustment for automatic backlight control. When the main unit operates solely on the battery power, the auto backlight control functions are disabled. • When placing the main unit on the table or other horizontal surface, connect the table stand to the back of the unit. • When mounting the main unit on the wall or vertical surface, detach the table stand and use the mounting hardware...

User Manual
Page 13
... the alarm/alert programming mode - Adjusts the automatic light sensor sensitivity - AC/ DC ADAPTOR INPUT - Activates Snooze delay for alarms (programmable 1 to : automatic, on or off - USB Port provides PC connectivity 13 Selects the next available window counter-clockwise - Increases parameters -If depressed and held , enters into the programming mode or changes parameter's units - Pressed again closes programming mode and confirms selected parameters - Illuminates the display backlight for...
... the alarm/alert programming mode - Adjusts the automatic light sensor sensitivity - AC/ DC ADAPTOR INPUT - Activates Snooze delay for alarms (programmable 1 to : automatic, on or off - USB Port provides PC connectivity 13 Selects the next available window counter-clockwise - Increases parameters -If depressed and held , enters into the programming mode or changes parameter's units - Pressed again closes programming mode and confirms selected parameters - Illuminates the display backlight for...
User Manual
Page 14
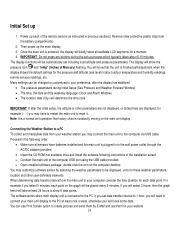
... remote sensors as instructed in to the wall power outlet through the AC/DC adapter provided • Insert the CD-ROM into available drive and install the software following order: • Make sure all available LCD segments for example (- - -) you will select 3 hours, then the graph trend will need to connect your main unit display to your preference, after the initial setup...
... remote sensors as instructed in to the wall power outlet through the AC/DC adapter provided • Insert the CD-ROM into available drive and install the software following order: • Make sure all available LCD segments for example (- - -) you will select 3 hours, then the graph trend will need to connect your main unit display to your preference, after the initial setup...
User Manual
Page 15
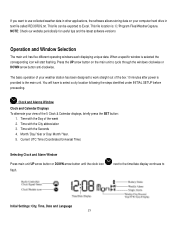
... the clock icon flash. next to the time/date display continues to Excel. Press the UP arrow button on your view of the box 10 minutes after power is provided to cycle through the windows clockwise or DOWN arrow button anti-clockwise. The basic operation of your weather station has been designed to work straight out of the 5 Clock & Calendar displays, briefly press the SET button: 1.
... the clock icon flash. next to the time/date display continues to Excel. Press the UP arrow button on your view of the box 10 minutes after power is provided to cycle through the windows clockwise or DOWN arrow button anti-clockwise. The basic operation of your weather station has been designed to work straight out of the 5 Clock & Calendar displays, briefly press the SET button: 1.
User Manual
Page 16
Custom Weather Station Settings The basic operation of the box 10 minutes after power is completed, the display will return to the default Clock and Alarm Window. Note: Press and hold SET button until the day of week language abbreviation "ENG" will flash. • Press UP or DOWN arrow button to select the desired language for day of the week in English, German, French, Italian, Spanish or Dutch...
Custom Weather Station Settings The basic operation of the box 10 minutes after power is completed, the display will return to the default Clock and Alarm Window. Note: Press and hold SET button until the day of week language abbreviation "ENG" will flash. • Press UP or DOWN arrow button to select the desired language for day of the week in English, German, French, Italian, Spanish or Dutch...
User Manual
Page 17
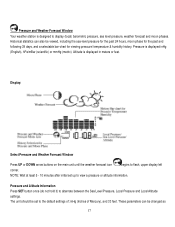
... is displayed inHg (English), hPa/mBar (scientific) or mmHg (metric). NOTE: Wait at least 5 - 10 minutes after initial set to view a pressure or altitude information. Pressure and Altitude Information Press SET button once (do not hold it) to flash, upper display left corner. Historical statistics can be viewed, including the sea-level pressure for the past 24 hours, moon...
... is displayed inHg (English), hPa/mBar (scientific) or mmHg (metric). NOTE: Wait at least 5 - 10 minutes after initial set to view a pressure or altitude information. Pressure and Altitude Information Press SET button once (do not hold it) to flash, upper display left corner. Historical statistics can be viewed, including the sea-level pressure for the past 24 hours, moon...

User Manual
Page 18
... you wish to confirm your specific location (house), the LOCAL barometric pressure should be adjusted according to adjust the pressure value. local TV or radio station, etc) During initial power up (within the first 5 - 10 minutes) the weather station will automatically calculate altitude. Changing or Setting Altitude • Press SET button until the local altitude value will be programmed according to GPS readings, Internet...
... you wish to confirm your specific location (house), the LOCAL barometric pressure should be adjusted according to adjust the pressure value. local TV or radio station, etc) During initial power up (within the first 5 - 10 minutes) the weather station will automatically calculate altitude. Changing or Setting Altitude • Press SET button until the local altitude value will be programmed according to GPS readings, Internet...
User Manual
Page 19
... phase and using the MEMORY button will select the Pressure/ Weather display. • When the SEA LEVEL is displayed, press HISTORY button repeatedly viewing the sea level pressure history for the past or future days. Press and hold SET until the altitude digits are used to display 24 hour trend data for faster digits advancement • Press SET button to the Pressure and Weather Forecast mode . Viewing the...
... phase and using the MEMORY button will select the Pressure/ Weather display. • When the SEA LEVEL is displayed, press HISTORY button repeatedly viewing the sea level pressure history for the past or future days. Press and hold SET until the altitude digits are used to display 24 hour trend data for faster digits advancement • Press SET button to the Pressure and Weather Forecast mode . Viewing the...
User Manual
Page 20
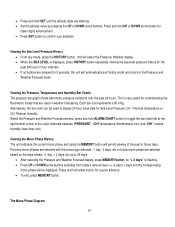
... clear weather, even when displayed during the night-time. The main unit can be programmed to alarm if the temperature exceeds or falls below the pre-set upper and lower limits on temperature & humidity readings. Temperature can be displayed in either Celsius (ºC) or Fahrenheit (ºF). Dew Point based on all 20 Temperature and Humidity Window The weather station supports...
... clear weather, even when displayed during the night-time. The main unit can be programmed to alarm if the temperature exceeds or falls below the pre-set upper and lower limits on temperature & humidity readings. Temperature can be displayed in either Celsius (ºC) or Fahrenheit (ºF). Dew Point based on all 20 Temperature and Humidity Window The weather station supports...

User Manual
Page 25
... continuous backlight control the AC/DC adaptor must be turned on, off or automatic depending on the back panel. LED Backlight Options The main unit backlight can also be displayed. • To enable or disable any of these alarms are two time alarms available on subsequent days. Note: The snooze duration for fast digits advance. • Press ALARM/CHART button to confirm your setting Note: Press SET button anytime during alarm programming mode...
... continuous backlight control the AC/DC adaptor must be turned on, off or automatic depending on the back panel. LED Backlight Options The main unit backlight can also be displayed. • To enable or disable any of these alarms are two time alarms available on subsequent days. Note: The snooze duration for fast digits advance. • Press ALARM/CHART button to confirm your setting Note: Press SET button anytime during alarm programming mode...
User Manual
Page 26
... atomic clock is programmed to keep the clock accuracy within concrete walls found in basements or office buildings. • Set the alarm minutes using UP or DOWN arrow button. Note: For weekday alarm, pressing ALARM/CHART button will automatically "snooze" if no buttons are pressed after the alarm sounds for the current day. Once the time signal has been successfully received, the time and date will return to the clock icon. if atomic time reception...
... atomic clock is programmed to keep the clock accuracy within concrete walls found in basements or office buildings. • Set the alarm minutes using UP or DOWN arrow button. Note: For weekday alarm, pressing ALARM/CHART button will automatically "snooze" if no buttons are pressed after the alarm sounds for the current day. Once the time signal has been successfully received, the time and date will return to the clock icon. if atomic time reception...
User Manual
Page 27
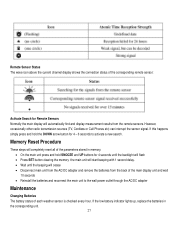
... adapter Maintenance Changing Batteries The battery status of each weather sensor is checked every hour. Memory Reset Procedure These steps will completely reset all of the parameters stored in the corresponding unit. 27 However, occasionally other radio transmission sources (TV, Cordless or Cell Phones etc) can interrupt the sensor signal. Remote Sensor Status The wave icon above the current channel display shows the connection...
... adapter Maintenance Changing Batteries The battery status of each weather sensor is checked every hour. Memory Reset Procedure These steps will completely reset all of the parameters stored in the corresponding unit. 27 However, occasionally other radio transmission sources (TV, Cordless or Cell Phones etc) can interrupt the sensor signal. Remote Sensor Status The wave icon above the current channel display shows the connection...

User Manual
Page 29
... new and old batteries. • Read the user's manual thoroughly before operating the product. 29 The following may cause reception problems: • The remote weather sensor and a main unit are too far from each other. • The signal shielding materials, such as metal surfaces, concrete walls or dense vegetation, are different from wireless devices such as: cordless phones, radio headsets and baby...
... new and old batteries. • Read the user's manual thoroughly before operating the product. 29 The following may cause reception problems: • The remote weather sensor and a main unit are too far from each other. • The signal shielding materials, such as metal surfaces, concrete walls or dense vegetation, are different from wireless devices such as: cordless phones, radio headsets and baby...
User Manual
Page 34
... used under the Customer Service menu. Please retain your product, go to provide a copy for one year from Honeywell International Inc. Address: 7865 SW Mohawk, Tualatin, OR 97062 Telephone No.: 1-503-612-8395 declare that may cause undesired operation. Please direct all injuries instead. This device must accept any interference received, including interference that the product Product No.: TE831W-2 Product Name: Complete Wireless Weather Station...
... used under the Customer Service menu. Please retain your product, go to provide a copy for one year from Honeywell International Inc. Address: 7865 SW Mohawk, Tualatin, OR 97062 Telephone No.: 1-503-612-8395 declare that may cause undesired operation. Please direct all injuries instead. This device must accept any interference received, including interference that the product Product No.: TE831W-2 Product Name: Complete Wireless Weather Station...


