

User Guide
Page 5
... separation between the equipment and receiver, or connecting the equipment to provide reasonable protection against harmful interference in a particular installation. Pursuant to Part 15 of data or damage to equipment and may cause harmful interference to equipment. This device complies with the instruction manual, may contain important operating and maintenance servicing information. Failure to take or avoid a specified...
... separation between the equipment and receiver, or connecting the equipment to provide reasonable protection against harmful interference in a particular installation. Pursuant to Part 15 of data or damage to equipment and may cause harmful interference to equipment. This device complies with the instruction manual, may contain important operating and maintenance servicing information. Failure to take or avoid a specified...

User Guide
Page 9
... Step 3: Configure Address 37 Step 4: Configure the Controller for VideoBloX Mode 37 (Optional) Configuring UltraKey Plus Using the Web Browser 37 Logging onto the Web Browser 37 Step 1: Configure UltraKey Plus to VideoBloX Mode 38 Step 2: Configure VideoBloX Network Settings 39 Step 3A: Configure the Controller for a Serial Port Connection 39 Step 3B: Configure the Controller for an Ethernet Connection 40 3 Installing UltraKey Plus...
... Step 3: Configure Address 37 Step 4: Configure the Controller for VideoBloX Mode 37 (Optional) Configuring UltraKey Plus Using the Web Browser 37 Logging onto the Web Browser 37 Step 1: Configure UltraKey Plus to VideoBloX Mode 38 Step 2: Configure VideoBloX Network Settings 39 Step 3A: Configure the Controller for a Serial Port Connection 39 Step 3B: Configure the Controller for an Ethernet Connection 40 3 Installing UltraKey Plus...
User Guide
Page 10
... the Web Browser 50 Step 1: Configure UltraKey Plus to MAXPRO Mode 50 Step 2: Configure MAXPRO Network Settings 51 Step 3A: Configure the Controller for a Serial Port Connection 52 Step 3B: Configure the Controller for an Ethernet Connection 53 4 System Administration and Troubleshooting 55 System Administration Using the Controller LCD 55 Logging on and Navigating to the Settings Menu 55 Configuring the Hardware 56 Managing the Users...
... the Web Browser 50 Step 1: Configure UltraKey Plus to MAXPRO Mode 50 Step 2: Configure MAXPRO Network Settings 51 Step 3A: Configure the Controller for a Serial Port Connection 52 Step 3B: Configure the Controller for an Ethernet Connection 53 4 System Administration and Troubleshooting 55 System Administration Using the Controller LCD 55 Logging on and Navigating to the Settings Menu 55 Configuring the Hardware 56 Managing the Users...

User Guide
Page 11
...Figure 4-3 Figure 4-4 Figure 4-5 Figure 4-6 Figure 4-7 UltraKey Plus Port Connections 19 UltraKey Plus Controller Keyboard Layout 22 The UltraKey Navigation Controls 23 LCD and LCD Navigation Keys 30 AC Power Adapter with CEE 7/16 Europlug 32 RJ45 to DB9 Male Adapter for ...Connections to MAXPRO-Net 48 UltraKey Plus Login Page 50 System Configuration Tab 51 MAXPRO Configuration Tab 52 Port Settings Tab 53 IP Configuration Tab 53 Configure Hardware 65 Manage Users 66 Configuring Hardkey 67 Configuring File 67 Software Upgrade Warning Message 68 System Reboot 69 Change Password...
...Figure 4-3 Figure 4-4 Figure 4-5 Figure 4-6 Figure 4-7 UltraKey Plus Port Connections 19 UltraKey Plus Controller Keyboard Layout 22 The UltraKey Navigation Controls 23 LCD and LCD Navigation Keys 30 AC Power Adapter with CEE 7/16 Europlug 32 RJ45 to DB9 Male Adapter for ...Connections to MAXPRO-Net 48 UltraKey Plus Login Page 50 System Configuration Tab 51 MAXPRO Configuration Tab 52 Port Settings Tab 53 IP Configuration Tab 53 Configure Hardware 65 Manage Users 66 Configuring Hardkey 67 Configuring File 67 Software Upgrade Warning Message 68 System Reboot 69 Change Password...
User Guide
Page 15
Document Overview This user guide includes: • UltraKey Plus controller user instructions (Chapter 1). • Installation/connection and configuration instructions specific to VideoBloX (Chapter 2) • Installation/connection and configuration instructions specific to MAXPRO-Net (Chapter 3). • System Administration and troubleshooting (Chapter 4) Document 800-02573 Rev B 15 11/2009 UltraKey Plus Controller Installation and User Guide About this Document and the UltraKey Plus In this section: • Document Overview, page 15 •...
Document Overview This user guide includes: • UltraKey Plus controller user instructions (Chapter 1). • Installation/connection and configuration instructions specific to VideoBloX (Chapter 2) • Installation/connection and configuration instructions specific to MAXPRO-Net (Chapter 3). • System Administration and troubleshooting (Chapter 4) Document 800-02573 Rev B 15 11/2009 UltraKey Plus Controller Installation and User Guide About this Document and the UltraKey Plus In this section: • Document Overview, page 15 •...

User Guide
Page 16
... other electronic documents in PDF format including data sheets, quick references, installation and user guides, specifications, software and product notices: http://www.honeywellvideo.com. Cross-reference within document. Pressing a key on the controller keyboard. Buttons you select. Double-click Open from the File menu. Press and hold Login. Italic Placeholders: words that displays on a web browser to the System Administrator Guide. Typographical Conventions This document uses these typographical conventions: Font...
... other electronic documents in PDF format including data sheets, quick references, installation and user guides, specifications, software and product notices: http://www.honeywellvideo.com. Cross-reference within document. Pressing a key on the controller keyboard. Buttons you select. Double-click Open from the File menu. Press and hold Login. Italic Placeholders: words that displays on a web browser to the System Administrator Guide. Typographical Conventions This document uses these typographical conventions: Font...

User Guide
Page 18
... local electrical current. VideoBloX master port. Use of installation. Ultrakey Plus installation and user guide All installations. Backwards compatibility with your UltraKey Plus Controller shipment. Ultrakey Plus can be connected to the UltraKey Plus. 18 Power adapter with ... Quantity 1 1 1 box Table 0-2 Shipping Checklist Part Use with plugs for RS232 Backwards compatibility with VideoBloX and VideoBloX Lite CPU installations. Ultrakey Plus keyboard controller All installations. Australian 10 A/240V). 1 Connector...
... local electrical current. VideoBloX master port. Use of installation. Ultrakey Plus installation and user guide All installations. Backwards compatibility with your UltraKey Plus Controller shipment. Ultrakey Plus can be connected to the UltraKey Plus. 18 Power adapter with ... Quantity 1 1 1 box Table 0-2 Shipping Checklist Part Use with plugs for RS232 Backwards compatibility with VideoBloX and VideoBloX Lite CPU installations. Ultrakey Plus keyboard controller All installations. Australian 10 A/240V). 1 Connector...

User Guide
Page 22
Using the UltraKey Plus Controller Using the UltraKey Plus to navigate both the LCD menus during configuration and set up as well as during normal operation with your matrix system. Figure 1-1 shows the layout of ways to Navigate the LCD Menus There are a variety of the UltraKey Plus and Table 1-1 describes the key functions. Figure 1-1 UltraKey Plus Controller Keyboard Layout 22 See Figure 1-2 for a brief overview of the three main navigation options.
Using the UltraKey Plus Controller Using the UltraKey Plus to navigate both the LCD menus during configuration and set up as well as during normal operation with your matrix system. Figure 1-1 shows the layout of ways to Navigate the LCD Menus There are a variety of the UltraKey Plus and Table 1-1 describes the key functions. Figure 1-1 UltraKey Plus Controller Keyboard Layout 22 See Figure 1-2 for a brief overview of the three main navigation options.
User Guide
Page 24
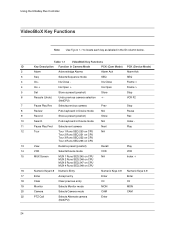
Iris Close - Using the UltraKey Plus Controller VideoBloX Key Functions Note Use Figure 1-1 to locate each key as labeled in Camera Mode PCK (Cam Mode) PCK (Device Mode) 2 Alarm Acknowledge Alarms Alarm Ack Alarm Ack 3 Seq Selects Sequence mode SEQ SEQ 4 Iris - Iris Close Frame < 4 Iris + Iris Open + Iris Open Frame > 5 Set Store a preset (preshot) Store Stop 6 Recycle (Undo) Undo previous camera selection Table 1-1 VideoBloX Key Functions ID Key Description Function in the ID column below.
Iris Close - Using the UltraKey Plus Controller VideoBloX Key Functions Note Use Figure 1-1 to locate each key as labeled in Camera Mode PCK (Cam Mode) PCK (Device Mode) 2 Alarm Acknowledge Alarms Alarm Ack Alarm Ack 3 Seq Selects Sequence mode SEQ SEQ 4 Iris - Iris Close Frame < 4 Iris + Iris Open + Iris Open Frame > 5 Set Store a preset (preshot) Store Stop 6 Recycle (Undo) Undo previous camera selection Table 1-1 VideoBloX Key Functions ID Key Description Function in the ID column below.

User Guide
Page 33
.... 2. GND RX- RX+ #1 #2 #5 #7 #8 #2 #1 #5 #4 #3 5 RJ45 to display the Login page. 3. Press Alt + Clr + Home keys on the screen. Press Type to VB mode by pressing the Mode Maxpro button and logging into the Settings menu again. 5. If current mode is displayed. 6. UltraKey Plus Controller Installation and User Guide Figure 2-5 VideoBloX Serial Port RS422 Connection Example VB master: 1--RS422_TX - 2--RS422_TX + 3--RS422_RX + 4--RS422_RX - 5--GND VIdeoBlox Master Connections VideoBloX Serial Port (RS422) RJ45 define...
.... 2. GND RX- RX+ #1 #2 #5 #7 #8 #2 #1 #5 #4 #3 5 RJ45 to display the Login page. 3. Press Alt + Clr + Home keys on the screen. Press Type to VB mode by pressing the Mode Maxpro button and logging into the Settings menu again. 5. If current mode is displayed. 6. UltraKey Plus Controller Installation and User Guide Figure 2-5 VideoBloX Serial Port RS422 Connection Example VB master: 1--RS422_TX - 2--RS422_TX + 3--RS422_RX + 4--RS422_RX - 5--GND VIdeoBlox Master Connections VideoBloX Serial Port (RS422) RJ45 define...

User Guide
Page 34
If you do not change this setting. 9. Press Users Menu to configure the device. 3. Refer to User Menus on page 62 to display the configuration screen. 2. Note In this operation invalid. 3. You can also use the numeric keypad to enter a number between 1 and 32 to assign to the controller. Press parity to select 7 bit or 8 bit. 10. Press Home and then Quit to a VideoBloX...
If you do not change this setting. 9. Press Users Menu to configure the device. 3. Refer to User Menus on page 62 to display the configuration screen. 2. Note In this operation invalid. 3. You can also use the numeric keypad to enter a number between 1 and 32 to assign to the controller. Press parity to select 7 bit or 8 bit. 10. Press Home and then Quit to a VideoBloX...

User Guide
Page 36
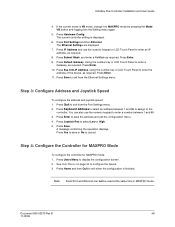
... number key or LCD Touch Panel to display Login page. 3. The Settings screen displays. 4. Press Alt + Clr + Home keys on the controller to enter a Gateway as well.Press Enter. 9. Press the Subnet Mask, using the number key or LCD Touch Panel to VB mode by pressing the Mode Maxpro button and logging into Setting menu again. 5. Enter the PIN password 3434. Press Save to the controller after all the devices have been connected correctly. 2. Apply AC power...
... number key or LCD Touch Panel to display Login page. 3. The Settings screen displays. 4. Press Alt + Clr + Home keys on the controller to enter a Gateway as well.Press Enter. 9. Press the Subnet Mask, using the number key or LCD Touch Panel to VB mode by pressing the Mode Maxpro button and logging into Setting menu again. 5. Enter the PIN password 3434. Press Save to the controller after all the devices have been connected correctly. 2. Apply AC power...

User Guide
Page 37
... from the Port Settings menu. 2. You can also use the numeric keypad to enter a number between 1 and 32 to assign to select an address between 1 and 32. Press Home and then Quit to , or copy and paste, the applicable IP address into your web browser: • LAN connections: for VideoBloX mode: 1. In the Password field enter 1234 (default). 4. Press Keyboard Address to the controller. If not...
... from the Port Settings menu. 2. You can also use the numeric keypad to enter a number between 1 and 32 to assign to select an address between 1 and 32. Press Home and then Quit to , or copy and paste, the applicable IP address into your web browser: • LAN connections: for VideoBloX mode: 1. In the Password field enter 1234 (default). 4. Press Keyboard Address to the controller. If not...

User Guide
Page 39
... menu, click VideoBloX Configuration. Under Keyboard ID Setting, enter a number between 1 and 32 to configure the system for Serial or Ethernet connections respectively. Document 800-02573 Rev B 39 11/2009 Click Apply to save the configuration, Cancel to exit without saving, or Default to restore all factory default values. 5. See Figure 2-10. 2. UltraKey Plus Controller Installation and User Guide Step 2: Configure VideoBloX Network Settings To configure VideoBloX network settings...
... menu, click VideoBloX Configuration. Under Keyboard ID Setting, enter a number between 1 and 32 to configure the system for Serial or Ethernet connections respectively. Document 800-02573 Rev B 39 11/2009 Click Apply to save the configuration, Cancel to exit without saving, or Default to restore all factory default values. 5. See Figure 2-10. 2. UltraKey Plus Controller Installation and User Guide Step 2: Configure VideoBloX Network Settings To configure VideoBloX network settings...

User Guide
Page 47
... port mode, baud rate, databit, parity and stop bit. • Press Type to select RS422 or RS232. • Press Baudrate to select Low or High. 5. Step 3: Configure Address and Joystick Speed To configure the controller address and joystick speed: 1. A message displays confirming the operation. Press Users Menu to configure the device. 3. The Serial Setting menu displays where you can also use the numeric keypad or LCD Touch Panel to...
... port mode, baud rate, databit, parity and stop bit. • Press Type to select RS422 or RS232. • Press Baudrate to select Low or High. 5. Step 3: Configure Address and Joystick Speed To configure the controller address and joystick speed: 1. A message displays confirming the operation. Press Users Menu to configure the device. 3. The Serial Setting menu displays where you can also use the numeric keypad or LCD Touch Panel to...
User Guide
Page 49
... Settings menu. 2. Document 800-02573 Rev B 49 11/2009 The current controller setting is VB mode, change it to enter a Gateway, as required. Press Enter. 9. Step 3: Configure Address and Joystick Speed To configure the address and joystick speed: 1. If the current mode is displayed. 6. Press Hardware Config. The Ethernet Settings are displayed. 7. Using the number key or LCD Touch Panel to MAXPRO mode by pressing the Mode VB button and logging into the Setting menu...
... Settings menu. 2. Document 800-02573 Rev B 49 11/2009 The current controller setting is VB mode, change it to enter a Gateway, as required. Press Enter. 9. Step 3: Configure Address and Joystick Speed To configure the address and joystick speed: 1. If the current mode is displayed. 6. Press Hardware Config. The Ethernet Settings are displayed. 7. Using the number key or LCD Touch Panel to MAXPRO mode by pressing the Mode VB button and logging into the Setting menu...

User Guide
Page 56
... update slider firmware. From the Settings menu, press Hardware Config. It may takes several minutes to cancel. Note The valid KBD Address is between 1 and 32 in MAXPRO mode. 56 Keyboard Address To modify/change the keyboard address, press Keyboard Addr.Enter the number using either the numeric pad or LCD touch panel. and 1 and 99 in VB mode; System Administration and Troubleshooting Configuring the Hardware 1. Log onto the controller. 2. The Hardware Config...
... update slider firmware. From the Settings menu, press Hardware Config. It may takes several minutes to cancel. Note The valid KBD Address is between 1 and 32 in MAXPRO mode. 56 Keyboard Address To modify/change the keyboard address, press Keyboard Addr.Enter the number using either the numeric pad or LCD touch panel. and 1 and 99 in VB mode; System Administration and Troubleshooting Configuring the Hardware 1. Log onto the controller. 2. The Hardware Config...

User Guide
Page 58
System Administration and Troubleshooting Joystick Res To adjust joystick speed, press Joystick Res to save and exit. 3. From the Settings menu, press User Manage. Adding a User To add a user ( for example, ABC), you can follow the steps below. 1. Select Enter to save and exit. 4. Press Add User. 2. Click in Manage User menu. To delete entry, press Clear. Zero Joystick To reset the default position of the Joystick, Press Zero Joystick. Log onto the controller. 2. The...
System Administration and Troubleshooting Joystick Res To adjust joystick speed, press Joystick Res to save and exit. 3. From the Settings menu, press User Manage. Adding a User To add a user ( for example, ABC), you can follow the steps below. 1. Select Enter to save and exit. 4. Press Add User. 2. Click in Manage User menu. To delete entry, press Clear. Zero Joystick To reset the default position of the Joystick, Press Zero Joystick. Log onto the controller. 2. The...

User Guide
Page 62
... Settings menu, press Check Hardware. You can touch each time. User Menus To change the starting menu of the top line indicates the two options for the button size in the pop up menu. Press the button to exit. The User menu submenu displays. 3. To set the button function. 8. The Check Controls submenu displays. • Key: When you press a key, the key value and its status is displayed on LCD. • Joystick...
... Settings menu, press Check Hardware. You can touch each time. User Menus To change the starting menu of the top line indicates the two options for the button size in the pop up menu. Press the button to exit. The User menu submenu displays. 3. To set the button function. 8. The Check Controls submenu displays. • Key: When you press a key, the key value and its status is displayed on LCD. • Joystick...

User Guide
Page 65
... down list. Click Save to save the configuration or Quit to 32. 5. UltraKey Plus Controller Installation and User Guide 3. Options are Low or High. 6. Options are Off or On. 7. Document 800-02573 Rev B 65 11/2009 Select Background Light from the drop down list. Click Login. Press Add, enter the User name and Password. A message Are you sure you can enter the number between...
... down list. Click Save to save the configuration or Quit to 32. 5. UltraKey Plus Controller Installation and User Guide 3. Options are Low or High. 6. Options are Off or On. 7. Document 800-02573 Rev B 65 11/2009 Select Background Light from the drop down list. Click Login. Press Add, enter the User name and Password. A message Are you sure you can enter the number between...


