
Owner's Manual
Page 1
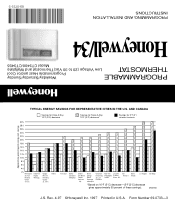
...;F (5°C) decrease Savings for Twice-A-Day 10°F (5°C) decrease* Savings for 5°F (3°) summer increase 30% 28% 26% 24% 22% 20% 18% 16% 14% 12% 10% 8% 6% 4% 2% Minneapolis St. Form Number 69-0733-3 69-0733-3 PROGRAMMING AND INSTALLATION INSTRUCTIONS Honeywell/34 Model CT3400/CT3455 THERMOSTAT Low Voltage (20 to 30 Vac)Thermostat and Wallplate PROGRAMMABLE Programmable Heat and/or Cool Weekday/Saturday/Sunday Approximate percentage of...
...;F (5°C) decrease Savings for Twice-A-Day 10°F (5°C) decrease* Savings for 5°F (3°) summer increase 30% 28% 26% 24% 22% 20% 18% 16% 14% 12% 10% 8% 6% 4% 2% Minneapolis St. Form Number 69-0733-3 69-0733-3 PROGRAMMING AND INSTALLATION INSTRUCTIONS Honeywell/34 Model CT3400/CT3455 THERMOSTAT Low Voltage (20 to 30 Vac)Thermostat and Wallplate PROGRAMMABLE Programmable Heat and/or Cool Weekday/Saturday/Sunday Approximate percentage of...
Owner's Manual
Page 2
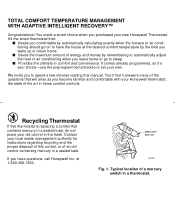
... questions, call Honeywell Inc. s Provides the ultimate in a thermostat. It comes already programmed, so it answers many of energy and money by the time you wake up or return home. Typical location of an old control containing mercury in home comfort controls. Contact your Honeywell thermostat, the state of this manual. You made a smart choice when you to sleep. TOTAL COMFORT TEMPERATURE MANAGEMENT WITH ADAPTIVE INTELLIGENT RECOVERY™ Congratulations...
... questions, call Honeywell Inc. s Provides the ultimate in a thermostat. It comes already programmed, so it answers many of energy and money by the time you wake up or return home. Typical location of an old control containing mercury in home comfort controls. Contact your Honeywell thermostat, the state of this manual. You made a smart choice when you to sleep. TOTAL COMFORT TEMPERATURE MANAGEMENT WITH ADAPTIVE INTELLIGENT RECOVERY™ Congratulations...
Owner's Manual
Page 3
... Contents STEP 1 Prepare For Installation ...2 STEP 2 Remove Old Thermostat 4 STEP 3 Before You Program ...6 Install the Batteries ...6 Adaptive Intelligent Recovery™ Selection 7 STEP 4 Program The Thermostat 9 STEP 5 Mount Thermostat Wallplate 16 STEP 6 Adjust System On-Time, Clock Display, as Required 18 STEP 7 Adjust Fan Operation Switch, as Required 20 STEP 8 Wire Wallplate Terminals 21 STEP 9 Mount The Thermostat 24 STEP 10 Check Thermostat Operation After Programming and Installing 25 STEP 11 Set the Fan and System Switches 28 Troubleshooting Guide ...30 Index ...34...
... Contents STEP 1 Prepare For Installation ...2 STEP 2 Remove Old Thermostat 4 STEP 3 Before You Program ...6 Install the Batteries ...6 Adaptive Intelligent Recovery™ Selection 7 STEP 4 Program The Thermostat 9 STEP 5 Mount Thermostat Wallplate 16 STEP 6 Adjust System On-Time, Clock Display, as Required 18 STEP 7 Adjust Fan Operation Switch, as Required 20 STEP 8 Wire Wallplate Terminals 21 STEP 9 Mount The Thermostat 24 STEP 10 Check Thermostat Operation After Programming and Installing 25 STEP 11 Set the Fan and System Switches 28 Troubleshooting Guide ...30 Index ...34...
Owner's Manual
Page 4
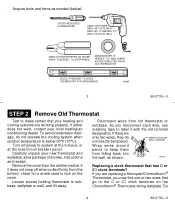
... not snap off power to make certain that has C or C1 clock terminals? M5136 Replacing a clock thermostat that your heating and cooling systems are replacing a Honeywell Chronotherm® Thermostat, you disconnect each wire, use masking tape to keep them from the bottom, check for a screw used to subbase, wallplate or wall, and lift away. s Remove the cover from old thermostat or subbase. If either does not work, contact your new thermostat and wallplate;
... not snap off power to make certain that has C or C1 clock terminals? M5136 Replacing a clock thermostat that your heating and cooling systems are replacing a Honeywell Chronotherm® Thermostat, you disconnect each wire, use masking tape to keep them from the bottom, check for a screw used to subbase, wallplate or wall, and lift away. s Remove the cover from old thermostat or subbase. If either does not work, contact your new thermostat and wallplate;
Owner's Manual
Page 5
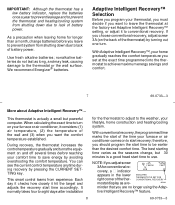
... a heat pump or multistage system. The thermostat will not work with the thermostat. Batteries must be in effect, as shown in back of the thermostat as possible after the indicator starts flashing. As the batteries are included with your transformer. Disconnect the wires and wrap them together. do not reprogram, the factory-preprogrammed BACK OF THERMOSTAT settings will be installed for programming and operation of removing the old ones...
... a heat pump or multistage system. The thermostat will not work with the thermostat. Batteries must be in effect, as shown in back of the thermostat as possible after the indicator starts flashing. As the batteries are included with your transformer. Disconnect the wires and wrap them together. do not reprogram, the factory-preprogrammed BACK OF THERMOSTAT settings will be installed for programming and operation of removing the old ones...
Owner's Manual
Page 6
... the comfort temperature established. With Adaptive Intelligent Recovery™, your furnace or air conditioner, it hit the target and adjusts the recovery start time to the weather, your furnace or air conditioner comes on the back of the wall and (3) when you are no longer using the Adap- When calculating the exact time to turn . It normally takes four to eight days after installation for the thermostat to adjust to be...
... the comfort temperature established. With Adaptive Intelligent Recovery™, your furnace or air conditioner, it hit the target and adjusts the recovery start time to the weather, your furnace or air conditioner comes on the back of the wall and (3) when you are no longer using the Adap- When calculating the exact time to turn . It normally takes four to eight days after installation for the thermostat to adjust to be...
Owner's Manual
Page 7
... thermostat, it is installed on the wall. If you left off. Use of the day. If you are sleeping. (Again, lower heat or higher cool. Fill in the times and temperatures you please. Before programming, remove the clear plastic overlay covering the display. Four time periods are shown in parentheses. Each period has its own setting key. When pressing the keys, use the ball of your program schedule of time and temperature settings...
... thermostat, it is installed on the wall. If you left off. Use of the day. If you are sleeping. (Again, lower heat or higher cool. Fill in the times and temperatures you please. Before programming, remove the clear plastic overlay covering the display. Four time periods are shown in parentheses. Each period has its own setting key. When pressing the keys, use the ball of your program schedule of time and temperature settings...
Owner's Manual
Page 8
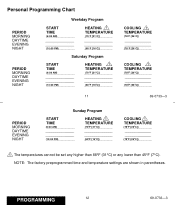
...[_2_6_°C 69-0733-3 PERIOD MORNING DAYTIME EVENING NIGHT Sunday Program START TIME (_6_:0_0__A_M (_1_0_:0_0__P_M HEATING 1 TEMPERATURE _(7_0_°_F__[_2_1_°C _(6_0_°_F__[_1_6_°C COOLING 1 TEMPERATURE (_7_8_°_F__[2_6_°_C (_7_8_°_F__[2_6_°_C 1 The temperatures cannot be set any higher than 88°F (31°C) or any lower...
...[_2_6_°C 69-0733-3 PERIOD MORNING DAYTIME EVENING NIGHT Sunday Program START TIME (_6_:0_0__A_M (_1_0_:0_0__P_M HEATING 1 TEMPERATURE _(7_0_°_F__[_2_1_°C _(6_0_°_F__[_1_6_°C COOLING 1 TEMPERATURE (_7_8_°_F__[2_6_°_C (_7_8_°_F__[2_6_°_C 1 The temperatures cannot be set any higher than 88°F (31°C) or any lower...
Owner's Manual
Page 9
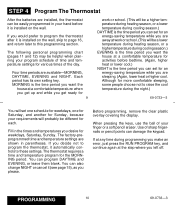
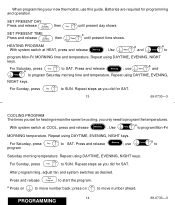
.... SET PRESENT TIME Press and release Set Present Day/Time then a Time until present day shows. use this guide. After programming, adjust fan and system switches as you did for SAT. 13 69-0733-3 COOLING PROGRAM The times you only need to move number ahead. 14 PROGRAMMING 69-0733-3 For Saturday, press Day a to program Mon-Fri MORNING temperature. Use a Temp to SAT. Run Press and release Program to SUN. Batteries are required for programming and operation. HEATING PROGRAM With system switch...
.... SET PRESENT TIME Press and release Set Present Day/Time then a Time until present day shows. use this guide. After programming, adjust fan and system switches as you did for SAT. 13 69-0733-3 COOLING PROGRAM The times you only need to move number ahead. 14 PROGRAMMING 69-0733-3 For Saturday, press Day a to program Mon-Fri MORNING temperature. Use a Temp to SAT. Run Press and release Program to SUN. Batteries are required for programming and operation. HEATING PROGRAM With system switch...
Owner's Manual
Page 10
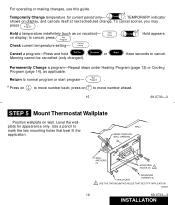
..., you may press Run . Hold Temp on display, and cancels itself at next scheduled change. to normal program or start program- Temp ; Program a , Temp Hold appears Current Check current temperature setting- Return to cancel, press Run . a Press on wall. WALL WIRES THROUGH WALL OPENING WALL ANCHORS (2) MOUNTING HOLES (3) 1 WALLPLATE MOUNTING SCREWS (2) 1 USE THE TWO MOUNTING HOLES THAT BEST FIT APPLICATION. Use a pencil to move number ahead. 15 69-0733-3 STEP 5 Mount Thermostat Wallplate s Position wallplate on to...
..., you may press Run . Hold Temp on display, and cancels itself at next scheduled change. to normal program or start program- Temp ; Program a , Temp Hold appears Current Check current temperature setting- Return to cancel, press Run . a Press on wall. WALL WIRES THROUGH WALL OPENING WALL ANCHORS (2) MOUNTING HOLES (3) 1 WALLPLATE MOUNTING SCREWS (2) 1 USE THE TWO MOUNTING HOLES THAT BEST FIT APPLICATION. Use a pencil to move number ahead. 15 69-0733-3 STEP 5 Mount Thermostat Wallplate s Position wallplate on to...

Owner's Manual
Page 11
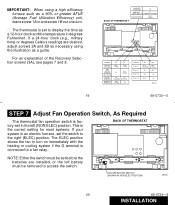
... screws. s Remove wallplate from wall, and drill 3/16 inch holes in , 1B- LEVEL M611B 17 69-0733-3 STEP 6 Adjust System On-Time, Clock Display, As Required s The thermostat on -time, readjust screws 1A and/or 1B as a guide. Setting the screw out one turn means turning the screw approximately 360° counterclockwise, or about one turn ). • Gas/Oil Warm Air-Set at the Gas/ Oil Warm Air setting (1A...
... screws. s Remove wallplate from wall, and drill 3/16 inch holes in , 1B- LEVEL M611B 17 69-0733-3 STEP 6 Adjust System On-Time, Clock Display, As Required s The thermostat on -time, readjust screws 1A and/or 1B as a guide. Setting the screw out one turn means turning the screw approximately 360° counterclockwise, or about one turn ). • Gas/Oil Warm Air-Set at the Gas/ Oil Warm Air setting (1A...
Owner's Manual
Page 12
... 7 Adjust Fan Operation Switch, As Required s The thermostat fan operation switch is an electric furnace, set before the batteries are desired, adjust screws 2A and 2B as necessary using a high efficiency furnace such as a 12-hour clock and the temperature in and screw 1B out one turn on immediately with the heating or cooling system if the G terminal is connected to access the switch. If a 24-hour clock (e.g., military time) or degrees Celsius readings are installed, or...
... 7 Adjust Fan Operation Switch, As Required s The thermostat fan operation switch is an electric furnace, set before the batteries are desired, adjust screws 2A and 2B as necessary using a high efficiency furnace such as a 12-hour clock and the temperature in and screw 1B out one turn on immediately with the heating or cooling system if the G terminal is connected to access the switch. If a 24-hour clock (e.g., military time) or degrees Celsius readings are installed, or...

Owner's Manual
Page 13
... the wall with the terminal of your old thermostat. M614A 22 69-0733-3 INSTALLATION move the factory-installed jumper connect- If unsure about household wiring procedures, call your new thermostat. PROVIDE DISCONNECT MEANS AND OVERLOAD PROTECTION AS REQUIRED. Refer to help prevent drafts from adversely affecting thermostat operation. PROVIDE DISCONNECT MEANS AND OVERLOAD PROTECTION AS REQUIRED. M612A HEATING RELAY OR VALVE COIL FAN RELAY COOLING CONTACTOR COIL 1 1 POWER SUPPLY. STEP 8 Wire Wallplate Terminals...
... the wall with the terminal of your old thermostat. M614A 22 69-0733-3 INSTALLATION move the factory-installed jumper connect- If unsure about household wiring procedures, call your new thermostat. PROVIDE DISCONNECT MEANS AND OVERLOAD PROTECTION AS REQUIRED. Refer to help prevent drafts from adversely affecting thermostat operation. PROVIDE DISCONNECT MEANS AND OVERLOAD PROTECTION AS REQUIRED. M612A HEATING RELAY OR VALVE COIL FAN RELAY COOLING CONTACTOR COIL 1 1 POWER SUPPLY. STEP 8 Wire Wallplate Terminals...
Owner's Manual
Page 14
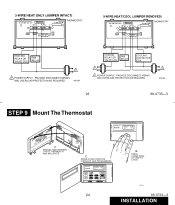
... CASE TO LATCH M5143 69-0733-3 INSTALLATION 3-WIRE HEAT ONLY (JUMPER INTACT) W G R RC Y THERMOSTAT 5-WIRE HEAT/COOL (JUMPER REMOVED) W G R RC Y THERMOSTAT HEATING RELAY OR VALVE COIL FAN RELAY 1 1 POWER SUPPLY. SWING COVER OPEN FOR CHECKOUT AND PROGRAMMING AM MON DAYTIME HEAT ON Set Present Day Time Hold Temp Day Morning Run Program Night On Auto Fan Daytime Current Setting Temp Evening Time Heat On Cool 24 B. PROVIDE DISCONNECT MEANS AND OVERLOAD PROTECTION AS REQUIRED. M613A HEATING RELAY OR VALVE COIL FAN RELAY COOLING CONTACTOR COIL 1 1 POWER SUPPLY.
... CASE TO LATCH M5143 69-0733-3 INSTALLATION 3-WIRE HEAT ONLY (JUMPER INTACT) W G R RC Y THERMOSTAT 5-WIRE HEAT/COOL (JUMPER REMOVED) W G R RC Y THERMOSTAT HEATING RELAY OR VALVE COIL FAN RELAY 1 1 POWER SUPPLY. SWING COVER OPEN FOR CHECKOUT AND PROGRAMMING AM MON DAYTIME HEAT ON Set Present Day Time Hold Temp Day Morning Run Program Night On Auto Fan Daytime Current Setting Temp Evening Time Heat On Cool 24 B. PROVIDE DISCONNECT MEANS AND OVERLOAD PROTECTION AS REQUIRED. M613A HEATING RELAY OR VALVE COIL FAN RELAY COOLING CONTACTOR COIL 1 1 POWER SUPPLY.
Owner's Manual
Page 15
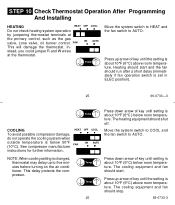
...-0733-3 Temp M2472 Move the system switch to HEAT and the fan switch to AUTO. HEAT FAN M2472 OFF COOL ON AUTO Press down arrow of key until setting is below 50°F (10°C). This delay protects the compressor. Press up arrow of key until the setting is changed, thermostat may delay up to five minutes before turning on the air conditioner. stead, you could jumper R and W wires at...
...-0733-3 Temp M2472 Move the system switch to HEAT and the fan switch to AUTO. HEAT FAN M2472 OFF COOL ON AUTO Press down arrow of key until setting is below 50°F (10°C). This delay protects the compressor. Press up arrow of key until the setting is changed, thermostat may delay up to five minutes before turning on the air conditioner. stead, you could jumper R and W wires at...

Owner's Manual
Page 16
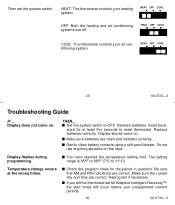
... page 20), fan operates with the heating or cooling system. 27 69-0733-3 STEP 11 Set The Fan And System Switches First set the fan switch. The fan should run continuously. Use for improved air circulation during special occasions or for most homes. FAN ON AUTO FAN ON AUTO 28 69-0733-3 A single-speed fan turns on low with the air conditioner or furnace. Exception: If fan operation switch on back of thermostat is in the AUTO position, fan cycles with furnace only.
... page 20), fan operates with the heating or cooling system. 27 69-0733-3 STEP 11 Set The Fan And System Switches First set the fan switch. The fan should run continuously. Use for improved air circulation during special occasions or for most homes. FAN ON AUTO FAN ON AUTO 28 69-0733-3 A single-speed fan turns on low with the air conditioner or furnace. Exception: If fan operation switch on back of thermostat is in the AUTO position, fan cycles with furnace only.
Owner's Manual
Page 17
.... HEAT OFF COOL 29 69-0733-3 Troubleshooting Guide IF... s Check the program times for Adaptive Intelligent Recovery™, the start times will occur before your programmed comfort periods. 30 69-0733-3 HEAT: The thermostat controls your air conditioning system. HEAT OFF COOL COOL: The thermostat controls your heating system. Display flashes during programming. The setting range is 45°F to 88°F (7°C to 31°C). Then set for the period in question. s Gently clean battery contacts using...
.... HEAT OFF COOL 29 69-0733-3 Troubleshooting Guide IF... s Check the program times for Adaptive Intelligent Recovery™, the start times will occur before your programmed comfort periods. 30 69-0733-3 HEAT: The thermostat controls your air conditioning system. HEAT OFF COOL COOL: The thermostat controls your heating system. Display flashes during programming. The setting range is 45°F to 88°F (7°C to 31°C). Then set for the period in question. s Gently clean battery contacts using...
Owner's Manual
Page 18
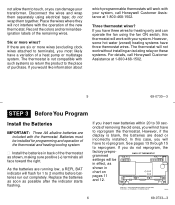
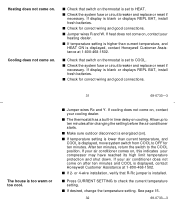
... and replace or reset if necessary. If your air conditioner comes on thermostat is set to ten minutes after ten minutes and COOL is installed. or 4-wire installation, verify that switch on , this indicates your compressor may have reached its high limit temperature protection and shut down. s Check that R-Rc jumper is displayed, contact Honeywell Customer Assistance at 1-800-468-1502. s Check for correct wiring and good connections. Heating does not come...
... and replace or reset if necessary. If your air conditioner comes on thermostat is set to ten minutes after ten minutes and COOL is installed. or 4-wire installation, verify that switch on , this indicates your compressor may have reached its high limit temperature protection and shut down. s Check that R-Rc jumper is displayed, contact Honeywell Customer Assistance at 1-800-468-1502. s Check for correct wiring and good connections. Heating does not come...
Owner's Manual
Page 19
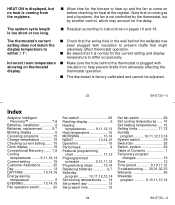
... cycle length is factory-calibrated and cannot be adjusted. 33 69-0733-3 Index Adaptive Intelligent Recovery 7,8 Batteries, installation 6 Batteries, replacement ........ 6,7 Blinking display 6 Canceling programs 15 Change temperature 15 Checking current setting ....... 15 Clock display 19 Conventional Recovery ....... 7,8 Cooling temperatures ........ 9,11,12,14 Current setting 15 Customer Assistance 35 Day 13 DAYTIME 13,14,15 Energy-saving temperature 9 EVENING 13,14,15 Fan operation switch 20 Fan switch 29 Flashing display 6 Heating temperatures ........ 9,11,12,13 Hold...
... cycle length is factory-calibrated and cannot be adjusted. 33 69-0733-3 Index Adaptive Intelligent Recovery 7,8 Batteries, installation 6 Batteries, replacement ........ 6,7 Blinking display 6 Canceling programs 15 Change temperature 15 Checking current setting ....... 15 Clock display 19 Conventional Recovery ....... 7,8 Cooling temperatures ........ 9,11,12,14 Current setting 15 Customer Assistance 35 Day 13 DAYTIME 13,14,15 Energy-saving temperature 9 EVENING 13,14,15 Fan operation switch 20 Fan switch 29 Flashing display 6 Heating temperatures ........ 9,11,12,13 Hold...
Owner's Manual
Page 20
... was in the possession of wires connected to state. Some states do not allow limitations on how long an implied warranty lasts, so the above . This warranty shall not apply if it , postage prepaid, to the following information available-thermostat model number and date code, type of heating/cooling system (e.g., hot water, warm air, oil, gas, etc.), and number of a consumer. Before you purchased...
... was in the possession of wires connected to state. Some states do not allow limitations on how long an implied warranty lasts, so the above . This warranty shall not apply if it , postage prepaid, to the following information available-thermostat model number and date code, type of heating/cooling system (e.g., hot water, warm air, oil, gas, etc.), and number of a consumer. Before you purchased...


