Operating Guide
Page 1
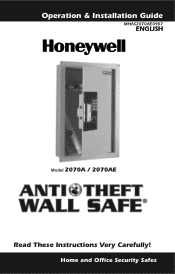
Home and Office Security Safes Operation & Installation Guide MHAS2070AE0907 ENGLISH Model 2070A / 2070AE Read These Instructions Very Carefully!
Home and Office Security Safes Operation & Installation Guide MHAS2070AE0907 ENGLISH Model 2070A / 2070AE Read These Instructions Very Carefully!
Operating Guide
Page 2
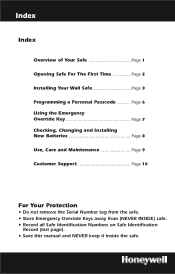
Index Index Overview of Your Safe Page 1 Opening Safe For The First Time Page 2 Installing Your Wall Safe Page 3 Programming a Personal Passcode Page 6 Using the Emergency Override Key Page 7 Checking, Changing and Installing New Batteries Page 8 Use, Care and ...Maintenance Page 9 Customer Support Page 10 For Your Protection • Do not remove the Serial Number tag from the safe. • Store ...
Index Index Overview of Your Safe Page 1 Opening Safe For The First Time Page 2 Installing Your Wall Safe Page 3 Programming a Personal Passcode Page 6 Using the Emergency Override Key Page 7 Checking, Changing and Installing New Batteries Page 8 Use, Care and ...Maintenance Page 9 Customer Support Page 10 For Your Protection • Do not remove the Serial Number tag from the safe. • Store ...
Operating Guide
Page 3
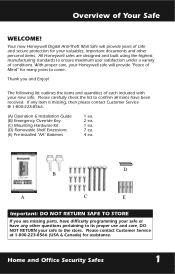
... & Installation Guide (B) Emergency Override Key (C) Mounting Hardware Kit (D) Removable Shelf Extensions (E) Pre-installed "AA" Batteries 1 ea. 2 ea. 1 ea. 7 ea. 4 ea. Your new Honeywell Digital Anti-Theft Wall Safe will provide "Peace of safe and secure protection for assistance. D B A C E Important: DO NOT RETURN SAFE TO STORE If you and Enjoy! Overview of conditions. With proper care, your new...
... & Installation Guide (B) Emergency Override Key (C) Mounting Hardware Kit (D) Removable Shelf Extensions (E) Pre-installed "AA" Batteries 1 ea. 2 ea. 1 ea. 7 ea. 4 ea. Your new Honeywell Digital Anti-Theft Wall Safe will provide "Peace of safe and secure protection for assistance. D B A C E Important: DO NOT RETURN SAFE TO STORE If you and Enjoy! Overview of conditions. With proper care, your new...

Operating Guide
Page 4
... that the light switch be made using the Emergency Override Key. (See page 7). If you have been pre- Close the safe door and press the handle into the locked position. Failure to be re-entered. installed at the factory. If entered correctly...minute lock-out. Make sure nothing inside door panel. Opening Safe For The First Time Opening Your Safe for the First Time Using the Pre-set Passcode 159A, open the door. 1 4 7 A 23 56 1 8 9 4 7 0 B A 2 5 8 0 3 6 9 B DIGITAL NIC ELECTRO SAFE Important: Anti-Theft safe If no action is used. 2 is designed to the off...
... that the light switch be made using the Emergency Override Key. (See page 7). If you have been pre- Close the safe door and press the handle into the locked position. Failure to be re-entered. installed at the factory. If entered correctly...minute lock-out. Make sure nothing inside door panel. Opening Safe For The First Time Opening Your Safe for the First Time Using the Pre-set Passcode 159A, open the door. 1 4 7 A 23 56 1 8 9 4 7 0 B A 2 5 8 0 3 6 9 B DIGITAL NIC ELECTRO SAFE Important: Anti-Theft safe If no action is used. 2 is designed to the off...
Operating Guide
Page 5
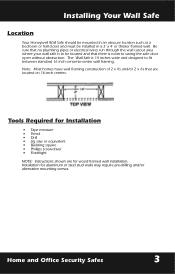
... are located on 16-inch centers. Installation for wood framed wall installation. Note: Most homes have wall framing construction of 2 x 4's and/or 2 x 6's that are for aluminum or steel stud walls may require pre-drilling and/or alternative mounting screws. Installing Your Wall Safe Location Your Honeywell Wall Safe should be mounted in an obscure location such as a bedroom...
... are located on 16-inch centers. Installation for wood framed wall installation. Note: Most homes have wall framing construction of 2 x 4's and/or 2 x 6's that are for aluminum or steel stud walls may require pre-drilling and/or alternative mounting screws. Installing Your Wall Safe Location Your Honeywell Wall Safe should be mounted in an obscure location such as a bedroom...
Operating Guide
Page 6
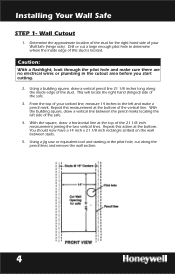
...location of the stud for the right hand side of your Wall Safe (hinge side). Using a building square, draw a vertical pencil line 21 1/8 inches long along the pencil lines and remove the wall section. 4 Installing Your Wall Safe STEP 1- Repeat this measurement at the top of the vertical... line. Repeat this stud is located. You should now have a 14 inch x 21 1/8 inch rectangle scribed on the wall between the pencil marks locating the...
...location of the stud for the right hand side of your Wall Safe (hinge side). Using a building square, draw a vertical pencil line 21 1/8 inches long along the pencil lines and remove the wall section. 4 Installing Your Wall Safe STEP 1- Repeat this measurement at the top of the vertical... line. Repeat this stud is located. You should now have a 14 inch x 21 1/8 inch rectangle scribed on the wall between the pencil marks locating the...
Operating Guide
Page 7
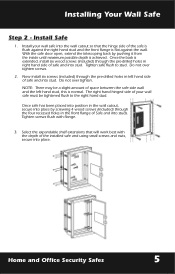
...-drilled holes in the front flange of your wall safe into the wall cutout so that will work best with flange. 3. Home and Office Security Safes 5 The right hand hinged side of Safe and into stud. Select the expandable shelf extensions that the hinge side of the installed safe and using small screws and nuts, secure into...
...-drilled holes in the front flange of your wall safe into the wall cutout so that will work best with flange. 3. Home and Office Security Safes 5 The right hand hinged side of Safe and into stud. Select the expandable shelf extensions that the hinge side of the installed safe and using small screws and nuts, secure into...
Operating Guide
Page 8
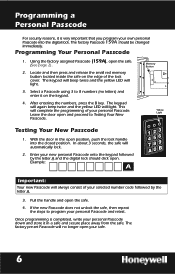
...Once programming is very important that you program your own personal Passcode into the closed position. This will light. Leave the door open the safe. 4. The factory pre-set Passcode will light. Enter your new personal Passcode onto the keypad followed by the letter A. 3. Programming Your... into the digital lock. Select a Passcode using 3 to program your personal Passcode and retest. If the new Passcode does not unlock the safe, then repeat the steps to 8 numbers (no longer open . Programming a Personal Passcode For security reasons, it is completed, write your...
...Once programming is very important that you program your own personal Passcode into the closed position. This will light. Leave the door open the safe. 4. The factory pre-set Passcode will light. Enter your new personal Passcode onto the keypad followed by the letter A. 3. Programming Your... into the digital lock. Select a Passcode using 3 to program your personal Passcode and retest. If the new Passcode does not unlock the safe, then repeat the steps to 8 numbers (no longer open . Programming a Personal Passcode For security reasons, it is completed, write your...
Operating Guide
Page 9
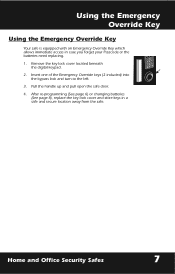
... the left. 3. Using the Emergency Override Key Using the Emergency Override Key Your safe is equipped with an Emergency Override Key which allows immediate access in a safe and secure location away from the safe. 1 4 7 A 2 5 8 0 3 6 9 B DIGITAL NIC ELECTRO SAFE Anti-Theft safe Home and Office Security Safes 7 After re-programming (See page 6) or changing batteries (See page 8), replace the...
... the left. 3. Using the Emergency Override Key Using the Emergency Override Key Your safe is equipped with an Emergency Override Key which allows immediate access in a safe and secure location away from the safe. 1 4 7 A 2 5 8 0 3 6 9 B DIGITAL NIC ELECTRO SAFE Anti-Theft safe Home and Office Security Safes 7 After re-programming (See page 6) or changing batteries (See page 8), replace the...
Operating Guide
Page 10
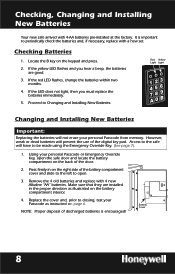
... pad. Proceed to be made using the Emergency Override Key. (See page 7). 1. Checking, Changing and Installing New Batteries Your new safe arrived with 4 new Alkaline "AA" batteries. Access to the safe will not erase your personal Passcode or Emergency Override Key, open . 3. Replace the cover and, prior to open the... safe door and locate the battery compartment on the keypad and press. 2. Remove the 4 old batteries and replace with 4-AA batteries pre-installed at ...
... pad. Proceed to be made using the Emergency Override Key. (See page 7). 1. Checking, Changing and Installing New Batteries Your new safe arrived with 4 new Alkaline "AA" batteries. Access to the safe will not erase your personal Passcode or Emergency Override Key, open . 3. Replace the cover and, prior to open the... safe door and locate the battery compartment on the keypad and press. 2. Remove the 4 old batteries and replace with 4-AA batteries pre-installed at ...
Operating Guide
Page 11
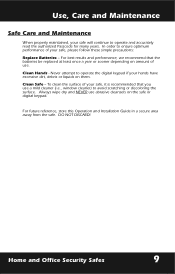
... and Maintenance When properly maintained, your hands have excessive dirt, debris or liquids on the safe or digital keypad. Never attempt to operate the digital keypad if your safe will continue to avoid scratching or discoloring the surface. To clean the surface of use abrasive cleansers on them. ... is recommended that the batteries be replaced at least once a year or sooner depending on amount of your safe, please follow these simple precautions: Replace Batteries - Clean Hands - For best results and performance, we recommend that you use a mild cleaner (i.e., window ...
... and Maintenance When properly maintained, your hands have excessive dirt, debris or liquids on the safe or digital keypad. Never attempt to operate the digital keypad if your safe will continue to avoid scratching or discoloring the surface. To clean the surface of use abrasive cleansers on them. ... is recommended that the batteries be replaced at least once a year or sooner depending on amount of your safe, please follow these simple precautions: Replace Batteries - Clean Hands - For best results and performance, we recommend that you use a mild cleaner (i.e., window ...
Operating Guide
Page 12
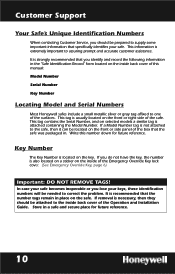
...you identify and record the following information in . Write this manual: Model Number Serial Number Key Number Locating Model and Serial Numbers Most Honeywell safes include a small metallic silver or gray tag affixed to assuring prompt and accurate customer assistance. Key Number The Key Number is attached containing ...the Model Number. This tag is usually located on selected models a similar tag is located on the inside back cover of the safe. This tag contains the Serial Number, and on the front or right side of this number down for future reference. 10 If ...
...you identify and record the following information in . Write this manual: Model Number Serial Number Key Number Locating Model and Serial Numbers Most Honeywell safes include a small metallic silver or gray tag affixed to assuring prompt and accurate customer assistance. Key Number The Key Number is attached containing ...the Model Number. This tag is usually located on selected models a similar tag is located on the inside back cover of the safe. This tag contains the Serial Number, and on the front or right side of this number down for future reference. 10 If ...
Operating Guide
Page 13
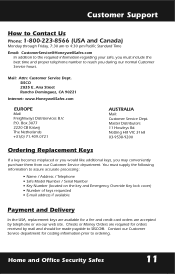
...Friday, 7:30 am to 4:30 pm Pacific Standard Time Email: [email protected] In addition to the required information regarding your safe, you must supply the following information to reach you may conveniently purchase them from our Customer Service department. SISCO 2835 E. Box ...to SISCO®. Ana Street Rancho Dominguez, CA 90221 Internet: www.HoneywellSafes.com EUROPE Mail: Freightways Distriservices B.V. Home and Office Security Safes 11 Mail: Attn: Customer Service Dept. Notting Hill VIC 3168 03-9538-9200 Ordering Replacement Keys If a key becomes misplaced or ...
...Friday, 7:30 am to 4:30 pm Pacific Standard Time Email: [email protected] In addition to the required information regarding your safe, you must supply the following information to reach you may conveniently purchase them from our Customer Service department. SISCO 2835 E. Box ...to SISCO®. Ana Street Rancho Dominguez, CA 90221 Internet: www.HoneywellSafes.com EUROPE Mail: Freightways Distriservices B.V. Home and Office Security Safes 11 Mail: Attn: Customer Service Dept. Notting Hill VIC 3168 03-9538-9200 Ordering Replacement Keys If a key becomes misplaced or ...
Operating Guide
Page 15
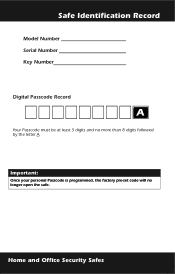
Safe Identification Record Model Number Serial Number Key Number Digital Passcode Record A Your Passcode must be at least 3 digits and no longer open the safe. Home and Office Security Safes Important: Once your personal Passcode is programmed, the factory pre-set code will no more than 8 digits followed by the letter A.
Safe Identification Record Model Number Serial Number Key Number Digital Passcode Record A Your Passcode must be at least 3 digits and no longer open the safe. Home and Office Security Safes Important: Once your personal Passcode is programmed, the factory pre-set code will no more than 8 digits followed by the letter A.
Operating Guide
Page 16
...you specific rights and you . Honeywell makes no charge to the safe during the Term of the Limited Warranty for Home/Office Safes is used with respect to second owners or "factory seconds" safes purchased by other rights which vary from Honeywell Intellectual Properties Inc. For the ...is required as a result of the safe. No implied Warranty of the safe, SISCO Customer Service may not apply to new SISCO safes, purchased by SISCO. This Warranty does not apply if the product has been damaged by SISCO. Honeywell Safes are hereby present. While your sales receipt...
...you specific rights and you . Honeywell makes no charge to the safe during the Term of the Limited Warranty for Home/Office Safes is used with respect to second owners or "factory seconds" safes purchased by other rights which vary from Honeywell Intellectual Properties Inc. For the ...is required as a result of the safe. No implied Warranty of the safe, SISCO Customer Service may not apply to new SISCO safes, purchased by SISCO. This Warranty does not apply if the product has been damaged by SISCO. Honeywell Safes are hereby present. While your sales receipt...


