Instruction Manual
Page 3
...safety precautions and warnings in this manual before it occurs, and by observing appropriate safety procedures. EXPLANATION OF THE NAILING ACTION OF THE HITACHI NAILER ⅜ SINGLE ACTUATION MECHANISM (SINGLE SEQUENTIAL ACTUATION MECHANISM): First, press the push lever against the wood; Basic... which , if not avoided, will be avoided by recognizing a potentially hazardous situation before operating or maintaining this nailer. Never use this Nailer for applications other than those specified in minor or moderate injury, or may result in this Manual. After fastening...
...safety precautions and warnings in this manual before it occurs, and by observing appropriate safety procedures. EXPLANATION OF THE NAILING ACTION OF THE HITACHI NAILER ⅜ SINGLE ACTUATION MECHANISM (SINGLE SEQUENTIAL ACTUATION MECHANISM): First, press the push lever against the wood; Basic... which , if not avoided, will be avoided by recognizing a potentially hazardous situation before operating or maintaining this nailer. Never use this Nailer for applications other than those specified in minor or moderate injury, or may result in this Manual. After fastening...
Instruction Manual
Page 5
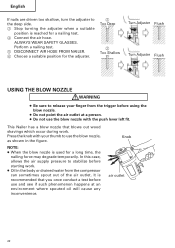
... from the Nailer when the coupling joint is disconnected. 15. Continued WARNING 7. BE CAREFUL OF THE FOLLOWING WHEN USING BLOW NOZZLE 1) Do not touch the trigger. 2) Do not point the air outlet at a person. 3) Do not touch the push lever or set it to contain long hair. 14. Flying nails can be... stored in use the Nailer unless the push lever is used on the Nailer, the Nailer can remain charged with or remove the push lever, otherwise the push lever becomes inoperable. 16. ALWAYS WEAR...
... from the Nailer when the coupling joint is disconnected. 15. Continued WARNING 7. BE CAREFUL OF THE FOLLOWING WHEN USING BLOW NOZZLE 1) Do not touch the trigger. 2) Do not point the air outlet at a person. 3) Do not touch the push lever or set it to contain long hair. 14. Flying nails can be... stored in use the Nailer unless the push lever is used on the Nailer, the Nailer can remain charged with or remove the push lever, otherwise the push lever becomes inoperable. 16. ALWAYS WEAR...
Instruction Manual
Page 8
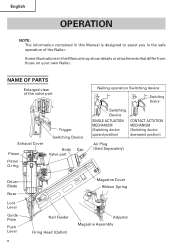
NAME OF PARTS Enlarged view of the Nailer. English OPERATION NOTE: The information contained in the safe operation of the valve part Exhaust Cover Piston Piston O-ring Trigger Switching Device Body Cap Valve part Nailing operation Switching device Switching Device Switching Device SINGLE ACTUATION MECHANISM...: downward position) Air Plug (Sold Separately) Driver Blade Nose Lock Lever Guide Plate Push Lever 8 Magazine Cover Ribbon Spring Nail Feeder Firing Head (Outlet) Adjuster Magazine Assembly Some illustrations in this Manual is designed to assist you in this Manual may ...
NAME OF PARTS Enlarged view of the Nailer. English OPERATION NOTE: The information contained in the safe operation of the valve part Exhaust Cover Piston Piston O-ring Trigger Switching Device Body Cap Valve part Nailing operation Switching device Switching Device Switching Device SINGLE ACTUATION MECHANISM...: downward position) Air Plug (Sold Separately) Driver Blade Nose Lock Lever Guide Plate Push Lever 8 Magazine Cover Ribbon Spring Nail Feeder Firing Head (Outlet) Adjuster Magazine Assembly Some illustrations in this Manual is designed to assist you in this Manual may ...
Instruction Manual
Page 9
...HITACHI nails for the NT65MA2. Only nails shown in tool malfunction and/or nail breakdown, leading to use of nails 15 Gauge finish nails Min. English SPECIFICATIONS Operating pressure Dimensions Length × Height × Width Weight Nail.... (2.0 kg) 100 Nails .042 ft3/cycle at 100 psi (1.20 ltr/cycle at 6.9 bar) (1.20 ltr/cycle at 7 kgf/cm2) 3/8 NPT Thread NAIL SELECTION WARNING ● Be... sure to serious injuries. Max. .095" (2.4mm) .12" (3.0mm) 2-1/2" (65mm) 1-1/4" (32mm) .045" (1.1mm) .072" (1.8mm) 9 Dimensions of any other nails...
...HITACHI nails for the NT65MA2. Only nails shown in tool malfunction and/or nail breakdown, leading to use of nails 15 Gauge finish nails Min. English SPECIFICATIONS Operating pressure Dimensions Length × Height × Width Weight Nail.... (2.0 kg) 100 Nails .042 ft3/cycle at 100 psi (1.20 ltr/cycle at 6.9 bar) (1.20 ltr/cycle at 7 kgf/cm2) 3/8 NPT Thread NAIL SELECTION WARNING ● Be... sure to serious injuries. Max. .095" (2.4mm) .12" (3.0mm) 2-1/2" (65mm) 1-1/4" (32mm) .045" (1.1mm) .072" (1.8mm) 9 Dimensions of any other nails...
Instruction Manual
Page 12
...) (1.20) Air compressor size formula Amount of air required = number of Nailers × average nails driven each minute per Nailer × air consumption at given air pressure × safety factor (always 1.2) Example: 3 Nailers operating at 100 psi driving 30 nails per minute Amount of Hitachi pneumatic tool lubricant into the air plug on the air hose...
...) (1.20) Air compressor size formula Amount of air required = number of Nailers × average nails driven each minute per Nailer × air consumption at given air pressure × safety factor (always 1.2) Example: 3 Nailers operating at 100 psi driving 30 nails per minute Amount of Hitachi pneumatic tool lubricant into the air plug on the air hose...
Instruction Manual
Page 13
... high pressure. Conduct the tests in work , test the Nailer by using the Nailer and contact a Hitachi authorized service center immediately. (1) DISCONNECT AIR HOSE FROM NAILER. WARNING ● Never use . 1 Reduce the air pressure to ANSI Z87.1 specifications. Before actually beginning the nailing work area MUST wear safety glasses with side shields which conforms to...
... high pressure. Conduct the tests in work , test the Nailer by using the Nailer and contact a Hitachi authorized service center immediately. (1) DISCONNECT AIR HOSE FROM NAILER. WARNING ● Never use . 1 Reduce the air pressure to ANSI Z87.1 specifications. Before actually beginning the nailing work area MUST wear safety glasses with side shields which conforms to...
Instruction Manual
Page 14
Otherwise, it will not operate properly.) Upward position Switching Device Ⅺ THE NAILER MUST NOT LEAK AIR. (3) Remove the finger from the trigger and press the push lever against the wood. Ⅺ THE NAILER MUST NOT OPERATE. Trigger Do not connect air hose Push Lever (2) Adjust the air pressure... to the upward position completely as shown in the Nailer. Set the switching device to the upward position (SINGLE ACTUATION MECHANISM). (Set the switching device to 70 psi (4.9 bar 5 kgf/cm2). ...
Otherwise, it will not operate properly.) Upward position Switching Device Ⅺ THE NAILER MUST NOT LEAK AIR. (3) Remove the finger from the trigger and press the push lever against the wood. Ⅺ THE NAILER MUST NOT OPERATE. Trigger Do not connect air hose Push Lever (2) Adjust the air pressure... to the upward position completely as shown in the Nailer. Set the switching device to the upward position (SINGLE ACTUATION MECHANISM). (Set the switching device to 70 psi (4.9 bar 5 kgf/cm2). ...

Instruction Manual
Page 15
Drive nails into the workpiece that position for 5 seconds or longer. Ⅺ THE NAILER MUST NOT OPERATE. Pull the trigger. Ⅺ THE NAILER MUST OPERATE. 2 Hold the trigger back while separating the push lever from the wood. Ⅺ The nailer will remain in operated status (the driver blade will remain ..., pull the trigger and then wait in that is observed, you may load nails in the Nailer. English (4) Separate the push lever from the trigger. Ⅺ Nailer operation will end (the driver blade will return to the top). (6) Set the switching device to the downward position (CONTACT ...
Drive nails into the workpiece that position for 5 seconds or longer. Ⅺ THE NAILER MUST NOT OPERATE. Pull the trigger. Ⅺ THE NAILER MUST OPERATE. 2 Hold the trigger back while separating the push lever from the wood. Ⅺ The nailer will remain in operated status (the driver blade will remain ..., pull the trigger and then wait in that is observed, you may load nails in the Nailer. English (4) Separate the push lever from the trigger. Ⅺ Nailer operation will end (the driver blade will return to the top). (6) Set the switching device to the downward position (CONTACT ...
Instruction Manual
Page 16
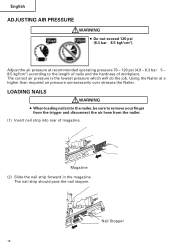
... pressure which will do the job. Magazine (2) Slide the nail strip forward in the magazine. LOADING NAILS WARNING ● When loading nails into the nailer, be sure to the length of nails and the hardness of magazine. The nail strip should pass the nail stopper. Nail Stopper 16 Using the Nailer at recommended operating pressure 70 - 120 psi (4.9 - 8.3 bar...
... pressure which will do the job. Magazine (2) Slide the nail strip forward in the magazine. LOADING NAILS WARNING ● When loading nails into the nailer, be sure to the length of nails and the hardness of magazine. The nail strip should pass the nail stopper. Nail Stopper 16 Using the Nailer at recommended operating pressure 70 - 120 psi (4.9 - 8.3 bar...

Instruction Manual
Page 17
English (3) Pull the nail feeder (B) back to engage the nail feeder (A) to ANSI Z87.1 specifications. 17 DANGER ● Operators and others in work area MUST wear safety glasses with side shields which conforms to the nail strip. NOTE: ● Use nail strip at least 5 nails remaining. Nail Feeder (B) Nail Feeder (A) The Nailer is now ready to operate. Removing the nails: 1 Depress the nail feeder (A) slightly and slowly slide the nail feeder (B) forward. 2 Remove the nails from the Nailer. 2 NAILER OPERATION 1 Nail Feeder (A) Read section titled "SAFETY"(pages 4 - 7).
English (3) Pull the nail feeder (B) back to engage the nail feeder (A) to ANSI Z87.1 specifications. 17 DANGER ● Operators and others in work area MUST wear safety glasses with side shields which conforms to the nail strip. NOTE: ● Use nail strip at least 5 nails remaining. Nail Feeder (B) Nail Feeder (A) The Nailer is now ready to operate. Removing the nails: 1 Depress the nail feeder (A) slightly and slowly slide the nail feeder (B) forward. 2 Remove the nails from the Nailer. 2 NAILER OPERATION 1 Nail Feeder (A) Read section titled "SAFETY"(pages 4 - 7).
Instruction Manual
Page 18
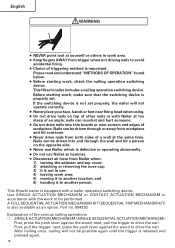
...Keep fingers AWAY from trigger when not driving nails to avoid accidental firing. ● Choice of an angle; If the switching device is not set . Nails can be performed. Use SINGLE ACTUATION MECHANISM or CONTACT ACTUATION MECHANISM in use Nailer as an option. A FULL SEQUENTIAL ACTUATION ...driven into thin boards or near firing head when using. ● Do not drive nails on top of other nails or with Nailer at the same time. This Hitachi nailer is not in accordance with a nailer operation switching device. First, pull the trigger; next, press the push lever against...
...Keep fingers AWAY from trigger when not driving nails to avoid accidental firing. ● Choice of an angle; If the switching device is not set . Nails can be performed. Use SINGLE ACTUATION MECHANISM or CONTACT ACTUATION MECHANISM in use Nailer as an option. A FULL SEQUENTIAL ACTUATION ...driven into thin boards or near firing head when using. ● Do not drive nails on top of other nails or with Nailer at the same time. This Hitachi nailer is not in accordance with a nailer operation switching device. First, pull the trigger; next, press the push lever against...
Instruction Manual
Page 19
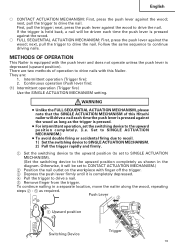
... set to SINGLE ACTUATION MECHANISM). (Set the switching device to continue driving nails. Push Lever 3 1 Upward position 4 Switching Device Trigger 19 METHODS OF OPERATION This Nailer is equipped with this Hitachi nailer will drive a nail each time the push lever is held back, a nail will be driven each time the push lever is pressed against the...
... set to SINGLE ACTUATION MECHANISM). (Set the switching device to continue driving nails. Push Lever 3 1 Upward position 4 Switching Device Trigger 19 METHODS OF OPERATION This Nailer is equipped with this Hitachi nailer will drive a nail each time the push lever is held back, a nail will be driven each time the push lever is pressed against the...
Instruction Manual
Page 20
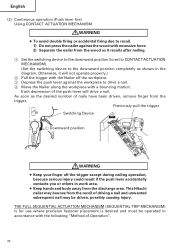
This Hitachi nailer may bounce from the recoil of driving a nail and unwanted subsequent nail may be operated in accordance with the following "Method of Operation". 20 Each depression of nails have been driven, remove finger from the discharge area. THE FULL SEQUENTIAL ACTUATION MECHANISM (SEQUENTIAL... position (to set to CONTACT ACTUATION MECHANISM). (Set the switching device to drive a nail. 4 Move the Nailer along the workpiece with the Nailer off the trigger except during nailing operation, beacuse serious injury could result if the push lever accidentally contacts you or others...
This Hitachi nailer may bounce from the recoil of driving a nail and unwanted subsequent nail may be operated in accordance with the following "Method of Operation". 20 Each depression of nails have been driven, remove finger from the discharge area. THE FULL SEQUENTIAL ACTUATION MECHANISM (SEQUENTIAL... position (to set to CONTACT ACTUATION MECHANISM). (Set the switching device to drive a nail. 4 Move the Nailer along the workpiece with the Nailer off the trigger except during nailing operation, beacuse serious injury could result if the push lever accidentally contacts you or others...
Instruction Manual
Page 21
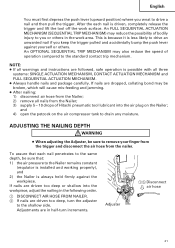
... finger from the trigger and disconnect the air hose from the Nailer; 3) supply 5 - 10 drops of Hitachi pneumatic tool lubricant into the workpiece, adjust the nailing in the following order. 1 DISCONNECT AIR HOSE FROM NAILER. 2 If nails are driven too deep, turn increments. If nails are dropped, collating bond may also reduse the speed of bodily...
... finger from the trigger and disconnect the air hose from the Nailer; 3) supply 5 - 10 drops of Hitachi pneumatic tool lubricant into the workpiece, adjust the nailing in the following order. 1 DISCONNECT AIR HOSE FROM NAILER. 2 If nails are driven too deep, turn increments. If nails are dropped, collating bond may also reduse the speed of bodily...
Instruction Manual
Page 22
... this case, allows the air supply pressure to release your thumb to the deep side. 3 Stop turning the adjuster when a suitable position is reached for a nailing test. 4 Connect the air hose. Perform a nailing test. 5 DISCONNECT AIR HOSE FROM NAILER. 6 Choose a suitable position for a long time, the...
... this case, allows the air supply pressure to release your thumb to the deep side. 3 Stop turning the adjuster when a suitable position is reached for a nailing test. 4 Connect the air hose. Perform a nailing test. 5 DISCONNECT AIR HOSE FROM NAILER. 6 Choose a suitable position for a long time, the...
Instruction Manual
Page 23
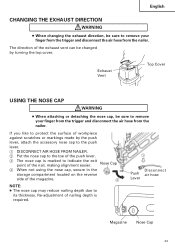
... due to remove your finger from the trigger and disconnect the air hose from the nailer. If you like to protect the surface of the nail, making alignment easier. English CHANGING THE EXHAUST DIRECTION WARNING ● When changing the exhaust direction, be sure to remove your finger from the ...trigger and disconnect the air hose from the nailer. Nose Cap 4 When not using the nose cap, secure in the storage compartment located on the reverse side of nailing depth is marked to indicate the exit point of workpiece against scratches or markings ...
... due to remove your finger from the trigger and disconnect the air hose from the nailer. If you like to protect the surface of the nail, making alignment easier. English CHANGING THE EXHAUST DIRECTION WARNING ● When changing the exhaust direction, be sure to remove your finger from the ...trigger and disconnect the air hose from the nailer. Nose Cap 4 When not using the nose cap, secure in the storage compartment located on the reverse side of nailing depth is marked to indicate the exit point of workpiece against scratches or markings ...
Instruction Manual
Page 24
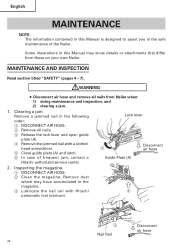
WARNING ● Disconnect air hose and remove all nails. 3 Release the lock lever and open guide plate (A). 4 Remove the jammed nail with Hitachi 4 pneumatic tool lubricant. 3 Nail Rail 1 Disconnect air hose 24 head screwdriver. 5 Close guide plate (A) and latch. 6 In case of the Nailer. MAINTENANCE AND INSPECTION Read section titled "SAFETY" (pages 4 - 7). Remove dust which may...
WARNING ● Disconnect air hose and remove all nails. 3 Release the lock lever and open guide plate (A). 4 Remove the jammed nail with Hitachi 4 pneumatic tool lubricant. 3 Nail Rail 1 Disconnect air hose 24 head screwdriver. 5 Close guide plate (A) and latch. 6 In case of the Nailer. MAINTENANCE AND INSPECTION Read section titled "SAFETY" (pages 4 - 7). Remove dust which may...
Instruction Manual
Page 26
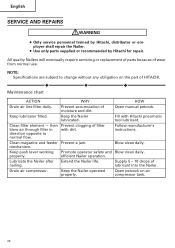
... petcock on the part of wear from normal use. All quality Nailers will eventually require servicing or replacement of parts because of HITACHI. mechanism. nailing. properly. efficient Nailer operation. English SERVICE AND REPAIRS WARNING ● Only service personnel trained by Hitachi, distributor or employer shall repair the Nailer. ● Use only parts supplied or recommended by...
... petcock on the part of wear from normal use. All quality Nailers will eventually require servicing or replacement of parts because of HITACHI. mechanism. nailing. properly. efficient Nailer operation. English SERVICE AND REPAIRS WARNING ● Only service personnel trained by Hitachi, distributor or employer shall repair the Nailer. ● Use only parts supplied or recommended by...
Instruction Manual
Page 27
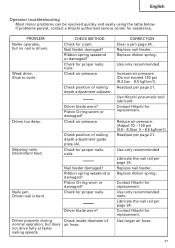
...Hitachi authorized service center for a jam. PROBLEM Nailer operates, but does air hose. CHECK METHOD Check for assistance. Ribbon spring weakend or damaged? Check position of nailing depth adjustment guide plate (A). Check position of nailing depth adjustment adjuster. Nails jam. Drives properly during Check inside diameter of normal operation, but no nail...fully at faster nailing speeds. Use only recommended nails. Contact Hitachi for proper nails. nails. Contact Hitachi for proper nails. Driver blade worn? Check for replacement. nails. Reduce air ...
...Hitachi authorized service center for a jam. PROBLEM Nailer operates, but does air hose. CHECK METHOD Check for assistance. Ribbon spring weakend or damaged? Check position of nailing depth adjustment guide plate (A). Check position of nailing depth adjustment adjuster. Nails jam. Drives properly during Check inside diameter of normal operation, but no nail...fully at faster nailing speeds. Use only recommended nails. Contact Hitachi for proper nails. nails. Contact Hitachi for proper nails. Driver blade worn? Check for replacement. nails. Reduce air ...
Parts List
Page 3
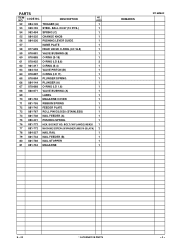
... 884-145 DESCRIPTION TRIGGER (A) NO. SOCKET HD. BOLT (W/FLANGE) M5X20 1 77 881-772 MACHINE SCREW (W/WASHER) M5X16 (BLACK) 2 78 884-327 NAIL RAIL 1 79 881-744 NAIL FEEDER (B) 1 80 881-766 NAIL STOPPER 1 81 881-754 MAGAZINE 1 REMARKS NT 65MA2 8 -- 03 * ALTERNATIVE PARTS --- 3 --- USED 1 53 959-155 STEEL BALL D3.97 (10 PCS... 881-752 MAGAZINE COVER 1 71 881-755 RIBBON SPRING 1 72 881-745 FEEDER PLATE 1 73 881-767 ROLL PIN D2.5X20 (STAINLESS) 1 74 881-746 NAIL FEEDER (A) 1 75 880-321 PUSHING SPRING 1 76 881-773 HEX. PARTS ITEM NO.
... 884-145 DESCRIPTION TRIGGER (A) NO. SOCKET HD. BOLT (W/FLANGE) M5X20 1 77 881-772 MACHINE SCREW (W/WASHER) M5X16 (BLACK) 2 78 884-327 NAIL RAIL 1 79 881-744 NAIL FEEDER (B) 1 80 881-766 NAIL STOPPER 1 81 881-754 MAGAZINE 1 REMARKS NT 65MA2 8 -- 03 * ALTERNATIVE PARTS --- 3 --- USED 1 53 959-155 STEEL BALL D3.97 (10 PCS... 881-752 MAGAZINE COVER 1 71 881-755 RIBBON SPRING 1 72 881-745 FEEDER PLATE 1 73 881-767 ROLL PIN D2.5X20 (STAINLESS) 1 74 881-746 NAIL FEEDER (A) 1 75 880-321 PUSHING SPRING 1 76 881-773 HEX. PARTS ITEM NO.


