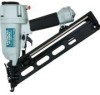
Instruction Manual
Page 3
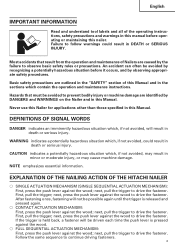
...or may result in this manual before it occurs, and by recognizing a potentially hazardous situation before operating or maintaining this Nailer for applications other than those specified in death or serious injury. WARNING indicates a potentially hazardous situation which, if not ...avoided, could result in the sections which contain the operation and maintenance instructions. EXPLANATION OF THE NAILING ACTION OF THE HITACHI NAILER ⅜ SINGLE ACTUATION MECHANISM (SINGLE SEQUENTIAL ACTUATION MECHANISM): First, press the push lever against the wood to drive the fastener...
...or may result in this manual before it occurs, and by recognizing a potentially hazardous situation before operating or maintaining this Nailer for applications other than those specified in death or serious injury. WARNING indicates a potentially hazardous situation which, if not ...avoided, could result in the sections which contain the operation and maintenance instructions. EXPLANATION OF THE NAILING ACTION OF THE HITACHI NAILER ⅜ SINGLE ACTUATION MECHANISM (SINGLE SEQUENTIAL ACTUATION MECHANISM): First, press the push lever against the wood to drive the fastener...
Instruction Manual
Page 4
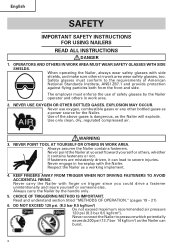
... working implement. 4. KEEP FINGERS AWAY FROM TRIGGER WHEN NOT DRIVING FASTENERS TO AVOID ACCIDENTAL FIRING. Never carry the Nailer with the Nailer. When operating the Nailer, always wear safety glasses with side shields, and make sure others in horseplay with finger on trigger since you could... drive a fastener unintentionally and injure yourself or someone else. English SAFETY IMPORTANT SAFETY INSTRUCTIONS FOR USING NAILERS READ ALL INSTRUCTIONS DANGER 1. OPERATORS AND OTHERS IN WORK AREA MUST WEAR SAFETY GLASSES WITH SIDE SHIELDS. If fasteners are ...
... working implement. 4. KEEP FINGERS AWAY FROM TRIGGER WHEN NOT DRIVING FASTENERS TO AVOID ACCIDENTAL FIRING. Never carry the Nailer with the Nailer. When operating the Nailer, always wear safety glasses with side shields, and make sure others in horseplay with finger on trigger since you could... drive a fastener unintentionally and injure yourself or someone else. English SAFETY IMPORTANT SAFETY INSTRUCTIONS FOR USING NAILERS READ ALL INSTRUCTIONS DANGER 1. OPERATORS AND OTHERS IN WORK AREA MUST WEAR SAFETY GLASSES WITH SIDE SHIELDS. If fasteners are ...
Instruction Manual
Page 5
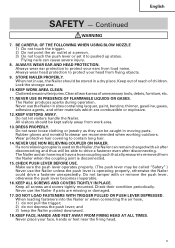
...furniture, etc. 11. KEEP VISITORS AWAY. Rubber gloves and nonskid footwear are missing or damaged. 17. Lock the storage area. 10. The Nailer and air hose must have a hose coupling such that all pressure is disconnected. 15. Keep all work area. 13. Never use the.... CHECK PUSH LEVER BEFORE USE. DO NOT LOAD FASTENERS WITH TRIGGER PULLED OR PUSH LEVER DEPRESSED. STORE NAILER PROPERLY. KEEP WORK AREA CLEAN. Do not let visitors handle the Nailer. DRESS PROPERLY. Do not tamper with air after disconnecting. KEEP ALL SCREWS AND COVERS TIGHTLY IN PLACE....
...furniture, etc. 11. KEEP VISITORS AWAY. Rubber gloves and nonskid footwear are missing or damaged. 17. Lock the storage area. 10. The Nailer and air hose must have a hose coupling such that all pressure is disconnected. 15. Keep all work area. 13. Never use the.... CHECK PUSH LEVER BEFORE USE. DO NOT LOAD FASTENERS WITH TRIGGER PULLED OR PUSH LEVER DEPRESSED. STORE NAILER PROPERLY. KEEP WORK AREA CLEAN. Do not let visitors handle the Nailer. DRESS PROPERLY. Do not tamper with air after disconnecting. KEEP ALL SCREWS AND COVERS TIGHTLY IN PLACE....
Instruction Manual
Page 6
...the risk of the operation switching device. DO NOT DISCONNECT AIR HOSE FROM NAILER WITH FINGER ON TRIGGER. Never attempt to another person. English SAFETY - the fasteners can be hidden by a Hitachi authorized service center. 28. BEFORE STARTING WORK, CHECK THE FASTENING OPERATION SWITCHING... since people who are no live electrical wires that may be driven through the wall and hit a person on top of an angle; DISCONNECT AIR HOSE FROM NAILER WHEN: 1) doing maintenance and inspection; 2) loading fasteners; 3) turning the adjuster and top cover; 4) attaching or removing the ...
...the risk of the operation switching device. DO NOT DISCONNECT AIR HOSE FROM NAILER WITH FINGER ON TRIGGER. Never attempt to another person. English SAFETY - the fasteners can be hidden by a Hitachi authorized service center. 28. BEFORE STARTING WORK, CHECK THE FASTENING OPERATION SWITCHING... since people who are no live electrical wires that may be driven through the wall and hit a person on top of an angle; DISCONNECT AIR HOSE FROM NAILER WHEN: 1) doing maintenance and inspection; 2) loading fasteners; 3) turning the adjuster and top cover; 4) attaching or removing the ...
Instruction Manual
Page 7
... OTHER THAN THOSE SPECIFIED IN THIS MANUAL. 33. USE ONLY PARTS, ACCESSORIES OR FASTENERS SUPPLIED OR RECOMMENDED BY HITACHI. Maintain Nailers properly. 6. Continued WARNING 30. MAINTAIN NAILER WITH CARE. EMPLOYER'S RESPONSIBILITIES 1. HANDLE NAILER CAREFULLY. To avoid this manual. 32. Keep the Nailer clean and lubricated for better and safer performance. 35. NEVER MODIFY OR ALTER...
... OTHER THAN THOSE SPECIFIED IN THIS MANUAL. 33. USE ONLY PARTS, ACCESSORIES OR FASTENERS SUPPLIED OR RECOMMENDED BY HITACHI. Maintain Nailers properly. 6. Continued WARNING 30. MAINTAIN NAILER WITH CARE. EMPLOYER'S RESPONSIBILITIES 1. HANDLE NAILER CAREFULLY. To avoid this manual. 32. Keep the Nailer clean and lubricated for better and safer performance. 35. NEVER MODIFY OR ALTER...
Instruction Manual
Page 8
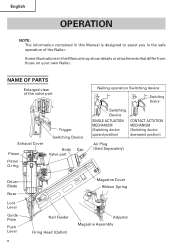
... information contained in this Manual is designed to assist you in this Manual may show details or attachments that differ from those on your own Nailer. NAME OF PARTS Enlarged view of the...
... information contained in this Manual is designed to assist you in this Manual may show details or attachments that differ from those on your own Nailer. NAME OF PARTS Enlarged view of the...
Instruction Manual
Page 9
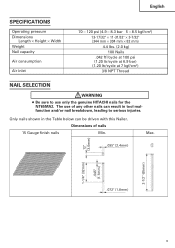
... the Table below can result in tool malfunction and/or nail breakdown, leading to use of nails 15 Gauge finish nails Min. Dimensions of any other nails can be driven with this Nailer. Max. .095" (2.4mm) .12" (3.0mm) 2-1/2" (65mm) 1-1/4" (32mm) .045" (1.1mm) .072" (1.8mm) 9 The use only the genuine HITACHI nails for the NT65MA2.
... the Table below can result in tool malfunction and/or nail breakdown, leading to use of nails 15 Gauge finish nails Min. Dimensions of any other nails can be driven with this Nailer. Max. .095" (2.4mm) .12" (3.0mm) 2-1/2" (65mm) 1-1/4" (32mm) .045" (1.1mm) .072" (1.8mm) 9 The use only the genuine HITACHI nails for the NT65MA2.
Instruction Manual
Page 11
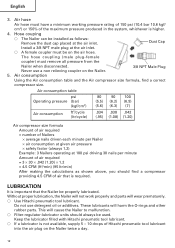
... Regulator Compressor Side Lubricator Filter 11 Drain daily. 2. Filter The filter removes moisture and dirt mixed in the Nailer. Inspect the regulator before operation to be sure it operates properly. Lubricator ........ Regulator ......... Use Hitachi pneumatic tool lubricant. Explosion may accelerate wear and corrosion in compressed air. Keep the filter clean by regular...
... Regulator Compressor Side Lubricator Filter 11 Drain daily. 2. Filter The filter removes moisture and dirt mixed in the Nailer. Inspect the regulator before operation to be sure it operates properly. Lubricator ........ Regulator ......... Use Hitachi pneumatic tool lubricant. Explosion may accelerate wear and corrosion in compressed air. Keep the filter clean by regular...
Instruction Manual
Page 12
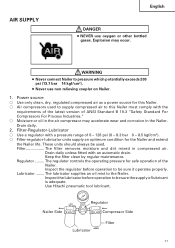
... Male Plug 5. Dust Cap Install a 3/8 NPT male plug at the air inlet. Hose couping ⅜ The Nailer can be used. This will wear prematurely. ⅜ Use Hitachi pneumatic tool lubricant. Air consumption Using the Air consumption table and the Air compressor size formula, find a compressor providing 4.5 CFM of the maximum pressure produced...
... Male Plug 5. Dust Cap Install a 3/8 NPT male plug at the air inlet. Hose couping ⅜ The Nailer can be used. This will wear prematurely. ⅜ Use Hitachi pneumatic tool lubricant. Air consumption Using the Air consumption table and the Air compressor size formula, find a compressor providing 4.5 CFM of the maximum pressure produced...
Instruction Manual
Page 13
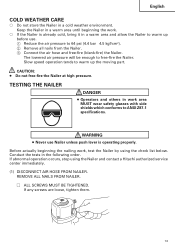
... BE TIGHTENED. CAUTION: ● Do not free-fire the Nailer at high pressure. Before actually beginning the nailing work, test the Nailer by using the Nailer and contact a Hitachi authorized service center immediately. (1) DISCONNECT AIR HOSE FROM NAILER. English COLD WEATHER CARE ⅜ Do not store the Nailer in a warm area until beginning the work. ⅜...
... BE TIGHTENED. CAUTION: ● Do not free-fire the Nailer at high pressure. Before actually beginning the nailing work, test the Nailer by using the Nailer and contact a Hitachi authorized service center immediately. (1) DISCONNECT AIR HOSE FROM NAILER. English COLD WEATHER CARE ⅜ Do not store the Nailer in a warm area until beginning the work. ⅜...
Instruction Manual
Page 14
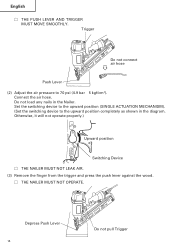
... (SINGLE ACTUATION MECHANISM). (Set the switching device to 70 psi (4.9 bar 5 kgf/cm2). Otherwise, it will not operate properly.) Upward position Switching Device Ⅺ THE NAILER MUST NOT LEAK AIR. (3) Remove the finger from the trigger and press the push lever against the wood. Ⅺ THE... NAILER MUST NOT OPERATE. Trigger Do not connect air hose Push Lever (2) Adjust the air pressure to the upward position completely as shown in the Nailer. Do not load any nails in the diagram. English Ⅺ THE PUSH LEVER...
... (SINGLE ACTUATION MECHANISM). (Set the switching device to 70 psi (4.9 bar 5 kgf/cm2). Otherwise, it will not operate properly.) Upward position Switching Device Ⅺ THE NAILER MUST NOT LEAK AIR. (3) Remove the finger from the trigger and press the push lever against the wood. Ⅺ THE... NAILER MUST NOT OPERATE. Trigger Do not connect air hose Push Lever (2) Adjust the air pressure to the upward position completely as shown in the Nailer. Do not load any nails in the diagram. English Ⅺ THE PUSH LEVER...

Instruction Manual
Page 15
...the same type to the downward position completely as shown in that is observed, you may load nails in the actual application. Ⅺ THE NAILER MUST OPERATE PROPERLY. 15 Otherwise, it will remain at the bottom). 3 Remove the finger from the wood. English (4) Separate the push lever... from the trigger. Ⅺ Nailer operation will end (the driver blade will return to the top). (6) Set the switching device to the downward position (CONTACT ACTUATION MECHANISM). (Set the...
...the same type to the downward position completely as shown in that is observed, you may load nails in the actual application. Ⅺ THE NAILER MUST OPERATE PROPERLY. 15 Otherwise, it will remain at the bottom). 3 Remove the finger from the wood. English (4) Separate the push lever... from the trigger. Ⅺ Nailer operation will end (the driver blade will return to the top). (6) Set the switching device to the downward position (CONTACT ACTUATION MECHANISM). (Set the...
Instruction Manual
Page 16
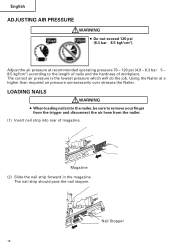
... Magazine (2) Slide the nail strip forward in the magazine. Adjust the air pressure at a higher than required air pressure unnecessarily over stresses the Nailer. Using the Nailer at recommended operating pressure 70 - 120 psi (4.9 - 8.3 bar 5 - 8.5 kgf/cm2) according to remove your finger from the trigger ...and disconnect the air hose from the nailer. (1) Insert nail strip into rear of workpiece. English ADJUSTING AIR PRESSURE WARNING ● Do not exceed 120 psi (8.3 bar 8.5 kgf/cm2). Nail ...
... Magazine (2) Slide the nail strip forward in the magazine. Adjust the air pressure at a higher than required air pressure unnecessarily over stresses the Nailer. Using the Nailer at recommended operating pressure 70 - 120 psi (4.9 - 8.3 bar 5 - 8.5 kgf/cm2) according to remove your finger from the trigger ...and disconnect the air hose from the nailer. (1) Insert nail strip into rear of workpiece. English ADJUSTING AIR PRESSURE WARNING ● Do not exceed 120 psi (8.3 bar 8.5 kgf/cm2). Nail ...

Instruction Manual
Page 17
Nail Feeder (B) Nail Feeder (A) The Nailer is now ready to ANSI Z87.1 specifications. 17 DANGER ● Operators and others in work area MUST wear safety glasses with side shields which conforms to operate. English (3) Pull the nail feeder (B) back to engage the nail feeder (A) to the nail strip. NOTE: ● Use nail strip at least 5 nails remaining. Removing the nails: 1 Depress the nail feeder (A) slightly and slowly slide the nail feeder (B) forward. 2 Remove the nails from the Nailer. 2 NAILER OPERATION 1 Nail Feeder (A) Read section titled "SAFETY"(pages 4 - 7).
Nail Feeder (B) Nail Feeder (A) The Nailer is now ready to ANSI Z87.1 specifications. 17 DANGER ● Operators and others in work area MUST wear safety glasses with side shields which conforms to operate. English (3) Pull the nail feeder (B) back to engage the nail feeder (A) to the nail strip. NOTE: ● Use nail strip at least 5 nails remaining. Removing the nails: 1 Depress the nail feeder (A) slightly and slowly slide the nail feeder (B) forward. 2 Remove the nails from the Nailer. 2 NAILER OPERATION 1 Nail Feeder (A) Read section titled "SAFETY"(pages 4 - 7).
Instruction Manual
Page 18
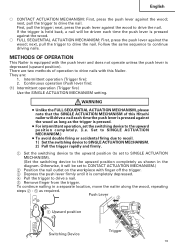
...; 4) leaving work area; 5) moving it to another location; next, pull the trigger to drive the nail. This Hitachi nailer is properly set properly, the nailer will not be performed. Before starting work, check the nailing operation switching device. nails can be driven through the wall... or CONTACT ACTUATION MECHANISM in accordance with the work , make sure that the switching device is equipped with Nailer at too steep of an angle; First, pull the trigger; Explanation of the various nailing operations ⅜ SINGLE ACTUATION MECHANISM (SINGLE SEQUENTIAL ACTUATION...
...; 4) leaving work area; 5) moving it to another location; next, pull the trigger to drive the nail. This Hitachi nailer is properly set properly, the nailer will not be performed. Before starting work, check the nailing operation switching device. nails can be driven through the wall... or CONTACT ACTUATION MECHANISM in accordance with the work , make sure that the switching device is equipped with Nailer at too steep of an angle; First, pull the trigger; Explanation of the various nailing operations ⅜ SINGLE ACTUATION MECHANISM (SINGLE SEQUENTIAL ACTUATION...
Instruction Manual
Page 19
...● Unlike the FULL SEQUENTIAL ACTUATION MECHANISM, please note that the SINGLE ACTUATION MECHANISM of operation to drive nails with this Hitachi nailer will be driven each time the push lever is depressed (upward position). Otherwise, it is pressed. ● For intermittent ...operation, set the switching device to the upward position completely. (i.e. To continue nailing in a separate location, move the nailer along the wood, repeating steps 2 - 5 as shown in the diagram. Push Lever 3 1 Upward position 4 Switching Device Trigger 19 METHODS OF OPERATION ...
...● Unlike the FULL SEQUENTIAL ACTUATION MECHANISM, please note that the SINGLE ACTUATION MECHANISM of operation to drive nails with this Hitachi nailer will be driven each time the push lever is depressed (upward position). Otherwise, it is pressed. ● For intermittent ...operation, set the switching device to the upward position completely. (i.e. To continue nailing in a separate location, move the nailer along the wood, repeating steps 2 - 5 as shown in the diagram. Push Lever 3 1 Upward position 4 Switching Device Trigger 19 METHODS OF OPERATION ...
Instruction Manual
Page 20
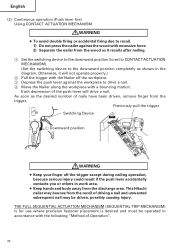
... the workpiece with the following "Method of the push lever will not operate properly.) 2 Pull the trigger with the Nailer off the trigger except during nailing operation, beacuse serious injury could result if the push lever accidentally contacts you or others in ...accordance with a bouncing motion. As soon as shown in the diagram. Each depression of Operation". 20 This Hitachi nailer may bounce from the recoil of nails have been driven, remove finger from the trigger. THE FULL SEQUENTIAL ACTUATION MECHANISM (SEQUENTIAL TRIP MECHANISM) is...
... the workpiece with the following "Method of the push lever will not operate properly.) 2 Pull the trigger with the Nailer off the trigger except during nailing operation, beacuse serious injury could result if the push lever accidentally contacts you or others in ...accordance with a bouncing motion. As soon as shown in the diagram. Each depression of Operation". 20 This Hitachi nailer may bounce from the recoil of nails have been driven, remove finger from the trigger. THE FULL SEQUENTIAL ACTUATION MECHANISM (SEQUENTIAL TRIP MECHANISM) is...
Instruction Manual
Page 21
...or shallow into the air plug on the air compressor tank to the standard contact trip mechanism. and 4) open the petcock on the Nailer; To assure that each nail is possible with all three systems: SINGLE ACTUATION MECHANISM, CONTACT ACTUATION MECHANISM and FULL SEQUENTIAL ACTUATION MECHANISM.... lever (upward position) where you wnat to remove your finger from the trigger and disconnect the air hose from the Nailer; 3) supply 5 - 10 drops of Hitachi pneumatic tool lubricant into the workpiece, adjust the nailing in the work surface. Adjustments are followed, safe operation is driven...
...or shallow into the air plug on the air compressor tank to the standard contact trip mechanism. and 4) open the petcock on the Nailer; To assure that each nail is possible with all three systems: SINGLE ACTUATION MECHANISM, CONTACT ACTUATION MECHANISM and FULL SEQUENTIAL ACTUATION MECHANISM.... lever (upward position) where you wnat to remove your finger from the trigger and disconnect the air hose from the Nailer; 3) supply 5 - 10 drops of Hitachi pneumatic tool lubricant into the workpiece, adjust the nailing in the work surface. Adjustments are followed, safe operation is driven...
Instruction Manual
Page 22
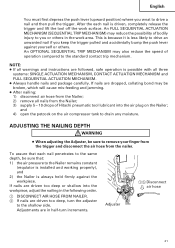
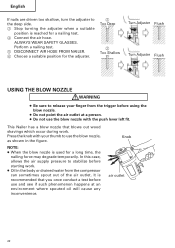
This Nailer has a blow nozzle that you once conduct a test before use and see if such phenomenon happens at a person. ● Do not use the blow nozzle, ... work . It is recommended that blows out wood shavings which occur during work . ● Oil in the figure. Perform a nailing test. 5 DISCONNECT AIR HOSE FROM NAILER. 6 Choose a suitable position for the adjuster. 2 Too Deep 2 Too Shallow Turn Adjuster Flush Turn Adjuster Flush USING THE BLOW NOZZLE WARNING ● Be sure to...
This Nailer has a blow nozzle that you once conduct a test before use and see if such phenomenon happens at a person. ● Do not use the blow nozzle, ... work . It is recommended that blows out wood shavings which occur during work . ● Oil in the figure. Perform a nailing test. 5 DISCONNECT AIR HOSE FROM NAILER. 6 Choose a suitable position for the adjuster. 2 Too Deep 2 Too Shallow Turn Adjuster Flush Turn Adjuster Flush USING THE BLOW NOZZLE WARNING ● Be sure to...
Instruction Manual
Page 23
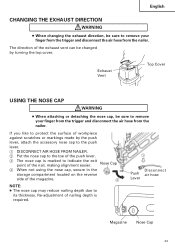
... side of the exhaust vent can be changed by the push lever, attach the accessory nose cap to the push lever. 1 DISCONNECT AIR HOSE FROM NAILER. 2 Put the nose cap to the toe of the push lever. 3 The nose cap is required. 1 Disconnect Push air hose Lever Magazine Nose Cap ... EXHAUST DIRECTION WARNING ● When changing the exhaust direction, be sure to remove your finger from the trigger and disconnect the air hose from the nailer. The direction of the magazine. 2 NOTE: ● The nose cap may reduce nailing depth due to its thickness. Re-adjustment of the nail, making ...
... side of the exhaust vent can be changed by the push lever, attach the accessory nose cap to the push lever. 1 DISCONNECT AIR HOSE FROM NAILER. 2 Put the nose cap to the toe of the push lever. 3 The nose cap is required. 1 Disconnect Push air hose Lever Magazine Nose Cap ... EXHAUST DIRECTION WARNING ● When changing the exhaust direction, be sure to remove your finger from the trigger and disconnect the air hose from the nailer. The direction of the magazine. 2 NOTE: ● The nose cap may reduce nailing depth due to its thickness. Re-adjustment of the nail, making ...


