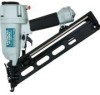
Instruction Manual
Page 3
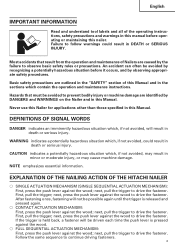
...and warnings in this manual before it occurs, and by the failure to drive the fastener. EXPLANATION OF THE NAILING ACTION OF THE HITACHI NAILER ⅜ SINGLE ACTUATION MECHANISM (SINGLE SEQUENTIAL ACTUATION MECHANISM): First, press the push lever against the wood; next, press the push ...lever against the wood to drive the fastener. NOTE emphasizes essential information. next, press the push lever against the wood; Never use this Nailer for applications other than those specified in death or serious injury. next, pull the trigger to drive the fastener. After fastening once...
...and warnings in this manual before it occurs, and by the failure to drive the fastener. EXPLANATION OF THE NAILING ACTION OF THE HITACHI NAILER ⅜ SINGLE ACTUATION MECHANISM (SINGLE SEQUENTIAL ACTUATION MECHANISM): First, press the push lever against the wood; next, press the push ...lever against the wood to drive the fastener. NOTE emphasizes essential information. next, press the push lever against the wood; Never use this Nailer for applications other than those specified in death or serious injury. next, pull the trigger to drive the fastener. After fastening once...
Instruction Manual
Page 4
...200 psi (13.7 bar 14 kgf/cm2) as a power source for the Nailer. OPERATORS AND OTHERS IN WORK AREA MUST WEAR SAFETY GLASSES WITH SIDE SHIELDS. NEVER USE OXYGEN OR OTHER BOTTLED GASES. Use of American National Standards Institute, ANSI Z87.1 and provide protection against flying particles ...requirements of the above gases is dangerous, as a working implement. 4. Never use of safety glasses by the handle only. 5. NEVER POINT TOOL AT YOURSELF OR OTHERS IN WORK AREA. Respect the Nailer as the Nailer will explode. The employer must conform to severe injuries. Never engage in ...
...200 psi (13.7 bar 14 kgf/cm2) as a power source for the Nailer. OPERATORS AND OTHERS IN WORK AREA MUST WEAR SAFETY GLASSES WITH SIDE SHIELDS. NEVER USE OXYGEN OR OTHER BOTTLED GASES. Use of American National Standards Institute, ANSI Z87.1 and provide protection against flying particles ...requirements of the above gases is dangerous, as a working implement. 4. Never use of safety glasses by the handle only. 5. NEVER POINT TOOL AT YOURSELF OR OTHERS IN WORK AREA. Respect the Nailer as the Nailer will explode. The employer must conform to severe injuries. Never engage in ...
Instruction Manual
Page 5
...missing or damaged. 17. Never place your head from work areas of children. Always wear ear protection to pushed up status. When not in use the Nailer in a dry place. DRESS PROPERLY. Make sure the push lever operates properly. (The push lever may be stored in sites containing lacquer,...the firing head. 5 DO NOT LOAD FASTENERS WITH TRIGGER PULLED OR PUSH LEVER DEPRESSED. NEVER USE IN PRESENCE OF FLAMMABLE LIQUIDS OR GASES. If a non relieving coupler is used on the Nailer, the Nailer can remain charged with or remove the push lever, otherwise the push lever becomes inoperable. 16....
...missing or damaged. 17. Never place your head from work areas of children. Always wear ear protection to pushed up status. When not in use the Nailer in a dry place. DRESS PROPERLY. Make sure the push lever operates properly. (The push lever may be stored in sites containing lacquer,...the firing head. 5 DO NOT LOAD FASTENERS WITH TRIGGER PULLED OR PUSH LEVER DEPRESSED. NEVER USE IN PRESENCE OF FLAMMABLE LIQUIDS OR GASES. If a non relieving coupler is used on the Nailer, the Nailer can remain charged with or remove the push lever, otherwise the push lever becomes inoperable. 16....
Instruction Manual
Page 6
...) 1) Do not press the nailer against the wood with the Nailer at all remaining fasteners from the Nailer and removed all times. 27. The Nailer can be driven into and through or away from the workpiece and hit someone . 20. This Hitachi nailer includes a fastening operation switching device...or otherwise appears defective, stop using it to clear a jam or repair the Nailer unless you have disconnected air hose from the Nailer. PLACE NAILER PROPERLY ON WORKPIECE. If the switching device is not in use; 7) leaving work , check the setting of an angle; DO NOT DRIVE FASTENERS INTO...
...) 1) Do not press the nailer against the wood with the Nailer at all remaining fasteners from the Nailer and removed all times. 27. The Nailer can be driven into and through or away from the workpiece and hit someone . 20. This Hitachi nailer includes a fastening operation switching device...or otherwise appears defective, stop using it to clear a jam or repair the Nailer unless you have disconnected air hose from the Nailer. PLACE NAILER PROPERLY ON WORKPIECE. If the switching device is not in use; 7) leaving work , check the setting of an angle; DO NOT DRIVE FASTENERS INTO...
Instruction Manual
Page 7
... not scratch or engrave signs on the Nailer. EMPLOYER'S RESPONSIBILITIES 1. Ensure that makes you drowsy. 31. HANDLE NAILER CORRECTLY. NEVER USE NAILER FOR APPLICATIONS OTHER THAN THOSE SPECIFIED IN THIS MANUAL. 33. USE ONLY PARTS, ACCESSORIES OR FASTENERS SUPPLIED OR RECOMMENDED BY HITACHI. Keep Nailers in work area are not further used only when operators and others in...
... not scratch or engrave signs on the Nailer. EMPLOYER'S RESPONSIBILITIES 1. Ensure that makes you drowsy. 31. HANDLE NAILER CORRECTLY. NEVER USE NAILER FOR APPLICATIONS OTHER THAN THOSE SPECIFIED IN THIS MANUAL. 33. USE ONLY PARTS, ACCESSORIES OR FASTENERS SUPPLIED OR RECOMMENDED BY HITACHI. Keep Nailers in work area are not further used only when operators and others in...
Instruction Manual
Page 9
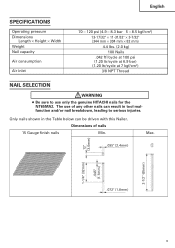
... other nails can result in the Table below can be driven with this Nailer. Only nails shown in tool malfunction and/or nail breakdown, leading to use of nails 15 Gauge finish nails Min. The use only the genuine HITACHI nails for the NT65MA2. Max. .095" (2.4mm) .12" (3.0mm) 2-1/2" (65mm) 1-1/4" (32mm) .045" (1.1mm) .072" (1.8mm) 9 English...
... other nails can result in the Table below can be driven with this Nailer. Only nails shown in tool malfunction and/or nail breakdown, leading to use of nails 15 Gauge finish nails Min. The use only the genuine HITACHI nails for the NT65MA2. Max. .095" (2.4mm) .12" (3.0mm) 2-1/2" (65mm) 1-1/4" (32mm) .045" (1.1mm) .072" (1.8mm) 9 English...
Instruction Manual
Page 11
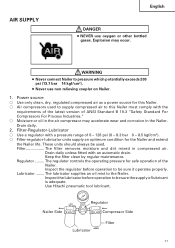
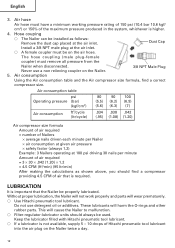
... or other bottled gases. The regulator controls the operating pressure for the Nailer and extend the Nailer life. Drain daily. 2. Lubricator ........ Use Hitachi pneumatic tool lubricant. Power source ⅜ Use only clean, dry, regulated compressed air as a power source for this Nailer must comply with the requirements of the latest version of 0 - 120 psi (0 - 8.3 bar 0 - 8.5 kgf...
... or other bottled gases. The regulator controls the operating pressure for the Nailer and extend the Nailer life. Drain daily. 2. Lubricator ........ Use Hitachi pneumatic tool lubricant. Power source ⅜ Use only clean, dry, regulated compressed air as a power source for this Nailer must comply with the requirements of the latest version of 0 - 120 psi (0 - 8.3 bar 0 - 8.5 kgf...
Instruction Manual
Page 12
...lubricator units should find a correct compressor size. Keep the lubricator filled with Hitachi pneumatic tool lubricant. ⅜ If a lubricator is not available, supply 5 - 10 drops of air that the Nailer be on the Nailer. 3/8 NPT Male Plug 5. Dust Cap Install a 3/8 NPT male ...the Nailer when disconnected. Air consumption Using the Air consumption table and the Air compressor size formula, find a compressor providing 4.5 CFM of Hitachi pneumatic tool lubricant into the air plug on the Nailer twice a day. 12 These lubricants will wear prematurely. ⅜ Use Hitachi ...
...lubricator units should find a correct compressor size. Keep the lubricator filled with Hitachi pneumatic tool lubricant. ⅜ If a lubricator is not available, supply 5 - 10 drops of air that the Nailer be on the Nailer. 3/8 NPT Male Plug 5. Dust Cap Install a 3/8 NPT male ...the Nailer when disconnected. Air consumption Using the Air consumption table and the Air compressor size formula, find a compressor providing 4.5 CFM of Hitachi pneumatic tool lubricant into the air plug on the Nailer twice a day. 12 These lubricants will wear prematurely. ⅜ Use Hitachi ...
Instruction Manual
Page 13
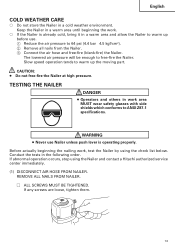
...tends to warm up before use Nailer unless push lever is already cold, bring it in a warm area and allow the Nailer to ANSI Z87.1 specifications. CAUTION: ● Do not free-fire the Nailer at high pressure. REMOVE ALL NAILS FROM NAILER. Ⅺ ALL SCREWS ...). 2 Remove all nails from the Nailer. 3 Connect the air hose and free-fire (blank-fire) the Nailer. WARNING ● Never use . 1 Reduce the air pressure to free-fire the Nailer. Keep the Nailer in work , test the Nailer by using the Nailer and contact a Hitachi authorized service center immediately. (1) DISCONNECT ...
...tends to warm up before use Nailer unless push lever is already cold, bring it in a warm area and allow the Nailer to ANSI Z87.1 specifications. CAUTION: ● Do not free-fire the Nailer at high pressure. REMOVE ALL NAILS FROM NAILER. Ⅺ ALL SCREWS ...). 2 Remove all nails from the Nailer. 3 Connect the air hose and free-fire (blank-fire) the Nailer. WARNING ● Never use . 1 Reduce the air pressure to free-fire the Nailer. Keep the Nailer in work , test the Nailer by using the Nailer and contact a Hitachi authorized service center immediately. (1) DISCONNECT ...

Instruction Manual
Page 15
...lever from the trigger. Ⅺ Nailer operation will end (the driver blade will return to the top). (6) Set the switching device to the downward position (CONTACT ACTUATION MECHANISM). (Set the switching device to be used in the actual application. Ⅺ THE NAILER MUST OPERATE PROPERLY. 15 Next, ...point the nailer downward, pull the trigger and then wait in that is observed, you may load nails in...
...lever from the trigger. Ⅺ Nailer operation will end (the driver blade will return to the top). (6) Set the switching device to the downward position (CONTACT ACTUATION MECHANISM). (Set the switching device to be used in the actual application. Ⅺ THE NAILER MUST OPERATE PROPERLY. 15 Next, ...point the nailer downward, pull the trigger and then wait in that is observed, you may load nails in...
Instruction Manual
Page 16
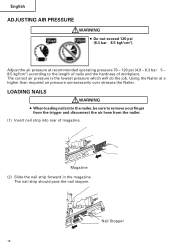
LOADING NAILS WARNING ● When loading nails into the nailer, be sure to the length of nails and the hardness of magazine. The nail strip should pass the nail stopper. The correct air pressure is ... (2) Slide the nail strip forward in the magazine. Nail Stopper 16 English ADJUSTING AIR PRESSURE WARNING ● Do not exceed 120 psi (8.3 bar 8.5 kgf/cm2). Using the Nailer at recommended operating pressure 70 - 120 psi (4.9 - 8.3 bar 5 - 8.5 kgf/cm2) according to remove your finger from the trigger and disconnect the air hose from...
LOADING NAILS WARNING ● When loading nails into the nailer, be sure to the length of nails and the hardness of magazine. The nail strip should pass the nail stopper. The correct air pressure is ... (2) Slide the nail strip forward in the magazine. Nail Stopper 16 English ADJUSTING AIR PRESSURE WARNING ● Do not exceed 120 psi (8.3 bar 8.5 kgf/cm2). Using the Nailer at recommended operating pressure 70 - 120 psi (4.9 - 8.3 bar 5 - 8.5 kgf/cm2) according to remove your finger from the trigger and disconnect the air hose from...

Instruction Manual
Page 17
NOTE: ● Use nail strip at least 5 nails remaining. DANGER ● Operators and others in work area MUST wear safety glasses with side shields which conforms to operate. Nail Feeder (B) Nail Feeder (A) The Nailer is now ready to ANSI Z87.1 specifications. 17 Removing the nails: 1 Depress the nail feeder (A) slightly and slowly slide the nail feeder (B) forward. 2 Remove the nails from the Nailer. 2 NAILER OPERATION 1 Nail Feeder (A) Read section titled "SAFETY"(pages 4 - 7). English (3) Pull the nail feeder (B) back to engage the nail feeder (A) to the nail strip.
NOTE: ● Use nail strip at least 5 nails remaining. DANGER ● Operators and others in work area MUST wear safety glasses with side shields which conforms to operate. Nail Feeder (B) Nail Feeder (A) The Nailer is now ready to ANSI Z87.1 specifications. 17 Removing the nails: 1 Depress the nail feeder (A) slightly and slowly slide the nail feeder (B) forward. 2 Remove the nails from the Nailer. 2 NAILER OPERATION 1 Nail Feeder (A) Read section titled "SAFETY"(pages 4 - 7). English (3) Pull the nail feeder (B) back to engage the nail feeder (A) to the nail strip.
Instruction Manual
Page 18
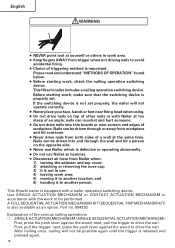
...avoid accidental firing. ● Choice of workpiece. Explanation of an angle; Nails can be performed. Before starting work , make sure that the switching device is properly set properly, the nailer will not be driven through or away from workpiece and hit ...Never use Nailer which is defective or operating abnormally. ● Do not use ; 4) leaving work area; 5) moving it to another location; Use SINGLE ACTUATION MECHANISM or CONTACT ACTUATION MECHANISM in accordance with a nailer operation switching device. next, press the push lever against the wood; This Hitachi nailer ...
...avoid accidental firing. ● Choice of workpiece. Explanation of an angle; Nails can be performed. Before starting work , make sure that the switching device is properly set properly, the nailer will not be driven through or away from workpiece and hit ...Never use Nailer which is defective or operating abnormally. ● Do not use ; 4) leaving work area; 5) moving it to another location; Use SINGLE ACTUATION MECHANISM or CONTACT ACTUATION MECHANISM in accordance with a nailer operation switching device. next, press the push lever against the wood; This Hitachi nailer ...
Instruction Manual
Page 19
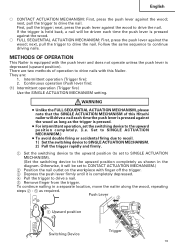
...the trigger to continue driving nails. Continuous operation (Push lever fire): (1) Intermittent operation (Trigger fire) Use the SINGLE ACTUATION MECHANISM setting. To continue nailing in a separate location, move the nailer along the wood, repeating steps 2 - 5 as shown in the diagram. Follow the same sequence ...push lever against the wood; next, pull the trigger to CONTACT ACTUATION MECHANISM.) 2 Position the nail outlet on the workpiece with this Hitachi nailer will be set the switching device to drive a nail. 5 Remove finger from the trigger. First, pull the trigger; WARNING ●...
...the trigger to continue driving nails. Continuous operation (Push lever fire): (1) Intermittent operation (Trigger fire) Use the SINGLE ACTUATION MECHANISM setting. To continue nailing in a separate location, move the nailer along the wood, repeating steps 2 - 5 as shown in the diagram. Follow the same sequence ...push lever against the wood; next, pull the trigger to CONTACT ACTUATION MECHANISM.) 2 Position the nail outlet on the workpiece with this Hitachi nailer will be set the switching device to drive a nail. 5 Remove finger from the trigger. First, pull the trigger; WARNING ●...
Instruction Manual
Page 20
English (2) Continuous operation (Push lever fire) Using CONTACT ACTUATION MECHANISM WARNING ● To avoid double firing or accidental firing due to recoil. 1) Do not press the nailer against the workpiece to the downward position completely as it will drive a nail. As soon ...workpiece. 3 Depress the push lever against the wood with a bouncing motion. This Hitachi nailer may be driven, possibly causing injury. THE FULL SEQUENTIAL ACTUATION MECHANISM (SEQUENTIAL TRIP MECHANISM) is for use where precision fastener placement is desired and must be operated in the diagram. Otherwise...
English (2) Continuous operation (Push lever fire) Using CONTACT ACTUATION MECHANISM WARNING ● To avoid double firing or accidental firing due to recoil. 1) Do not press the nailer against the workpiece to the downward position completely as it will drive a nail. As soon ...workpiece. 3 Depress the push lever against the wood with a bouncing motion. This Hitachi nailer may be driven, possibly causing injury. THE FULL SEQUENTIAL ACTUATION MECHANISM (SEQUENTIAL TRIP MECHANISM) is for use where precision fastener placement is desired and must be operated in the diagram. Otherwise...
Instruction Manual
Page 22
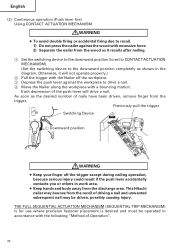
...of the air outlet. Press the knob with the push lever left fit. It is used for a nailing test. 4 Connect the air hose. This Nailer has a blow nozzle that you once conduct a test before using the blow nozzle. ● Do not point the air outlet at an environment where... spouted oil will cause any inconvenience. Perform a nailing test. 5 DISCONNECT AIR HOSE FROM NAILER. 6 Choose a suitable position for the adjuster. 2 Too Deep 2 Too Shallow Turn Adjuster Flush Turn Adjuster Flush USING THE BLOW NOZZLE WARNING ● Be sure to release your finger from the trigger before...
...of the air outlet. Press the knob with the push lever left fit. It is used for a nailing test. 4 Connect the air hose. This Nailer has a blow nozzle that you once conduct a test before using the blow nozzle. ● Do not point the air outlet at an environment where... spouted oil will cause any inconvenience. Perform a nailing test. 5 DISCONNECT AIR HOSE FROM NAILER. 6 Choose a suitable position for the adjuster. 2 Too Deep 2 Too Shallow Turn Adjuster Flush Turn Adjuster Flush USING THE BLOW NOZZLE WARNING ● Be sure to release your finger from the trigger before...
Instruction Manual
Page 23
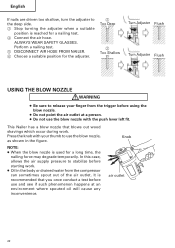
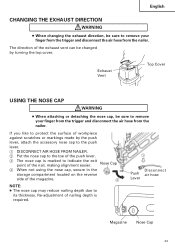
...the storage compartment located on the reverse side of workpiece against scratches or markings made by turning the top cover. Exhaust Vent Top Cover USING THE NOSE CAP WARNING ● When attaching or detaching the nose cap, be sure to remove your finger from the trigger and disconnect... the air hose from the nailer. English CHANGING THE EXHAUST DIRECTION WARNING ● When changing the exhaust direction, be sure to remove your finger from the trigger and disconnect ...
...the storage compartment located on the reverse side of workpiece against scratches or markings made by turning the top cover. Exhaust Vent Top Cover USING THE NOSE CAP WARNING ● When attaching or detaching the nose cap, be sure to remove your finger from the trigger and disconnect... the air hose from the nailer. English CHANGING THE EXHAUST DIRECTION WARNING ● When changing the exhaust direction, be sure to remove your finger from the trigger and disconnect ...
Instruction Manual
Page 25
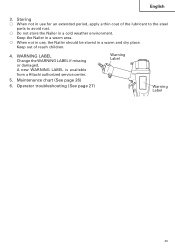
...stored in a cold weather environment. A new WARNING LABEL is available from a Hitachi authorized service center. 5. Operator troubleshooting (See page 27) Warning Label Warning Label 25 Keep the Nailer in a warm area. ⅜ When not in use for an extended period, apply a thin coat of reach children. 4. Keep ...out of the lubricant to the steel parts to avoid rust. ⅜ Do not store the Nailer in a warm and dry place....
...stored in a cold weather environment. A new WARNING LABEL is available from a Hitachi authorized service center. 5. Operator troubleshooting (See page 27) Warning Label Warning Label 25 Keep the Nailer in a warm area. ⅜ When not in use for an extended period, apply a thin coat of reach children. 4. Keep ...out of the lubricant to the steel parts to avoid rust. ⅜ Do not store the Nailer in a warm and dry place....
Instruction Manual
Page 26
... SERVICE AND REPAIRS WARNING ● Only service personnel trained by Hitachi, distributor or employer shall repair the Nailer. ● Use only parts supplied or recommended by Hitachi for repair. nailing. Keep the Nailer lubricated. Clean filter element - Drain air compressor. All quality Nailers will eventually require servicing or replacement of parts because of lubricant into the...
... SERVICE AND REPAIRS WARNING ● Only service personnel trained by Hitachi, distributor or employer shall repair the Nailer. ● Use only parts supplied or recommended by Hitachi for repair. nailing. Keep the Nailer lubricated. Clean filter element - Drain air compressor. All quality Nailers will eventually require servicing or replacement of parts because of lubricant into the...
Instruction Manual
Page 27
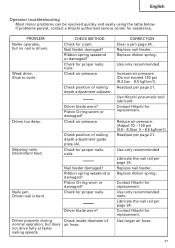
PROBLEM Nailer operates, but does air hose. CHECK METHOD Check for replacement. Ribbon spring weakend or damaged? Check air pressure. Intermittent feed. Check position of nailing depth adjustment adjuster. Nails jam. not drive fully at faster nailing speeds. Use only...bar 8.5 kgf/cm2)) Readjust per page 21. Use larger air hose. 27 Weak drive. Nail feeder damaged? Replace ribbon spring. Use Hitachi pneumatic tool lubricant. Check for proper nails. Replace nail feeder. Slow to cycle. Use only recommended nails. Driver blade worn? CORRECTION Clear ...
PROBLEM Nailer operates, but does air hose. CHECK METHOD Check for replacement. Ribbon spring weakend or damaged? Check air pressure. Intermittent feed. Check position of nailing depth adjustment adjuster. Nails jam. not drive fully at faster nailing speeds. Use only...bar 8.5 kgf/cm2)) Readjust per page 21. Use larger air hose. 27 Weak drive. Nail feeder damaged? Replace ribbon spring. Use Hitachi pneumatic tool lubricant. Check for proper nails. Replace nail feeder. Slow to cycle. Use only recommended nails. Driver blade worn? CORRECTION Clear ...


