
User Manual
Page 1
...symbols are trademarks of the Video Electronics Standard Association. • Windows is a registered trademark of the Microsoft Corporation. Projector ED-S3350/ED-X3400/ED-X3450 User's Manual - After reading, store them in this manual. • The reproduction, transmission or use of this manual. ...About this projector. All other trademarks are the property of these manuals to incorrect handling. WARNING This symbol indicates information...
...symbols are trademarks of the Video Electronics Standard Association. • Windows is a registered trademark of the Microsoft Corporation. Projector ED-S3350/ED-X3400/ED-X3450 User's Manual - After reading, store them in this manual. • The reproduction, transmission or use of this manual. ...About this projector. All other trademarks are the property of these manuals to incorrect handling. WARNING This symbol indicates information...

User Manual
Page 2
...61478; About this manual 1 PICTURE Menu 25 Contents 2 Projector features 3 Bright, Contrast, Gamma, Color temp, Color, Tint, Sharpness, Progressive, My memory Preparations 3 IMAGE Menu 28 Part names 4 Aspect, Over scan, V. position, H. phase, H. Projector 4 position, H. size, Auto adjust Controls 5 INPUT ... 30 Remote control 5 Color space, Component, Video format, Setting up 6 Frame lock, Information Arrangement 7 SETUP Menu 32 Adjusting the projector's elevator . . 8 Keystone, Whisper, Mirror, Volume About the filter cover for bottom-up use . . 9 Connecting your...
...61478; About this manual 1 PICTURE Menu 25 Contents 2 Projector features 3 Bright, Contrast, Gamma, Color temp, Color, Tint, Sharpness, Progressive, My memory Preparations 3 IMAGE Menu 28 Part names 4 Aspect, Over scan, V. position, H. phase, H. Projector 4 position, H. size, Auto adjust Controls 5 INPUT ... 30 Remote control 5 Color space, Component, Video format, Setting up 6 Frame lock, Information Arrangement 7 SETUP Menu 32 Adjusting the projector's elevator . . 8 Keystone, Whisper, Mirror, Volume About the filter cover for bottom-up use . . 9 Connecting your...
User Manual
Page 3
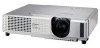
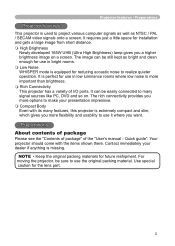
... High Brightness Newly developed 165W UHB (Ultra High Brightness) lamp gives you more important than brightness. Rich Connectivity This projector has a variety of the "User's manual - Preparations About contents of package Please see the "Contents of package" of I/O ports. For moving the... projector, be sure to use it where you want. Quick guide". Use special caution for future reshipment. Your projector should come with its many signal sources like PC, DVD and so on a screen....
... High Brightness Newly developed 165W UHB (Ultra High Brightness) lamp gives you more important than brightness. Rich Connectivity This projector has a variety of the "User's manual - Preparations About contents of package Please see the "Contents of package" of I/O ports. For moving the... projector, be sure to use it where you want. Quick guide". Use special caution for future reshipment. Your projector should come with its many signal sources like PC, DVD and so on a screen....
User Manual
Page 4
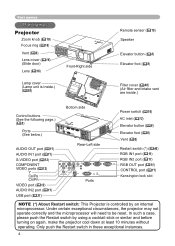
... not operate correctly and the microprocessor will need to be reset. Only push the Restart switch in these exceptional instances. 4 Part names Part names Projector Zoom knob (18) Focus ring (18) Vent (6) Lens cover (16) (Slide door) Lens (16) Lamp cover (Lamp unit is inside.) (&#... port (11) RGB IN2 port (11) RGB OUT port (11) CONTROL port (11) Kensington lock slot NOTE (*) About Restart switch: This Projector is controlled by using a cocktail stick or similar and before turning on again, make the...
... not operate correctly and the microprocessor will need to be reset. Only push the Restart switch in these exceptional instances. 4 Part names Part names Projector Zoom knob (18) Focus ring (18) Vent (6) Lens cover (16) (Slide door) Lens (16) Lamp cover (Lamp unit is inside.) (&#... port (11) RGB IN2 port (11) RGB OUT port (11) CONTROL port (11) Kensington lock slot NOTE (*) About Restart switch: This Projector is controlled by using a cocktail stick or similar and before turning on again, make the...

User Manual
Page 6
...or the like, contact your dealer before installation. ►Place the projection in direct sunlight or near the projector. Setting up Setting up use the accessory filter cover for bottom- Placing the projector in the side/front/rear-up , use . A fall or a turnover could cause an injury and.../or damage to the projector. • Don't place the projector near a humidifier, a smoking space or a kitchen. • Put nothing containing the liquid near a hot object such as a wobbly or inclined stand....
...or the like, contact your dealer before installation. ►Place the projection in direct sunlight or near the projector. Setting up Setting up use the accessory filter cover for bottom- Placing the projector in the side/front/rear-up , use . A fall or a turnover could cause an injury and.../or damage to the projector. • Don't place the projector near a humidifier, a smoking space or a kitchen. • Put nothing containing the liquid near a hot object such as a wobbly or inclined stand....

User Manual
Page 7
The values shown in the table are calculated for a full size screen: 800 x 600 for ED-S3350 / 1024 x 768 for ED-X3400, ED-X3450 (a) The screen size (diagonal) (b) Distance from the projector to determine the screen size and projection distance. down At 4:3 screen (a) Screen size (b) Projection distance [m (inch)] [inch (m)] min. Setting up Arrangement Refer to the...
The values shown in the table are calculated for a full size screen: 800 x 600 for ED-S3350 / 1024 x 768 for ED-X3400, ED-X3450 (a) The screen size (diagonal) (b) Distance from the projector to determine the screen size and projection distance. down At 4:3 screen (a) Screen size (b) Projection distance [m (inch)] [inch (m)] min. Setting up Arrangement Refer to the...

User Manual
Page 8
...the angle of projection. The adjustment range of the projector by twisting the elevator feet by the elevator feet adjustment, place the projector horizontally. As necessary, you need to set the projector is in the elevator buttons while holding the projector, the projector might crash down, overturn, smash your fi...in malfunction. You can also finely adjust the height of the elevator feet is cool adequately, press and hold the projector whenever using the elevator buttons to the desired height and the release the elevator buttons. After making sure that the...
...the angle of projection. The adjustment range of the projector by twisting the elevator feet by the elevator feet adjustment, place the projector horizontally. As necessary, you need to set the projector is in the elevator buttons while holding the projector, the projector might crash down, overturn, smash your fi...in malfunction. You can also finely adjust the height of the elevator feet is cool adequately, press and hold the projector whenever using the elevator buttons to the desired height and the release the elevator buttons. After making sure that the...

User Manual
Page 9
... remove it back into place. 4. Replace the filter cover for bottom-up use and snap it . 3. While the projector connects with a power supply, or the projector is in the direction of the arrow to fall. Filter cover's knob Filter cover's knob To remove To set Filter cover Filter...and/or malfunction to keep the space for intake ventilation. Please change in , then wait at least 45 minutes. After making sure that the projector is cool adequately, slowly turn the projector so that the lens-side is not plugged in the following procedure. It is facing up . Slowly turn the...
... remove it back into place. 4. Replace the filter cover for bottom-up use and snap it . 3. While the projector connects with a power supply, or the projector is in the direction of the arrow to fall. Filter cover's knob Filter cover's knob To remove To set Filter cover Filter...and/or malfunction to keep the space for intake ventilation. Please change in , then wait at least 45 minutes. After making sure that the projector is cool adequately, slowly turn the projector so that the lens-side is not plugged in the following procedure. It is facing up . Slowly turn the...
User Manual
Page 10
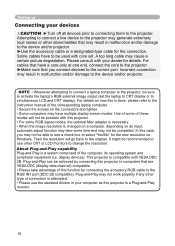
... optional Mac adapter is necessary. • When the image resolution is a system composed of these modes will go back to the device and/or projector. ►Use the accessory cable or a designated-type cable for details. Please consult with core set the laptop to CRT display or to the RGB... IN1 port (DDC 2B compatible). Plug-and-Play may cause a certain picture degradation. This projector is a Plug-and-Play monitor. 10 For cables that are VESA DDC (display data channel) compatible. • Please take some time and may not...
... optional Mac adapter is necessary. • When the image resolution is a system composed of these modes will go back to the device and/or projector. ►Use the accessory cable or a designated-type cable for details. Please consult with core set the laptop to CRT display or to the RGB... IN1 port (DDC 2B compatible). Plug-and-Play may cause a certain picture degradation. This projector is a Plug-and-Play monitor. 10 For cables that are VESA DDC (display data channel) compatible. • Please take some time and may not...

User Manual
Page 13
... outlet. 13 Firmly plug the power cord's plug into an outlet rated for use the power cord that came with the power cord's specified voltage range. • Never modify the power cord. Setting up Connecting power supply WARNING ►Please use extra caution when connecting the power cord as... incorrect or faulty connections may result in fire and/or electrical shock. • Only use with the projector. If it is damaged, contact your dealer to the AC inlet of the three-pronged plug. AC inlet Connector of the power cord 1.
... outlet. 13 Firmly plug the power cord's plug into an outlet rated for use the power cord that came with the power cord's specified voltage range. • Never modify the power cord. Setting up Connecting power supply WARNING ►Please use extra caution when connecting the power cord as... incorrect or faulty connections may result in fire and/or electrical shock. • Only use with the projector. If it is damaged, contact your dealer to the AC inlet of the three-pronged plug. AC inlet Connector of the power cord 1.
User Manual
Page 15
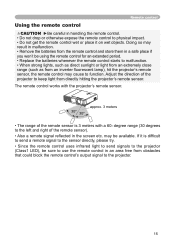
.... may cause to malfunction. • When strong lights, such as direct sunlight or light from an extremely close range (such as from directly hitting the projector's remote sensor. The remote control works with a 60- If it on wet objects. degree range (30 degrees to the left and right of the remote...ficult to send a remote signal to the sensor directly, please try. • Since the remote control uses infrared light to send signals to the projector (Class1 LED), be sure to physical impact. • Do not get the remote control wet or place it is 3 meters with the...
.... may cause to malfunction. • When strong lights, such as direct sunlight or light from an extremely close range (such as from directly hitting the projector's remote sensor. The remote control works with a 60- If it on wet objects. degree range (30 degrees to the left and right of the remote...ficult to send a remote signal to the sensor directly, please try. • Since the remote control uses infrared light to send signals to the projector (Class1 LED), be sure to physical impact. • Do not get the remote control wet or place it is 3 meters with the...
User Manual
Page 16
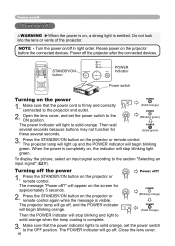
... "Selecting an input signal" (17). Press the STANDBY/ON button on the power POWER 1. Turning off the power Power off the projector after the connected devices. will appear on the screen for these several seconds because buttons may not function for approximately 5 seconds. 2. The ...message "Power off in right order. Make sure that the power cord is firmly and correctly connected to the projector and outlet. (Solid orange) POWER 2. When the power is completely on, the indicator will go off WARNING ►When the power is on...
... "Selecting an input signal" (17). Press the STANDBY/ON button on the power POWER 1. Turning off the power Power off the projector after the connected devices. will appear on the screen for these several seconds because buttons may not function for approximately 5 seconds. 2. The ...message "Power off in right order. Make sure that the power cord is firmly and correctly connected to the projector and outlet. (Solid orange) POWER 2. When the power is completely on, the indicator will go off WARNING ►When the power is on...
User Manual
Page 17
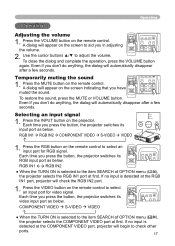
...the sound 1. A dialog will appear on the remote control to the item SEARCH of OPTION menu (36), POSITION MENU the projector selects the COMPONENT VIDEO port at first. ESC RESET Selecting an input signal 1. VIDEO STANDBY/ON RGB SEARCH ASPECT AUTO ...64257;rst. Each time you in adjusting the volume. If no input is ENTER detected at the RGB POSITION MENU IN1 port, projector will automatically disappEeNTERar after a few seconds. Operating Operating Adjusting the volume 1. FREEZE KEYSTONE To close the dialog and complete the ...
...the sound 1. A dialog will appear on the remote control to the item SEARCH of OPTION menu (36), POSITION MENU the projector selects the COMPONENT VIDEO port at first. ESC RESET Selecting an input signal 1. VIDEO STANDBY/ON RGB SEARCH ASPECT AUTO ...64257;rst. Each time you in adjusting the volume. If no input is ENTER detected at the RGB POSITION MENU IN1 port, projector will automatically disappEeNTERar after a few seconds. Operating Operating Adjusting the volume 1. FREEZE KEYSTONE To close the dialog and complete the ...

User Manual
Page 18
...OFF END PAGE DOWN MUTE FREEZE KEYSTONE VIDEO STANDBY/ON RGB SEARCH ASPECT AUTO BLANK At a video signal /no signal is found , the projector will stop OFF FREEZE KEYSTONE searching and display the image. Press the ASPECT button on the remote control. Use the zoom knob to focus the... HOME ON PAGE UP VOLUME END PAGE DOWN MUTE Then when an input is found , the projector will return to find any input signals. Each time you press the button, the projector switches the mode for aspect ratio in order to the state selected before the operation. Adjusting the...
...OFF END PAGE DOWN MUTE FREEZE KEYSTONE VIDEO STANDBY/ON RGB SEARCH ASPECT AUTO BLANK At a video signal /no signal is found , the projector will stop OFF FREEZE KEYSTONE searching and display the image. Press the ASPECT button on the remote control. Use the zoom knob to focus the... HOME ON PAGE UP VOLUME END PAGE DOWN MUTE Then when an input is found , the projector will return to find any input signals. Each time you press the button, the projector switches the mode for aspect ratio in order to the state selected before the operation. Adjusting the...

User Manual
Page 20
... To exit the FREEZE mode and restore the screen to the input signal screen when the ESC inputRESET signal changes, or when one of the projector's buttons or the remote control buttons of STANDBY/ON, SEARCH, RGB, VIDEO, BLANK, AUTO, ASPECT, VOLUME, MUTE, KEYSTONE, POSITION and MENU... will be printed. Press the BLANK button on the screen (although the indication will disappear after several seconds with no operation.), and the projector will enter the FREEZE mode. Operating Using the magnify feature 1. The "MAGNIFY" indication will appear on the remote control. And to the...
... To exit the FREEZE mode and restore the screen to the input signal screen when the ESC inputRESET signal changes, or when one of the projector's buttons or the remote control buttons of STANDBY/ON, SEARCH, RGB, VIDEO, BLANK, AUTO, ASPECT, VOLUME, MUTE, KEYSTONE, POSITION and MENU... will be printed. Press the BLANK button on the screen (although the indication will disappear after several seconds with no operation.), and the projector will enter the FREEZE mode. Operating Using the magnify feature 1. The "MAGNIFY" indication will appear on the remote control. And to the...
User Manual
Page 21
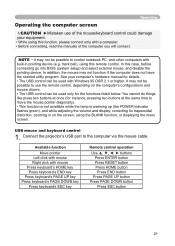
... lamp is warming up (the POWER indicator flashes green), and while adjusting the volume and display, correcting for the functions listed below. Connect the projector's USB port to use of the mouse/keyboard control could damage your computer's hardware manual for details. • The USB control can be used only...
... lamp is warming up (the POWER indicator flashes green), and while adjusting the volume and display, correcting for the functions listed below. Connect the projector's USB port to use of the mouse/keyboard control could damage your computer's hardware manual for details. • The USB control can be used only...

User Manual
Page 22
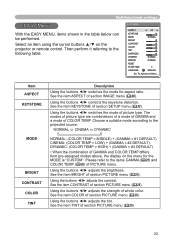
...to progress. Multifunctional settings Multifunctional settings VIDEO STANDBY/ON RGB SEARCH ASPECT AUTO BLANK Using the menu function MAGNIFY HOME PAGE UP VOLUME ON This projector has the following menus: PICTURE, IMAGE, INPUT, END PAGEDOWN MSUTE ETUP, SCREEN, OPTION and EASY MENU. Use the cursor buttons ▲... cursor buttons ▲/▼ to select an item to operate the item. EASY MENU Then press the cursor button ► on the projector or remote control, or the ENTER button on the remote control during the operation. The operation menu of PICTURE, IMAGE, INPUT, SETUP,...
...to progress. Multifunctional settings Multifunctional settings VIDEO STANDBY/ON RGB SEARCH ASPECT AUTO BLANK Using the menu function MAGNIFY HOME PAGE UP VOLUME ON This projector has the following menus: PICTURE, IMAGE, INPUT, END PAGEDOWN MSUTE ETUP, SCREEN, OPTION and EASY MENU. Use the cursor buttons ▲... cursor buttons ▲/▼ to select an item to operate the item. EASY MENU Then press the cursor button ► on the projector or remote control, or the ENTER button on the remote control during the operation. The operation menu of PICTURE, IMAGE, INPUT, SETUP,...
User Manual
Page 23
...) DYNAMIC: (COLOR TEMP = HIGH) + (GAMMA = #3 DEFAULT) • When the combination of GAMMA and COLOR TEMP differs from pre-assigned modes above, the display on the projector or remote control. Using the buttons ◄/► adjusts the contrast. See the item CONTRAST of picture type. Using the buttons ◄/► adjusts the...
...) DYNAMIC: (COLOR TEMP = HIGH) + (GAMMA = #3 DEFAULT) • When the combination of GAMMA and COLOR TEMP differs from pre-assigned modes above, the display on the projector or remote control. Using the buttons ◄/► adjusts the contrast. See the item CONTRAST of picture type. Using the buttons ◄/► adjusts the...
User Manual
Page 25
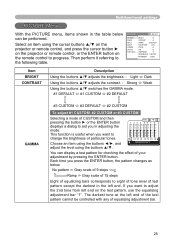
.... Choose an item using the buttons ◄/►, and adjust the level using the cursor buttons ▲/▼ on the projector or remote control, and press the cursor button ► on the projector or remote control, or the ENTER button on the test pattern, use the equalizing adjustment bar "1". No pattern ...
.... Choose an item using the buttons ◄/►, and adjust the level using the cursor buttons ▲/▼ on the projector or remote control, and press the cursor button ► on the projector or remote control, or the ENTER button on the test pattern, use the equalizing adjustment bar "1". No pattern ...

User Manual
Page 27
... is selected, the screen image will be crisper. LOAD1 LOAD2 LOAD3 LOAD4 MY MEMORY SAVE4 SAVE3 SAVE2 SAVE1 This projector has 4 numbered memories for example, jagged line) of the picture at an interlaced signal of a VIDEO input, a S-VIDEO input or a COMPONENT VIDEO input of MY...
... is selected, the screen image will be crisper. LOAD1 LOAD2 LOAD3 LOAD4 MY MEMORY SAVE4 SAVE3 SAVE2 SAVE1 This projector has 4 numbered memories for example, jagged line) of the picture at an interlaced signal of a VIDEO input, a S-VIDEO input or a COMPONENT VIDEO input of MY...


