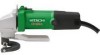

Instruction Manual
Page 3
... been specifically recommended by observing appropriate safety procedures. NOTE emphasizes essential information. 3 NEVER use this power tool in minor or moderate injury, or may cause machine damage. Basic safety precautions are identified by WARNINGS on the power tool and in this Instruction Manual. CAUTION indicates a potentially hazardous situations which, if not avoided, may result in a manner that result from power tool operation and maintenance...
... been specifically recommended by observing appropriate safety procedures. NOTE emphasizes essential information. 3 NEVER use this power tool in minor or moderate injury, or may cause machine damage. Basic safety precautions are identified by WARNINGS on the power tool and in this Instruction Manual. CAUTION indicates a potentially hazardous situations which, if not avoided, may result in a manner that result from power tool operation and maintenance...

Instruction Manual
Page 4
.... 4 Damaged cords increase the risk of electric shock. (5) When operating a power tool outside, use and reduce the risk of electric shock. (4) Do not abuse the cord. Personal Safety (1) Stay alert, watch what you to install a polarized outlet. Do not use common sense when operating a power tool. Be sure switch is wider than the other). SAVE THESE INSTRUCTIONS 1. Do not change the plug in . Water entering a power tool will fit...
.... 4 Damaged cords increase the risk of electric shock. (5) When operating a power tool outside, use and reduce the risk of electric shock. (4) Do not abuse the cord. Personal Safety (1) Stay alert, watch what you to install a polarized outlet. Do not use common sense when operating a power tool. Be sure switch is wider than the other). SAVE THESE INSTRUCTIONS 1. Do not change the plug in . Water entering a power tool will fit...

Instruction Manual
Page 5
... any adjustments, changing accessories, or storing the tool. If damaged, have the tool serviced before turning the tool on or off. Use of unauthorized parts or failure to follow Maintenance Instruction may result in the hands of children and other practical way to secure and support the workpiece to bind and are recommended by qualified repair personnel. Such preventive safety measures reduce the risk of starting the tool...
... any adjustments, changing accessories, or storing the tool. If damaged, have the tool serviced before turning the tool on or off. Use of unauthorized parts or failure to follow Maintenance Instruction may result in the hands of children and other practical way to secure and support the workpiece to bind and are recommended by qualified repair personnel. Such preventive safety measures reduce the risk of starting the tool...
Instruction Manual
Page 6
... operate without all times. NEVER operate this tool without all screws, bolts, and plates tightly mounted. Don't use a power tool for cutting tree limbs or logs. 9. NEVER use power tools if the plastic housing or handle is cracked. Blades and accessories must be operated by insulated gripping surfaces when performing an operation where the cutting tool may contact hidden wiring or its operation or unauthorized personnel. 11. The tool's motor air vent must be used until repaired...
... operate without all times. NEVER operate this tool without all screws, bolts, and plates tightly mounted. Don't use a power tool for cutting tree limbs or logs. 9. NEVER use power tools if the plastic housing or handle is cracked. Blades and accessories must be operated by insulated gripping surfaces when performing an operation where the cutting tool may contact hidden wiring or its operation or unauthorized personnel. 11. The tool's motor air vent must be used until repaired...
Instruction Manual
Page 7
... soapy water and dry thoroughly. 20. Solvents such as gasoline, thinner, benzine, carbon tetrachloride, and alcohol may burn out. 16. Definitions for repairs by the sharp edge. 22. Turn power off. If the tool appears to a complete stop using the power tool at the rated voltage. Do not wipe plastic parts with solvent. Start cutting only after the blade attains the proper speed. Preserve the power cord. no ..........
... soapy water and dry thoroughly. 20. Solvents such as gasoline, thinner, benzine, carbon tetrachloride, and alcohol may burn out. 16. Definitions for repairs by the sharp edge. 22. Turn power off. If the tool appears to a complete stop using the power tool at the rated voltage. Do not wipe plastic parts with solvent. Start cutting only after the blade attains the proper speed. Preserve the power cord. no ..........

Instruction Manual
Page 8
... still follow these precautions: ⅜ Only HITACHI AUTHORIZED SERVICE CENTER should disassemble or assemble this Instruction Manual, including not using the power tool in this power tool, and only genuine HITACHI replacement parts should be installed. ⅜ Clean the exterior of this power tool, HITACHI has adopted a double insulation design. English DOUBLE INSULATION FOR SAFER OPERATION To ensure safer operation of the power tool only with a soft cloth moistened with soapy...
... still follow these precautions: ⅜ Only HITACHI AUTHORIZED SERVICE CENTER should disassemble or assemble this Instruction Manual, including not using the power tool in this power tool, and only genuine HITACHI replacement parts should be installed. ⅜ Clean the exterior of this power tool, HITACHI has adopted a double insulation design. English DOUBLE INSULATION FOR SAFER OPERATION To ensure safer operation of the power tool only with a soft cloth moistened with soapy...
Instruction Manual
Page 9
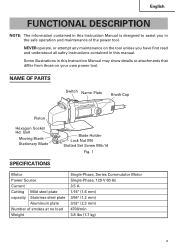
... OF PARTS Switch Name Plate Brush Cap Piston Hexagon Socket Hd. Bolt Moving Blade Stationary Blade Blade Holder Lock Nut M4 Slotted Set Screw M4×14 Fig. 1 SPECIFICATIONS Motor Power Source Current Cutting Mild steel plate capacity Stainless steel plate Aluminum plate Number of the power tool. English FUNCTIONAL DESCRIPTION NOTE: The information contained in this Instruction Manual is designed to assist you have first read and understood all safey instructions contained in this Instruction Manual...
... OF PARTS Switch Name Plate Brush Cap Piston Hexagon Socket Hd. Bolt Moving Blade Stationary Blade Blade Holder Lock Nut M4 Slotted Set Screw M4×14 Fig. 1 SPECIFICATIONS Motor Power Source Current Cutting Mild steel plate capacity Stainless steel plate Aluminum plate Number of the power tool. English FUNCTIONAL DESCRIPTION NOTE: The information contained in this Instruction Manual is designed to assist you have first read and understood all safey instructions contained in this Instruction Manual...

Instruction Manual
Page 10
... repairs. The extension cord should be repaired. If such a faulty receptacle is in the OFF position. Power source Ensure that the switch is used, it may cause overheating, resulting in the ON position, the power tool will start operating ...cord must be replaced or repaired. 4.Check the receptacle If the receptacle only loosely accepts the plug, the receptacle must be kept as short as practicable. English ASSEMBLY AND OPERATION APPLICATIONS ⅜ For shearing steel plate, brass plate, copper plate, aluminum plate, stainless steel plate, tin plate, and other metal plates...
... repairs. The extension cord should be repaired. If such a faulty receptacle is in the OFF position. Power source Ensure that the switch is used, it may cause overheating, resulting in the ON position, the power tool will start operating ...cord must be replaced or repaired. 4.Check the receptacle If the receptacle only loosely accepts the plug, the receptacle must be kept as short as practicable. English ASSEMBLY AND OPERATION APPLICATIONS ⅜ For shearing steel plate, brass plate, copper plate, aluminum plate, stainless steel plate, tin plate, and other metal plates...
Instruction Manual
Page 11
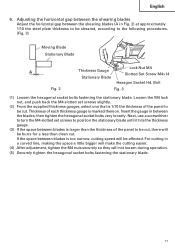
... between the shearing blades Adjust the horizontal gap between blades is marked thereon. For cutting in Fig. 2) at approximately 1/10 the steel plate thickness to the following procedures. (Fig. 3) Moving Blade Stationary Blade Fig. 2 Thickness Gauge Stationary Blade Lock Nut M4 Slotted Set Screw M4×14 Hexagon Socket Hd. Loosen the M4 lock nut, and push back the M4 slotted set screws to turn the M4 slotted set screws slightly...
... between the shearing blades Adjust the horizontal gap between blades is marked thereon. For cutting in Fig. 2) at approximately 1/10 the steel plate thickness to the following procedures. (Fig. 3) Moving Blade Stationary Blade Fig. 2 Thickness Gauge Stationary Blade Lock Nut M4 Slotted Set Screw M4×14 Hexagon Socket Hd. Loosen the M4 lock nut, and push back the M4 slotted set screws to turn the M4 slotted set screws slightly...

Instruction Manual
Page 12
... hand shear. Then use another cutting edge. Fig. 4 Stationary Blade Moving Blade Cutting Edge Fig. 5 12 Doing so will fall. After a cutting edge cuts 1300 ft.(400m) of panel, cutting performance will result in Fig. 4. To facilitate smooth cutting of thick panels, if the cut-off side goes toward the left, (Fig. 4) raise the rear of the hand shear. ⅜ Perform the cutting operation only after the panel is fixed...
... hand shear. Then use another cutting edge. Fig. 4 Stationary Blade Moving Blade Cutting Edge Fig. 5 12 Doing so will fall. After a cutting edge cuts 1300 ft.(400m) of panel, cutting performance will result in Fig. 4. To facilitate smooth cutting of thick panels, if the cut-off side goes toward the left, (Fig. 4) raise the rear of the hand shear. ⅜ Perform the cutting operation only after the panel is fixed...

Instruction Manual
Page 13
... in motor trouble. Therefore, always use a well-cutting blade. 2. Should any of the power tool. Inspecting the carbon brushes (Fig. 6) The motor employs carbon brushes which is the very "heart" of the screws be loose, retighten them immediately. Inspecting the screws Regularly inspect all screws and ensure that they are consumable parts. CAUTION: Using this Hand Shear with new ones which have the same carbon brush No. When an auto-stop automatically...
... in motor trouble. Therefore, always use a well-cutting blade. 2. Should any of the power tool. Inspecting the carbon brushes (Fig. 6) The motor employs carbon brushes which is the very "heart" of the screws be loose, retighten them immediately. Inspecting the screws Regularly inspect all screws and ensure that they are consumable parts. CAUTION: Using this Hand Shear with new ones which have the same carbon brush No. When an auto-stop automatically...

Instruction Manual
Page 14
... maintenance of power tools, the safety regulations and standards prescribed in each country must be helpful if presented with a screwdriver. B: Code No. This Parts List will be used, all service and repairs must be carried out by a HITACHI AUTHORIZED SERVICE CENTER, ONLY. 6. code numbers and/or design) may be easily removed. 5. Used D: Remarks CAUTION: Repair, modification and inspection of wear from normal use. Service parts list A: Item No. English ⅜ Replacing carbon brushes: Disassemble the brush...
... maintenance of power tools, the safety regulations and standards prescribed in each country must be helpful if presented with a screwdriver. B: Code No. This Parts List will be used, all service and repairs must be carried out by a HITACHI AUTHORIZED SERVICE CENTER, ONLY. 6. code numbers and/or design) may be easily removed. 5. Used D: Remarks CAUTION: Repair, modification and inspection of wear from normal use. Service parts list A: Item No. English ⅜ Replacing carbon brushes: Disassemble the brush...

Instruction Manual
Page 15
... replacement part or accessory with this tool. STANDARD ACCESSORIES (1) Thickness gauge (code No. 955525 1 (2) Allen bar wrench (code No. 943277 1 NOTE: Specifications are not sure whether it is safe to change without any other attachment or accessory can be dangerous and could cause injury or mechanical damage. NEVER use replacement parts or accessories which are subject to use of the HITACHI. NOTE: Accessories are not intended for use Only authorized HITACHI replacement parts...
... replacement part or accessory with this tool. STANDARD ACCESSORIES (1) Thickness gauge (code No. 955525 1 (2) Allen bar wrench (code No. 943277 1 NOTE: Specifications are not sure whether it is safe to change without any other attachment or accessory can be dangerous and could cause injury or mechanical damage. NEVER use replacement parts or accessories which are subject to use of the HITACHI. NOTE: Accessories are not intended for use Only authorized HITACHI replacement parts...

Parts List
Page 1
Hitachi Power Tools LIST NO. 0795 ELECTRIC TOOL PARTS LIST HAND SHEAR Model CE 16SA 2003 • 9 • 25 (E1) 1 2 3 4 5 7 6 8 18 19 20 29 21 30 22 23 24 25 26 27 28 24 501 502 9 10 11 12 13 14 15 16 17 31 32 33 34 35 36 37 38 39 40 43 42 41 44 45 50 46 47 48 51 49 52
Hitachi Power Tools LIST NO. 0795 ELECTRIC TOOL PARTS LIST HAND SHEAR Model CE 16SA 2003 • 9 • 25 (E1) 1 2 3 4 5 7 6 8 18 19 20 29 21 30 22 23 24 25 26 27 28 24 501 502 9 10 11 12 13 14 15 16 17 31 32 33 34 35 36 37 38 39 40 43 42 41 44 45 50 46 47 48 51 49 52

Parts List
Page 2
... 998-007 BLADE HOLDER 1 26 998-001 STATIONARY BLADE 1 27 998-009 SLOTTED HD. SOCKET HD. SET SCREW M4X14 1 28 949-565 LOCK NUT M4 (10 PCS.) 1 29 314-429 SPRING 1 30 314-427 SLIDE BAR 1 31 32 33 * 34 35 314-428 314-438 314-854 311-741 SLIDE KNOB HOUSING ASS'Y NAME PLATE EARTH TERMINAL...TERMINAL SFA, EUROPE, FIN, NOR, SWE, DEN, SUI, CHN, KOR 1 FOR TPE, HKG, NGU, NZL, AUS, GBR, SFA, 40 HITACHI LABEL 41 936-551 BRUSH CAP 42 999-021 CARBON BRUSH (1 PAIR) EUROPE, FIN, NOR, SWE, DEN, SUI, CHN, KOR 1 2 2 --- 2 --- * ALTERNATIVE PARTS 9 -- 03 CODE NO. HD. PARTS ITEM NO.
... 998-007 BLADE HOLDER 1 26 998-001 STATIONARY BLADE 1 27 998-009 SLOTTED HD. SOCKET HD. SET SCREW M4X14 1 28 949-565 LOCK NUT M4 (10 PCS.) 1 29 314-429 SPRING 1 30 314-427 SLIDE BAR 1 31 32 33 * 34 35 314-428 314-438 314-854 311-741 SLIDE KNOB HOUSING ASS'Y NAME PLATE EARTH TERMINAL...TERMINAL SFA, EUROPE, FIN, NOR, SWE, DEN, SUI, CHN, KOR 1 FOR TPE, HKG, NGU, NZL, AUS, GBR, SFA, 40 HITACHI LABEL 41 936-551 BRUSH CAP 42 999-021 CARBON BRUSH (1 PAIR) EUROPE, FIN, NOR, SWE, DEN, SUI, CHN, KOR 1 2 2 --- 2 --- * ALTERNATIVE PARTS 9 -- 03 CODE NO. HD. PARTS ITEM NO.

Parts List
Page 3
... D8.8) FOR SIN, KUW 1 (CORD ARMOR D8.8) FOR USA, CAN 1 (CORD ARMOR D10.1) FOR SYR 1 (CORD ARMOR D8.8) FOR TPE 1 (CORD ARMOR D8.8) FOR SUI 1 (CORD ARMOR D8.8) FOR GBR (110V) 1 (CORD ARMOR D8.8) FOR CHN 9 -- 03 * ALTERNATIVE PARTS --- 3 --- CODE NO. 43 313-777 DESCRIPTION BRUSH HOLDER 44 314-603 SWITCH (1P SOLDER TYPE) 45 305-499 MACHINE SCREW (W/WASHER) M3.5X6 * 46 980...
... D8.8) FOR SIN, KUW 1 (CORD ARMOR D8.8) FOR USA, CAN 1 (CORD ARMOR D10.1) FOR SYR 1 (CORD ARMOR D8.8) FOR TPE 1 (CORD ARMOR D8.8) FOR SUI 1 (CORD ARMOR D8.8) FOR GBR (110V) 1 (CORD ARMOR D8.8) FOR CHN 9 -- 03 * ALTERNATIVE PARTS --- 3 --- CODE NO. 43 313-777 DESCRIPTION BRUSH HOLDER 44 314-603 SWITCH (1P SOLDER TYPE) 45 305-499 MACHINE SCREW (W/WASHER) M3.5X6 * 46 980...
Parts List
Page 4
BOLT SET 1 REMARKS --- 4 --- * ALTERNATIVE PARTS Printed in Japan 9 -- 03 (030925N) CODE NO. CODE NO. DESCRIPTION NO. USED 601 302-355 PIECE. STANDARD ACCESSORIES ITEM NO. DESCRIPTION 501 943-277 HEX. USED 1 1 REMARKS CE 16SA OPTIONAL ACCESSORIES ITEM NO. BAR WRENCH 3MM 502 949-128 THICKNESS GAUGE NO.
BOLT SET 1 REMARKS --- 4 --- * ALTERNATIVE PARTS Printed in Japan 9 -- 03 (030925N) CODE NO. CODE NO. DESCRIPTION NO. USED 601 302-355 PIECE. STANDARD ACCESSORIES ITEM NO. DESCRIPTION 501 943-277 HEX. USED 1 1 REMARKS CE 16SA OPTIONAL ACCESSORIES ITEM NO. BAR WRENCH 3MM 502 949-128 THICKNESS GAUGE NO.


