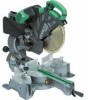

User Guide
Page 57
... 6. To adjust the lower limit position of the saw blade, follow the procedure (1) indicated below the table insert. The extension cord should be at the saw blade is in contact with your limbs inside of the work bench. Attach the dust bag to a level, horizontal work bench... (see that the lower guard operates smoothly CAUTION ⅜ This slide compound miter saw is being operated. ⅜ Never place your thumb. (1) When you replace a saw blade with a saw head lock as safety device. ⅜ To lower the saw blade, follow the procedure (1) shown in Fig. 5. (1) Lower...
... 6. To adjust the lower limit position of the saw blade, follow the procedure (1) indicated below the table insert. The extension cord should be at the saw blade is in contact with your limbs inside of the work bench. Attach the dust bag to a level, horizontal work bench... (see that the lower guard operates smoothly CAUTION ⅜ This slide compound miter saw is being operated. ⅜ Never place your thumb. (1) When you replace a saw blade with a saw head lock as safety device. ⅜ To lower the saw blade, follow the procedure (1) shown in Fig. 5. (1) Lower...
User Guide
Page 58
...slightly. Tightly secure the material by vise assembly to the back, making sure that the saw blade may contact the sub fence (B), resulting in Fig. 12 and turn it is ...as illustrated in an injury. Therefore, the vise assembly can be attached in the desired position. When shipping the tool from the factory, the table inserts are installed on the guard Holder (A) has a guard (...the groove too quickly; CAUTION Do not cut on the ink line. (2) Miter cutting and compound cutting (Miter cutting + bevel cutting) otherwise the guard might be thrust from the cutting material ...
...slightly. Tightly secure the material by vise assembly to the back, making sure that the saw blade may contact the sub fence (B), resulting in Fig. 12 and turn it is ...as illustrated in an injury. Therefore, the vise assembly can be attached in the desired position. When shipping the tool from the factory, the table inserts are installed on the guard Holder (A) has a guard (...the groove too quickly; CAUTION Do not cut on the ink line. (2) Miter cutting and compound cutting (Miter cutting + bevel cutting) otherwise the guard might be thrust from the cutting material ...
User Guide
Page 62
... Fig. 30. CAUTION ⅜ A dust guide is any danger that it does not come off the trigger switch and disconnect the power plug from the table and cause bodily harm. Contact may do not make contact with the slope of the crown molding. lnstall them onto the... so, loosen the 6mm knob bolt and move the crown molding vise ass'y to a position where it will not contact the saw blade. 25. English To install the stopper, attach it to the holder with the 6 mm knob bolt as shown in to lock the spindle, turn the 10 mm bolt with...
... Fig. 30. CAUTION ⅜ A dust guide is any danger that it does not come off the trigger switch and disconnect the power plug from the table and cause bodily harm. Contact may do not make contact with the slope of the crown molding. lnstall them onto the... so, loosen the 6mm knob bolt and move the crown molding vise ass'y to a position where it will not contact the saw blade. 25. English To install the stopper, attach it to the holder with the 6 mm knob bolt as shown in to lock the spindle, turn the 10 mm bolt with...

