
Instruction Manual
Page 5
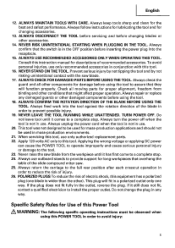
... by not risking unintentional contact with this tool, use outboard stands to provide support for Use of the slide compound miter saw. 25. ALWAYS CONFIRM THE ROTATION DIRECTION OF THE BLADE BEFORE USING THE TOOL. Always use only authorized ... for descriptions of the blade in a polarized outlet only one blade is not in conjunction with the saw blade from binding and other damaged components before inserting the power plug into the tool against the rotation ...damage to this equipment has a polarized plug (one way. English 12. Apply 120 volts AC only to the tool. 23.
... by not risking unintentional contact with this tool, use outboard stands to provide support for Use of the slide compound miter saw. 25. ALWAYS CONFIRM THE ROTATION DIRECTION OF THE BLADE BEFORE USING THE TOOL. Always use only authorized ... for descriptions of the blade in a polarized outlet only one blade is not in conjunction with the saw blade from binding and other damaged components before inserting the power plug into the tool against the rotation ...damage to this equipment has a polarized plug (one way. English 12. Apply 120 volts AC only to the tool. 23.

Instruction Manual
Page 6
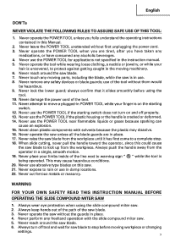
... workpieces that overhang the table of the slide compound miter saw . 13. Always cease operating the saw blade away from the operator. 10. When replacing the saw . 17. Always confirm that the rpm...using the tool. 7. Always handle the saw blade. 12. Always wait until the motor has reached full speed before lifting the saw blade with care when dismounting and mounting it... tool to completely stop completely before starting the tool. 20. During miter or bevel cutting, always wait for the saw blade to supporting structure if, during normal operation, there is clean ...
... workpieces that overhang the table of the slide compound miter saw . 13. Always cease operating the saw blade away from the operator. 10. When replacing the saw . 17. Always confirm that the rpm...using the tool. 7. Always handle the saw blade. 12. Always wait until the motor has reached full speed before lifting the saw blade with care when dismounting and mounting it... tool to completely stop completely before starting the tool. 20. During miter or bevel cutting, always wait for the saw blade to supporting structure if, during normal operation, there is clean ...
Instruction Manual
Page 7
... on and off tool and wait for applications not specified in place. 4. Never clean plastic components with the slide compound miter saw blade to a complete stop before using the slide compound miter saw blade. 3. Always push the handle away from the operator in this Manual. 2. Never expose to move a... changing settings. 7 Never raise the saw . 21. When slide cutting, never pull the handle toward the operator, since this saw blade from the workpiece. This may dissolve. 16. Never use the POWER TOOL if the starting switch. 12. English DON'Ts NEVER VIOLATE THE ...
... on and off tool and wait for applications not specified in place. 4. Never clean plastic components with the slide compound miter saw blade to a complete stop before using the slide compound miter saw blade. 3. Always push the handle away from the operator in this Manual. 2. Never expose to move a... changing settings. 7 Never raise the saw . 21. When slide cutting, never pull the handle toward the operator, since this saw blade from the workpiece. This may dissolve. 16. Never use the POWER TOOL if the starting switch. 12. English DON'Ts NEVER VIOLATE THE ...

Instruction Manual
Page 12
English SPECIFICATIONS Item Model C 12LSH /C 12RSH Motor Type Series commutator motor Power source Single-phase AC 60Hz Voltage (Volts) 120 Full-load current (Amp) 15 Laser Marker Maximum output
English SPECIFICATIONS Item Model C 12LSH /C 12RSH Motor Type Series commutator motor Power source Single-phase AC 60Hz Voltage (Volts) 120 Full-load current (Amp) 15 Laser Marker Maximum output
Instruction Manual
Page 32
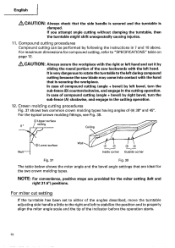
... Fig. 37 Fig. 38 The table below shows the miter angle and the bevel angle settings that is securing the workpiece. In case of the saw blade may come into contact with the hand that are ...miter cut it by left bevel, turn the sub-fence (A) clockwise, and engage in the cutting operation. It is clamped. Compound cutting procedures Compound cutting can be performed by right bevel, turn the sub-fence (B) counterclockwise, and engage in the cutting operation. 12. In case of compound cutting (angle + bevel) by sliding the round portion of compound cutting (angle + bevel...
... Fig. 37 Fig. 38 The table below shows the miter angle and the bevel angle settings that is securing the workpiece. In case of the saw blade may come into contact with the hand that are ...miter cut it by left bevel, turn the sub-fence (A) clockwise, and engage in the cutting operation. It is clamped. Compound cutting procedures Compound cutting can be performed by right bevel, turn the sub-fence (B) counterclockwise, and engage in the cutting operation. 12. In case of compound cutting (angle + bevel) by sliding the round portion of compound cutting (angle + bevel...
Parts List
Page 1
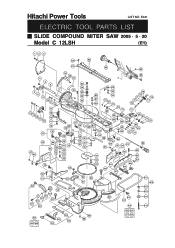
Hitachi Power Tools LIST NO. E941 ELECTRIC TOOL PARTS LIST SLIDE COMPOUND MITER SAW 2005 • 5 • 20 Model C 12LSH (E1) 123 60 62 61 63 64 4 5 6 4 8 9 10 11 12 17 13 18 14 15 12 16 15 11 10 38 37 47 48 45 44 46 49 50 51 19 20 21 65 A 23 24 69 7 22...
Hitachi Power Tools LIST NO. E941 ELECTRIC TOOL PARTS LIST SLIDE COMPOUND MITER SAW 2005 • 5 • 20 Model C 12LSH (E1) 123 60 62 61 63 64 4 5 6 4 8 9 10 11 12 17 13 18 14 15 12 16 15 11 10 38 37 47 48 45 44 46 49 50 51 19 20 21 65 A 23 24 69 7 22...


