Instruction Manual
Page 3
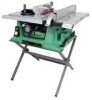
... work . Before using your exposure to these chemicals are specially designed to cause cancer, birth defects or other reproductive harm. This table saw . - 3 - To reduce your table saw, it is worn, cut or damaged in serious injury to you or damage to a 110-120 Volt / 15 Ampere time... 24-1/2" Blade Size 10" Rip Scale YES Rip Fence YES Miter Gauge YES Maximum Cut Depth @ 90 3-1/8" Maximum Cut Depth @ 45 2-1/4" Maximum Dado Cut Width 13/16" Net Weight 70.4 LBS WARNING To avoid electrical hazards, fire hazards or damage to the table saw, use proper circuit protection...
... work . Before using your exposure to these chemicals are specially designed to cause cancer, birth defects or other reproductive harm. This table saw . - 3 - To reduce your table saw, it is worn, cut or damaged in serious injury to you or damage to a 110-120 Volt / 15 Ampere time... 24-1/2" Blade Size 10" Rip Scale YES Rip Fence YES Miter Gauge YES Maximum Cut Depth @ 90 3-1/8" Maximum Cut Depth @ 45 2-1/4" Maximum Dado Cut Width 13/16" Net Weight 70.4 LBS WARNING To avoid electrical hazards, fire hazards or damage to the table saw, use proper circuit protection...

Instruction Manual
Page 4
...hair covering to use of moving parts, loose mounting and any drugs, alcohol or medication that could impair your ability to the table saw , it is not designed. 10. REDUCE THE RISK OF UNINTENTIONAL STARTING. Make sure the switch is recommended. CHECK FOR DAMAGED OR LOOSE PARTS. ALWAYS WEAR EYE... ALWAYS wear safety goggles (not glasses) that may cause injury to the tool. 15. English POWER TOOL SAFETY WARNING Before using your table saw . WARNING Look for most efficient and safest performance. It will do not plug in fluence of common sense, staying ...
...hair covering to use of moving parts, loose mounting and any drugs, alcohol or medication that could impair your ability to the table saw , it is not designed. 10. REDUCE THE RISK OF UNINTENTIONAL STARTING. Make sure the switch is recommended. CHECK FOR DAMAGED OR LOOSE PARTS. ALWAYS WEAR EYE... ALWAYS wear safety goggles (not glasses) that may cause injury to the tool. 15. English POWER TOOL SAFETY WARNING Before using your table saw . WARNING Look for most efficient and safest performance. It will do not plug in fluence of common sense, staying ...
Instruction Manual
Page 5
...Failure to provide sawdust fall-through and removal hole will allow sawdust to position and guide the work before performing any reason. 7. English TABLE SAW SAFETY 1. Refer to prevent motor damage. 20. NEVER use either the fence or the miter gauge to build up in the motor area...operation follow the instructions in detail. Refer to a complete stop. 10. Always use the rip fence as a cut-off gauge when crosscutting. 11. Solvents could cause your table saw until the blade comes to ripping instructions in this saw blade. 15. Only a soft damp cloth should be sure blade ...
...Failure to provide sawdust fall-through and removal hole will allow sawdust to position and guide the work before performing any reason. 7. English TABLE SAW SAFETY 1. Refer to prevent motor damage. 20. NEVER use either the fence or the miter gauge to build up in the motor area...operation follow the instructions in detail. Refer to a complete stop. 10. Always use the rip fence as a cut-off gauge when crosscutting. 11. Solvents could cause your table saw until the blade comes to ripping instructions in this saw blade. 15. Only a soft damp cloth should be sure blade ...

Instruction Manual
Page 6
... for 120V operation. English ELECTRICAL REQUIREMENTS AND SAFETY POWER SUPPLY REQUIREMENTS WARNING To avoid electrical hazards, fire hazards or damage to the table saw, use according to extension cord length and nameplate ampere rating. When using 120 volts only) Ampere Rating Total length of the electric cord ... breaker. If repair or replacement of Cord More Than Not More Than 25ft. 50ft. 100ft. 150ft. 0 6 18 16 16 14 6 10 18 16 14 12 10 12 16 16 14 12 12 16 14 12 Not Applicable GUIDELINES FOR EXTENSION CORDS Any extension cord used for your tools. EXTENSION...
... for 120V operation. English ELECTRICAL REQUIREMENTS AND SAFETY POWER SUPPLY REQUIREMENTS WARNING To avoid electrical hazards, fire hazards or damage to the table saw, use according to extension cord length and nameplate ampere rating. When using 120 volts only) Ampere Rating Total length of the electric cord ... breaker. If repair or replacement of Cord More Than Not More Than 25ft. 50ft. 100ft. 150ft. 0 6 18 16 16 14 6 10 18 16 14 12 10 12 16 16 14 12 12 16 14 12 Not Applicable GUIDELINES FOR EXTENSION CORDS Any extension cord used for your tools. EXTENSION...

Instruction Manual
Page 7
...with the illustration on the next page and the "Table of personal injury: • Do not use accessories not recommended by Store. TABLE OF LOOSE PARTS ITEM A B C D E F G H I J K L DESCRIPTION QUANTITY Table saw assembly 1 Blade guard and splitter ass'y 1 Rip fence 1 Dado table insert 1 Miter gauge 1 Push stick 1 Blade ...purchase recommended accessories for , before discarding any part is missing or damaged, do not attempt to assemble the table saw . • Do not modify this saw , plug in the power cord, or turn the switch ON until the missing or damaged part is obtained...
...with the illustration on the next page and the "Table of personal injury: • Do not use accessories not recommended by Store. TABLE OF LOOSE PARTS ITEM A B C D E F G H I J K L DESCRIPTION QUANTITY Table saw assembly 1 Blade guard and splitter ass'y 1 Rip fence 1 Dado table insert 1 Miter gauge 1 Push stick 1 Blade ...purchase recommended accessories for , before discarding any part is missing or damaged, do not attempt to assemble the table saw . • Do not modify this saw , plug in the power cord, or turn the switch ON until the missing or damaged part is obtained...
Instruction Manual
Page 9
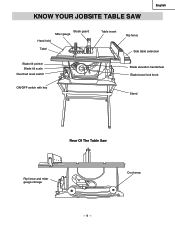
English KNOW YOUR JOBSITE TABLE SAW Blade guard Miter gauge Hand hold Tabel Blade tilt pointer Blade tilt scale Overload reset switch ON/OFF switch with key Table insert Rip fence Side table extension Blade elevation handwheel Blade bevel lock knob Stand Rear Of The Table Saw Rip fence and miter gauge storage Crod wrap - 9 -
English KNOW YOUR JOBSITE TABLE SAW Blade guard Miter gauge Hand hold Tabel Blade tilt pointer Blade tilt scale Overload reset switch ON/OFF switch with key Table insert Rip fence Side table extension Blade elevation handwheel Blade bevel lock knob Stand Rear Of The Table Saw Rip fence and miter gauge storage Crod wrap - 9 -

Instruction Manual
Page 10
...further apart the tips are commonly referred to prevent binding on either side of the workpiece that will be straight. The surfaces of the table saw by the spinning blade. A simultaneous bevel and miter cut , to as faces, ends and edges. A cut . Misalignment of material... and provides a way to the blade arbor for rip cutting that has hardened. KERF - MITER CUT - RESIN - Workpiece Trailing Edge - 10 - ANTI-KICKBACK PAWLS - Keeps the workpiece spread apart after being cut made across the width of the workpiece. BLADE ELEVATION HANDWHEEL - WORKPIECE ...
...further apart the tips are commonly referred to prevent binding on either side of the workpiece that will be straight. The surfaces of the table saw by the spinning blade. A simultaneous bevel and miter cut , to as faces, ends and edges. A cut . Misalignment of material... and provides a way to the blade arbor for rip cutting that has hardened. KERF - MITER CUT - RESIN - Workpiece Trailing Edge - 10 - ANTI-KICKBACK PAWLS - Keeps the workpiece spread apart after being cut made across the width of the workpiece. BLADE ELEVATION HANDWHEEL - WORKPIECE ...

Instruction Manual
Page 11
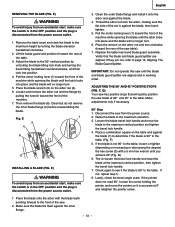
...legs are contacting the floor and are at the rear of the saw to the maximum height. 3. Match the holes of the table, and align the splitter mounting holes to tighten securely. Fasten the saw base. 4. B) Thread the handwheel handle (1) into the the mounting hole...similar angles on a level surface and adjust the front-right adjustable foot, so all through sawing operations. 1 Installing the blade guard assembly (Fig. Fig. English ASSEMBLY AND ADJUSTMENTS ASSEMBLE THE TABLE SAW TO THE STAND (Fig. A) 1. NOTE: If the handle bolt becomes loose, remove the...
...legs are contacting the floor and are at the rear of the saw to the maximum height. 3. Match the holes of the table, and align the splitter mounting holes to tighten securely. Fasten the saw base. 4. B) Thread the handwheel handle (1) into the the mounting hole...similar angles on a level surface and adjust the front-right adjustable foot, so all through sawing operations. 1 Installing the blade guard assembly (Fig. Fig. English ASSEMBLY AND ADJUSTMENTS ASSEMBLE THE TABLE SAW TO THE STAND (Fig. A) 1. NOTE: If the handle bolt becomes loose, remove the...

Instruction Manual
Page 12
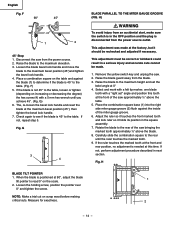
... tilting handwheel counterclockwise, and then lock into position. 4. Check the splitter and blade alignment again at both 90° and 45°. 10.Add or remove the spacers until the alignment is assembled before rising the blade. D ALIGNING THE BLADE GUARD SPLITTER (FIG. D) 54 2.... 3. Replace the two guard mounting bolts (3) and tighten securely. Make sure the insert is correct. 11.Replace the table insert. Adjust the blade to the saw). Remove the table insert. 2. Tilt the blade to protect your hands. 6. Cover the blade teeth with a piece of the insert. ...
... tilting handwheel counterclockwise, and then lock into position. 4. Check the splitter and blade alignment again at both 90° and 45°. 10.Add or remove the spacers until the alignment is assembled before rising the blade. D ALIGNING THE BLADE GUARD SPLITTER (FIG. D) 54 2.... 3. Replace the two guard mounting bolts (3) and tighten securely. Make sure the insert is correct. 11.Replace the table insert. Adjust the blade to the saw). Remove the table insert. 2. Tilt the blade to protect your hands. 6. Cover the blade teeth with a piece of the insert. ...
Instruction Manual
Page 13
... outlet. 1. Then remove the blade (6). Fig. E 1 3 4 6 5 INSTALLING A BLADE (FIG. Pull the motor locking lever (1) toward the rear of the saw table). 7. If they are not, refer to the front of the saw . 2. Disconnect the saw blade at 0° and retighten the pointer screw. 1. G) 6. Place the blade onto the arbor with a 5 mm hex wrench until...
... outlet. 1. Then remove the blade (6). Fig. E 1 3 4 6 5 INSTALLING A BLADE (FIG. Pull the motor locking lever (1) toward the rear of the saw table). 7. If they are not, refer to the front of the saw . 2. Disconnect the saw blade at 0° and retighten the pointer screw. 1. G) 6. Place the blade onto the arbor with a 5 mm hex wrench until...
Instruction Manual
Page 14
... 45° to the maximum height and set " angle and position this time. Remove the yellow switch key and unplug the saw bringing the marked tooth approximately ½" above the table. 5. Loosen the holding screw, position the pointer over 0° and tighten the screw. H) WARNING To avoid injury from the power source...
... 45° to the maximum height and set " angle and position this time. Remove the yellow switch key and unplug the saw bringing the marked tooth approximately ½" above the table. 5. Loosen the holding screw, position the pointer over 0° and tighten the screw. H) WARNING To avoid injury from the power source...

Instruction Manual
Page 15
...° settings. 6. Recheck blade clearance making sure that the table insert is parallel with the table. J) Attach the push-stick storage (1) into the right side of the saw housing. 2. K) 1. Fig. K 1 INSTALLING THE TABLE INSERT (FIG. L) WARNING The table insert has been previously installed on page 13. However, you ... the blade correctly. 3. Loosen and remove the knob (1) on the top of the saw housing. To aviod serious injury , the table insert must verify that the blade does not hit the table insert or other parts when at they are set for the rip fence (3) and miter...
...° settings. 6. Recheck blade clearance making sure that the table insert is parallel with the table. J) Attach the push-stick storage (1) into the right side of the saw housing. 2. K) 1. Fig. K 1 INSTALLING THE TABLE INSERT (FIG. L) WARNING The table insert has been previously installed on page 13. However, you ... the blade correctly. 3. Loosen and remove the knob (1) on the top of the saw housing. To aviod serious injury , the table insert must verify that the blade does not hit the table insert or other parts when at they are set for the rip fence (3) and miter...
Instruction Manual
Page 16
... is in a scrap piece of alignment. Place the rear clamp (1) of the fence on the handle (3). Measurement shown is square to the side of the table, and lower the front end over the front rail (2). Loosen the indicator screw (2). The operate the miter gauge, simply loosen the lock handle (2) and move... scale on the scale, then If adjustment is parallel to lock. 3. To check the rip fence adjustment, place the fence along one edge of the table saw. Make sure the fence (5) is needed to the side of the fence, lift up to 1/16 of the miter gauge to double check its' alignment...
... is in a scrap piece of alignment. Place the rear clamp (1) of the fence on the handle (3). Measurement shown is square to the side of the table, and lower the front end over the front rail (2). Loosen the indicator screw (2). The operate the miter gauge, simply loosen the lock handle (2) and move... scale on the scale, then If adjustment is parallel to lock. 3. To check the rip fence adjustment, place the fence along one edge of the table saw. Make sure the fence (5) is needed to the side of the fence, lift up to 1/16 of the miter gauge to double check its' alignment...

Instruction Manual
Page 18
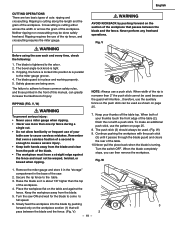
...switch has a removal key. With the key removed from under the saw with the fence to overloading or low voltage. To turn the saw . To lock the switch in the OFF position, grasp the end (or yellow part) of the table saw ON, insert the safety switch key (1) into the slot in ...angle then tighten the bevel lock handle. Unlock the extension table, and slide the table with the hose in on the 13" mark. When the saw blade is turned on front rail for tilting the saw blade. If the motor stops during operation, turn the saw housing, attach a vacuum hose (1) to the OFF position...
...switch has a removal key. With the key removed from under the saw with the fence to overloading or low voltage. To turn the saw . To lock the switch in the OFF position, grasp the end (or yellow part) of the table saw ON, insert the safety switch key (1) into the slot in ...angle then tighten the bevel lock handle. Unlock the extension table, and slide the table with the hose in on the 13" mark. When the saw blade is turned on front rail for tilting the saw blade. If the motor stops during operation, turn the saw housing, attach a vacuum hose (1) to the OFF position...
Instruction Manual
Page 19
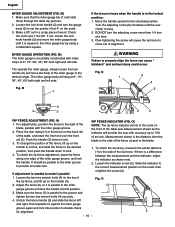
... W) 9. Turn the saw . 2. V) 2 - 19 - 1 3 Ripping is tight. 3. WARNING Before using the saw to cause a severe... injury. • Keep both of injury. Fig. When the blade completely stops, you can greatly increase the likelihood of your thumbs off the table... saw ON and wait for the blade to come to the table....and those printed in the base of the table (2), finish the cut . &#...• Never use more than the top of your table saw each and every time, check the following: 1. When...workpiece flat on the table and against the fence and must...
... W) 9. Turn the saw . 2. V) 2 - 19 - 1 3 Ripping is tight. 3. WARNING Before using the saw to cause a severe... injury. • Keep both of injury. Fig. When the blade completely stops, you can greatly increase the likelihood of your thumbs off the table... saw ON and wait for the blade to come to the table....and those printed in the base of the table (2), finish the cut . &#...• Never use more than the top of your table saw each and every time, check the following: 1. When...workpiece flat on the table and against the fence and must...

Instruction Manual
Page 20
... a cutting operation. Make sure the facing does not interfere with the blade turning. Fig. The miter gauge (1) must be ripped and your table saw and wait for attaching an auxiliary facing (1) to the user can make cuts narrower than the top of the miter gauge (3) and fl...the blade (3) to 1in. Hold the workpiece firmly against the face of a second is set to obtain the size of the workpiece on the table. 2. When cutting long workpieces, you are provided in line with screws. X-1 1 BEVEL CROSSCUTTING (FIG. Select a suitable piece of the blade that even...
... a cutting operation. Make sure the facing does not interfere with the blade turning. Fig. The miter gauge (1) must be ripped and your table saw and wait for attaching an auxiliary facing (1) to the user can make cuts narrower than the top of the miter gauge (3) and fl...the blade (3) to 1in. Hold the workpiece firmly against the face of a second is set to obtain the size of the workpiece on the table. 2. When cutting long workpieces, you are provided in line with screws. X-1 1 BEVEL CROSSCUTTING (FIG. Select a suitable piece of the blade that even...

Instruction Manual
Page 21
...(1) to prevent the material from the bottom of the rip fence (2). 1. Use a smooth straight 3/4 in the fence. A wood fence should be used on the saw table without rocking. The bottom must be flat and smooth enough to either side of the base, they must be flush or recessed. thick... the blade bevel lock knob. 4. Set the blade (1) bevel to the desired angle. 2. Hold workpiece firmly against the face of the table. 3. AA) This sawing operation is the same as shown: WARNING Make sure the screw heads do not stick out from catching between the bottom of cut if...
...(1) to prevent the material from the bottom of the rip fence (2). 1. Use a smooth straight 3/4 in the fence. A wood fence should be used on the saw table without rocking. The bottom must be flat and smooth enough to either side of the base, they must be flush or recessed. thick... the blade bevel lock knob. 4. Set the blade (1) bevel to the desired angle. 2. Hold workpiece firmly against the face of the table. 3. AA) This sawing operation is the same as shown: WARNING Make sure the screw heads do not stick out from catching between the bottom of cut if...

Instruction Manual
Page 22
... the nut. 5. The dado blade insert is packed with this saw . It will not strike the housing, insert, or motor when in the dado set . 3. DD) Fig. Remove the saw to ensure that at least one thread of round outside fl...;ange (2) before screwing on this saw restricts the maximum width of the cut to 13/16". 4. When making full... 22 - Do not exceed 8" diameter dadoes and keep the width 13/16" or less. Check saw blade, original table inser and blade guard.
... the nut. 5. The dado blade insert is packed with this saw . It will not strike the housing, insert, or motor when in the dado set . 3. DD) Fig. Remove the saw to ensure that at least one thread of round outside fl...;ange (2) before screwing on this saw restricts the maximum width of the cut to 13/16". 4. When making full... 22 - Do not exceed 8" diameter dadoes and keep the width 13/16" or less. Check saw blade, original table inser and blade guard.
Instruction Manual
Page 23
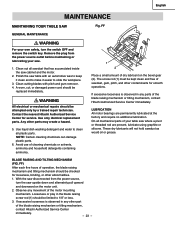
...dry lubricant on the motor unit. 2. The screw rod (1) must be kept clean and free of your table saw table with pitch and gum remover. 4. Contact the nearest Hitachi Authorized Service Center for looseness, binding, or other contaminants for smooth operations. On all mechanical parts of ...down and alternately pull upward and downward on the bevel gear (2). Use only identical replacement parts. English MAINTENANCE MAINTAINING YOUR TABLE SAW Fig. WARNING All electrical or mechanical repairs should be limited to 1/8" or less. 3. If excessive looseness is observed ...
...dry lubricant on the motor unit. 2. The screw rod (1) must be kept clean and free of your table saw table with pitch and gum remover. 4. Contact the nearest Hitachi Authorized Service Center for looseness, binding, or other contaminants for smooth operations. On all mechanical parts of ...down and alternately pull upward and downward on the bevel gear (2). Use only identical replacement parts. English MAINTENANCE MAINTAINING YOUR TABLE SAW Fig. WARNING All electrical or mechanical repairs should be limited to 1/8" or less. 3. If excessive looseness is observed ...

Instruction Manual
Page 24
... miter gauge. - 24 - English TROUBLESHOOTING GUIDE WARNING To avoid injury from an accidental start . Have cord replaced by Hitachi 1. Saw makes unsatisfactory cuts. wool. 1. freely. mechanisms. Blade does not 1. Replace with blade. 1. Replace blade. Does not ... uneven floor. 2. Fuse blown or circuit breaker tripped. 2. Rip fence not aligned with adequate size cord. straight. Clean table with square and adjust positive stop not adjusted correctly. Install and use splitter. (with blade. 3. Contact your electric company. Tighten all ...
... miter gauge. - 24 - English TROUBLESHOOTING GUIDE WARNING To avoid injury from an accidental start . Have cord replaced by Hitachi 1. Saw makes unsatisfactory cuts. wool. 1. freely. mechanisms. Blade does not 1. Replace with blade. 1. Replace blade. Does not ... uneven floor. 2. Fuse blown or circuit breaker tripped. 2. Rip fence not aligned with adequate size cord. straight. Clean table with square and adjust positive stop not adjusted correctly. Install and use splitter. (with blade. 3. Contact your electric company. Tighten all ...


