Instruction Manual
Page 4
...which it is not designed. 10. Non-slip footwear is unintentionally contacted. 18. DISCONNECT TOOLS before turning ON. 16. CHECK FOR DAMAGED OR LOOSE PARTS. Always operate the power tool...NOT wear loose clothing, gloves, neckties, rings, bracelets or other part that is loose or damaged should be hazardous to the table saw , it is critical that you or damage to use power ... to use of moving parts. Check for lubricating and changing accessories. 20. NEVER LEAVE TOOL RUNNING UNATTENDED. All visitors should be properly adjusted, repaired or replaced. 21. DO NOT ...
...which it is not designed. 10. Non-slip footwear is unintentionally contacted. 18. DISCONNECT TOOLS before turning ON. 16. CHECK FOR DAMAGED OR LOOSE PARTS. Always operate the power tool...NOT wear loose clothing, gloves, neckties, rings, bracelets or other part that is loose or damaged should be hazardous to the table saw , it is critical that you or damage to use power ... to use of moving parts. Check for lubricating and changing accessories. 20. NEVER LEAVE TOOL RUNNING UNATTENDED. All visitors should be properly adjusted, repaired or replaced. 21. DO NOT ...

Instruction Manual
Page 12
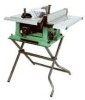
...either side without the proper insert in place. Install the saw blade onto the arbor with the saw blade (10). (Fig. Ensure that the blade is properly aligned with the blade teeth pointing toward the front of table in the table recess, insert the screws through splitter bracket (5). BLADE GUARD... the rear of the insert and leveling the rear of the table). 9. Set the blade to maximum height and the tilt to keep the arbor from a thrown workpiece, blade parts, or blade contact, never operate saw . 6. Replace the blade insert in the direction of the blade flange...
...either side without the proper insert in place. Install the saw blade onto the arbor with the saw blade (10). (Fig. Ensure that the blade is properly aligned with the blade teeth pointing toward the front of table in the table recess, insert the screws through splitter bracket (5). BLADE GUARD... the rear of the insert and leveling the rear of the table). 9. Set the blade to maximum height and the tilt to keep the arbor from a thrown workpiece, blade parts, or blade contact, never operate saw . 6. Replace the blade insert in the direction of the blade flange...
Instruction Manual
Page 22
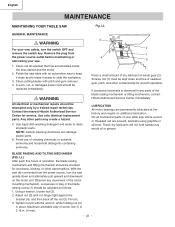
...Hitachi Authorized Service Center for smooth operation. Any other abnormalities. With the saw dis-connected from the power source outlet before maintaining or lubricating your saw table with pitch and gum remover. 4. Clean out all plastic parts. On all mechanical parts of operation, the blade raising mechanism and tilting mechanism should be replaced... OFF and remove the switch key. English MAINTENANCE MAINTAINING YOUR TABLE SAW Fig. Remove the plug from the power source, turn . 3. Use only identical replacement parts. Using a wrench, loosen nut (2). 2. Avoid use of...
...Hitachi Authorized Service Center for smooth operation. Any other abnormalities. With the saw dis-connected from the power source outlet before maintaining or lubricating your saw table with pitch and gum remover. 4. Clean out all plastic parts. On all mechanical parts of operation, the blade raising mechanism and tilting mechanism should be replaced... OFF and remove the switch key. English MAINTENANCE MAINTAINING YOUR TABLE SAW Fig. Remove the plug from the power source, turn . 3. Use only identical replacement parts. Using a wrench, loosen nut (2). 2. Avoid use of...


