
Instruction Manual
Page 11
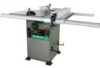
... the table extension before front rail fixed. 3. ASSEMBLY THE TABLE EXTENSION (FIG. Place a straight edge or combination square on the saw to the saw table. Remove the styrofoam (4) under the motor. 2 4. A-1 ASSEMBLY THE FRONT AND REAR TABLE RAIL (FIG. Repeat for the left front... for each bolts. A 1 Fig. When the front rail is removed from the cabinet stand. 4. A & A-1) WARNING To avoid injury from an accidental start, make sure the STYROFOAM is level with the saw table, aligning the mounting holes (1). 2. Repeat for the left table extension next to...
... the table extension before front rail fixed. 3. ASSEMBLY THE TABLE EXTENSION (FIG. Place a straight edge or combination square on the saw to the saw table. Remove the styrofoam (4) under the motor. 2 4. A-1 ASSEMBLY THE FRONT AND REAR TABLE RAIL (FIG. Repeat for the left front... for each bolts. A 1 Fig. When the front rail is removed from the cabinet stand. 4. A & A-1) WARNING To avoid injury from an accidental start, make sure the STYROFOAM is level with the saw table, aligning the mounting holes (1). 2. Repeat for the left table extension next to...
Instruction Manual
Page 23
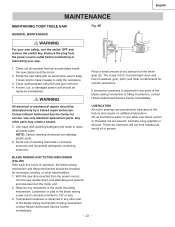
... mechanism, contact Hitachi Authorized Service Center immediately. - 23 - A worn, cut, or damaged power cord should be limited to clean all plastic parts. With the saw disconnected from the power source outlet before maintaining or lubricating your own safety, turn the saw cabinet and the motor.... 2. On all sawdust that has accumulated inside the saw upside down and alternately pull upward and...
... mechanism, contact Hitachi Authorized Service Center immediately. - 23 - A worn, cut, or damaged power cord should be limited to clean all plastic parts. With the saw disconnected from the power source outlet before maintaining or lubricating your own safety, turn the saw cabinet and the motor.... 2. On all sawdust that has accumulated inside the saw upside down and alternately pull upward and...


