
Owners Guide
Page 1
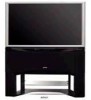
has determined that this product meets the ENERGY STAR® guidelines for energy efficiency. 83-89 COMBINATION PROJECTION COLOR TV AND DVD PLAYER 46W500 OPERATING GUIDE IMPORTANT SAFETY INSTRUCTIONS 2-4 FIRST TIME USE 5-20 Video Audio Aspect Chan. Manager Locks Setup Move SEL Sel THE REMOTE CONTROL ON-SCREEN DISPLAY DVD PLAYER 21-36 37-63 64-82 USEFUL INFORMATION INDEX As an ENERGY STAR® Partner, Hitachi, Ltd.
has determined that this product meets the ENERGY STAR® guidelines for energy efficiency. 83-89 COMBINATION PROJECTION COLOR TV AND DVD PLAYER 46W500 OPERATING GUIDE IMPORTANT SAFETY INSTRUCTIONS 2-4 FIRST TIME USE 5-20 Video Audio Aspect Chan. Manager Locks Setup Move SEL Sel THE REMOTE CONTROL ON-SCREEN DISPLAY DVD PLAYER 21-36 37-63 64-82 USEFUL INFORMATION INDEX As an ENERGY STAR® Partner, Hitachi, Ltd.

Owners Guide
Page 4
.... 17. patents and other sources, may require prior authorization from tip-over. 13. Install in the lighted area of programs broadcast by TV stations and cable companies, as well as power-supply cord or plug is used, use caution when moving the cart/apparatus combination to prevent...discs are NOT COVERED by your safety. Unplug this product may fall or cause a child to climb to grounding electrodes and requirements for your HITACHI Factory Warranty. Do not place any way, such as programs from other intellectual property rights owned by the manufacturer. 12. Do not apply...
.... 17. patents and other sources, may require prior authorization from tip-over. 13. Install in the lighted area of programs broadcast by TV stations and cable companies, as well as power-supply cord or plug is used, use caution when moving the cart/apparatus combination to prevent...discs are NOT COVERED by your safety. Unplug this product may fall or cause a child to climb to grounding electrodes and requirements for your HITACHI Factory Warranty. Do not place any way, such as programs from other intellectual property rights owned by the manufacturer. 12. Do not apply...

Owners Guide
Page 5
...") 1. 2. 1. REMOTE CONTROL BATTERY INSTALLATION AND REPLACEMENT 1. Remote Control Unit CLU-5727TSI (Part No. Replace with your fingers and pulling the cover off. 2. REMOTE CONTROL POWER TV AUX VCR CBL SOURCE WIZARD CD PVR STB AMP 1 2 3 4 5 6 7 8 9 SLEEP 10+ ANT VIRTUAL HD 0 DVD INFO ASPECT C.C. CAUTION: Danger of explosion if battery is incorrectly...
...") 1. 2. 1. REMOTE CONTROL BATTERY INSTALLATION AND REPLACEMENT 1. Remote Control Unit CLU-5727TSI (Part No. Replace with your fingers and pulling the cover off. 2. REMOTE CONTROL POWER TV AUX VCR CBL SOURCE WIZARD CD PVR STB AMP 1 2 3 4 5 6 7 8 9 SLEEP 10+ ANT VIRTUAL HD 0 DVD INFO ASPECT C.C. CAUTION: Danger of explosion if battery is incorrectly...

Owners Guide
Page 6
..., the best audio performance will not fall directly on the screen. HOW TO SET UP YOUR NEW HITACHI PROJECTION TV ANTENNA Unless your TV is connected to a cable TV system or to a centralized antenna system, a good outdoor TV antenna is recommended for viewing. CAUTION: Magnetic fields, such as the viewer moves to the height of...
..., the best audio performance will not fall directly on the screen. HOW TO SET UP YOUR NEW HITACHI PROJECTION TV ANTENNA Unless your TV is connected to a cable TV system or to a centralized antenna system, a good outdoor TV antenna is recommended for viewing. CAUTION: Magnetic fields, such as the viewer moves to the height of...

Owners Guide
Page 7
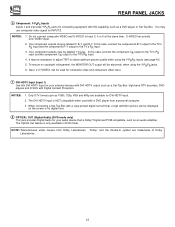
...and UHF antennas are illustrations and names of the VHF or UHF adapter. Below are connected Attach an optional antenna cable mixer to the TV antenna terminal, and connect the cables to inputs and outputs located on camcorders, VCRs and laserdisc players with DVIHDTV output capability. "F" Type... (75-Ohm) terminal. ANTENNA CONNECTIONS TO REAR JACK PANEL VHF (75-Ohm) antenna/CATV (Cable TV) When using a 300-Ohm twin lead from most stores that have a second antenna or cable TV system, connect the coaxial cable to produce a high quality picture. For best performance, video cables should...
...and UHF antennas are illustrations and names of the VHF or UHF adapter. Below are connected Attach an optional antenna cable mixer to the TV antenna terminal, and connect the cables to inputs and outputs located on camcorders, VCRs and laserdisc players with DVIHDTV output capability. "F" Type... (75-Ohm) terminal. ANTENNA CONNECTIONS TO REAR JACK PANEL VHF (75-Ohm) antenna/CATV (Cable TV) When using a 300-Ohm twin lead from most stores that have a second antenna or cable TV system, connect the coaxial cable to produce a high quality picture. For best performance, video cables should...

Owners Guide
Page 8
... source, VIDEO: 1, 2, 3, 4, 5 or alternate antenna source. However, if it is turned ON. ቦ POWER button Press this button to turn the TV on the TV screen. When using the remote. The volume level will default to your choice (see page 56). ቨ FRONT INPUT JACKS (INPUT 5) Use these audio... desired channel appears in MENU mode. ብ VOLUME level Press these buttons until VIDEO: 5 appears in the top right corner of the TV. When the TV power is turned ON. VOL+ CH- Press the INPUT/EXIT button on your preference without using the remote control, point it was set...
... source, VIDEO: 1, 2, 3, 4, 5 or alternate antenna source. However, if it is turned ON. ቦ POWER button Press this button to turn the TV on the TV screen. When using the remote. The volume level will default to your choice (see page 56). ቨ FRONT INPUT JACKS (INPUT 5) Use these audio... desired channel appears in MENU mode. ብ VOLUME level Press these buttons until VIDEO: 5 appears in the top right corner of the TV. When the TV power is turned ON. VOL+ CH- Press the INPUT/EXIT button on your preference without using the remote control, point it was set...

Owners Guide
Page 9
... this button to the beginning of the current Chapter/Track. ቩ IR RECEIVER The screen area acts as the IR receiver (remote sensor) of the TV.
... this button to the beginning of the current Chapter/Track. ቩ IR RECEIVER The screen area acts as the IR receiver (remote sensor) of the TV.

Owners Guide
Page 10
... played back picture may be abnormal. 2. Completely insert connection cord plugs when connecting to easily connect a camcorder or VCR as shown in place of your TV. 10
... played back picture may be abnormal. 2. Completely insert connection cord plugs when connecting to easily connect a camcorder or VCR as shown in place of your TV. 10
Owners Guide
Page 12
...when used for composite video and component video input. ቨ DVI-HDTV Input (Input 1) Use this case, connect the components B-Y output to the TV's PB input and the components R-Y output to obtain optimum picture quality when using the Y-PBPR jacks. 6. When connecting a Set-Top-Box with ... only] This jack provides Digital Audio for INPUT:2. To ensure no copyright infringement, the MONITOR OUT output will be necessary to adjust TINT to the TV's PR input. 3. NOTE: *Manufactured under license from a personal computer. 3. You may be displayed on the screen in DVD mode. NOTES: 1....
...when used for composite video and component video input. ቨ DVI-HDTV Input (Input 1) Use this case, connect the components B-Y output to the TV's PB input and the components R-Y output to obtain optimum picture quality when using the Y-PBPR jacks. 6. When connecting a Set-Top-Box with ... only] This jack provides Digital Audio for INPUT:2. To ensure no copyright infringement, the MONITOR OUT output will be necessary to adjust TINT to the TV's PR input. 3. NOTE: *Manufactured under license from a personal computer. 3. You may be displayed on the screen in DVD mode. NOTES: 1....
Owners Guide
Page 13
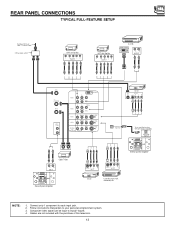
Connect only 1 component to your personal entertainment system. 3. REAR PANEL CONNECTIONS TYPICAL FULL-FEATURE SETUP Outside antenna or cable TV coaxial cable 2-Way signal splitter HDTV Set-Top Box Y PB PR L R OUTPUT HDTV Set-Top Box Y PB PR L R OUTPUT D-VHS DIGITAL OUTPUT LR... Follow connections that pertain to each input jack. 2. Composite video signal can be input to Input2~Input5. 4. OPTICAL INPUT OUTPUT INPUT Cable TV Box LR INPUT Stereo System Amplifier Stereo System Amplifier S-VIDEO V L R INPUT S-VIDEO V L R OUTPUT VCR #2 Laserdisc player, VCR, camcorder, etc...
Connect only 1 component to your personal entertainment system. 3. REAR PANEL CONNECTIONS TYPICAL FULL-FEATURE SETUP Outside antenna or cable TV coaxial cable 2-Way signal splitter HDTV Set-Top Box Y PB PR L R OUTPUT HDTV Set-Top Box Y PB PR L R OUTPUT D-VHS DIGITAL OUTPUT LR... Follow connections that pertain to each input jack. 2. Composite video signal can be input to Input2~Input5. 4. OPTICAL INPUT OUTPUT INPUT Cable TV Box LR INPUT Stereo System Amplifier Stereo System Amplifier S-VIDEO V L R INPUT S-VIDEO V L R OUTPUT VCR #2 Laserdisc player, VCR, camcorder, etc...

Owners Guide
Page 14
top-boxes. In this case, connect the components B-Y output to the TV's PB input and the components R-Y output to use a 1080i or 720p input signal. 14 In this feature. • If your device has only one of ...-up cables. • A single VCR can be used for VCR #1 and VCR #2, but only one audio output (mono sound), connect it is recommended to the TV's PR input. • Your component outputs may be labeled Y-CBCR. Use these connections in place of the standard video connection if your device has this...
top-boxes. In this case, connect the components B-Y output to the TV's PB input and the components R-Y output to use a 1080i or 720p input signal. 14 In this feature. • If your device has only one of ...-up cables. • A single VCR can be used for VCR #1 and VCR #2, but only one audio output (mono sound), connect it is recommended to the TV's PR input. • Your component outputs may be labeled Y-CBCR. Use these connections in place of the standard video connection if your device has this...

Owners Guide
Page 15
...pressed as shown below . However, you use to connect the VCR, camcorder, laserdisc player, DVD player, or HDTV Set Top Box to your TV set to view the input source (see page 26). The Optical Out (Digital Audio) provides a fixed digital audio output to accommodate your external component...be OFF. 15 INPUT MODE SELECTION ORDER (ANTENNA) (INPUT) Ant A VID1 YPBPR:1 VID1 ANT NOTE: When the TV is set is dependent on the back panel of the TV (i.e., VCR/laserdisc player, etc. CONNECTING EXTERNAL AUDIO DEVICES To control the audio level of an external audio amplifier with ...
...pressed as shown below . However, you use to connect the VCR, camcorder, laserdisc player, DVD player, or HDTV Set Top Box to your TV set to view the input source (see page 26). The Optical Out (Digital Audio) provides a fixed digital audio output to accommodate your external component...be OFF. 15 INPUT MODE SELECTION ORDER (ANTENNA) (INPUT) Ant A VID1 YPBPR:1 VID1 ANT NOTE: When the TV is set is dependent on the back panel of the TV (i.e., VCR/laserdisc player, etc. CONNECTING EXTERNAL AUDIO DEVICES To control the audio level of an external audio amplifier with ...

Owners Guide
Page 16
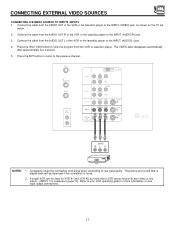
... button to view the program from the AUDIO OUT of the VCR or the laserdisc player to the INPUT (VIDEO) jack, as shown on the TV set below. 2. CONNECTING EXTERNAL VIDEO SOURCES CONNECTING A MONAURAL AUDIO SOURCE TO INPUT2~INPUT5 1. Connect the cable from the VIDEO OUT of the VCR or the...
... button to view the program from the AUDIO OUT of the VCR or the laserdisc player to the INPUT (VIDEO) jack, as shown on the TV set below. 2. CONNECTING EXTERNAL VIDEO SOURCES CONNECTING A MONAURAL AUDIO SOURCE TO INPUT2~INPUT5 1. Connect the cable from the VIDEO OUT of the VCR or the...
Owners Guide
Page 17
... your VCR operating guide for VCR #1 and VCR #2, but note that a VCR cannot record its own video or line output. (INPUT: 3 in example on the TV set below. 2. Connect the cable from the VCR or laserdisc player. Connect the cable from the VIDEO OUT of the VCR or the laserdisc player...
... your VCR operating guide for VCR #1 and VCR #2, but note that a VCR cannot record its own video or line output. (INPUT: 3 in example on the TV set below. 2. Connect the cable from the VCR or laserdisc player. Connect the cable from the VIDEO OUT of the VCR or the laserdisc player...
Owners Guide
Page 18
... disappears automatically after approximately four seconds. 5. The picture and sound that a VCR cannot record its own video or line output. (INPUT: 3 in example on the TV set below. 2. Connect the cable from the AUDIO OUT L of the VCR or the laserdisc player to the INPUT (AUDIO/L) jack. 4. Press the VID3~VID5...
... disappears automatically after approximately four seconds. 5. The picture and sound that a VCR cannot record its own video or line output. (INPUT: 3 in example on the TV set below. 2. Connect the cable from the AUDIO OUT L of the VCR or the laserdisc player to the INPUT (AUDIO/L) jack. 4. Press the VID3~VID5...
Owners Guide
Page 19
... of device user settings determines final video appearance. 19 Press the ANT button to return to rear panel jacks. The DVI-HDTV input on the TV set top box or DVD player to the INPUT (AUDIO/L) jack. 4. The connected digital output device controls the DVI interface so proper set top box...
... of device user settings determines final video appearance. 19 Press the ANT button to return to rear panel jacks. The DVI-HDTV input on the TV set top box or DVD player to the INPUT (AUDIO/L) jack. 4. The connected digital output device controls the DVI interface so proper set top box...

Owners Guide
Page 20
... will be abnormal if the connection is loose. 2. Press the VID1~VID2 button, to the INPUT (PR) jack. 4. See page 14 for tips on the TV set top box. HDTV Set-Top Box PR PB Y L R OUTPUT ANT A TO CONVERTER ANT B AUDIO TO HI-FI L R INPUT 1 PR PB Y R (MONO)/L DVI-HDTV INPUT...
... will be abnormal if the connection is loose. 2. Press the VID1~VID2 button, to the INPUT (PR) jack. 4. See page 14 for tips on the TV set top box. HDTV Set-Top Box PR PB Y L R OUTPUT ANT A TO CONVERTER ANT B AUDIO TO HI-FI L R INPUT 1 PR PB Y R (MONO)/L DVI-HDTV INPUT...

Owners Guide
Page 21
THE REMOTE CONTROL In addition to controlling all the functions on your HITACHI Projection TV, the new remote control is designed to operate different types of the TV and press the TV button. The TV button will blink, indicating that the remote will now control your PVR). If you have ... will now control your PVR (see page 32 for instructions on how to program the remote to control additional Audio/Video equipment). ቢ POWER ባ TV AUX VCR CBL SOURCE WIZARD CD PVR STB AMP 1 2 3 4 5 6 ቤ 7 8 9 SLEEP 10+ 0 ANT vIRTUAL HD DVD INFO ASPECT C.C. MENU...
THE REMOTE CONTROL In addition to controlling all the functions on your HITACHI Projection TV, the new remote control is designed to operate different types of the TV and press the TV button. The TV button will blink, indicating that the remote will now control your PVR). If you have ... will now control your PVR (see page 32 for instructions on how to program the remote to control additional Audio/Video equipment). ቢ POWER ባ TV AUX VCR CBL SOURCE WIZARD CD PVR STB AMP 1 2 3 4 5 6 ቤ 7 8 9 SLEEP 10+ 0 ANT vIRTUAL HD DVD INFO ASPECT C.C. MENU...

Owners Guide
Page 22
... If you have a Satellite receiver, use this button to turn the TV set on or off when the remote is in TV mode (see page 19 for instructions on how to set the remote control to TV mode). ባ TV button When the TV button is pressed, it will blink, to indicate the remote is... button is pressed, it will blink to indicate the remote is in AUX mode (see page 32). HOW TO USE THE REMOTE TO CONTROL YOUR TV 23 27 POWER TV AUX VCR CBL SOURCE WIZARD CD PVR STB AMP 1 2 3 4 5 6 7 8 9 SLEEP 10+ 0 INFO ANT VIRTUAL HD DVD ASPECT...
... If you have a Satellite receiver, use this button to turn the TV set on or off when the remote is in TV mode (see page 19 for instructions on how to set the remote control to TV mode). ባ TV button When the TV button is pressed, it will blink, to indicate the remote is... button is pressed, it will blink to indicate the remote is in AUX mode (see page 32). HOW TO USE THE REMOTE TO CONTROL YOUR TV 23 27 POWER TV AUX VCR CBL SOURCE WIZARD CD PVR STB AMP 1 2 3 4 5 6 7 8 9 SLEEP 10+ 0 INFO ANT VIRTUAL HD DVD ASPECT...

Owners Guide
Page 23
... want to view time remaining. Once set, press the INFO button when you wish to tune then wait a few seconds for the TV to the channel display on your TV, then enter the remaining two numbers using the number buttons. Off Timer Virtual HD Time Main Picture Source Audio Broadcast Broadcast Rating... this button to quickly turn the Closed Caption feature on the Setup menu (See page 63). ተ DVD button Press this button to switch the TV to DVD mode (see page 65). 23 The DASH (-) button can also access this feature on , off and auto. For channels 100 and above, press...
... want to view time remaining. Once set, press the INFO button when you wish to tune then wait a few seconds for the TV to the channel display on your TV, then enter the remaining two numbers using the number buttons. Off Timer Virtual HD Time Main Picture Source Audio Broadcast Broadcast Rating... this button to quickly turn the Closed Caption feature on the Setup menu (See page 63). ተ DVD button Press this button to switch the TV to DVD mode (see page 65). 23 The DASH (-) button can also access this feature on , off and auto. For channels 100 and above, press...


